Page is loading ...

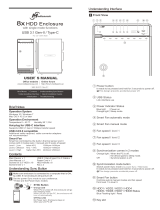
Model QB-X2U31R
4-Bay 3.5" SATA/I/II/III RAID HDD Case with USB 3.1
Handbuch
Manual
Manuale di Istruzioni

24
FANTEC QB-X2U31R 2-BAY 3.5" RAID
Table of ConTenTs:
1) INTRODUCTION.................................................................25
2) SPECIFICATIONS...........................................................25
3) PACKAGE CONTENTS................................................................26
4) OVERVIEW LED INDICATIONS / BUTTONS..................................26
5) OVERVIEW REAR PANEL...........................................................28
6) REMINDERS...................................................................29
7) RAID-MODES........................................................................30
8) CAUTIONS.....................................................................32
9) QUICK INSTALLATION GUIDE.....................................................32
10) HDD INITIALIZING AND FORMATTING........................................35
11) TROUBLESHOOTING................................................................40
12) FAQ..............................................................................42
13) CONTACT & TECHNICAL SUPPORT...........................................45

25
FANTEC QB-X2U31R 2-BAY 3.5" RAID
1) InTroduCTIon
Secure your data on the FANTEC QB-X2U31R with space for two SATA
hard drives in one housing. With various RAID-Levels (Single, 0 Span-
ning, 0 Striping, 1) the QB-X2U31R provides various settings for data
security and data redundancy. All drives can be displayed separately
and hence be controlled separately, switched easily, replaced and ex-
panded independently from manufacturer or capacity. The USB 3.1 Gen.
2 interface provides high data transfer up to 10 Gbps. With full SATA III
6G support and the new UASP transfer Protocol, the device can reach a
speed up to 70% higher than conventional USB 3.1 enclosures. The 60
mm fan can be used in automatic mode with built-in thermal sensor or
by manual mode with 3 levels of speed. The energy saving feature turns
off the FANTEC QB-X2U31R automatically when the PC is shut down.
2) speCIfICaTIons
Device Support: 3.5" SATA I/II/III Hard Drives
Internal Interface: SATA 6 Gibt/s
External Interface:
USB 3.1 Gen. 2 10Gbits/s and Gen. 1
5Gbit/s, Typ-C
Power Supply: AC Adapter, 12V / 3A
Material: High quality metal case
Dimensions (W/D/H): 92.6mm x 208.8mm x 160mm
OS Support:
Windows® 7, 10
Mac OS X 10.13 or later
Operation Environment:
Temperature 0 ~ 40°C
Humidity 90 % RH
Smart fan with 2 modes
(auto / manual) and
3 levels of speed:
Level 1: < 45°C 1,000 ~ 1,400rpm
Level 2: 45 ~ 55°C 1,500 ~ 1,900rpm
Level 3: > 55°C 2,400 ~ 2,800rpm

26
FANTEC QB-X2U31R 2-BAY 3.5" RAID
3) paCkage ConTenTs
• FANTEC QB-X2U31R
• USB 3.1 Cable Type-C to Type-C
• Power Adapter
• User Manual
• 2x HDD handle and screws
(Screws for HDD fixation)
4) overvIew led IndICaTIons / buTTons
Description
Power button
Mode button
Smart fan button
It needs to be pressed and held for
3 seconds to power off.
This design prevents accidental power off.
RAID Mode button needs to be pressed and
held for 3 seconds to switch the device’s
RAID mode.
This design will prevent accidental execution of this function.
Auto, manual and fan speed from level 1 to 3.
1
2
3

27
FANTEC QB-X2U31R 2-BAY 3.5" RAID
Power LED
USB link
HDD1/HDD2
Single Mode
RAID 0 Spanning
RAID 0 Striping
RAID 1 Mirroring
AUTO
FAN 1
FAN 2
FAN 3
6
9
7
10
8
11
12
13
14
HDD Handle
Blue - Power on
Orange - Sleep mode on
USB port is in use
blue - HDD connected
purple - HDD access
red - HDD error
Smart Fan on
FAN speed out level 1 (low)
FAN speed out level 2 (middle)
FAN speed out level 3 (high)
4
5

28
FANTEC QB-X2U31R 2-BAY 3.5" RAID
1
5
2
3
4
6
5) overvIew rear panel
Smart Power SYNC switch
Fan
Security lock
USB 3.1
DC jack
RAID mode
confirm button
Smart Power
SYNC button
2
5
3
6
4
1
SYNC switch
Synchronization is off.
When the PC is off,
the device goes to sleep mode.
Description

29
FANTEC QB-X2U31R 2-BAY 3.5" RAID
6) safeTy InsTruCTIons
• Carefully read and follow the Quick Install Guide and User Manual.
• Do not place this device near water.
• Clean only with dry cloth.
• Do not block any ventilation openings.
• Install in accordance with the manufacturer’s instructions.
• Do not place near any heat sources such as radiators, heat registers,
stoves, or the devices (including amplifiers) that produce heat.
• Protect the power cord from being walked on or pinched particularly
at plugs, convenience receptacles, and the point where they exit
from the devices.
• Power supply cords should be routed so that they are not likely to be
walked on or pinched by items placed upon them or against them.
• Only use attachments/accessories specified by the manufacturer.
• Unplug this during lightning storms or when unused for long
periods of time.
• Refer all servicing to qualified service personnel. Servicing is
required when the devices has been damaged in any way, such as
power-supply cord or plug is damaged, liquid has been spilled or
objects have fallen into the devices, the devices has been exposed to
rain or moisture, does not operate normally, or has been dropped.
• Do not drop or shake the device.
• Do not move the device when it is powered on.
• Do not overload wall outlets.

= 4 TB
= 4 TB
30
FANTEC QB-X2U31R 2-BAY 3.5" RAID
7) raId-Modes
SINGLE MODE
In Single Mode or “Non-RAID” Mode the hard drives of a set are displayed
as independent drives at the computer. This function can be used if RAID
is not neccessary, if only one hard drive is installed or two hard drives of
different brands or capacities are installed.
Please note: In Windows the command “safely remove hardware” can not
be used on a single drive-letter but only on a complete set.
RAID 0 SPANNING
Spanning connects several physical drives to one large virtual drive and
thereby bypasses the physical limitations of individually connected hard
drives. The data is written continually from HDD 1 to HDD 2 (see image).
When one drive fails or gets damaged all data will be lost be can only be
reconstructed with professional help.

= 4 TB
= 2 TB
31
FANTEC QB-X2U31R 2-BAY 3.5" RAID
RAID 0 STRIPING
Striping connects several drives to one large virtual drive as a logical
unit. The data is written parallel onto all hard drives, which results in an
increased data-transfer-rate. When one drive fails or gets damaged all data
will be lost and can only be reconstructed with professional help. The usab-
le memory corresponds to the memory of the smallest drive times two. For
this mode we recommend to use two identical hard drives (same capacity,
brand and model-number).
RAID 1 MIRRORING
Mirroring is the automatic copying of data onto several hard drives. This
ensures high reliability of the data network in the event of a hard drive failu-
re. In case of failure of one disk access is still possible and after exchange
of the failed drive the data will be restored. The usable memory corresponds
to the memory of the smallest drive.
For this mode we recommend to use two identical hard drives (same capa-
city, brand and model-number).

32
FANTEC QB-X2U31R 2-BAY 3.5" RAID
8
)
CauTIons
Before using RAID enclosure
1. Changing RAID modes causes data lost,
backup your data before making changes.
2. Do not cover or block the ventilation hole.
3. Check for visible damage on unit,
accessories and cables before using the device.
4. Do not expose the enclosure to water and humid condition.
5. Changing the RAID mode and initializing with the confirm button will
cause the partition table to be changed. Your data will be lost.
6. When using “RAID function”, HDD of the same capacity,
model name and brand is recommended.
HDD format recommended
• Windows NTFS or exFAT
• Mac OS HFS+ (Mac OS Extended)
• Windows + Macintosh OS FAT32 or exFAT
9) QuICk InsTallaTIon guIde
1. Please use the provided
screws to secure the handles to the HDDs.

33
FANTEC QB-X2U31R 2-BAY 3.5" RAID
3. Slide 2 HDDs into the chassis and make
sure they are securely installed in order
from left to right.
Make sure the HDD1 is securely
installed first at all times.
Otherwise the PC may not
recognize the device.
4. Close and secure the cover.
5. Plug in power adapter
and USB cable.
6. Make sure the PC is ON
and ready to go, then
power on the device.
2. Press down the lock to open the cover.

34
FANTEC QB-X2U31R 2-BAY 3.5" RAID
7. There are 4 mode options for QB-X2U31R, Single, RAID 0 Spanning,
RAID 0 Striping and RAID 1.
The enclosure is NOT default to any of the above. So If you just put
hard drives in without setting a mode to use, the enclosure will just
turn off after a few seconds of turning it ON. The confirmation button
is hidden in the back, so please find it first before you start.
The setup procedures are as follows,
Make sure the enclosure is connected to a computer that is ON.
Power on the enclosure and press and hold MODE button on the
front until mode option LED flashes. Press it again to select the
RAID mode you want then press the Confirmation button on the
back panel until the device shuts down.
Power on the device again and the RAID mode set-up is
completed. Now you just need to partition and format the drives.
a
b
C
Changing RAID mode causes data lost, backup
your data before making changes.

35
FANTEC QB-X2U31R 2-BAY 3.5" RAID
Front view
Blue / ActiveBlue / Active
Blue
10) hdd InITIalIZIng and forMaTTIng
MS Windows (32/64 bit)
If the HDD is uninitialized, you may have to initialize it by doing steps
as followed: At first click “Start” at your PC and key in “diskmgmt.msc”.
After that please press “ENTER key“.
1. Start disk initialization.
Default Setting is at ”AUTO” mode.
8. FAN mode setup, users need to press the „FAN“ button to change
mode.

36
FANTEC QB-X2U31R 2-BAY 3.5" RAID
2. Create new partition and format disk.
3. HDD format completed.
Start disk initialization.
NOTE: Please enable GPT (7/8/8.1/10) if the total capacity is more
than 2TB and enable MBR if the total capacity is less than 2TB.

37
FANTEC QB-X2U31R 2-BAY 3.5" RAID
Activate MBR if total volume is less than 2TB
Activate GPT if total volume is more than 2TB
MAC OS X 10.6 or later
1. Click on Programs > Utility > Disk Utility icon.
MBR (Master Boot Record)
GPT (GUID Partition Table)

38
FANTEC QB-X2U31R 2-BAY 3.5" RAID
2. HDD initialize...
3. Click Erase
4. Click Erase

39
FANTEC QB-X2U31R 2-BAY 3.5" RAID
5. HDD format in process
6. Format completed

40
FANTEC QB-X2U31R 2-BAY 3.5" RAID
2. If the transfer rate is not normal, please check if the SATA
HDD jumper is set up in 1.5 or 3.0Gbps.
3. If there is noise with the fan, unscrew and take out the fan cover, pull
out the power cord, clean the fan and assemble it back.
4. If the fan stops working, do not dismantle it. Please return to the
retail store immediately.
5. The heated air would flow out from the fan based on forced
convection process and cool down the chassis‘ internal temperature.
6. To take the HDD out of the device, slightly press down the
handle and, then pull it out.
11) TroubleshooTIng
1. If the noise is present, change
the device with another fan of
size 60x60x10mm 2 pins.
Otherwise return the device
to the retail store.

41
FANTEC QB-X2U31R 2-BAY 3.5" RAID
7. USB port of your PC must support power-off function so that the
device would go into sleeping mode. Setting up motherboard‘s
(power management) in S3 is strongly recommended. For more
details, please refer to user guide of motherboard BIOS setting.

42
FANTEC QB-X2U31R 2-BAY 3.5" RAID
12) faQ
1. Under RAID 1 mode, if one of disk is crashed, can the device rebuild
the data when I connect another new HDD?
Answer: Yes, the device would start RAID 1 rebuilding automatically
when you connect another new HDD. No extra setup or configuration
is needed. In order to start RAID 1 rebuild procedure, please execute
following points step by step:
- Turn off the device and remove the crashed/faulty disk.
- Please turn on your PC, connect the USB3.1 cable at first to the PC
and then connect the FANTEC QB-X2U31R to the USB3.1 cable.
Now power on the device.
- Put a brand new HDD into the empty rack.
- Within a few seconds both Status LED of the device start blinking to
indicate the rebuild process has been started.
- The speed of rebuilding is about 250GB/h, which means rebuilding a
disk of a size of 500GB will last about 2h minimum, maybe more.
- If both status LED shine steady blue, the rebuild procedure is finished
successfully.
IMPORTANT NOTE:
- To rebuild your data securely, we recommend a new HDD that has
same brand and model no. or a brand new HDD which is bigger
than the crashed HDD.
- Don‘t disconnect the USB Cable during rebuilding
or Power off the PC.
/