Garmin eTrex User manual

Category
Navigators
Type
User manual

This manual is also suitable for

owner’s
manual
eTrex
®
personal navigator
TM
eTrexCamoCover.indd 1 2/19/2003, 1:39:00 PM
©2000 -2003 Garmin Ltd. or its subsidiaries
Garmin International, Inc.
1200 East 151
st
Street, Olathe, Kansas 66062 U.S.A.
Tel. 913/397.8200
Fax 913/397.8282
Garmin (Europe) Ltd.
Unit 5, The Quadrangle, Abbey Park Industrial Estate, Romsey, SO51 9DL, U.K.
Tel. 44/1794.519944
Fax 44/1794.519222
Garmin (Asia) Corporation
No. 68, Jangshu 2
nd
Road., Shijr, Taipei County, Taiwan
Tel. 886/2.2642.9199
Fax 886/2.2642.9099
All rights reserved. Except as expressly provided herein, no part of this manual
may be reproduced, copied, transmitted, disseminated, downloaded or stored in
any storage medium, for any purpose without prior written consent of Garmin Ltd.
Garmin Ltd. hereby grants permission to download a single copy of this manual
onto a hard drive or other electronic storage medium to be viewed for personal use,
provided that such electronic or printed copy of this manual contains the complete
text of this copyright notice and provided further that any unauthorized commercial
distribution of this manual is strictly prohibited.
Information in this manual is subject to change without notice. Garmin
Ltd. reserves the right to change or improve its products and to make changes in
the content without obligation to notify any person or organization of such changes.
Visit the Garmin web site for current updates and supplemental information con-
cerning the use and operation of this and other Garmin products.
Web site address: www.garmin.com
Garmin
®
and eTrex
®
are registered trademarks of Garmin Ltd. and may not be used
without the express permission of Garmin Ltd.
February 2003 Part Number 190-00205-02 Rev. C Printed in Taiwan
eTrexCamoCover.indd 2 2/19/2003, 1:39:21 PM
1
Learning to Use Your New eTrex
The eTrex is easy to learn to operate and use for many
practical navigation applications. Understanding button
operation and display screen conventions will take only a
few minutes and you can begin basic navigation with just
a little instruction.
To get the most practical use from your new eTrex,
take the time to read through this Owner’s Manual to
understand the operating features of the unit. This
manual has been designed to provide all that you need to
know to operate your eTrex.
eTrex Registration
Help us to better support you by completing
your on-line registration today!
Why should you register your eTrex purchase?
• Notifi cation of Product Updates
• Notifi cation of New Products
Connect to our web site (www.garmin.com) and look
for the Product Registration link on the home page. If
your eTrex contains an 8-digit serial number, it can be
found inside the battery compartment.
Thanks for choosing the Garmin eTrex. If you have
any questions or comments regarding the use of the eTrex
you can visit our web site (www.garmin.com) or contact
our Customer Service Department:
M-F, 8:00-5:00 CST (except holidays) at
1-800-800-1020.
On Your Mark. . .
Introduction
etrex manual.indd 1 2/19/2003, 1:36:17 PM
2
Introduction.............................................................. 1-8
Registration .................................................................... 1
Warnings and Cautions .................................................. 3
FCC Compliance Statement ........................................... 4
Features.......................................................................... 5
Buttons........................................................................... 6
Description..................................................................... 7
Accessories ..................................................................... 8
Installing the Batteries .................................................... 8
Getting Started ....................................................... 9-17
Satellite Page Basics ...................................................... 10
Map Page Basics ........................................................... 11
Navigation Page Basics ................................................. 12
Main Menu Page Basics ................................................ 13
Creating a Waypoint..................................................... 14
Heading in the Right Direction..................................... 16
Cancelling a GOTO...................................................... 17
Reference ............................................................... 18-41
Map Page Options ........................................................ 19
Navigation Page Options .............................................. 20
Main Menu .................................................................. 21
Mark Waypoint Page .................................................... 22
Waypoints Page ............................................................ 23
Review Waypoint Page ................................................. 24
Routes .......................................................................... 27
Tracks........................................................................... 30
Setup Menu.................................................................. 33
Appendices ............................................................ 42-51
Appendix A: Specifi cations........................................... 42
Appendix B: What is GPS? ........................................... 43
Appendix C: Satellite Reception Tips............................ 44
Appendix D: Time Offset Chart.................................... 45
Appendix E: Wiring Diagram ....................................... 46
Appendix F: Troubleshooting ....................................... 47
Appendix G: FAQs ....................................................... 48
Appendix H: Index....................................................... 49
Warranty .................................................................... 52
Introduction
Table of
Contents
etrex manual.indd 2 2/19/2003, 1:36:39 PM
3
WARNING: If you choose to use the eTrex in a
vehicle, it is the sole responsibility of the owner/operator
of the eTrex to secure the GPS unit so that it will not cause
damage or personal injury in the event of an accident.
Do not mount the eTrex over airbag panels or in a place
where the driver or passengers are likely to have an
impact with it in an accident or collision.
WARNING: If you choose to use the eTrex in a
vehicle, it is the sole responsibility of the operator of the
vehicle to operate the vehicle in a safe manner, maintain
full surveillance of all driving conditions at all times, and
never become distracted by the eTrex to the exclusion
of safe operating practices. It is unsafe to operate the
eTrex while you are driving. Failure by the operator of
a vehicle equipped with an eTrex to pay full attention
to operating the vehicle and road conditions while the
vehicle is in motion could result in an accident or
collision with property damage and personal injury.
CAUTION: IT IS THE USER’S RESPONSIBILITY TO
USE THIS PRODUCT PRUDENTLY. THIS PRODUCT IS
INTENDED TO BE USED ONLY AS A TRAVEL AID AND
MUST NOT BE USED FOR ANY PURPOSE REQUIRING
PRECISE MEASUREMENT OF DIRECTION, DISTANCE,
LOCATION, OR TOPOGRAPHY.
CAUTION: The Global Positioning System (GPS) is
operated by the government of the United States, which
is solely responsible for its accuracy and maintenance.
The system is subject to changes which could affect the
accuracy and performance of all GPS equipment.
Although the eTrex is a precision electronic NAVigation
AID (NAVAID), any NAVAID can be misused or misinter-
preted and, therefore, become unsafe.
CAUTION: Electronics are protected if immersed,
but the battery compartment may get wet. Make sure the
batteries and compartment are dry before using.
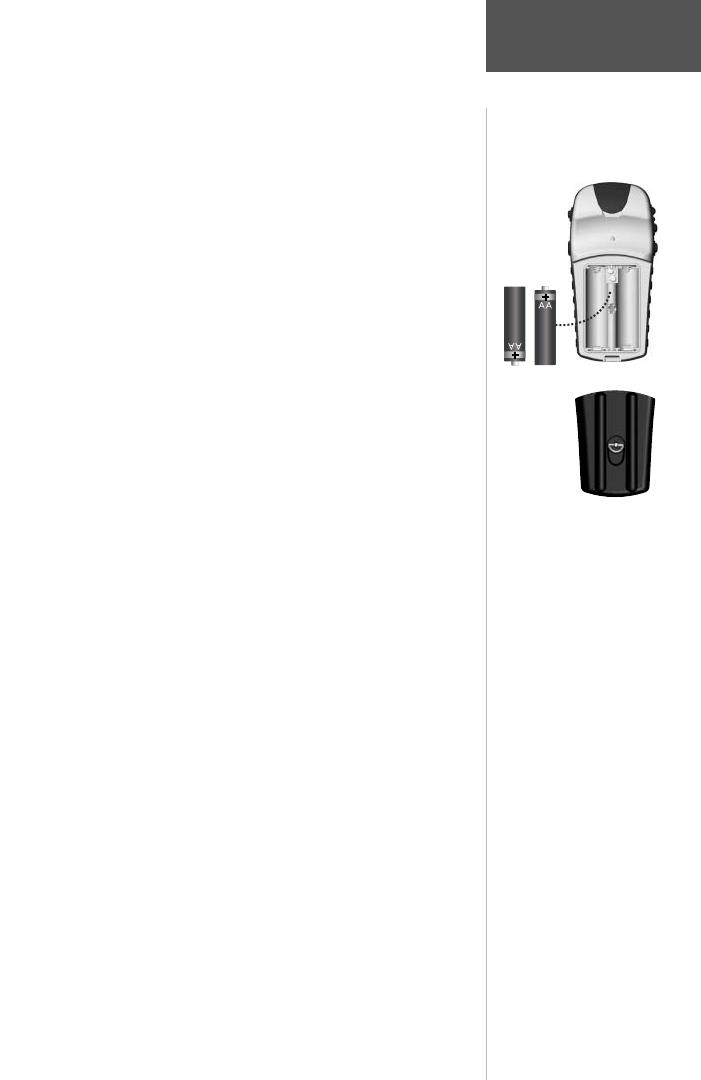
Remove the batteries from
your eTrex if you don’t
expect to use it for several
months. Be sure to
observe the proper
polarity when inserting
batteries. Follow the
battery manufacturer’s
instructions on the proper
care and handling of the
batteries.
Warnings and
Cautions
Introduction
etrex manual.indd 3 2/19/2003, 1:36:39 PM
4
The eTrex complies with Part 15 of the FCC limits
for Class B digital devices. This equipment generates,
uses, and can radiate radio frequency energy and, if not
installed or used in accordance with the instructions, may
cause harmful interference to radio communications.
There is no guarantee that interference will not occur
in a particular instance. If this equipment does cause
harmful interference to other equipment, try to correct
the problem by relocating the equipment.
Consult an authorized Garmin dealer or other quali-
ed service technician if the problem cannot be corrected.
Operation is subject to the following conditions: (1) This
device cannot cause harmful interference, and (2) this
device must accept any interference received, including
interference that may cause undesired
operation.
The eTrex does not contain any user-serviceable
parts. Repairs should be made only by an authorized
Garmin service center. Unauthorized repairs can void the
warranty.
Introduction
FCC Compliance
Statement
California’s
Proposition 65
WARNING: This product, its packaging, and its
components contain chemicals known to the State of
California to cause cancer, birth defects, or reproductive
harm. This Notice is being provided in accordance with
California’s Proposition 65. If you have any questions or
would like additional information, please refer to our web
site at www.garmin.com/prop65.
etrex manual.indd 4 2/19/2003, 1:36:43 PM
5
The eTrex is a six ounce, 12 channel, hand held
GPS receiver. It has a built-in GPS antenna and only fi ve
user-buttons. All buttons are located on either side of
the unit, allowing for simple, one-handed operation that
won’t obstruct your view of the display. It runs for 22
hours on two AA alkaline batteries in ‘Battery Save’ mode.
In addition to determining your location, the eTrex
will create, name and save a location (as an electronic
waypoint) in its memory, allowing you to navigate back to
this point any time you want. And once you start moving,
your GPS provides other data, like speed, direction of
movement, time and distance to destination, and more.
From these basic features, your Garmin GPS can
provide one more critical benefi t; peace of mind, because,
with GPS you’ll know where you are, where you’ve been
and where you’re going. And since you’ll always know the
way back home, you can concentrate on what you set out
to do and enjoy the great outdoors.
Other features include:
Waypoints: 500 with name and graphic symbol.
Tracks: Automatic track log; 10 saved tracks
let you retrace your path in both
directions.
Route: Route lets you navigate up to 50
waypoints in sequence.
Trip Computer: Current speed, average speed,
maximum speed, direction of
movement, bearing, elevation, time
of sunrise/sunset, trip timer and trip
odometer.
Hunt and Fish: A
page displaying the best times for
hunting and fi shing at a chosen loca
tion
and date.
Sun and Moon: A page displaying sun and moon
rise and set by date and location.
NOTE: You should
always be prepared and
capable of navigating
without the eTrex. It
is designed to augment
other forms of basic
navigation, not entirely
replace them.
Introduction
eTrex Features
etrex manual.indd 5 2/19/2003, 1:36:48 PM
6
Operating the eTrex is as simple as pressing a button!
The UP/DOWN Buttons:
• Select options on pages and menus
• Adjust display contrast on Satellite Page
• Zoom in and out on Map Page
• Cycle through trip data on Navigation Page
The ENTER Button:
Confi rms data entry or menu selections
• Displays options on main pages
Pressing and holding the ENTER button
activates the Mark Waypoint Page
The PAGE Button:
Switches between pages and moves you out
of pages. If you start to do something and
you don’t want to continue, you can stop by
pressing the PAGE Button.
The POWER Button:
• Turns the unit on and off
• Turns the display backlight On and Off
Introduction
eTrex Buttons
etrex manual.indd 6 2/19/2003, 1:36:49 PM
7
DOWN Button
UP Button
ENTER
Button
External Power
and
Data Connector
Internal
GPS Antenna
LCD Display
(with backlight)
POWER
Button
PAG E
Button
Battery
Compartment
Waterproof Case
Introduction
eTrex
Description
Slot for
Carry Lanyard
Insertion.
etrex manual.indd 7 2/19/2003, 1:36:50 PM
8
Standard Accessories
Lanyard
Attaches to a slot on the bottom of the unit for convenient carrying.
Owner’s Manual
Quick Start Guide
Optional Accessories
Carrying Case
Protects the eTrex when not in use. (Not shown)
Belt Clip Assembly
Allows easy access to the eTrex when clipped on a belt. (Not shown)
Holster
Allows easy access to the eTrex when clipped on a belt. (Not shown)
Automotive Mounting Bracket
Can be temporarily or permanently mounted on the dash. (Not shown)
Auto Power Adapter
Provides eTrex operation from an automobile cigarette lighter.
PC Data Cable
Allows for transfer of data from a PC to an eTrex. (Not shown)
Data Cable
Wiring harness. Connections for data input/output. (Not shown)
Bicycle Mounting Kit
Allows the eTrex to be mounted on a bicycle handle bar.
PC Cable/Auto Power Adapter
Allows transfer of waypoints and routes from a PC to the eTrex and provides
unit operation from an automobile cigarette lighter.
MapSource
®
Map Data CD-ROMs
An excellent tool for creating waypoints and routes on your PC using a
background map and downloading them to your eTrex.
Installing the Batteries
The eTrex operates on two AA batteries (not included),
which are installed at the back of the unit. To install the
batteries, remove the battery cover by turning the D-ring
on the back of the unit 1/4 turn counter-clockwise and pull
the cover away. Insert the batteries observing proper polar-
ity. Attach the battery cover by turning the D-ring 1/4 turn
clockwise. Two AA alkaline batteries should last about 22
hours in ‘Battery Save’ mode.
Auto Power Adapter
- Converts 12VDC
output from the lighter to
3VDC input to the eTrex.
Not interchangeable
with power adapters for
Garmin VHF 720, 725,
and 725e, or GPS 170,
175, 190, and 195.
PC Interface Cable with
Auto Power Adapter
Bicycle Mounting Kit
Introduction
Accessories
etrex manual.indd 8 2/19/2003, 1:36:52 PM
9
The Getting Started Section introduces you to the basic
operation of the eTrex. The Reference Section shows you how
to use all of the eTrex’s remaining features.
The First Step
The eTrex operates on information gathered from
satellites. To gather this information, take your eTrex
outside and fi nd a large, open area that has a clear view of
the sky (a nearby park would work fi ne). Press and hold
the POWER Button to turn the unit on. You’ll see the
Welcome Page for a few seconds while the eTrex performs
a self-test, followed by the Satellite Page.
The eTrex needs to receive at least three strong
satellite signals to fi nd your location. The Satellite Page
displays graphic tracking of satellites, the strength of the
satellite signals, and the satellite tracking status.
The Satellite Page
When you see the “READY TO NAVIGATE” message
on the Satellite Page, the eTrex has found your location
and you are ready to go!
Backlighting and Contrast
If the lighting conditions make it hard for you to see
the screen, you can adjust the contrast or turn on the
backlight. Press and release the POWER Button from any
screen to turn on the backlight. The backlight is timed
to stay on for 30 seconds to save battery power. To
adjust the screen contrast, press the PAGE Button until
you see the Satellite Page. Press the UP Button to make
the screen darker, press the DOWN Button to make the
screen lighter.
The Welcome Page
Getting Started
Here We Go. . .
)
NOTE: When you use the eTrex for the fi rst
time, it will take up to fi ve minutes to fi nd
your location. After the fi rst use, the eTrex only
needs about 15 to 45 seconds to fi nd your
location.
etrex manual.indd 9 2/19/2003, 1:36:59 PM
10
Selecting a Page
All of the information needed to operate the eTrex is
found on four main “pages” (or display screens). These
pages are the Satellite, Map, Pointer, and Menu.
Simply press the PAGE Button to switch between
pages.
Satellite Page Basics
The Satellite Page shows the eTrex gathering all the
necessary satellite information in order to work. There are
two display options on the Satellite Page, Normal Skyview
and Advanced Skyview. Normal Skyview shows you (in
animation), the satellites, satellite signal strength, and the
eTrex’s estimated location accuracy.
To activate the Advanced Skyview page, simply press
ENTER when on the Satellite Page, select ‘Advanced
Skyview’ and press ENTER again. This page displays
the numbered satellites the eTrex is using, their proxim-
ity to your current position, and their individual signal
strengths. To determine the location of the satellites
being used around you, the outer circle of the display
represents the horizon and the center represents the sky
The “READY TO
NAVIGATE” message
must appear before you
can begin using your
eTrex to navigate.
Page Basics
Getting Started
Status Message
Satellites
Location Accuracy
(estimated)
Satellite Signal
Strength Bars
Map
Navigation
MenuSatellite
PAG E
PAG E
PAG E
PAG E
PAG E
PAG E
PAG E
PAG E
Pressing ENTER on the
Advanced Skyview Page
also offers the options of
Orienting the Sky Ahead
or Northward, Setup
Display (backlighting/
contrast), and returning
to Normal Skyview.
Normal Skyview
Advanced Skyview
etrex manual.indd 10 2/19/2003, 1:37:00 PM
11
The Map Page showing
different symbols and
waypoints.
On the Map Page, the
UP and DOWN Buttons
are used to adjust the
map scale from 200 feet
to 800 miles.
Map Page Basics
The Map Page shows where you are (the animated
gure) and provides a real picture of where you are going.
As you travel (the animated fi gure “walks”) and leaves a
“trail” (track log). Waypoint names and symbols are also
shown on the map. We will show you how to record your
location by marking a waypoint in the “Discovering GPS
Navigation” section.
To help you better visualize the “real world”, the
eTrex automatically rotates the map as you move, so that
waypoints that are ahead of you are always displayed in
front of the animated fi gure. The North Pointer always
shows you where north is.
To make sure you can see your entire trip, you can
change the map scale (from 200 feet to 800 miles!) by
pressing and holding the UP Button to view a larger area,
and the DOWN Button for viewing a smaller area.
The Map Page
“You”; Your
Location
North Pointer
Path to
Destination
Destination
Waypoint
Map
Scale
“Trail” (track
log)
Getting Started
Page Basics
etrex manual.indd 11 2/19/2003, 1:37:01 PM
12
The eTrex is not a compass.
The Compass Ring on the
Pointer Page is controlled
by the unit’s GPS receiver.
You must be moving in
order for it to track your
movement.
On the Navigation Page,
the UP and DOWN
Buttons are used to cycle
through different trip
data.
Navigation Page Basics
The Navigation Page helps guide you to a destination.
When you’re moving with no particular destination in
mind, the Navigation Page shows you your moving direc-
tion and speed. When you’re moving towards a specifi c
destination, the Navigation Page shows you the name of the
location, the distance and time to go, and displays a
direction arrow in the compass ring. To navigate, simply
follow the arrow.
By pressing the UP or DOWN Buttons, you can
cycle through other trip computer information such as
average speed, maximum speed, moving direction
(heading), bearing, position coordinates, elevation, time of
sunrise/sunset, trip timer and trip odometer.
Compass Ring
Time to reach
the Destination
Straight Line
Distance to the
Destination
Waypoint (Location) Name
Direction Arrow
(follow this)
Destination Symbol
The Navigation Page
Speed
Moving Direction
Line
)
NOTE: The direction arrow, destination symbol
and bearing information only appear on the
Navigation Page when you have started a
GOTO, a route or a TracBack.
Getting Started
Page Basics
etrex manual.indd 12 2/19/2003, 1:37:02 PM
13
Menu Basics
The Main Menu gives you access to eTrex’s more
advanced features. With the Main Menu you can create
and view waypoints, create a route, save and view track
logs or access the system setup features. Information on
all these advanced features is included in the reference
section of this manual.
Changing the Time Zone
Practice using the Menu Page and change the time
zone.
To change the time zone:
1. Press the PAGE Button and switch to the ‘MENU’
Page. Press the UP or DOWN Button and highlight
‘SETUP’. Press ENTER. The ‘SETUP’ Page appears.
2. Press the UP or DOWN Button and highlight ‘TIME’
and press ENTER.
3. Press the UP or DOWN Button and select the ‘TIME
ZONE’ fi eld and press ENTER.
4. Press the UP or DOWN Button, scroll through the
selections, and press ENTER when you have found
the correct zone. Press PAGE to get back to the
page of your choice.
You can choose from 30
time zones, plus ‘other’.
The Main Menu Page
Backlight
Indicator
Menu Options
Time and Date
Battery
Strength
Getting Started
Page Basics
From the Main Menu, the
UP and DOWN Buttons
are used to cycle through
menu options and access
advanced features.
etrex manual.indd 13 2/19/2003, 1:37:03 PM
14
This completes a basic explanation of the page
features of the eTrex.
Discovering the Fun of GPS Navigation
Discovering how to use your eTrex is as easy as taking
a quick walk around an open outdoor area. In this brief
exercise, you’ll mark your current location (your home
for example), travel a short distance away, and then have
the eTrex guide you back to where you started (to get the
most out of this exercise, make sure to walk for at least
the time noted for each step).
Creating a Waypoint
The fi rst step in the exercise is to mark your location
as a waypoint so you can return to it later.
To Mark a Waypoint:
1. Press the PAGE Button and switch to the ‘MENU’
Page.
2. Press the UP or DOWN Button and highlight the
‘MARK’ fi eld.
3. Press ENTER. The ‘MARK WAYPOINT’ Page appears
with ‘OK?’ highlighted.
Before we actually mark the waypoint, let’s change the
symbol to a house and the name ‘001’ to something a little
more meaningful such as HOME.
To change the waypoint symbol:
1. On the ‘MARK WAYPOINT’ Page, press the UP or
DOWN Button to highlight the small fl ag symbol
and press ENTER. Using the UP or DOWN Button,
scroll through the symbols and highlight the house
symbol. Press ENTER.
NOTE: The eTrex must state “READY TO
NAVIGATE” before you mark a waypoint.
You’ll fi nd the MARK
option on the ‘MENU’
Page.
The Elevation and Posi-
tion Coordinates are
displayed at the bottom
of the ‘MARK
WAYPOINT’ Page and
the ‘REVIEW
WAYPOINT’ Page.
Getting Started
Let the Fun
Begin!
)
etrex manual.indd 14 2/19/2003, 1:37:04 PM
15
To change the waypoint name:
1. On the ‘MARK WAYPOINT’ Page, press the UP or
DOWN Button to highlight the Waypoint Name
‘001’.
2. Press ENTER. The ‘EDIT WAYPOINT NAME’ Page
appears.
3. Press ENTER. Using the UP or DOWN Button, scroll
through the letter selections. Select ‘H’ and press
ENTER. Repeat this process and fi nish the word
‘HOME’.
4. Press the UP or DOWN Button to highlight the ‘OK’
eld and press ENTER. The ‘MARK WAYPOINT’
Page appears.
5. Press the UP or DOWN Button to highlight the
‘OK’ fi eld and press ENTER. Your location, named
‘HOME’, is now marked and stored in memory.
Now that you’ve marked your location, it’s time to go
for a brisk walk. Press the PAGE Button and switch to
the Map Page.
Walk in a straight line for 3-4 minutes at a
fast pace and watch the Map Page.
Your location is shown by the fi gure in the middle of
the screen. As you move, watch the animated fi gure walk,
and a line—called a “track”—appear along the path you
have just covered.
Now take a sharp right turn and walk at a
brisk pace for another 3-4 minutes.
You can see your change in direction displayed on the
Map .
You can create or edit a
waypoint on the ‘EDIT
LOCATION’ Page. From
the ‘MARK WAYPOINT’
Page, highlight the Posi-
tion Coordinates fi eld
and press ENTER. Then
follow the on-screen
instructions.
The ‘EDIT WAYPOINT
NAME’ Page.
NOTE: As a shortcut tip, press and hold
ENTER to mark a waypoint.
Getting Started
Edit Waypoints
)
etrex manual.indd 15 2/19/2003, 1:37:05 PM
16
Guidance by Garmin
The eTrex guides you to a destination using a GOTO
(GOTO means Going TO a destination in a direct line).
Now let’s use the GOTO feature and the Pointer Page to
travel back to our starting location.
To Start a GOTO:
1. Press the PAGE Button and switch to the ‘MENU’
Page.
2. Press the UP or DOWN Button and highlight
‘WAYPOINTS’.
3. Press ENTER. The ‘WAYPOINTS’ Page appears.
4. Press the UP or DOWN Button and select the tab
containing ‘HOME’ and press ENTER.
5. Press the UP or DOWN Button to select ‘HOME’
and press ENTER. The ‘REVIEW WAYPOINT’ Page
appears.
6. Press the UP or DOWN Button to highlight the
‘GOTO’, and press ENTER.
The Navigation Page appears and you’re now ready
for the eTrex to guide you back to your starting location!
Heading in the Right Direction
The eTrex will guide you back to where you started
using the Navigation Page. The pointer tells you the
direction to the destination. Walk in the direction the
arrow is pointing until the arrow points to the top of the
compass ring. If the arrow points to the right, you need
to go to the right. If the arrow points to the left, go left.
When the arrow is pointing straight up, you are on the
correct track!
The arrow tells you
what direction you
should move. When
the arrow is pointing
right as shown here,
just move right until
the arrow is pointing
straight up and points
to the moving direction
line (see picture below).
When the pointer points
straight up as shown,
you’re on track!
Follow the
Arrow
Getting Started
etrex manual.indd 16 2/19/2003, 1:37:06 PM
17
The destination name, distance to the destination and
time to reach your destination are displayed at the top of
the screen. The speed you are traveling is shown at the
bottom of the screen. Once you are getting close to your
destination, the eTrex will give you the message “ARRIV-
ING DESTINATION”.
Cancelling A GOTO
Anytime you want to stop a GOTO:
1. Press the PAGE Button and switch to the ‘POINTER’
Page. Press ENTER.
2. Highlight ‘STOP NAVIGATION’ on the ‘OPTIONS’
Page and press ENTER.
Clearing a Cluttered Map Display
After you’ve used the eTrex for a few trips, the map
display will become a bit messy from keeping track of
your every move. You can clean up the screen by clearing
the track log (the lines left on the Map Page):
To clear the track log:
1. Press the PAGE Button and switch to the ‘MENU’
Page.
2.
Press the UP or DOWN Button and highlight
‘TRACKS’.
3. Press ENTER. You are now on the ‘TRACK LOG’
Page. Use the UP Button and highlight ‘CLEAR’.
Press ENTER.
4. Use the DOWN Button and highlight ‘YES’. Press
ENTER.
Press the PAGE Button to select any
page.
You’ve now gone through the basic operation of the
eTrex and you’re ready to get out there and have some
fun! To turn the eTrex off, press and hold the POWER
Button.
Highlight STOP
NAVIGATION and press
ENTER on the Options
Page to stop a GOTO.
Getting Started
You’ve Made It!
Clear the Track Log
when the Map Page
gets too cluttered.
etrex manual.indd 17 2/19/2003, 1:37:07 PM
18
Map Page Options
In addition to the basic aspects of the Map Page that
were covered on page 11, there is a ‘MAP OPTIONS’
feature which allows you to customize the Map Page. The
following options are available:
• Orient Map Ahead/Northward: When ‘AHEAD’ is
selected, the top of the map is oriented in the direction
you are currently moving. When ‘NORTHWARD’ is
selected, the map is always oriented to the north.
• Auto Zoom On/Off: When ‘AUTO ZOOM’ is turned on,
the map automatically adjusts its scale to display your entire
navigating route. When it’s turned off, you must press the
UP or DOWN Buttons to select the appropriate map scale.
• Show/Hide Waypoints: Allows you to view the map
with or without waypoints.
• Show Course Line/Bearing Line: ‘SHOW COURSE
LINE’ displays the path from your starting point to your
destination. ‘SHOW BEARING LINE’ displays the path
from your current location to your destination.
• Stop Navigation: ‘STOP NAVIGATION’ stops any
active navigation (navigation means there is a destination
waypoint, page 16). This option cannot be selected if
there is no active navigation.
To select a Map Page option:
1. Press the ENTER Button on the ‘MAP’ Page.
2. The Map Options Menu appears. Press the UP or
DOWN Button and highlight the desired option and
press ENTER. Once you press ENTER, the change
is made and the Options Menu disappears.
You will notice on the Map Page the little grey “man”.
The man stands still when you are not moving, he moves
when you move, and a blinking “?” means the eTrex has lost
satellite reception (weak signals). You should relocate the
eTrex or move to a place that has a clear view of the sky.
Selecting ‘Orient Map
Ahead’ from the Map
Page options orients the
map to the direction you
are moving.
When you select ‘Orient
Map Northward’ the
gure icon is replaced
by a ‘direction’ triangle.
The tip of the triangle
tells you the general
direction you are
moving.
Reference
Map Page
Options
etrex manual.indd 18 2/19/2003, 1:37:08 PM
  • Page 1 1
  • Page 2 2
  • Page 3 3
  • Page 4 4
  • Page 5 5
  • Page 6 6
  • Page 7 7
  • Page 8 8
  • Page 9 9
  • Page 10 10
  • Page 11 11
  • Page 12 12
  • Page 13 13
  • Page 14 14
  • Page 15 15
  • Page 16 16
  • Page 17 17
  • Page 18 18
  • Page 19 19
  • Page 20 20
  • Page 21 21
  • Page 22 22
  • Page 23 23
  • Page 24 24
  • Page 25 25
  • Page 26 26
  • Page 27 27
  • Page 28 28
  • Page 29 29
  • Page 30 30
  • Page 31 31
  • Page 32 32
  • Page 33 33
  • Page 34 34
  • Page 35 35
  • Page 36 36
  • Page 37 37
  • Page 38 38
  • Page 39 39
  • Page 40 40
  • Page 41 41
  • Page 42 42
  • Page 43 43
  • Page 44 44
  • Page 45 45
  • Page 46 46
  • Page 47 47
  • Page 48 48
  • Page 49 49
  • Page 50 50
  • Page 51 51
  • Page 52 52
  • Page 53 53
  • Page 54 54
  • Page 55 55
  • Page 56 56

Garmin eTrex User manual

Category
Navigators
Type
User manual
This manual is also suitable for

Ask a question and I''ll find the answer in the document

Finding information in a document is now easier with AI