Page is loading ...

POLYNICHE INSTALLATION
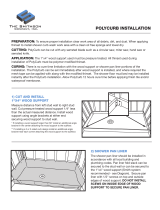
1) Find desired location to install PolyNiche, make
sure the location will be clear of obstacles once
wall is cut open so PolyNiche will t properly. Place
PolyNiche at against the wall where cutout is to
be made, with open side facing the wallboard.
Place a small level on the top side of PolyNiche to
ensure a level and plumb cut. Next, trace the 4
outer perimeter sides of PolyNiche, then remove it
from the wall.
2) Cut along the lines that were traced from
step 1. Use a keyhole, hand or jig saw to make
the cut into the wallboard. Once the wallboard
is cut, remove the loose center section.
PREPARATION: To ensure proper installation clear work area of all debris, dirt, and dust. PolyNiche
location must be determined according to stud location, and wallboard must be installed.
MATERIALS: Non-corrosive construction screws, 1”x4” wood strips and mesh tape.
APPLICATION: The 1"x4" wood strips used may be pressure treated. All thinset used during installation of
PolyNiche must be polymer modied thinset.
CURING: There is no cure time limitation with the wood strips. Once PolyNiche is installed the mesh tape
can be applied along with the modied thinset. Waterproof Membrane may then be applied over cured mesh
tape and modied thinset.
The Smithson Company, Inc.
561.312.4088 | Info@Smithsoncompany.com | smithsoncompany.com
125 S. State Rd. 7 | Suite 104-174 | Wellington, FL 33414
"Smithson" it's logo, "PolyNiche" it's logo are registered trademarks of The Smithson Company, Inc. PolyNiche is Patent Pending. Copyright 2014, Made in USA.

3. Cut 2 wood supports to be installed vertically
in the opening made from step 2. Cut wood
supports 4 inches longer than the vertical
opening measurement. Once cut, place the wood
supports on the backside of the wallboard
centered in the opening, with half of the wood
support exposed to the opening. Secure wood
supports in the wallboard using non-corrosive
screws, which are to be approx 6” apart on both
vertical sides of the opening.
4. Place PolyNiche into the wall with the opening side
facing out. Gently push PolyNiche into position until
the frame of PolyNiche sits at against the vertical
wood supports. PolyNiche should now be ush with
the ½” wallboard.
5. Ensure PolyNiche is ush with the ½” wallboard,
and sitting at against the vertical wood supports.
Using non-corrosive screws, secure PolyNiche in place
with the fasteners, which should be approx 6” apart.
The Smithson Company, Inc.
561.312.4088 | Info@Smithsoncompany.com | smithsoncompany.com
125 S. State Rd. 7 | Suite 104-174 | Wellington, FL 33414
"Smithson" it's logo, "PolyNiche" it's logo are registered trademarks of The Smithson Company, Inc. PolyNiche is Patent Pending. Copyright 2014, Made in USA.
POLYNICHE INSTALLATION

YOUR POLYNICHE IS READY TO BE TILED!
The Smithson Company, Inc.
561.312.4088 | Info@Smithsoncompany.com | smithsoncompany.com
125 S. State Rd. 7 | Suite 104-174 | Wellington, FL 33414
"Smithson" it's logo, "PolyNiche" it's logo are registered trademarks of The Smithson Company, Inc. PolyNiche is Patent Pending. Copyright 2014, Made in USA.
6. Remove any debris and ensure PolyNiche
and wallboard are clean. Apply drywall mesh
tape over all seams where PolyNiche meets the
wallboard. Secure mesh tape in place by
pressing it in place with a trowel.
7. Apply a skim coat of Polymer Modied
Thinset over the mesh tape to secure the
joint between PolyNiche, and the wallboard.
Flash out thinset if nessecary. Once the
thinset is cured, a coat of waterproof
membrane may be rolled or brush on.
POLYNICHE INSTALLATION
/