Page is loading ...

www.prosourcecenter.com
Rev 5/30/2019
Pro GEN II Water Proofing
for Tiled Shower Kit
Installation Instructions
For 48x48, 32x60, 48x60, 48x72, 60x60, 72x72, others
Please read all instructions thoroughly before beginning. If you have questions, please call.
(509) 334-4410
VERY IMPORTANT!
READ THE FOLLOWING BEFORE STARTING INSTALLATION
DO NOT use any brand or version of PRE-MIXED thin-set
mortar with this kit installation or tiling after kit installation.
DO NOT use any thin-set mortar modified or non-modified
that comes pre-made in a bucket or pail. None of these thin-
set mortars will reliably cure with any brand of waterproof
membranes or shower installations. DO NOT use mastics or
other ready-to-use-in-a-bucket type tile adhesives.
DO USE polymer/modified thin-set mortars that are sold as a
dry powder in a bag (typically 50#) that need to be thoroughly
mixed with water to activate and apply.
DO USE a well-known name brand polymer/modified thin-set
mortar to include companies like but not limited to (HB Fuller)
TEC, Laticrete, Mapei, Ardex, (CBP) Custom Building Prod-
ucts available from your local hardware store.

www.prosourcecenter.com
Rev 5/30/2019

www.prosourcecenter.com
Rev 5/30/2019
Pro GEN II Water Proofing
for Tiled Shower Kit
Installation Instructions
For 48x48, 32x60, 48x72, 72x72, others
Please read all instructions thoroughly before beginning. If you have questions, please call.
(800) 369-5458
Tools & Materials Required or Recommended
Jigsaw (for subfloor drain hole) & Drill (for pilot hole) or equivalent
Premium Modified (Latex/Polymer) Thin-set Mortar (NO pre-mixed, avoid fast-set)
5-Gallon Bucket
Mixer
3/16” x 3/16” Recommended, up to 1/4” x 1/4” square or V-notch trowel (Shower Pan)
Margin Trowel (optional) - may use flat edge of standard trowel
Utility Knife
PVC or ABS Cement per your area, and section of coupler pipe for connection
Level
Mortar mix if filling large gaps
Your Kit Includes:
Primary Pan Sections (varies per kit)
Extension Sets for Some Kit Sizes
108 - 216 SF Waterproofing Membrane
33 - 66 LF Waterproof Joint Band
4 Pre-shaped Inside Corners
1 Pro GEN II Flange in ABS or PVC
1 Pro GEN II Flange in ABS or PVC
Drain Grate Riser with Construction Plug
Hair Trap & Choice of Drain Grate Cover
Curb pieces if optionally ordered
Outside corners with curbs or option
2 outside corners with purchase of curb
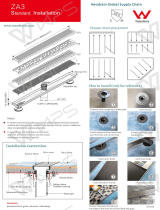
1. Ensure that your subfloor is flat and level. If not, use leveling compound before beginning installation. Locate drain
position and arrange pan pieces to center over drain area. If the area is smaller than the pan or pan plus extension(s),
trim foam with a fine-toothed hand, power saw, or utility knife and straight edge - preferably equally from each side
until the pan pieces fit the custom space properly with the hole centered on the desired drain location. If the overall
pan size is smaller than the desired floor plan by more than 1/2”, dry-pack mortar mix may be used to extend the size of
the shower pan where needed. When using dry-pack mortar (the mix ratio is usually not critical for small “patch” areas
- 3:1 to 5:1 sand to portland cement should be fine), be sure to protect a wood subfloor with tar paper. For gaps of 1/2”
or less, you may use modified thin-set mortar which can be directly applied to wood surfaces.

www.prosourcecenter.com
Rev 5/30/2019
2. Mark general drain location on the subfloor (if it does not already exist) by
using the center hole of the dry-fitted pan pieces as a guide. Trace another
circle inside the existing circle. It is preferable but not absolutely necessary
to leave a 1/2” or larger ridge for better drain flange support. You may also
use a center point and create a circle with about a 4” diameter.
3. Drill Pilot Hole on the inner circle you have hand
drawn Use the jigsaw to cut hole in subfloor
using the inner-most circle as a guide (~4”
diam.). There should be enough clearance for
the tail-piece of the drain flange, but the base of
the flange is preferably supported by the
subfloor. Be sure to (test) dry fit drain flange and
pan pieces (a dry-fit flange will sit “proud” of a
dry-fit pan before thin-set mortar is applied
underneath the pan.) A properly thin-set pan will
sit at the correct height during installation.
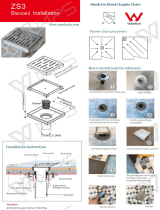
4. The pictures show various floor panel configurations depending on the kit.
A 48x48 pan will include 4 interlocking pieces.
A 32x60 pan will have two.
A 72x72 kit consists of a 48x48 pan with 2 extension sets (a total of 8 additional panel
pieces with mitered corners.)
A 48x72 kit uses just one extension set with the four extension pieces laid out as per
the diagram then trimmed.

www.prosourcecenter.com
Rev 5/30/2019
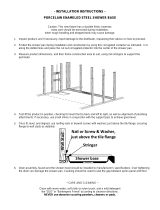
6. Test Fit drain flange directly to subfloor and measure distance to 2” diameter waste
pipe fitting under subfloor. Cut and test the proper length coupler pipe that will attach
flange to waste pipe but still allow the flange direct support at the subfloor. The top of
the 2” pipe coupler should come to about 1-1/2” below the top of the subfloor (and
sleeves inside drain outlet.) Ensure a successful dry fitting so that these will later glue
together correctly
5. The current pan can accommodate a variety of drain flanges including
those that are only supported by the pan pocket. Your drain pan is usually
precut at the warehouse to accommodate the much stronger GEN II drain
flange. However if it is not, trim the inside of the pan drain opening to allow
for a snug fit of the flange. It should dry fit as seen from the bottom of the
pan in this photo.
7. Using a 1/4” x 1/4” trowel, apply thin-set onto the entire
subfloor in the pan area AND to the back of the pan
(back-butter.) Although less thin-set may offer a
sufficient bond, insufficient thin-set will likely create a
scenario where the drain flange sits up too high (out of
the "pocket".
It is desirable for the flange to have full support at the base
on the subfloor unlike other designs that only have support
from a larger flimsy flange. Press the first pan section firmly
into the thinset mortar. Repeat until all sections are installed
into the desired pan area. Walk over the pan sections to help
ensure that each piece is fully embedded into the thin-set
mortar.
8. If you have constructed your own curb, ensure that
it is sheeted with a rigid material like concrete board
or sheetrock. If you purchased the optional foam
curb, test fit your curb sections and trim as neces-
sary to fit the desired space. Mark the location of
your curb(s) and trowel notched thin-set mortar into
the curb seating areas. Additionally back-butter the
ends, sides and bottom of each curb section. If you
purchased a curb, you should automatically have
received outside corners to be installed during the
waterproofing phase.

www.prosourcecenter.com
Rev 5/30/2019
NOTE ON WATERPROOFING PROCEDURE:
To be effective, the WP waterproofing membrane requires as close to 100% contact
with thin-set mortar as possible. Your high-quality preferably modified thin-set mortar
needs to be mixed according to manufacturers instruction to a creamy consistency to
ensure that it beds completely into the membrane’s factory-bonded fleece. You may
use any trowel with a notch between 1/8” to 3/16” - all video and install examples use a
3/16” to ensure excess thin-set mortar will need to be forced out with a flat edge. Until
you are familiar with the installation feel, occasionally lift a section to ensure that
100% coverage is achieved.
These instructions show the installation from the floor up. We highly recommended to allow the floor
installation to cure 24 hours before proceeding with the wall and other installation steps. If you need to
complete this installation more quickly - to avoid risk of disturbing the floor installation, we recommend
reversing the installation order (walls first starting at the bottom and going up) then finish with the floor
install. Please be sure to pre-cut the pan membrane for your floor section if using this method and set
aside for later. Running out of membrane high up on the wall well out of the direct-water area is not a
problem; running out of membrane for your floor area would be a problem.
Your waterproofing membrane is 1 meter or 39.5” wide. On 32” wide shower kits, you can precut a single
sheet of 39” wide membrane and precut for the drain hole if desired.
On all other shower kit configurations or on larger mortar bed layouts, you will need to plan for at least two
sheets with a minimum of a 2” overlap.
We highly recommend that you DO NOT overlap OVER the drain location to help ensure installation
integrity.
Pre-cut the membrane needed for the pan and curb and continue to the next step.
9. Dry fit your drain flange into the foam pocket and onto
your plumbing 2” diameter waste pipe. The GEN II
flange has locking grooves built into the bottom.
Literally step on the drain flange to force the locking
grooves into the foam pocket to guarantee a perfect
seat for final installation. At this point, just leave the
flange dry-fitted in place.
10. Trowel thin-set into an inside corner to prepare for the pre-shaped inside corner piece. Fit the corner
piece into position by hand. Using a margin trowel or the flat section of your trowel, press the corner into
the thin-set area to ensure a complete bond. Be sure you are achieving 100% coverage of thin-set on mem-
brane. Smooth the corner out and check for air bubbles. A properly installed corner blends into the instal-
lation as shown in the picture. Repeat for all 4 inside corners.

www.prosourcecenter.com
Rev 5/30/2019
11. Measure the distance between two corners and cut a section of 5” WP band that is about 1 inch less (it’s
best to be about 1/2” away from each edge while still allowing for a 2” overlap.) Fold the strip longitudinally
and crease it to prepare for install. Apply 3/16” notched modified thin-set mortar to the floor-to-wall joint
that you just measured. Seat the creased WP band piece first by hand then with the flat edge of a trowel
being careful not to disturb the bond you previously completed on the inside corners.
12. Repeat band installation procedure for all pan-to-wall and pan-to-curb
distances between your inside corners. Repeat the same procedure for any
vertical distances where two walls meet at a corner. When dealing with any
edge or corner, some installers use two straight edged tools at the same time
to speed installation. Be sure to clean up any excess thin-set that has been
forced out with your straight edge. These installed WP band sections double-
protect your installation at plane changes by waterproofing and isolating your
tile and grout from cracking at these traditionally vulnerable edges.
13. Mark out a wall section to incorporate a full-width sheet of membrane. As when preparing the band,
measure from corner to corner then cut a length from the large roll of WP membrane about 1 inch short to
allow centering of the piece about 1/2” away from each edge while still overlapping the band by 2”. Apply
3/16” notched modified thin-set mortar to the entire wall section marked out then seat and position the
prepared membrane. Once positioned, force the membrane into the thin-set first by hand - working from
the middle out. Follow up with the straight edge to force excess thin-set out from between the membrane
and wall. To help prevent trapped air, start from the middle and work your way to each edge. Ensure that
your thin-set remains creamy and is achieving nearly a 100% contact and bond. If your thin-set starts to
get too dry, mix a new batch.
The remainder of the installation is going to follow this same sequence of installation procedures. For
seamless continuation of the waterproofing, each new section will overlap the previous by 2 inches. The WP
membrane features a dashed line near the edge as a guide to assist you in proper installation.

www.prosourcecenter.com
Rev 5/30/2019
14. When adding an additional overlapping piece of WP membrane, work notched thin-set mortar over the
marked out section including an overlapping section on the previously installed membrane. Use the
dashed line as a guide for how much overlap of thin-set to provide. Install this an any remaining pieces
with the same exact installation procedures.
15. After all corner, edge and wall sections have been completed, install the final floor piece or pieces that
were previously cut and set aside. Trowel out 3/16” notched modified thin-set mortar over the entire pan
area including the pocket of the pan where the drain flange will install. Using ABS or PVC glue appropriate
for your plumbing, work glue on the inside fitting of the outlet of the drain flange and the outside area of
the top of the 2” plumbing coupler pipe you previously set up. Simultaneously seat the drain flange into the
thin-set at the pocket of the pan while gluing the outlet of the flange onto your plumbing. Press down to en-
sure a good seat before the plastic glue sets. If you have complete access to the plumbing underneath,
you may break this process into two steps - that is set the flange in thin-set and allow to cure, then later
access the plumbing underneath to glue the pipe to the flange outlet.
16. Now trowel out 3/16” notched modified thin-set
mortar over the “fleece” region of the drain
flange. However, DO NOT yet apply thin-set to the
center pocket recess of the flange. Position,
press in and set the floor piece(s) using the same
installation techniques used previously.
17. Carefully trim out the membrane covering the center flange recess with a sharp
utility knife. Use the straight edge of a trowel to ensure that the membrane at the
edge of the cut remains well bonded to the flange.

www.prosourcecenter.com
Rev 5/30/2019
18. Whether you have installed the optional foam curb or have built one out of 2x4 lumber covered with wall
board or concrete, the curb will also get covered with waterproof membrane. Apply notched modified thin-
set mortar to all curb surfaces, then apply WP membrane using the position, seat and press techniques
used throughout the installation. For curb runs longer than the length of the membrane, add additional
pieces while observing the 2 inch overlap rule. Using the same techniques used to install inside corners,
install an outside corner where the curb meets the wall.
19. Thread riser (with construction plug installed)
into riser locking ring (flat black ring with
threaded center.) Drop the entire assembly down
into the flange’s center pocket. Test fit the tile
that you will be installing on the floor next to the
riser assembly. Make final adjustments to the
height of the riser by threading up or down as
needed until the construction cover is about flush
with your dry-fitted tile.
20. With a margin trowel or small flat blade, push high-quality modified thin-set
mortar into pocket and into the locking grooves of the riser locking ring. This
process will allow final adjustments while allowing a super solid, strong and
well-supported riser and grate assembly after the thin-set has cured.
21. Make final adjustments to the position of your riser assembly adjacent to a
piece of dry-fit tile that will be installed on your floor. Turn the riser left or right
as needed for proper orientation to how your tile will be installed while still
observing an even height between the two. You may move the assembly hori-
zontally at this time if needed or even make a tilt adjustment if necessary.
Once you have the correct position, use your tile test piece to check all four
sides of the riser. Make further adjustments if necessary. Do not disturb the
riser assembly while allowing to dry and cure.
22. If you able to install tile without disturbing the floor or riser assembly, you may start right away. Be sure to
use the notch-size of trowel your tile’s manufacturer recommends - usually at least 1/4”. If time permits, it
is better to allow at least the floor components to cure to hardness before beginning tile installation. Be-
cause you are installing tile on a nearly vapor-impervious membrane layer, you will need to allow thin-set
to cure to hardness before considering the final grouting phase of your installation.

www.prosourcecenter.com
Rev 5/30/2019
Additional Considerations
Choosing the highest quality premium modified (latex/polymer) thin-set you can find
will make your installation much easier and yield better results. Because of the
high cost of shipping heavy materials, most people purchase thin-set mortar and
dry-pack mortar components locally. Good quality brand names to look for include
but are not limited to TEC, Laticrete, Mapei, Ardex, Custom Building Product (CBP)
and others.
· Despite some claims to the contrary regarding waterproof membranes, modified thin
-set is recommended by the Tile Council of America (TCA) for most modern tile in-
stallations and provides contemporary standards of performance. Fortunately,
your Pro WP is fully tested and backed for use with these superior thin-set mor-
tars. Maximizing air flow in the work area will really help accelerate cure times of
your thin-set.
· If you are installing very large, heavy tiles on your walls (12 x 18s, 12 x 24s,
18x18s, 24x24s and others), we highly recommend considering use of a “large-
format tile” version of modified thin-set mortar. Every major brand has such a ver-
sion available.
· Rather than sealing and resealing and scrubbing grout, we recommend the use of
TEC’s Power Grout. This grout has been engineered to perform like very expensive
epoxies and urethane grouts but offer lower pricing and much easier installation.
Power Grout is VERY stain resistant, permanently sealed, won’t effloresce or dis-
color, is easy to install like standard grout, and cures very quickly - 4 hours for dry
traffic, 24 hours for light wet use. Most any epoxy-based grout product also pro-
vides the highest performance levels albeit at higher cost and installation diffi-
culty. There are also other high-performance grout products available - please con-
sider using some type of high-performance grout product over traditional basic ce-
ment types.
· If your installation requires a grout color not available in the Power Grout family,
use TEC Grout Boost Advanced Pro. Although it will not offer fast cure times, this
product will dramatically improve the stain resistance and permanently seal your
standard portland-cement grout (made by various manufacturers). Formulations
are available for sanded and unsanded standard portland-cement grouts.
/