Page is loading ...

Manual Revision: 04/05/2017
For the latest information, technical specications, and support for
this product, please visit www.StarTech.com/RK1820WALHM.
FR: Guide de l’utilisateur - fr.startech.com
DE: Bedienungsanleitung - de.startech.com
ES: Guía del usuario - es.startech.com
NL: Gebruiksaanwijzing - nl.startech.com
PT: Guia do usuário - pt.startech.com
IT: Guida per l’uso - it.startech.com
RK1820WALHM
18U Hinged Wall-Mount Rack
Enclosure
*actual product may vary from photos

Instruction manual
Use of Trademarks, Registered Trademarks, and other Protected Names and Symbols
This manual may make reference to trademarks, registered trademarks, and other
protected names and/or symbols of third-party companies not related in any way to
StarTech.com. Where they occur these references are for illustrative purposes only and do not
represent an endorsement of a product or service by StarTech.com, or an endorsement of the
product(s) to which this manual applies by the third-party company in question. Regardless
of any direct acknowledgement elsewhere in the body of this document, StarTech.com hereby
acknowledges that all trademarks, registered trademarks, service marks, and other protected
names and/or symbols contained in this manual and related documents are the property of
their respective holders.
PHILLIPS® is a registered trademark of Phillips Screw Company in the United States or other
countries.

Instruction manual
i
Warning statements
Make sure that you assemble this product according to the instructions.
Read the entire manual and make sure that you understand the instructions before you start to assemble
and use this product.
Wall structures vary, and it is important to make sure that the type of wall structure and mounting
hardware that you are using will properly support the mounted equipment. Failure to do so might result
in personal injury and/or equipment damage. The wall structure should be capable of supporting at least
four times the weight of the mounted equipment.
This enclosure is extremely heavy. Never attempt to move or lift this enclosure without assistance.
Tipping hazard! Extending multiple components from this enclosure increases the chance that the
enclosure will tip over. To avoid this risk, do not extend more than one component from the enclosure.
Do not place any items on this enclosure and do not stack the enclosure on top of another enclosure.
Keep liquid away from this enclosure.
Make sure that you install the enclosure in an area that can handle the combined weight of the enclosure
and the equipment that you intend to place inside of the enclosure.
This product requires an earth ground connection. Do not use this product without an earth ground
connection.
Before you add equipment to this product, make sure that you have properly assembled, installed,
and mounted it to a wall.
When you load equipment into this product, load the heaviest equipment in the bottom section of this
product rst. Continue loading equipment in a descending order of weight, so that the lighter equipment
is installed in the upper sections of this product and the heavier items are on the bottom.
Varningsmeddelanden
Se till att du monterar produkten i enlighet med instruktionerna.
Läs hela manualen och se till att du förstår instruktionerna innan du börjar montera och använda
produkten.
Eftersom väggstrukturer varierar är det viktigt att kontrollera att väggstrukturen och
monteringsutrustningen som du använder klarar av den monterade utrustningen. Om du inte gör det
kan skada på person och/eller utrustning uppstå. Väggstrukturen ska kunna klara av minst fyra gånger
vikten av den monterade utrustningen.
Detta skåp är extremt tungt. Försök aldrig ytta på skåpet eller lyfta det utan hjälp.
Risk för vältning! Att förlänga era komponenter från detta skåp ökar risken för att det välter. Förläng inte
er än en komponent från skåpet för att undvika risk.
Placera inte saker ovanpå skåpet och ställ inte skåpet ovanpå ett annat skåp.
Håll vätskor borta från skåpet.
Se till att du installerar skåpet på en plats som kan hantera den kombinerade vikten av skåpet och
utrustningen som du tänker placera inuti.
Produkten behöver en jordad anslutning. Använd inte produkten utan en jordad anslutning.
Innan du lägger till utrustning till produkten, se till att du har monterat, installerat och fäst den till
en vägg korrekt.
När du lastar produkten med utrustning, ställ in den tyngsta utrustningen i den nedersta delen först.
Fortsätt ställa in utrustning i viktordning, så att den lättare utrustningen installeras i de övre delarna och
den tyngre utrustningen är längst ner.
Waarschuwingen
Zorg dat u dit product volgens de instructies in elkaar zet.
Lees de gehele handleiding en zorg dat u de instructies begrijpt voordat u dit product in elkaar zet
en gebruikt.
Omdat wandstructuren verschillen, is het belangrijk dat u ervoor zorgt dat het type wandstructuur
en de montagemiddelen die u gebruikt de gemonteerde apparatuur goed ondersteunen. Anders zou
lichamelijk letsel en/of schade aan de apparatuur kunnen ontstaan. De wandstructuur moet voldoende
zijn om ten minste vier keer het gewicht van de gemonteerde apparatuur te ondersteunen.
Deze behuizing is enorm zwaar. Probeer nooit deze behuizing te verplaatsen of op te tillen zonder hulp.
Kantelgevaar! Wanneer meerdere componenten uit deze behuizing steken, bestaat de kans dat deze zal
kantelen. Om dit risico te voorkomen, mag niet meer dan één component uit de behuizing steken.
Plaats geen voorwerpen op deze behuizing en stapel de behuizing niet op een andere behuizing.
Houd vloeistof uit de buurt van deze behuizing.
Zorg dat u de behuizing installeert op een plaats die geschikt is voor het gecombineerde gewicht van de
behuizing en de apparatuur die u in de behuizing wilt plaatsen.
Dit product vereist een geaarde verbinding. Gebruik dit product niet zonder een geaarde verbinding.
Voordat u apparatuur aan dit product toevoegt, moet u er zeker van zijn dat u dit product op de juiste
manier in elkaar gezet heeft, correct geïnstalleerd heeft en dat het aan een wand gemonteerd is.
Wanneer u dit product met apparatuur belast, moet de zwaarste apparatuur als eerste in het onderste
gedeelte van het product worden geplaatst. Ga door met het plaatsen van de apparatuur in aopende
volgorde, d.w.z. dat de lichtere apparatuur bovenin dit product en de zwaardere onderin worden
geïnstalleerd.
注意
必ず取扱説明書に従って本製品の組み立てを行って下さい。
最初に取扱説明書を最後まで読み、本製品の組み立て方をすべて理解してから組み立て作業を
始めて下さい。
壁面の構造は建物によって異なります。壁面の構造や使用する取り付け金具が設置する装置を適切に
支えられるかどうか、必ず確認してください。この注意を怠ると、怪我をする恐れや器物破損の恐れがあ
ります。設置する装置の少なくとも4倍の重量に耐えられる壁面構造が必要となります。
本製品は、非常に重いエンクロージャです。絶対に一人で持ち上げたり動かしたりしないで下さい。
転倒注意!本製品から複数のコンポーネントが突き出した状態にしておくとエンクロージャが転倒
する恐れがあります。転倒リスクを回避するために、エンクロージャからはコンポーネントが突き出
ないようにして下 さい。
本製品の上に何も載せないで下さい。複数のエンクロージャを重ねて設置しないで下さい。
液体物をエンクロージャに近づけないようにして下さい。
エンクロージャ自身と中に積載する装置の総重量に耐えられるエリアに設置して下さい。
この製品にはアースが必要です。アース接続をしていない状態で本製品を使用しないでください。
本製品に装置を積載する前に、組み立て、設置、壁面への取り付けが適切に行われているか確認
して下さい。
本製品に装置を積載する際は、最初に最も重い装置を一番下のセクションに入れて下さい。重い装置か
ら順に積載し、重いものが下のセクション、軽いものが上のセクションに配置されるようにして下さい。
Dichiarazioni di avvertenza
Assicurarsi di Assemblare il prodotto secondo le istruzioni.
Leggere l’intero manuale e assicurarsi di aver compreso tutte le istruzioni prima di iniziare ad assemblare
e a utilizzare questo prodotto.
La struttura dei muri può variare. È quindi importante vericare che il tipo di struttura e gli accessori
di montaggio utilizzati sorreggano senza problemi l’apparecchiatura montata. L’inosservanza di
questa indicazione potrebbe causare lesioni personali e/o danni all’apparecchiatura. La struttura
del muro dovrebbe essere in grado di sostenere un peso no a quattro volte superiore a quello
dell’apparecchiatura montata.
Il box esterno è molto pesante. Non tentare di spostarlo o sollevarlo senza assistenza.
Pericolo di ribaltamento! L’estensione di più componenti dal box esterno aumenta il rischio di
ribaltamento del box esterno. Per evitare questo rischio, non estendere più di un componente dal
box esterno.
Non collocare oggetti sul box esterno e non impilare un box esterno sopra un altro.
Tenere il box esterno lontano dai liquidi.
Assicurarsi di installarlo in un punto che possa sorreggere il peso combinato del box esterno e
dell’apparecchiatura che si intende collocare al suo interno.
Il prodotto richiede una messa a terra. Non utilizzare il prodotto in assenza di una messa a terra.
Prima di aggiungere un’apparecchiatura al prodotto, vericare di averlo assemblato, installato e montato
correttamente a una parete.
Quando si caricano le apparecchiature all’interno del prodotto, partire da quelle più pesanti collocandole
nella parte inferiore del prodotto. Continuare l’operazione in ordine decrescente di peso, in modo che
le apparecchiature più leggere siano installate nelle parti superiori del prodotto e quelle più pesanti
nella parte inferiore.
Avertissements
Assemblez ce produit conformément aux instructions.
Lisez tout le manuel et assurez-vous que vous comprenez les instructions avant de commencer à
assembler et utiliser ce produit.
Les structures des murs varient. Vous devez impérativement vérier que le type de mur et le matériel de
xation que vous utilisez permettent de soutenir correctement l’équipement. Dans le cas contraire, vous
risquez de vous blesser ou d’endommager le matériel. La structure du mur doit pouvoir supporter au
moins quatre fois le poids de l’équipement monté.
Ce rack de serveur est extrêmement lourd. Ne tentez jamais de le déplacer ou de le soulever sans aide.
Risque de basculement! L’extension de plusieurs composants à partir du rack de serveur augmente
le risque de basculement. Pour éviter ce risque, n’étendez pas plus d’un composant à partir du rack
de serveur.
Ne placez aucun objet sur ce rack de serveur et n’empilez pas le rack sur un autre rack.
N’approchez aucun liquide du rack de serveur.
Veillez à installer le rack de serveur dans un endroit pouvant supporter le poids combiné du rack et des
équipements que vous comptez placer à l’intérieur.
Ce produit nécessite un raccordement à la terre. N’utilisez pas ce produit sans raccordement à la terre.
Avant d’ajouter des équipements à ce produit, vériez que vous l’avez correctement assemblé, installé
et xé au mur.
Lorsque vous chargez des équipements dans ce produit, chargez les équipements les plus lourds dans
la partie inférieure du produit en priorité. Continuez de charger les équipements dans un ordre de poids
décroissant, de sorte que les équipements les plus légers soient installés dans les parties supérieures du
produit, et les éléments plus lourds dans les parties inférieures.

Instruction manual
iii
Table of Contents
Warnings ......................................................................................................................................................i
Introduction ............................................................................................ 1
Product diagram ........................................................................................................................................1
Product dimensions ................................................................................................................................. 2
Package contents ...................................................................................................................................... 3
Requirements ............................................................................................................................................. 3
Ground the enclosure ............................................................................ 4
Lock or unlock the front or rear door .................................................. 5
Remove the side panels ........................................................................5
Access your cables .................................................................................7
Reverse the front door ..........................................................................8
Adjust the depth of the mounting rails ..............................................10
Use the mounting rail tapped holes ...................................................11
Mount the enclosure to the wall .......................................................... 12
Install equipment ................................................................................... 13
Technical support ...................................................................................14
Warranty information ............................................................................ 14

Instruction manual
1
Introduction
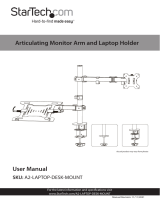
Product diagram
1
3
2
4
5
4
5
7
1
Front door
2
Rear door
3
Horizontal mounting rail
4
Vertical mounting rail
5
Cable access cover
6
Cable access opening
7
Side panel
6
8
Vent
3
7
8
8
6

Instruction manual
2
Product dimensions
Top and bottom panels
Front door Side panels
Enclosure
450 mm
Back of enclosure
600 mm
903.7 mm
65 mm
270 mm
30 mm
903.7 mm
600 mm
550 mm
903.7 mm
903.7 mm
809.3 mm
406.4 mm
28.6 mm

Instruction manual
3
Package contents
• 1 x wall-mount enclosure
• 1 x 1U shelf
• 1 x roll of hook-and-loop fastener
• 72 x 12-24 cage nuts
• 72 x 12-24 screws
• 2 x door keys
• 2 x side panel keys
• 1 x instruction manual
Requirements
• Phillips type screwdriver
• Appropriate tools and mounting hardware for the type of wall you’re using
Requirements are subject to change. For the latest requirements, please visit
www.StarTech.com/RK1820WALHM.
Note: The images in this manual depict RK12WALHM. The only dierence between
RK12WALHM and this product is the rack height and depth.

Instruction manual
4
Ground the enclosure
Warning! This product must be grounded. Do not use this product without an earth
ground connection.
1. Use an M6 screw to attach a grounding wire to the front or rear grounding point on
the enclosure.
2. Route the wire under the frame of the enclosure and connect the wire to your
facility’s earth ground connection. (gure 1)
gure 1
Grounding wire

Instruction manual
5
Lock or unlock the front or rear door
For additional security, the front and rear door of the enclosure can be locked with the
provided door keys.
• To lock or unlock the front or rear door of the enclosure, insert one of the provided
door keys in the lock on the door and turn the key clockwise or counterclockwise.
Remove the side panels
1. If the side panels are locked, use the provided side panel keys to unlock the panels.
2. Pull the two tabs on the side panel towards the center of the panel. (gure 2)
gure 2

Instruction manual
6
gure 3
3. Lift the side panel free from the enclosure. (gure 3)
4. Repeat steps 1 to 3 to remove the other side panel.
To put the side panels back on the enclosure, place one of the side panels in the
groove at the bottom of the enclosure. Pull the two tabs on the side panel towards the
center of the panel, push the top part of the side panel into the enclosure, and release
the tabs. Use one of the provided side panel keys to lock the side panel.

Instruction manual
7
gure 4
Access your cables
There are two cable access covers on the enclosure that you can remove to access and
manage your cables.
1. To take o a cable access cover, use a Phillips type screwdriver to remove the two
screws on both ends of the cable access cover.
2. Pull the cable access cover away from the enclosure. (gure 4)
To put the cable access cover back on, place the cover over the cable access opening
and use a Phillips type screwdriver to insert the screws through the cover and into the
enclosure. Tighten the screws.

Instruction manual
8
gure 5
Reverse the front door
To accommodate dierent rack congurations, you can reverse the front door of the
enclosure so that it opens to the left or right of the enclosure. The front door of the
enclosure is attached to the enclosure with levers that are located at the top and
bottom of the front door.
1. In the top corner of the inside of the front door, pull the lever down and move the
top corner of the front door away from the enclosure.
2. In the bottom corner of the inside of the front door, pull the lever up and remove
the front door from the enclosure. (gure 5)

Instruction manual
9
3. Flip the front door so that the levers are located on the opposite side.
4. Position the front door so that the top and bottom levers are aligned with the
washers located in the hinge area of the enclosure.
5. In the top corner of the front door, pull the lever down and release it into the washer
and hole in the enclosure.
6. In the bottom corner of the front door, pull the lever up and release it into the
washer and hole in the enclosure. (gure 6)
gure 6

Instruction manual
10
Adjust the depth of the mounting rails
The mounting rails come preinstalled in the enclosure but you can adjust the
mounting rails to accommodate dierent sizes of equipment. Both the front and back
set of mounting rails can be adjusted independently in 3/4 inch (20 mm) increments.
Warning! Do not attempt to adjust the mounting rails when equipment is installed in
the enclosure. Remove the equipment rst before you adjust the mounting rails.
1. Each of the mounting rails is connected to the enclosure with a screw and cage nut
in the upper and lower corners of the mounting rail. Use a Phillips type screwdriver
to remove the screws and cage nuts from the mounting rails.
2. Install the cage nuts at the desired depth.
3. Slide the mounting rail to the depth of the cage nuts and use a Phillips type
screwdriver to install and tighten the screws that you removed in step 1. (gure 7)
gure 7

Instruction manual
11
Use the mounting rail tapped holes
The mounting rails come preinstalled in the enclosure but you can adjust the
mounting rails so that you can use the tapped holes to install your equipment.
Warning! Do not attempt to adjust the mounting rails when equipment is installed in
the enclosure. Remove the equipment rst before you adjust the mounting rails.
1. Each of the mounting rails is connected to the enclosure with a screw and cage nut
in the upper and lower corners of the mounting rail. Use a Phillips type screwdriver
to remove the screws and cage nuts from the mounting rails.
2. Change the location of the mounting rails so that the sides of the rails with the
tapped holes are facing the front door. (gure 8)
3. To reattach the mounting rails to the enclosure, use a Phillips type screwdriver to
install and tighten the screws that you removed in step 1.
gure 8

Instruction manual
12
Mount the enclosure to the wall
Warning! Remove all equipment from the enclosure before you attempt to mount the
enclosure to the wall.
Warning! Wall structures vary and it is important to make sure that the type of
wall structure and mounting hardware that you are using will properly support the
mounted equipment. Failure to do so might result in personal injury and/or equipment
damage. The wall structure should be capable of supporting at least four times the
weight of the mounted equipment.
The RK1820WALHM weighs 115 lb. (52 kg) and can hold up to 198 lb. (90 kg) in weight.
Warning! If you lack the necessary expertise to attach this product to the wall that
you’re using, contact a construction professional to install the enclosure or to provide
specic mounting instructions for your wall structure.
The number of mounting holes on the rear door of the enclosure will vary depending
on the model of your enclosure. Each mounting hole can accommodate an M8, M10,
5/16”, or 3/8” bolt.
• Follow the appropriate steps for the type of wall that you’re attaching the enclosure
to and attach the enclosure to the wall.
Caution! The enclosure is extremely heavy and you should not attempt to lift and
hang the enclosure without the assistance of other people.

Instruction manual
13
Install equipment
Warning! Do not add equipment to the enclosure until the enclosure is securely
attached to the wall.
Warning! When you load equipment into this enclosure, load the heaviest equipment
in the bottom section of this enclosure rst. Continue loading equipment in a
descending order of weight, so that the lighter equipment is installed in the upper
sections of this enclosure and the heavier items are on the bottom.
This enclosure comes with cage nuts and screws but the equipment you’re installing
may come with mounting hardware. Consult the documentation that came with the
equipment to determine the best mounting hardware that you should use and how
you should install it.
1. Decide where in the enclosure you want to install the equipment and insert the
cage nuts in the mounting rails.
2. Line up the mounting holes on the equipment with the cage nuts.
3. Insert the screws through the mounting holes on the equipment and into the cage
nuts.

Instruction manual
14
Technical support
StarTech.com’s lifetime technical support is an integral part of our commitment to
provide industry-leading solutions. If you ever need help with your product, visit
www.startech.com/support and access our comprehensive selection of online tools,
documentation, and downloads.
For the latest drivers/software, please visit www.startech.com/downloads
Warranty information
This product is backed by a ve-year warranty.
StarTech.com warrants its products against defects in materials and workmanship
for the periods noted, following the initial date of purchase. During this period,
the products may be returned for repair, or replacement with equivalent
products at our discretion. The warranty covers parts and labor costs only.
StarTech.com does not warrant its products from defects or damages arising from
misuse, abuse, alteration, or normal wear and tear.
Limitation of liability
In no event shall the liability of StarTech.com Ltd. and StarTech.com USA LLP (or their
ocers, directors, employees or agents) for any damages (whether direct or indirect,
special, punitive, incidental, consequential, or otherwise), loss of prots, loss of business,
or any pecuniary loss, arising out of or related to the use of the product exceed the
actual price paid for the product. Some states do not allow the exclusion or limitation
of incidental or consequential damages. If such laws apply, the limitations or exclusions
contained in this statement may not apply to you.

Hard-to-nd made easy. At StarTech.com, that isn’t a slogan. It’s a promise.
StarTech.com is your one-stop source for every connectivity part you need. From
the latest technology to legacy products — and all the parts that bridge the old and
new — we can help you nd the parts that connect your solutions.
We make it easy to locate the parts, and we quickly deliver them wherever they need
to go. Just talk to one of our tech advisors or visit our website. You’ll be connected to
the products you need in no time.
Visit www.startech.com for complete information on all StarTech.com products and
to access exclusive resources and time-saving tools.
StarTech.com is an ISO 9001 Registered manufacturer of connectivity and technology
parts. StarTech.com was founded in 1985 and has operations in the United States,
Canada, the United Kingdom and Taiwan servicing a worldwide market.
/