Page is loading ...

INSTALLATION INSTRUCTIONS
Model # 7902 Post
READ AND SAVE THESE INSTRUCITONS
WARNING ! SHUT POWER OFF AT FUSE OR CIRCUIT BREAKER.
AVERTISSEMENT! COUPER LE COURANT AU NIVEAU DES FUSIBLES OU DU DISJONCTEUR.
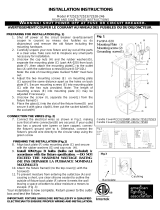
Fig 3
CAP NUT
STEEL WASHER
POST BASE
HEX NUT
Fig 2
2"
J-BOLTS
CAUTION: Scratches or chipped paint caused as a
result of abuse or by weed eaters, lawn mowers, etc.
and or use of certain fertilizers can cause corrosion to
steel or aluminum posts.
We recommend that you check your local wiring codes and consult an
electrical contractor before installing the post base.
We recommend that the portion of the base that will rest against the
concrete be coated with an asphalt base paint due to alkali condition of
various concrete mixes and soils which can react to the metallic surfaces
and cause corrosion.
SAFETY ALERT!
FIND THE LOCATION OF ANY UNDERGROUND PLUMBING, POWER
LINES, AND OTHER LINES BEFORE DIGGING.
1. Dig a hole approximately 16”DiaX20”Deep (Fig.1).
2. After consulting the local codes, dig a trench to the required depth
from the post hole to the power source.
WARNING! SHUT POWER OFF AT FUSE OR CIRCUIT BREAKER
AVERTISSEMENT! COUPER LE COURANT AU NIVEAU DES
FUSIBLES OU DU DISJONCTEUR.
3. Install the underground electrical cables. Make sure to leave
approximately 10” of lead wires from the concrete surface to allow
sufficient leads for splicing purposes (Fig.1).
4. Pour the concrete into the hole making sure the conduit with the
electrical wires is kept secured in the center of the hole (Fig.1).
5. Place the template over the fresh concrete and mark the location of
the four J-bolt holes (Fig.1).
6. Insert the 4 J-bolts into the fresh concrete and adjust them up or
down as needed to keep the ends of the J-bolts approx. 2”above the
surface. Finally check to make sure all four J-bolts are straight and
properly aligned.
7. After the concrete hardens, thread the hex-nuts (provided) onto the
J-bolts. Note: The hex-nuts may be adjusted up or down to assist in
leveling the post base.
8. Place the post base over the J-bolts and secure it with the steel
washers and cap nuts provided (Fig.3).
9. Secure the top pole into the bottom pole by turning clockwise.
(Fig.4)
10. Secure the top and bottom pole assembly into the post base by
turning clockwise. (Fig.5) NOTE: To help secure and to prevent
water from entering the pole, it is recommended that clear silicone
sealant be spread evenly on the threads of the top pole prior to
securing into the bottom pole and the bottom pole prior to securing
into the post base.
11. Install the light fixture over the post by following the instruction steps
from the instruction manual included with the fixture.
12. Remove the access window located at the post base (Fig.3) and
follow the wiring instructions included with the light fixture.
BOTTOM POLE
TOP POLE
MIDDLE FITTING
TOP FITTING
Fig 4
Fig 1
20"
16"
TEMPLATE
10"LEAD WIRES
POST BASE
BOTTOM POLE
BOTTOM POLE
MIDDLE FITTING
TOP FITTING
Fig 5
/