
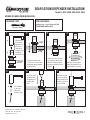
Turn o water
supply.
REQUIRED TOOLS: PARTS INCLUDED:
Adjustable Wrench
Optional Caps - Soap, Lotion and Finish
(TRADITIONAL MODELS ONLY)
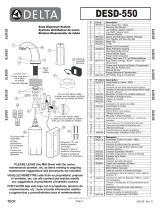
COUNTER
OR SINK
SPACER IS FOR
#4065 AND #9065
MODELS ONLY
1-3/8”
HOLE
A
B
C
F
G
D
E
1.
2.
3. 4.
5.
6. 7.
BEFORE YOU BEGIN YOUR INSTALLATION:
VEN-038-SOAP Rev. C
SOAP/LOTION DISPENSER INSTALLATION
Model #s 4055, 4060, 4065, 8555, 9065
Slide the brass spacer ring up to
top of dispenser shroud, then
thread the clamp nut. Tighten
nut snug to underside of sink or
counter.
Add soap or lotion to plastic
bottle. Thread bottle (E) into
bottom of dispenser shroud.
Pull and remove
spout (A) from
dispenser body
(B). Remove
clamp nut (C)
and brass spacer
ring (D) from
threaded shroud.
Slide red tubing
(F) into tube
tting (G) at
bottom of spout.
Insert open end of
red tubing down
through dispenser
and into plastic
bottle.
Push down on spout
to secure over white
O-rings. Pump spout a
few times to get soap
or lotion owing.
Fit dispenser body through
1-3/8” hole on counter or sink.
(No plumbers putty is required.
O-ring seals base).
41180 Raintree Court • Murrieta, CA 92562
1-888-304-0660 • 951-304-0520
www.waterstoneco.com
-
 1
1

Ask a question and I''ll find the answer in the document
Finding information in a document is now easier with AI
Related papers


Other documents
-
 BTI Aqua-Solutions SL5065-BN Installation guide
-
Kohler K-1895-BL Installation guide
-
Sloan Valve 3346052 Installation guide
-
 KRAUS KSD42SS Installation guide
-
-
Gerber Hardwater Single Handle Kitchen Faucet User manual
-
 Bobrick B-8281 Installation guide
-
 Bobrick B-828 Installation guide
-
 Bobrick B-840 Installation guide
-
 Brizo 060918A Installation guide


