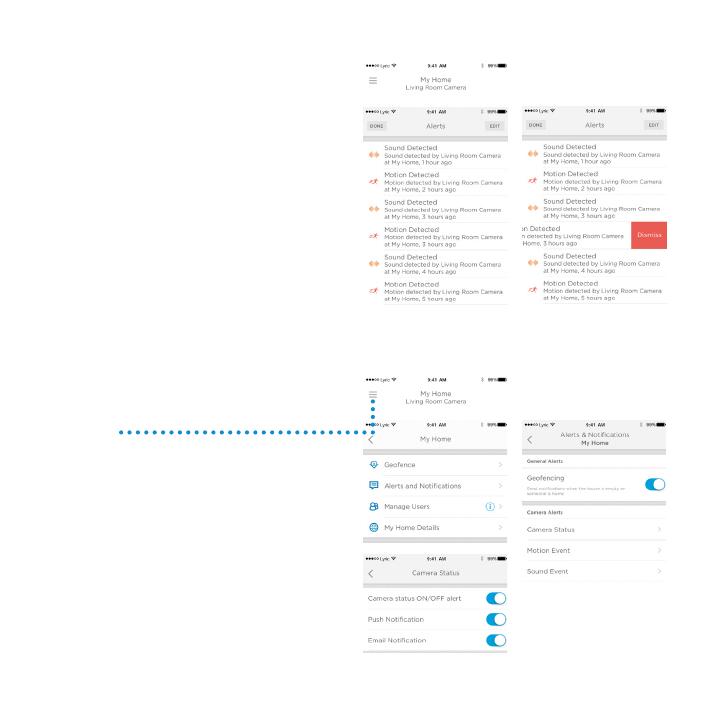
Honeywell RCHC4100WF1002/W User manual

Type
User manual

This manual is also suitable for

Honeywell RCHC4100WF1002/W is a smart thermostat that offers precise temperature control, flexible scheduling, and remote access to your home's comfort settings. With its intuitive touchscreen display and compatibility with popular smart home platforms, it's easy to manage your home's temperature from anywhere, anytime.

Honeywell RCHC4100WF1002/W is a smart thermostat that offers precise temperature control, flexible scheduling, and remote access to your home's comfort settings. With its intuitive touchscreen display and compatibility with popular smart home platforms, it's easy to manage your home's temperature from anywhere, anytime.

Lyric™ C1 Wi-Fi Security Camera
USER MANUAL
Before you begin
Read these instructions carefully. Failure to follow these instructions may damage
the product.
Download the Lyric app
To setup and use your new security
camera, search for Honeywell Lyric
in the App Store or Google Play.
GET IT ON
Lyric
ii
Need help?
If you need help at any point during the installation and setup of the
Wi-Fi Security Camera, please contact Honeywell Lyric Support:
Web: YourHome.Honeywell.com
Email: MyLyric@honeywell.com
Phone: 1-800-633-3991
iii
Contents
Welcome • 1
Camera overview • 2
Placement • 3
With stand • 3
Without stand • 3
Installation • 4
Download the Honeywell Lyric app • 4
Launch the Lyric app • 4
Connect the power cord • 4
Connect • 5
Connect to mobile device • 5
Connect to Wi-Fi • 5
Status LEDs • 6
Operation • 7
Remove/replace the stand • 7
Lyric app experience • 7
Reset • 7
SD card • 7
iv
App overview • 8
Livestreaming • 9
Configure alerts • 10
Select alert notification type • 10
Select alert recipients • 11
Review clips • 11
Camera settings • 12
Turn the LED on and o • 14
Turn the microphone on and o • 14
Motion detection • 15
Sound detection • 16
Smoke or carbon monoxide alarm detection • 17
Delete a camera • 18
v
Set up detection zones • 20
Geofencing setup • 19
App settings and account info • 22
Manage messages • 23
Frequently Asked Questions • 24
Specifications • 27
FCC Regulations • 28
Warranty • 29
vi
1
Welcome
Congratulations on your purchase of Honeywell’s Lyric™ C1 Wi-Fi
Security Camera. You can monitor visitors, pets, and family
yourself—anytime, anywhere.
What’s in the box?
You should find:
Honeywell Lyric C1 Wi-Fi Security Camera
Optional mounting screws
Power cord
8 GB microSD Card
Download the app
To setup and use your new camera, search for Honeywell Lyric in the
App Store or Google Play.
After downloading, follow the
instructions in the app.
GET IT ON
Lyric
2
Camera overview
Camera lens
LED indicator
Power cord
Stand
Reset hole
SD card and slot
3
Placement
With stand
Place the camera in a desired location for
viewing and recording.
Without stand
You can also mount the camera directly to
the wall without the stand.
4
Installation
Launch the Lyric app
4
Launch the Lyric app.
5
Select the Lyric C1 Wi-Fi Camera to install, then create an
account (if necessary), or sign in to your Lyric account.
6
Follow the instructions in the Lyric app to name the
camera and its location.
Download the Honeywell Lyric app
Note: Have your Wi-Fi password available and confirm
your router communicates at 2.4 GHz before installation.
1
Make sure bluetooth is enabled on your mobile device.
2
Search for Honeywell Lyric in the App Store or Google
Play.
3
Download the Honeywell Lyric app.
Connect the power cord
7
Remove the camera base and plug the power
cord’s USB end into the camera.
8
Reinsert the camera base and plug the camera
into a power outlet.
9
Wait until the LED on the camera blinks blue
(about 1 minute), then tap NEXT.
Note: If the LED turns solid red, it means the
connection mode timed out. Unplug the camera and
plug it back in.
GET IT ON
Lyric
Select a device to installl
Carrier 100%8:08 AM
Add New Device
Lyric C1 Wi-Fi Camera
Lyric Round
Lyric Water Leak &
Freeze Detector
5
Connect
Connect to Wi-Fi
Be sure you are on the same Wi-Fi network you
wish to connect your camera to.
1
Choose your Wi-Fi network from the list.
Press NEXT.
2
Enter your Wi-Fi password, if necessary.
Press DONE.
Note: The camera will beep during some steps in
this process.
Connect to mobile device
1
Enable bluetooth on your mobile device.
2
The app will look for the camera.
For one camera, it will connect
automatically.
For more than one camera, the app will
prompt you to select one camera at a time.
Each camera has a unique MAC ID printed
on the back. Use that ID to select the
camera you want to connect.
3
A QR code will display in the app. To connect
your camera to the app, hold the QR code
approximately 3-8 inches (7-20cm) from the
camera lens.
4
The camera LED turns purple and the camera
beeps.
Scan code to connect camera
Carrier 100%8:08 AM
NEXT
Connect
2.7-7.9 in
6
Status LEDs
During Wi-Fi connection and camera operation, the LED shows the status of
the camera.
LED Camera state
During installation
Blinking Blue Powered up. Ready to begin setup.
If the LED blinks blue during setup, it has lost
bluetooth connection. Unplug it and plug it back in
again. See “Connect the power cord” on page 4
for instructions.
Solid Blue Connected to App. Ready to complete setup.
Solid Red (for
2seconds)
Setup timed out, or connection failed. The LED will
then turn solid purple. Unplug camera, plug it back
in, and restart the process.
Solid Purple QR Code scan complete.
See “Connect to Wi-Fi” on page 5.
Blinking Green Connecting to Wi-Fi network.
Solid Green Connected to Wi-Fi network.
During operation
Blinking Green Connecting to Wi-Fi network.
Solid Green Connected to Wi-Fi and operating.
Blinking Red Not connected to Wi-Fi.
7
Operation
Remove/replace the stand
The C1 Camera stand is connected to the camera by a magnet. If you want
to remove the stand to hang the camera on the wall or replace the SD card,
simply pull the stand o of the camera. To replace, just snap it back on the
camera.
Lyric app experience
When you launch the application, live video from your
camera is displayed.
If you have multiple cameras, a list of them is displayed.
Select a camera from the list to view live video from that
camera.
Reset
If your Wi-Fi connection fails or you need to connect to a
dierent Wi-Fi network, insert one end of a paperclip into
the reset hole. Press and hold it for 10seconds until you
hear a chirp.
SD card
The camera comes with an encrypted 8GB SD card installed. It stores images
if the camera’s connection to the cloud is lost. You can replace it with any
compatible SDcard, up to 64GB.
8
App overview
These are the controls available during livestream.
Camera on/o
Press to turn the
camera on or o.
Motion/sound detector
Press to turn the motion or
sound detection alerts on or
o during livestream.
Snapshot control
Press to take pictures during
livestream. Images are saved
to mobile device’s photos.
Video clips
When the camera detects motion or sound, it records
a clip. Those clips are listed in chronological order
here. Swipe up to see the list of clips, then swipe up or
down to see the full list. Press a clip to watch it.
Push to Talk
Press and hold
to speak out of
the camera.
Release to stop.
9
Livestreaming
You can use your security camera to get a live look-in wherever
you place the camera. Each livestream session lasts 90
seconds. When one livestream session ends, you can start a
new one if you like.
Use the Push to Talk button to talk to someone through the
camera.
Livestreams are not saved to the SD card, and are not
uploaded to your cloud storage.
By default, livestreams are in HD. If data limits are a concern,
change this setting to Auto or Low. See “Video quality” on
page 13.
10
Configure alerts
When the camera detects a sound or
motion, it sends an alert to the app.
1
Press the Alerts icon when a red bubble
appears.
2
The Alerts are displayed with the Alert
type and the date/time stamp.
3
Press an alert to view the 30-second
video clip.
4
Swipe left, then press Dismiss to remove
the Alert.
5
To dismiss all Alerts, press Edit, then
press DISMISS ALL.
Select alert notification type
1
Press the side menu button on the home
screen.
2
Press Alerts and Notifications.
3
Select the notification type you want
to set (Camera Status, Motion Event, or
Sound Event).
4
Choose to turn on or o the following
types of notifications:
Camera Status ON/OFF alert -
displayed in the Alerts list.
Push Notification - displayed on your
mobile device.
Email Notificaton - sent via email
11
Select alert recipients
You can choose multiple people to have access to the camera and receive Alerts.
1
Press the side menu button on the home
screen.
2
Press Manage Users.
3
Press Add User at the bottom of the
app.
4
Enter the email address of the person
you want to add to the camera then
press SEND.
Review clips
1
Swipe up from the bottom of the home
screen to show clips.
2
Press a clip to watch it.
3
Press FILTER to sort the clips, then
select a filter type (All, New, Viewed,
Downloaded).
12
Camera settings
Camera settings can be controlled in the app. You can set up things like night mode, use
Lyric’s Geofencing capability, and turn on Motion or Sound Detection, and other settings.
1
Press the side menu button on the
home screen.
2
Press the camera you want to change
the settings on. Look for the name you
gave the camera when installed.
3
To change the camera mode, press
Camera Mode.
4
Press a setting for the camera mode:
Manual - turn the camera on or o
using the app.
Geofencing - the camera turns on
when you leave the area, and turns
o when you return.
5
To change the night vision settings,
press Night Vision.
6
Press a setting for night vision:
Auto - the camera adjusts its
settings automatically.
On - night vision is always on.
O - night vision is always o.
13
Video quality
You can change the quality of your video stream. This will help limit data use on your
mobile device.
1
Press the side menu button on the
home screen.
2
Press the camera you want to change
the settings on. Look for the name you
gave the camera when installed.
3
Press Video Quality.
4
Press a setting for video quality:
Auto - the camera adjusts its
settings automatically.
Low - lower quality video that uses
less data or bandwidth (VGA).
High - higher quality video that
uses more data or bandwidth
(720p HD).
14
Turn the LED on and o
If you want to turn the camera’s LED o (or back on), it is easy to do using the app.
1
Press the side menu button on the
home screen.
2
Press the camera you want to change
the settings on. Look for the name you
gave the camera when installed.
3
Use the Camera LED switch to turn the
LED on or o.
Turn the microphone on and o
If you want to turn the camera’s
microphone o (or back on), it is easy to
do using the app.
1
Press the side menu button on the
home screen.
2
Press the camera you want to change
the settings on. Look for the name you
gave the camera when installed.
3
Use the Camera Microphone switch to
turn the microphone on or o.
  • Page 1 1
  • Page 2 2
  • Page 3 3
  • Page 4 4
  • Page 5 5
  • Page 6 6
  • Page 7 7
  • Page 8 8
  • Page 9 9
  • Page 10 10
  • Page 11 11
  • Page 12 12
  • Page 13 13
  • Page 14 14
  • Page 15 15
  • Page 16 16
  • Page 17 17
  • Page 18 18
  • Page 19 19
  • Page 20 20
  • Page 21 21
  • Page 22 22
  • Page 23 23
  • Page 24 24
  • Page 25 25
  • Page 26 26
  • Page 27 27
  • Page 28 28
  • Page 29 29
  • Page 30 30
  • Page 31 31
  • Page 32 32
  • Page 33 33
  • Page 34 34
  • Page 35 35
  • Page 36 36

Honeywell RCHC4100WF1002/W User manual

Type
User manual
This manual is also suitable for

Honeywell RCHC4100WF1002/W is a smart thermostat that offers precise temperature control, flexible scheduling, and remote access to your home's comfort settings. With its intuitive touchscreen display and compatibility with popular smart home platforms, it's easy to manage your home's temperature from anywhere, anytime.

Ask a question and I''ll find the answer in the document

Finding information in a document is now easier with AI