Sony HDR-AS50 Quick start guide

Category
Camcorders
Type
Quick start guide

This manual is also suitable for

Sony HDR-AS50: Dive into the action and capture stunning footage with this versatile action camera. Whether you're hitting the slopes, riding the waves, or exploring the great outdoors, the HDR-AS50 is your perfect adventure companion. With its compact and durable design, this camera can withstand even the most extreme conditions. Experience the freedom of hands-free shooting with voice control and easily adjust settings with the intuitive user interface.

Sony HDR-AS50: Dive into the action and capture stunning footage with this versatile action camera. Whether you're hitting the slopes, riding the waves, or exploring the great outdoors, the HDR-AS50 is your perfect adventure companion. With its compact and durable design, this camera can withstand even the most extreme conditions. Experience the freedom of hands-free shooting with voice control and easily adjust settings with the intuitive user interface.

Checking the bundled items
The number in the parentheses indicates the quantity of that item
bundled.
•Camera (1) / Underwater Housing (MPK-UWH1) (1)
Camera is set in the Underwater Housing. Open the cover of the case as
illustrated below.
•Micro USB cable (1)
•Rechargeable battery pack
(NP-BX1) (1)
•Attachment Buckle (1)
•Startup Guide (this document) (1)
•Reference Guide (1)
Name of main parts
(on/standby) button
MENU button
Display panel
UP/DOWN buttons
REC lamp
REC (Movie/Still image) button/
ENTER (Menu execute) button
REC/LIVE lamp
Lens
Speaker
Microphones
Battery cover
Connector cover (Multi/Micro USB
Terminal)
REC lamp
Lock lever
Memory card cover
Getting Started
Charging the battery pack
1
Slide the lock lever down to open the battery cover, then
insert the battery pack.
Align the direction of the arrows on
the camera and the battery pack
Lock lever
2
Close the cover securely, then slide the lock lever up to
lock.
Confirm that the yellow mark on the lock lever is not visible.
3
Open the connector cover, then connect the inactivated
camera to an activated computer with the micro USB cable
(supplied).
CHG (Charge) lamp lights
in amber while charging
Micro USB cable
Connector cover
Inserting a memory card
Memory Stick Micro™
(Mark2) media
microSD card/
microSDHC card/
microSDXC card
Terminal side
Printed side
Memory cards that can be used with the camera
Memory card MP4 XAVC S
Memory Stick Micro™ (Mark2) media
(Mark2 only)
microSD memory card
*
1
microSDHC memory card
*
1
*
2
microSDXC memory card
*
1
*
2
*
1
SD Speed Class 4 ( ) or faster, or UHS Speed Class 1 ( ) or faster
*
2
A memory card that fulfills all the following specifications:
4 GB or more of memory
SD Speed Class 10 (
), or UHS Speed Class 1 ( ) or faster
Notes
•Operation with all memory cards is not assured. For details about memory cards
other than cards manufactured by Sony, contact the individual makers.
•Confirm the direction of the memory card. If you forcibly insert the memory card
in the wrong direction, the memory card, memory card slot, or image data may
be damaged.
•Format the memory card with the camera before use.
•Confirm that the connector cover and the battery pack/memory card cover are
securely closed and any foreign matter is not stuck in the cover before use.
Otherwise, it may result in water immersion.
Setting the clock
When the camera is turned on for the first time by pressing the (on/
standby) button, the area/daylight saving time (summer time)/date
and time setting screen is displayed.
Press the UP or DOWN button to select an item, then press the ENTER
button to execute.
Hints
•The date and time/area/daylight saving time (summer time) setting screen is
also displayed after the settings are reset.
•Regions are defined by the time difference between Greenwich Mean Time
(GMT) and the standard time of your home. For details on the time difference,
refer to “The list of time differences for world capitals” in the “Help Guide” (web
manual).
Shooting
Setting the shooting mode
Press the MENU button, then select the shooting mode.
List of modes
Icons Shooting modes
Movie mode
Photo mode
Time-lapse capture mode
Live streaming mode
Loop recording mode
Setting the movie format
Press the MENU button, then select (Shooting Settings) the
movie format (default: ).
Read This First
What is needed to make an appealing
movie with the camera
1 2
Getting Started Shooting
3
5
4
Setting
Creating your movie
Connecting to the
smartphone
You can edit movies by using Sony’s application software.
•Action Cam App (For smartphone/
tablet)
http://www.sony.net/acap/
•Action Cam Movie Creator (For PC)
http://www.sony.net/acmc/
HDR-AS50
4-586-868-11(1)
Digital HD Video Camera Recorder
Startup Guide
This guide describes the necessary preparations to start using the
camera, the basic operations, and so on. For details, refer to the “Help
Guide” (web manual).
http://rd1.sony.net/help/cam/1640/h_zz/
For the detailed information on how to use the camera and software,
visit the following Web site.
http://www.sony.net/actioncam/support/
© 2016 Sony Corporation Printed in China
http://www.sony.net/
Shooting
Press the REC button to start shooting.
To stop shooting, press the REC button again.
* When you press the REC button while the “One touch
recording” setting is “ON,” recording starts with the last
shooting mode set before the camera was turned off.
Note
•During periods of extended shooting, camera temperature may rise to a point
where shooting stops automatically.
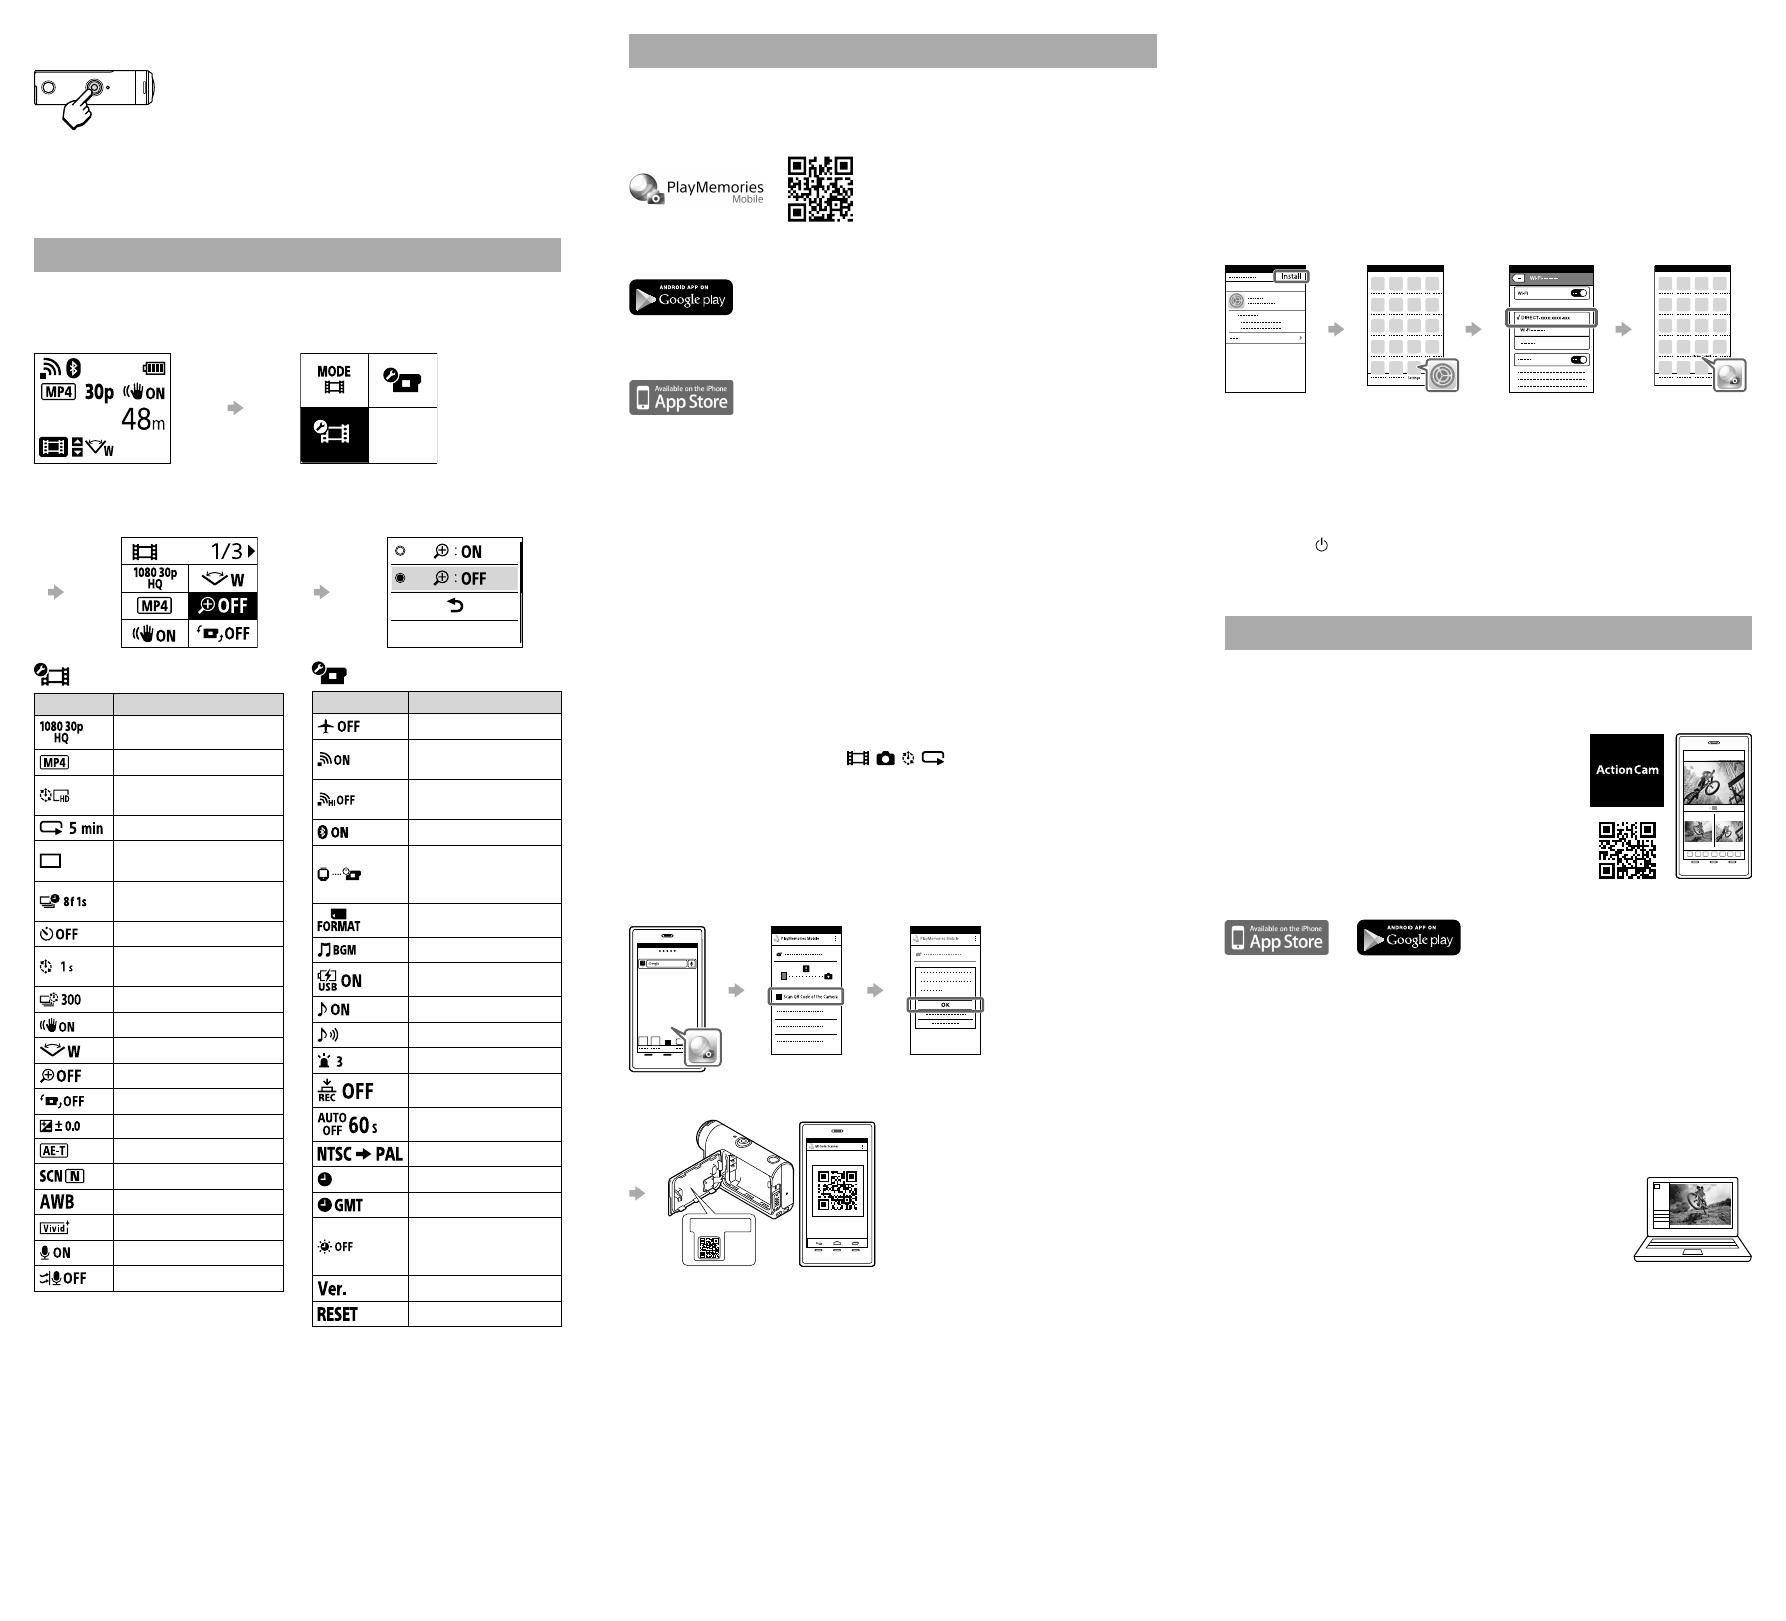
Setting
Press the MENU button, press the UP or DOWN button to select the
item, then press the ENTER button to execute.
Shooting screen MENU screen
MENU
button
Shooting settings
screen
Settings screen
ENTER
button
ENTER
button
Shooting Settings*
1
Icons Setting items
Image quality setting
Movie format
Time-lapse capture
image size
Loop recording time
Still image mode
switching
Still image shooting
interval
Self-timer
Time-lapse shooting
interval
Time-lapse shot number
SteadyShot (Movie)
Angle setting
Zoom setting
Flip
AE shift
Time-lapse AE mode
Scene
White balance
Color mode
Audio recording setting
Wind noise reduction
Camera Settings
Icons Setting items
Airplane mode
Wi-Fi connection
setting
Wi-Fi Hi Power
Setting*
2
Bluetooth setting
Bluetooth remote
controller power
setting
Format
Back ground music*
2
USB power supply
Beep
Beep volume
Lamp setting
One touch recording
Auto power off
Switching NTSC/PAL
Date & time setting
Area setting
Daylight saving time
(summer time)
setting
Version
Resetting the settings
*
1
Which items can be set depends on the shooting mode.
*
2
This setting is only available in some countries and regions.
For details about setting items, refer to “Changing the Settings” in the
“Help Guide” (web manual).
Connecting to the smartphone
Installing PlayMemories Mobile™ on
your smartphone
Android OS
Search for PlayMemories Mobile on Google Play, then install it.
iOS
Search for PlayMemories Mobile on App Store, then install it.
Notes
•Update PlayMemories Mobile to the latest version if you have already installed
it on your smartphone.
•The Wi-Fi function described in this manual is not guaranteed to work with all
smartphones and tablets.
•The operation methods and display screens for the application are subject to
change without notice by future upgrades.
•For more information about PlayMemories Mobile, refer to the following
website.
(http://www.sony.net/pmm/)
•Google play may not be supported depending on country or region. In this case,
search for “PlayMemories Mobile” on the internet then install it.
Using the QR Code to connect to a
smartphone via Wi-Fi
Turn on the camera, and set Wi-Fi to ON on the camera.
Select the shooting mode: , , , .
Start PlayMemories Mobile on the smartphone.
Select [Scan QR Code of the Camera] displayed on the PlayMemories
Mobile screen.
Select [OK] (If a message is displayed, select [OK] again).
Read the QR Code that is printed on the sticker attached to the rear
of the camera’s battery cover.
Android
When [Connect with the camera?] is displayed on the smartphone,
select [OK].
iPhone/iPad
Install a profile (setting information) to your smartphone according
to the on-screen directions.
On the Home screen, select [Settings] [Wi-Fi].
Select the SSID.
Return to the Home screen, then start PlayMemories Mobile.
Recalling your user ID and password without the sticker
If the sticker has peeled off or is unreadable, you can recall your user ID
and password by the following procedure.
Insert a charged battery pack into the camera.
Connect the camera to a computer with the micro USB cable
(supplied).
Press the (on/standby) button to turn the camera on.
Display [Computer] [PMHOME] [INFO] [WIFI_INF.TXT] on
your computer, then confirm your ID and password.
Creating your movie
Editing a movie with the Action Cam
App
The Action Cam App allows you to import
movies to your smartphone to edit them easily.
In addition, you can create time-lapse movies.
For more information about the Action Cam
App, refer to the following website.
http://www.sony.net/acap/
Install the Action Cam App that is compatible
with your smartphone.
Note
•Google play may not be supported depending on country or region.
Editing a movie with Action Cam Movie
Creator
Action Cam Movie Creator allows you to import movies and images to
your computer and to edit the movies.
In addition, you can add effects (such as Multi View, variable speed
playback, and so on) and create time-lapse movies.
For more information about Action Cam Movie
Creator, refer to the following website.
http://www.sony.net/acmc/
  • Page 1 1
  • Page 2 2

Sony HDR-AS50 Quick start guide

Category
Camcorders
Type
Quick start guide
This manual is also suitable for

Sony HDR-AS50: Dive into the action and capture stunning footage with this versatile action camera. Whether you're hitting the slopes, riding the waves, or exploring the great outdoors, the HDR-AS50 is your perfect adventure companion. With its compact and durable design, this camera can withstand even the most extreme conditions. Experience the freedom of hands-free shooting with voice control and easily adjust settings with the intuitive user interface.

Ask a question and I''ll find the answer in the document

Finding information in a document is now easier with AI