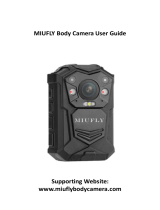
Sony FDR-X1000V User manual

Category
Action sports cameras
Type
User manual

This manual is also suitable for

Digital 4K Video Camera Recorder/Digital HD Video Camera Recorder
FDR-X1000V/HDR-AS200V
How to use
Read This First
Identifying the parts
Identifying the parts [1]
Screen display
Screen display [2]
Getting Started
Checking the bundled items
Checking the bundled items [3]
Inserting the battery pack
Inserting the battery pack [4]
Charging the battery pack
Charging the battery pack [5]
Inserting a memory card
Inserting a memory card [6]
The memory cards that can be used with the camera [7]
Using the Tripod Adaptor
Using the tripod adaptor (HDR-AS200V only) [8]
Using the Waterproof Case
Identifying the parts (Waterproof case) [9]
Using the waterproof case [10]
On waterproof performance of the waterproof case [11]
Notes on use for the waterproof case [12]
Water leakage [13]
Waterproof packing [14]
How to check for water leaks [15]
Maintenance [16]
Using Adhesive Mount
Using the adhesive mount [17]
Shooting
Shooting movies and still images
About the REC HOLD (lock) switch [18]
Shooting movies (Movie mode) [19]
Shooting still images (Photo mode) [20]
Loop recording mode [21]
Interval photo recording mode [22]
Notes on long-time recording [23]
Changing the Settings
List of setting items
List of setting items [24]
How to set the setting items [25]
Shooting settings
Image quality setting [26]
SteadyShot [27]
Flip [28]
Scene [29]
White balance [30]
AE shift [31]
Color mode [32]
Movie format [33]
Audio recording setting [34]
Wind noise reduction [35]
Loop recording time [36]
Still image angle of view [37]
Still image mode switching [38]
Still image shooting interval [39]
Self-timer [40]
Interval photo recording [41]
Camera settings
Wi-Fi connection [42]
GPS log [43]
Airplane mode [44]
Mount [45]
Time Code/User Bit [46]
IR-Remote Control [47]
HDMI settings [48]
USB Power Supply [49]
Auto power off [50]
Beep [51]
Date & time/area setting [52]
Daylight Saving Time (Summer time) setting [53]
Language setting [54]
Switching NTSC/PAL [55]
Version [56]
Format [57]
Resetting the settings [58]
Viewing
Viewing images on a TV
Viewing images on a TV [59]
Deleting images
Delete [60]
Create your movie
Highlight Movie Maker
Creating the highlight movie [61]
Importing the BGM [62]
Mount [63]
Stream real-time movie to a movie streaming site
Live Streaming with your camera (Real time movie streaming)
Live Streaming [64]
Preparing for Live Streaming [65]
Performing Live Streaming [66]
Restrictions [67]
Using the camera connected to other devices via Wi-Fi
Connecting to your smartphone
Preparation for connecting to your smartphone [68]
Sample smartphone screen display [69]
Using One-touch Functions to Connect to an NFC-enabled Android Smartphone [70]
Connecting to a smartphone without using NFC [71]
Connecting to the Live-View Remote
Connecting a single camera to Live-View Remote (Single connection) [72]
Connecting multiple cameras to Live-View Remote (Multi connection) [73]
Connecting to Handycam
Connecting a single camera to Handycam (Single connection) [74]
Connecting multiple cameras to Handycam (Multi connection) [75]
Editing images imported to your computer
Using the Action Cam Movie Creator
Useful functions of Action Cam Movie Creator [76]
Installing Action Cam Movie Creator on your computer [77]
Others
Recordable time
Estimated duration of recording and playback for supplied battery pack [78]
Estimated recording time of movies [79]
Estimated number of recordable still images [80]
Battery pack
On charging the battery pack [81]
Effective use of the battery pack [82]
About the remaining battery charge [83]
How to store the battery pack [84]
On battery pack life [85]
Using the camera abroad
On TV color systems [86]
Countries and regions where you can view images when [V.SYS] is set to [NTSC] [87]
Countries and regions where you can view images when [V.SYS] is set to [PAL] [88]
The list of time differences for world capitals [89]
Precautions
Do not use/store the camera in the following places [90]
On carrying [91]
Care and storage of the lens [92]
On cleaning [93]
On operating temperatures [94]
On moisture condensation [95]
Notes on optional accessories [96]
Note on disposal/transfer of the memory card [97]
On GPS [98]
On GPS errors [99]
On GPS use restriction [100]
Specifications
Specifications [101]
Trademarks
Trademarks [102]
Notes on License
On GNU GPL/LGPL applied software [103]
Troubleshooting
List of Default Setting
List of Default Setting [104]
Troubleshooting
Troubleshooting
Troubleshooting [105]
Battery pack and power
Cannot turn on the camera. [106]
The power turns off suddenly. [107]
Battery life is short. [108]
Cannot charge the camera. [109]
The remaining charge indicator is incorrect. [110]
Memory card
Operations using the memory card cannot be performed. [111]
Shooting images
Cannot record images. [112]
Cannot insert dates on images. [113]
Viewing images
Cannot playback images. [114]
The image does not appear on the TV. [115]
GPS
The camera is not receiving a GPS signal. [116]
Excessive error in location information. [117]
It takes time to triangulate although the GPS assist data is taken in. [118]
The location information has not been recorded. [119]
Computers
Your computer does not recognize the camera. [120]
Cannot import images. [121]
Action Cam Movie Creator cannot be installed. [122]
Action Cam Movie Creator does not work correctly. [123]
Cannot play back images on your computer. [124]
Wi-Fi
It takes too much time to transfer an image. [125]
Others
The lens gets fogged. [126]
The camera becomes warm when you use it for a long time. [127]
The date or time is incorrect. [128]
Warning indicators and messages
Warning indicators and error messages
Warning indicators and error messages [129]
[1] How to use Read This First Identifying the parts
Identifying the parts
FDR-X1000V
HDR-AS200V
1. REC HOLD switch
2. REC (Movie/Photo) button/ENTER (Menu execute) button
3. (N Mark)
4. PREV (previous menu) button
5. NEXT (next menu) button
6. Display panel
7. Speaker
8. GPS sensor
9. REC/LIVE lamp
10. IR remote receiver
11. Lens
12. Microphones
13. Connector cover (HDMI OUT jack, Multi/Micro USB Terminal) (FDR-X1000V only)
14. REC/access/CHG (Charge) lamp
15. Lock lever
16. Battery pack/memory card cover
17. Connector cover (Mic jack) (FDR-X1000V only)
18. Attachment screw hole for the accessory (FDR-X1000V only)
Tripod adaptor attachment hole (HDR-AS200V only)
19. Mic jack
*
20. Screw of the Tripod Adaptor (FDR-X1000V only)
21. Battery ejection lever
22. Battery insertion slot
23. Multi/Micro USB Terminal
*
24. Memory card insertion slot
25. HDMI OUT jack
26. Connector cover (HDMI OUT jack, Expansion connector, Mic jack) (HDR-AS200V only)
27. Expansion connector (HDR-AS200V only)
28. Connector cover (Multi/Micro USB Terminal) (HDR-AS200V only)
*
When an external microphone (sold separately) is connected, audio cannot be recorded through
the built-in microphone.
[2] How to use Read This First Screen display
Screen display
The indicators described below are displayed on this camera.
Display icon at 1
: Wi-Fi function enabled
: Location information cannot be received because the camera is searching for GPS
satellites to receive GPS signals.
: Recording location information available while triangulating
: Airplane mode enabled
: SteadyShot enabled
: Memory card is not inserted or cannot record to memory card.
: Battery level indicator of this unit
: Movie setting with XAVC S
(FDR-X1000V only): Movie setting with 4K
: Movie setting in the loop recording mode
: Audio recording OFF
Display value at 2
Resolution and frame rate during movie recording
Display items at 3
Selected setting items or setting value
Display icons at 4
: Movie mode
: Photo mode
: Interval photo recording mode
: Live streaming mode
Hint
The mode icon of the setting target will blink, when changing the settings.
[3] How to use
Getting Started Checking the bundled items
Checking the bundled items
Make sure that you have following bundled items.
The number in parentheses indicates the quantity of that item bundled.
Camera (1)
Camera is set in the Waterproof Case. Open the cover of the case as illustrated below.
FDR-X1000V
HDR-AS200V
Micro USB cable (1)
Rechargeable battery pack (NP-BX1) (1)
Waterproof Case (1)
FDR-X1000V
HDR-AS200V
Attachment Buckle (1)
Flat Adhesive Mount (1)
Curved Adhesive Mount (1)
Tripod adaptor (1) (HDR-AS200V only)
Startup Guide (1)
Reference Guide (1)
[4] How to use Getting Started Inserting the battery pack
Inserting the battery pack
1. Slide the lock lever to open the battery pack cover.
FDR-X1000V
HDR-AS200V
2. Insert the battery pack.
FDR-X1000V
HDR-AS200V
Align the mark as illustrated.
3. Close the cover.
Confirm that the yellow mark on the lock lever is not visible.
To remove the battery pack
Open the cover and slide the battery ejection lever, then remove the battery pack.
To set auto power off function
Select [A.OFF] from the [SETUP] - [CONFG] screen, then set the auto power off function.
The default setting is [60sec]. Change the setting as necessary. For details, see “Auto power
off”.
[5] How to use Getting Started Charging the battery pack
Charging the battery pack
1. Turn off the power of the camera.
Charging is not possible when the camera is turned on.
2. Open the connector cover, connect the camera to an activated computer with the micro
USB cable (supplied).
The REC/access/CHG (Charge) lamp lights in amber.
FDR-X1000V
HDR-AS200V
: Connector cover
: Micro USB cable
: REC/access/CHG (Charge) lamp
3. When charging is finished, delete the USB connection between the camera and the
computer.
Charging is complete when the REC/access/CHG (Charge) lamp turns off (full
charge).
The charging time
*1
of the battery pack NP-BX1 (supplied) is as follows
Via a computer: Approx. 245 minutes
Via AC-UD10
*2
(sold separately): Approx. 175 minutes
*1
Time required to charge a fully depleted battery pack at a temperature of 25°C (77°F). Charging may
take longer under certain circumstances or conditions.
*2
Rapid charging is possible by using the USB charger AC-UD10 (sold separately). To connect to the
charger, use the micro USB cable (supplied).
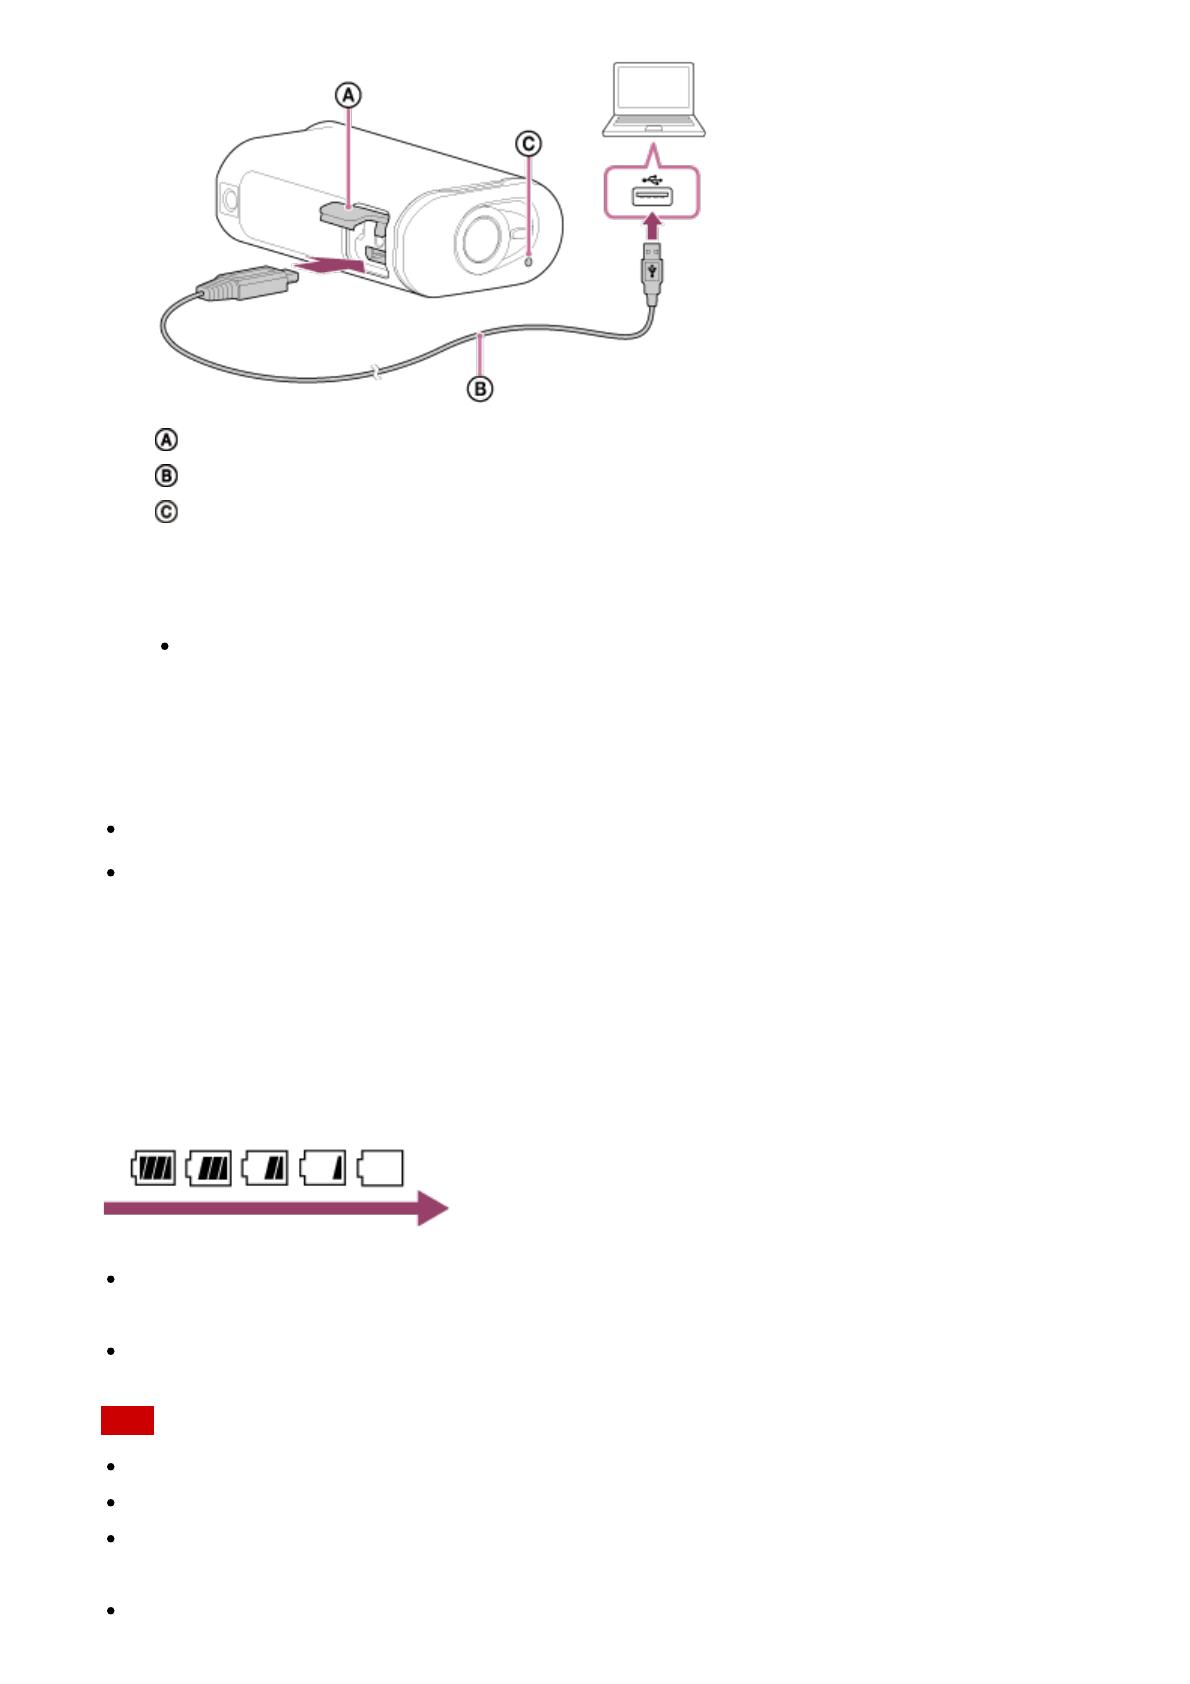
Checking the remaining battery charge
A remaining charge indicator appears on the upper right of the display panel.
The displayed remaining charge indicator may not be correct under certain
circumstances.
It takes about one minute until the correct remaining charge indicator appears.
Note
You can use only type X battery with this camera.
Turn off the camera while charging the battery.
Do not apply force to the camera, when you connect the camera to a computer. This may
cause damage to the camera or the computer.
When you connect the camera to a notebook computer that is not connected to an AC
power source, the battery of the notebook computer may be depleted rapidly. Do not
leave the camera connected to the computer for a long time.
Charging the battery pack or the connection with customized or hand-built computers is
not guaranteed. Depending on the type of USB device used, charging may not function
properly.
Operation with all computers is not assured.
If you do not intend to use the camera for an extended period, charge the camera once
every 6 to 12 months to maintain battery performance.
[6] How to use
Getting Started Inserting a memory card
Inserting a memory card
1. Open the cover.
2. Insert the memory card until it clicks.
microSD card: Insert in the direction of .
Memory Stick Micro™ (M2) media: Insert in the direction of .
FDR-X1000V
HDR-AS200V
1: microSD card
2: Memory Stick Micro (Mark2) media
: Terminal side
: Printed side
3. Close the cover.
To eject the memory card
Open the cover, then lightly push the memory card once.
Note
Insert the memory card properly, confirming each side is facing the correct direction.
Confirm the direction of the memory card. If you forcibly insert the memory card in the
wrong direction, the memory card, memory card slot, or image data may be damaged.
Format the memory card before use.
Save important data on the memory card on other media such as a computer, before
formatting the memory card.
Do not insert anything other than the compliant size of memory card into the memory card
slot. Otherwise, a malfunction may result.
When inserting or ejecting the memory card, be careful to prevent the memory card from
popping out and dropping.
[7] How to use
Getting Started Inserting a memory card
The memory cards that can be used with the camera
The memory cards that can be used with the camera are listed below.
SD card
In this guide, microSD memory cards are referred to as microSD card. The microSD memory
card that can be used with the camera are as follows.
microSD memory card
microSDHC memory card
microSDXC memory card
Memory Stick media
In this guide, Memory Stick media is referred to as Memory Stick Micro (Mark2) media card.
The Memory Stick Micro (Mark2) media that can be used with the camera is as follows.
Memory Stick Micro (Mark2) media
Note
Operation with all memory cards is not assured.
Use an SDXC card faster than Class10 when recording movies in XAVC S.
Use an SDXC UHS-I memory card (U3) when recording movies with 100 Mbps (FDR-
X1000V only).
The capacity of the memory card is up to 64GB.
[8] How to use
Getting Started Using the Tripod Adaptor
Using the tripod adaptor (HDR-AS200V only)
By attaching the tripod adaptor to the camera, you can attach accessories to the camera
without using the waterproof case.
1. Fix the screw of the tripod adaptor in the tripod adaptor attachment hole of the camera.
2. Match the bottom of the camera and fix firmly with the tripod screw in the direction of
the arrow.
To remove the tripod adaptor
Loosen the screw of the tripod adaptor in the direction of the arrow and remove the tripod
adaptor from the camera.
Note
Attach the waterproof case to the camera when using in water.
[9] How to use
Getting Started Using the Waterproof Case
Identifying the parts (Waterproof case)
SPK-X1 (supplied with FDR-X1000V)
  • Page 1 1
  • Page 2 2
  • Page 3 3
  • Page 4 4
  • Page 5 5
  • Page 6 6
  • Page 7 7
  • Page 8 8
  • Page 9 9
  • Page 10 10
  • Page 11 11
  • Page 12 12
  • Page 13 13
  • Page 14 14
  • Page 15 15
  • Page 16 16
  • Page 17 17
  • Page 18 18
  • Page 19 19
  • Page 20 20
  • Page 21 21
  • Page 22 22
  • Page 23 23
  • Page 24 24
  • Page 25 25
  • Page 26 26
  • Page 27 27
  • Page 28 28
  • Page 29 29
  • Page 30 30
  • Page 31 31
  • Page 32 32
  • Page 33 33
  • Page 34 34
  • Page 35 35
  • Page 36 36
  • Page 37 37
  • Page 38 38
  • Page 39 39
  • Page 40 40
  • Page 41 41
  • Page 42 42
  • Page 43 43
  • Page 44 44
  • Page 45 45
  • Page 46 46
  • Page 47 47
  • Page 48 48
  • Page 49 49
  • Page 50 50
  • Page 51 51
  • Page 52 52
  • Page 53 53
  • Page 54 54
  • Page 55 55
  • Page 56 56
  • Page 57 57
  • Page 58 58
  • Page 59 59
  • Page 60 60
  • Page 61 61
  • Page 62 62
  • Page 63 63
  • Page 64 64
  • Page 65 65
  • Page 66 66
  • Page 67 67
  • Page 68 68
  • Page 69 69
  • Page 70 70
  • Page 71 71
  • Page 72 72
  • Page 73 73
  • Page 74 74
  • Page 75 75
  • Page 76 76
  • Page 77 77
  • Page 78 78
  • Page 79 79
  • Page 80 80
  • Page 81 81
  • Page 82 82
  • Page 83 83
  • Page 84 84
  • Page 85 85
  • Page 86 86
  • Page 87 87
  • Page 88 88
  • Page 89 89
  • Page 90 90
  • Page 91 91
  • Page 92 92
  • Page 93 93
  • Page 94 94
  • Page 95 95
  • Page 96 96
  • Page 97 97
  • Page 98 98
  • Page 99 99
  • Page 100 100
  • Page 101 101
  • Page 102 102
  • Page 103 103
  • Page 104 104
  • Page 105 105
  • Page 106 106
  • Page 107 107
  • Page 108 108
  • Page 109 109
  • Page 110 110
  • Page 111 111
  • Page 112 112
  • Page 113 113
  • Page 114 114
  • Page 115 115
  • Page 116 116
  • Page 117 117
  • Page 118 118
  • Page 119 119
  • Page 120 120
  • Page 121 121
  • Page 122 122
  • Page 123 123
  • Page 124 124

Sony FDR-X1000V User manual

Category
Action sports cameras
Type
User manual
This manual is also suitable for

Ask a question and I''ll find the answer in the document

Finding information in a document is now easier with AI