FormNo.3435-406RevB
BlowerandDriveKit
48in,52in,60in,or72inE-ZVac
forZMaster
®
Mower
ModelNo.78551—SerialNo.402500000andUp
ModelNo.78552—SerialNo.404691666andUp
ModelNo.78553—SerialNo.402784468andUp
ModelNo.78554—SerialNo.402433838andUp
InstallationInstructions
Note:Determinetheleftandrightsidesofthemachinefromthenormaloperatingposition.
LooseParts
Usethechartbelowtoverifythatallpartshavebeenshipped.
ProcedureDescription
Qty.
Use
1
Nopartsrequired
Preparethemachine.
2
Nopartsrequired
Removetheexistingbeltcover,belt,
andbracket.
Pulleyassembly1
Pulley-platemount—formachineswith
analuminumspindleonly
1
3
Flangenut(3/8inch)—formachines
withanaluminumspindleonly
3
Installthepulleyassemblyandbelt.
Beltcoverbracket1
Carriagebolt(1/4x3/4inches)
2
4
Locknut(1/4inch)
2
Installthenewbeltcoverbracketfor
48-inchand52-inchmowers.
Beltcoverbracket1
Carriagebolt(1/4x3/4inches)
2
5
Locknut(1/4inch)
2
Installthenewbeltcoverbracketfor
60-inchand72-inchmowers.
Blowerassembly1
Baggerbelt1
Blowerbeltcover1
6
Spring
1
Installtheblower,baggerbelt,spring,
andbeltcover.
©2020—TheToro®Company
8111LyndaleAvenueSouth
Bloomington,MN55420
Registeratwww.Toro.com.
OriginalInstructions(EN)
PrintedintheUSA
AllRightsReserved
*3435-406*B
1
PreparingtheMachine
NoPartsRequired
Procedure
1.Parkthemachineonalevelsurface.
2.Movethemotion-controlleverstotheNEUTRAL-LOCKposition.
3.Engagetheparkingbrake.
4.Shutofftheengineandremovethekey.
g037289
Figure1
2
2
RemovingtheExistingBelt
Cover,Belt,andBracket
NoPartsRequired
Procedure
Note:Cleantheareaaroundthebeltcoverbefore
removing.
1.Lowerthemowerdecktothelowestheight-of-cut
position.
2.Removetherightbeltcover(Figure2).
g009036
Figure2
1.Pushtabdown.2.Removebeltcover.
3.For48-inchand52-inchmowersonly:Loosen
theboltsholdingtherightspindletothemower
deck(Figure3).
Note:Thiswillallowaccesstothenutsholding
therightbeltcoverbrackettothemowerdeck.
g010497
Figure3
48-inchand52-inchmowerdeckshown
1.Rightbeltcoverbracket3.Flangenut
2.Washer4.Loosenthesebolts.
4.Removetheexistingrightbeltcoverbracket
(Figure3andFigure4).
g009295
Figure4
60-inchand72-inchmowerdeckshown
1.Rightbeltcoverbracket3.Flangenut
2.Washer
5.Storetherightbeltcover,bracket,andhardware
forlateruseifyouremovethebaggerblower
andpulley.
6.Removeandretainthedeckbelt.
3
3
InstallingthePulley
AssemblyandBelt
Partsneededforthisprocedure:
1Pulleyassembly
1
Pulley-platemount—formachineswithanaluminum
spindleonly
3
Flangenut(3/8inch)—formachineswithanaluminum
spindleonly
ForMachineswithanAluminum
Spindle
1.Removethetopnut,washer,andsheavefrom
thespindle(Figure5).
Note:Notetheorientationofthesheavewhen
youremoveitfromthespindletoensurethat
youinstallitproperlylaterintheprocess.
g302393
Figure5
1.Topnut
3.Sheave
2.Washer
4.Spindle
2.Insertthepulley-platemountstudsintotheholes
inthesheave(Figure6).
g302390
Figure6
1.Sheave
2.Pulley-platemountstuds
4
3.Installthesheaveassemblytothespindleusing
thewasherandtopnut(Figure7).
g313933
Figure7
1.Topnut
3.Sheaveassembly
2.Washer
4.Spindle
4.Torquethetopnutto176to217N∙m(130to
160ft-lb).
Note:Ensurethatthesheavespinsfreely.
5.Alignthenewpulleyassemblysothatthe
openingstoverthestuds(Figure8).
6.Turnthepulleytolockitintoposition(Figure8).
7.Afterthenewpulleyassemblyisinposition,
installthenutstosecurethenewpulley
assembly(Figure8).
Torquethe3nutsto28to34N∙m(21to25ft-lb).
g313932
Figure8
1.Pulleyassembly
3.Stud
2.Nut
8.Installthedeckbelt.
5
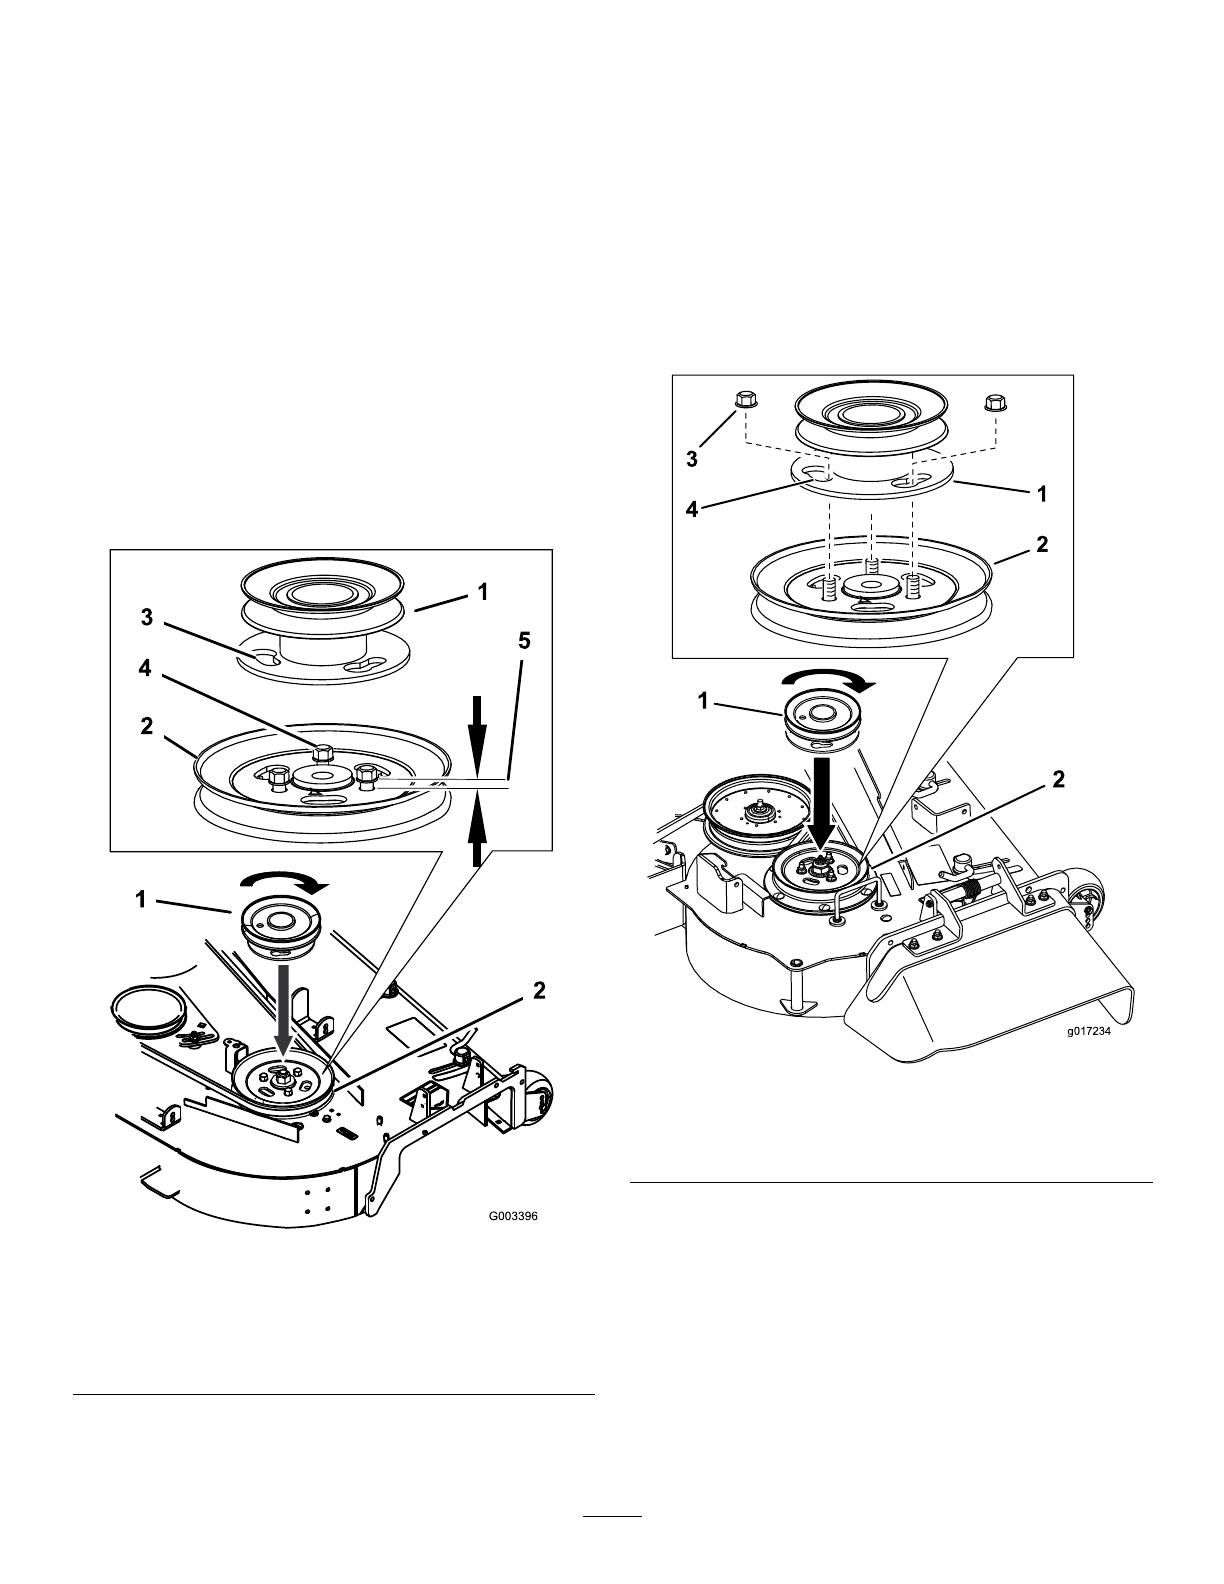
ForMachineswithBolts
1.Loosen,butdonotremove,thetappingboltson
theexistingmower-deckpulley(Figure9).
Note:Thereshouldbea5mm(3/16inch)
clearancebetweentheboltheadandpulley.
2.Alignthenewpulleyassemblysothatthe
openingstoverthepulleyboltheads(Figure9).
3.Turnthepulleytolockitintoposition(Figure9).
Note:Ifthepulleydoesnotturn,loosenthe
boltsmoretoraisetheboltheadsandallowthe
pulleytolockintoposition.
4.Afterthenewpulleyassemblyisinposition,
tightentheexistingboltstosecurenewpulley
assembly.
Note:Torquetheboltsto28to34N∙m(21to
25ft-lb).
g003396
Figure9
1.Pulley
assembly
3.Lockingslots
5.Clearance—5
mm(3/16inch)
2.Mower-deck
pulley
4.Boltheads
5.Installthedeckbelt.
ForMachineswithoutBolts
1.Removethenutsontheexistingmower-deck
pulley(Figure10).
2.Installthenewpulleyassemblyontothe
mower-deckpulleybolts(Figure10).
3.Turnthepulleytolockitintoposition(Figure10).
4.Afterthenewpulleyassemblyisinposition,
installthenutstosecurenewpulleyassembly.
Note:T orquethenutsto28to34N∙m(21to
25ft-lb).
g017234
Figure10
1.Pulley
assembly
2.Mower-deck
pulley
3.Locking
slots
4.Nuts
5.Installthedeckbelt.
6
4
InstallingtheNewBelt
CoverBracket
48-inchand52-inchMowers
Partsneededforthisprocedure:
1Beltcoverbracket
2
Carriagebolt(1/4x3/4inches)
2
Locknut(1/4inch)
Procedure
Installthebeltcoverbracketwith2carriagebolts(1/4
x3/4inches)and2locknuts(1/4inch)asshownin
Figure11.
g009300
Figure11
1.Locknut(1/4inch)3.Carriagebolt(1/4x3/4
inches)
2.Bracketfor48-inchand
52-inchmowerdecks
5
InstallingtheNewBelt
CoverBracket
60-inchand72-inchMowers
Partsneededforthisprocedure:
1Beltcoverbracket
2
Carriagebolt(1/4x3/4inches)
2
Locknut(1/4inch)
Procedure
Installthebeltcoverbracketwith2carriagebolts(1/4
x3/4inches)and2locknuts(1/4inch)asshownin
Figure12.
g009296
Figure12
1.Locknut(1/4inch)3.Carriagebolt(1/4x3/4
inches)
2.Bracketfor60-inchand
72-inchmowerdecks
7
6
InstallingtheBlower
Assembly,BaggerBelt,
SpringandBlower-Belt
Cover
Partsneededforthisprocedure:
1Blowerassembly
1Baggerbelt
1Blowerbeltcover
1
Spring
Procedure
RefertothebaggerOperator'sManualforthecorrect
proceduretoinstalltheblower,baggerbelt,spring,
andblower-beltcover.
8
  • Page 1 1
  • Page 2 2
  • Page 3 3
  • Page 4 4
  • Page 5 5
  • Page 6 6
  • Page 7 7
  • Page 8 8

Ask a question and I''ll find the answer in the document

Finding information in a document is now easier with AI