Page is loading ...

THANK YOU
We appreciate the trust and condence you have placed in Everbilt through the purchase of this sump system. We strive to continually create
quality products designed to enhance your home. Visit us online to see our full line of products available for your home improvement needs.
Thank you for choosing Everbilt!
USE AND CARE GUIDE
PRE-PLUMBED SUMP BASIN SYSTEM
WITH 3/10 HP SUMP PUMP
Questions, problems, missing parts? Before returning to the store,
call Everbilt Customer Service
8 a.m. - 7 p.m., EST, Monday - Friday, 9 a.m. - 6 p.m., EST, Saturday
1-877-297-6069
HOMEDEPOT.COM
Item # 1002 711 122
Model # THD1095

2
Table of Contents
Safety Information ..................................2
Warranty ..........................................3
Pre-Installation .....................................4
Application .......................................4
Typical Installation .................................4
Tools Required ....................................4
Materials Required (not included) .....................4
Product Description ................................5
Installation ........................................6
Safety Information
PRECAUTIONS
1. This document serves only as an installation guide. Refer to
your state and/or local plumbing or onsite wastewater treatment
and disposal regulations for details pertaining to your systems
design, installation and maintenance requirements.
2. Keep this instruction manual in a safe place for future reference.
3. The motor of this pump has a thermal protector that will trip if
the motor becomes too hot. The protector will reset itself once
the motor cools down and an acceptable temperature has been
reached. The pump may start unexpectedly if it is plugged in.
4. Ensure the electrical power source is adequate for the
requirements of the pump.
5. This pump is made of high-strength, corrosion-resistant
materials. It will provide trouble-free service for a long time
when properly installed, maintained, and used. However,
inadequate electrical power to the pump, dirt, or debris may
cause the pump to fail. Please carefully read the manual and
follow the instructions regarding common pump problems and
remedies.
DANGER: Do not pump ammable or explosive liquids
such as oil, gasoline, kerosene, ethanol, etc. Do not use
in the presence of ammable or explosive vapors. Using
this pump with or near ammable liquids can cause an
explosion or re, resulting in property damage, serious
personal injury, and/or death.
DANGER: ALWAYS disconnect the power to the pump
before servicing.
DANGER: Do not touch the motor housing during
operation. The motor is designed to operate at high
temperatures. Do not disassemble the motor housing.
DANGER: Do not handle the pump or pump motor with
wet hands or when standing on a wet or damp surface, or in
water. lf the basement oor is wet, do not walk on the wet
area until all power is turned off. If the shut-off box is in the
basement, call the electric company to shut off service to
the house, or call your local re department for instructions.
Remove the pump and repair or replace. Failure to follow
this warning can result in fatal electrical shock
WARNING: Extension cords may not deliver sufcient
voltage to the pump motor. Extension cords present a
life threatening safety hazard if the insulation becomes
damaged or the connection ends fall into water. The use of
an extension cord to power this pump is not permitted.
WARNING: Secure the discharge line before starting
the pump. An unsecured discharge line will whip, possibly
causing personal injury, and/or property damage.
WARNING: Release all pressure and drain all water from
the system before servicing any component.
WARNING: Wear safety goggles at all times when
working with pumps.
WARNING: This unit is designed only for use on 115
volts (single phase), 60 Hz, and is equipped with an
approved 3-conductor cord and 3-prong grounded plug.
Do not remove the ground pin under any circumstances.
The 3-prong plug must be directly inserted into a properly
installed and grounded 3-prong, grounding-type receptacle.
Do not use this pump with a 2-prong wall outlet. Replace
the 2-prong outlet with a properly grounded 3-prong
receptacle (a GFCI outlet) installed in accordance with the
National Electrical Code and local codes and ordinances. All
wiring should be performed by a qualied electrician.
WARNING: Protect the electrical cord from sharp objects,
hot surfaces, oil, and chemicals. Avoid kinking the cord. Do
not use damaged or worn cords.
WARNING: Failure to comply with the instruction and
designed operation of this unit may void the warranty.
ATTEMPTING TO USE A DAMAGED PUMP can result in
property damage, serious personal injury, and/or death.
WARNING: Ensure that the electrical circuit to the pump
is protected by a 15 Amp fuse or circuit breaker.

3 HOMEDEPOT.COM
Please contact 1-877-297-6069 for further assistance.
Safety Information (continued)
CAUTION: Do not lift the pump by the power cord,
CAUTION: Know the pump and its applications,
limitations, and potential hazards.
CAUTION: Periodically inspect the pump and system
components to ensure the pump intake is free of mud, sand,
and debris. Disconnect the pump from the power supply
before inspecting,
CAUTION: Follow all safety standards and all local
electrical codes.
ELECTRICAL SAFETY
WARNING: Do not splice the electrical power cord.
WARNING: Do not allow the electrical cord plug to be
submerged.
WARNING: Do not use extension cords. They are a re
hazard and can reduce voltage sufciently to prevent
pumping and/or damage the motor.
WARNING: Do not handle or service the pump while it is
connected to a power supply.
WARNING: DO NOT remove the grounding prong from the
plug or modify the plug. To protect against electrical shock,
the power cord is a three-wire conductor and includes
a 3-prong grounded plug. Plug the pump into a 3-wire,
grounded, grounding type receptacle. Connect the pump
according to electrical codes that apply.
Warranty
The manufacturer warrants to the original consumer purchaser of the pre-plumbed sump system that it will be free from defects in material
and workmanship for the Warranty Period of 12 months from date of purchase. The date of purchase shall be determined by the original
dated sales receipt noting the model number of the system. The original sales receipt must accompany the returned system. If the system
fails during the warranty period, disconnect the power, disconnect all plumbing and piping, empty any water from the pump and return the
pump to The Home Depot along with the receipt.
The manufacturer shall not be liable under this Warranty for any product that, in our sole judgment, has been subject to negligence,
misapplication, improper installation, or improper maintenance. Also, the manufacturer shall not be liable under this Warranty if the product
has been disassembled, modied, abused, or tampered with; if the electrical cord has been cut, damaged or spliced; if the pump discharge
has been reduced in size; if the pump has been used in water temperatures above the advertised rating, or water containing sand, lime,
cement, gravel or other abrasives; if the product has been used to pump chemicals or hydrocarbons; or if the label bearing the system
model has been removed.
Your sole remedy, and the manufacturer’s only duty, is that the manufacturer repair or replace defective systems (at the manufacturer’s
choice). You must pay all labor and shipping charges associated with this warranty. No request for service will be accepted if received after
the Warranty Period has expired. This warranty is non-transferable.
The manufacturer shall not be liable for any consequential, incidental, or contingent damages whatsoever. The manufacturer recommends
using a professional plumber for all installation and repair, and periodic inspection of the manufacturer’s pumps, plumbing connections, and
electrical cord. The manufacturer makes no warranty regarding the suitability of a product for a particular installation.
This warranty excludes all industrial, agricultural, commercial, and business usage of this system.
The foregoing warranties are exclusive and in lieu of all other express and implied warranties, including but not limited to the implied
warranties of merchantability and tness for a particular purpose. The forgoing warranties shall not extend beyond the duration expressly
provided herein.
Some states do not allow the exclusion or limitation of incidental or consequential damages or limitations on the duration of the implied
warranty, so the above limitations or exclusions may not apply to you. This warranty gives you specic legal rights and you may also have
other rights which may vary from state to state. This warranty applies to only pumps installed in the United States of America and Canada.
This warranty supersedes and replaces all previous warranty publications.
Contact the Customer Service Team at 1-877-297-6069 or visit www.HomeDepot.com.

4
Pre-Installation
APPLICATION
This submersible sump pump is designed for pumping water with up to 3/8 in. diameter solids. The pump is built with overload thermal
protections and auto reset. The pump is equipped with a 10 ft. 3-prong grounding-type power cord and tethered oat switch. This pump
operates automatically. Ball bearings on motor shafts never need lubrication.
TYPICAL INSTALLATION
Discharge pipe
Discharge ange
Basin
Basin stacking rib
Inlet pipe
Finished oor
Vent ange
Vent pipe
Electric cord grommet Pump power cord
Hub
Backll
Compacted sub-base
or concrete pad
TOOLS REQUIRED
Flathead
screwdriver
Phillips
screwdriver
Hand
hacksaw or
PVC cutter
Wrench
Thread
tape
Tape
measure
PVC
Primer
PVC primer
PVC
Cement
PVC cement
Safety
goggles
MATERIALS REQUIRED (NOT INCLUDED)
1-1/2 in. PVC
Schedule 40
Pipe
(1) 1-1/2 in. PVC
Schedule 40
Threaded Male
Adaptor
2 or 3 in. PVC
Schedule 40
Pipe
(1) 2 or 3 in. PVC
Schedule 40
Threaded Male
Adaptor

5 HOMEDEPOT.COM
Please contact 1-877-297-6069 for further assistance.
Pre-Installation (continued)
PRODUCT DESCRIPTION
A
B
C
D
Part Description
A Basin (with pump and discharge connection inside)
B Cord grommet (inside Basin (A))
C 1.25 in. and 1.5 in. ABS In-Line Sump Pump Check Valve
D 4 in. Snap-In inlet hub (inside Basin (A))

6
Installation
1
Preparing the basin for installation
□ Reach your hand inside the inlet hole (1) through the basin
(A) and remove the package that contains the inlet hub (D),
check valve (C), and cord grommet (B).
□ Reach your hand a second time inside the inlet hole (1)
through the basin (A) and grab power cord (2). Thread the
cords through the 2 in. hole (3) on top of the basin (A),
removing all slack. Ensure the cord is not tangled around
the pump or oat switch. Verify that the oat switch (4) can
move freely.
□ Press the cord through the slit and into a hole in the cord
grommet (B) and press the grommet (B) into the 2 in. hole
(3) in the cover to provide a tight seal.
2
3
B
4
A
1
2
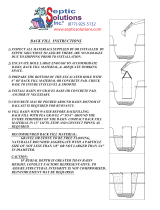
Preparing the installation location
□ Excavate a hole large enough to accommodate the basin
(A), backll material (1) and inlet piping (2).
□ Add 4 – 6 in. of clean sub-base material or concrete (3) to
the bottom of the hole.
□ Assure that it is level, compacted, and smooth.
□ Place the basin (A) in the hole and ensure that it is level.
A
1
2
3

7 HOMEDEPOT.COM
Please contact 1-877-297-6069 for further assistance.
Installation (continued)
3
Connecting the inlet piping
□ Connect the inlet piping (1) as required by code using the 4
in. snap-in inlet hub (D). Hand-tighten the hose clamp.
□ Carefully backll with naturally rounded gravel or stone,
larger than 3/8 in. and smaller than 3/4 in. diameter,
around the periphery of the basin (A).
A
1
D
4
Connecting the discharge piping
□ Install a 1-1/2 in. PVC Schedule 40 threaded male adapter
(1) (not included) into the discharge ange (2) as shown.
Use Teon tape, silicon sealant, or plumber’s pipe dope
to seal the threads. Ensure that you are connecting to the
sump pump discharge and not the vent port.
□ Connect discharge pipe (3) (not included) to the 1-1/2 in.
PVC Schedule 40 threaded male adapter (1) (not included)
using PVC primer and solvent cement to properly seal the
connection.
□ Install the 1-1/2 in. check valve (C) to the discharge line
at the appropriate location. Ensure the ow arrow on the
check valve (C) is pointed in the right direction. Tighten
ttings to ensure a watertight seal.
□ Install 1-1/2 in. PVC Schedule 40 pipe (4) (not included)
into the 1-1/2 in. check valve (C) and connect this pipe
to the appropriate sewer main pipe for discharge. Hand
tighten the ttings to ensure a watertight seal.
4
C
3
1
2

8
Installation (continued)
5
Attaching the vent connection
□ Install a 2 or 3 in. PVC Schedule 40 threaded male adaptor
(1) (not included) into the vent hole (2) as shown. Use
Teon tape, silicon sealant, or plumber’s pipe dope to seal
the threads.
□ Connect a vent pipe (3) (not included) to the 2 or 3 in.
PVC Schedule 40 threaded male adaptor (1) using PVC
primer and solvent cement to properly seal the connection.
Connect the vent pipe to the sewer’s vent system. We
suggest that a union be installed on this line to allow for
easy pump service or removal.
3
1
2
6
Connecting the power and verifying
proper operation
□ Make sure that the cord grommet is properly inserted into
the lid. This assures a water and gas tight seal.
□ Check the pump by lling the basin with water and observe
the pump’s operation through one complete cycle.
NOTE: The discharge pipe comes with a factory
installed weep hole located above the threaded adapter.
This weep hole is required to prevent air-lock and for
proper operation of the system.

Questions, problems, missing parts? Before returning to the store,
call Everbilt Customer Service
8 a.m. - 7 p.m., EST, Monday-Friday, 9 a.m. - 6 p.m., EST, Saturday
1-877-297-6069
HOMEDEPOT.COM
Retain this manual for future use.
/