Page is loading ...

Copyright(C)Sherpa4x4|www.sherpa4x4.com.au|info@sherpa4x4.com.au 1
www.sherpa4x4.com.au | [email protected]
SHERPA 4x4 WINCH OWNER'S MANUAL

Copyright(C)Sherpa4x4|www.sherpa4x4.com.au|info@sherpa4x4.com.au 2
PLEASE READ
WARNING!
Your winch has a duty cycle and cannot be run continuously without
allowing time to cool down. The higher the load, the higher the current
and heat produced. Remember to monitor the temperature of the winch
motors and cabling. As a rule of thumb, when winching at high loads, do
not winch for longer than 30 seconds, then follow by a 10 minute cool
down period. This will also allow your battery to rest. Overheating your
winch motor will reduce its pulling power and may lead to premature
failure.

Copyright(C)Sherpa4x4|www.sherpa4x4.com.au|info@sherpa4x4.com.au 3
NOTE – Your winch performance reduces with drum layers
WinchModel
25,000lb 17,000lb 12,000lb
10,000lb
9,500lb
PullingCapacitybyLayer Rating Capacity Rating Capacity Rating Capacity Rating Capacity Rating Capacity
(lb) (m) (lb) (m) (lb) (m) (lb) (m) (lb) (m)
1st 25,000 4.3 17,000 4.3 12,500 4.3 10,000 4.4 9,500 6.2
2nd 19,000 10.1 12,730 11.5 9,520 11.5 7,580 11.4 8,260 14.2
3rd 15,320 17.4 10,570 19 7,890 19 6,310 19.8 7,040 23.5
4th 12,840 26 9,040 29 6,740 28 5,400 28 6,130 28
5th 11,040 30 8,230 45
Plan your recovery to get the most out of your winch

Copyright(C)Sherpa4x4|www.sherpa4x4.com.au|info@sherpa4x4.com.au 4
OPERATION WARNINGS
WARNING! Please read and abide by the Operation Warnings to ensure personal safety
and the safety of others. Improper operation may lead to personal injury and equipment
damage. Read the following carefully before you attempt to operate your winch and please
retain for future reference.
- Uneven spooling of cable/rope while pulling a load can cause problems. If this happens,
reverse the winch to relieve the load and move your anchor point further to the centre of the
vehicle. After the recovery is complete, you can un-spool the cable/rope and rewind for a
neat layer of cable.
- Store the winch hand controller inside your vehicle where it will not be damaged or wet.
Inspect it before use.
- Always connect the controller with the clutch disengaged. DO NOT engage the clutch with
the motor running or under load.
- Avoid sudden direction changes of the winch rotation whilst winching. Allow the winch to
come to a stop before changing from ‘winch out’ to ‘winch in’ and vice versa.
- Never loop the hook back onto the cable or rope. This will cause kinking or fraying. Always
use a sling, tree trunk protector or chain of suitable strength and rating.
- Observe your winch at all times when performing a winch recovery and stand at a safe
distance. Stop the recovery every few meters to assure the cable/rope is not piling up on one
end of the winch. Jamming the cable/rope can damage your winch and cable.
- DO NOT attach tow or recovery hooks to winch mounting apparatus. They must be
attached to your vehicle frame.
- When performing a recovery with a snatch block, always maintain a direct line pull to the
centre of the winch. Ensure the hook is attached to the chassis of the vehicle.
- Ensure rated “D” or Bow shackles are used in conjunction with an approved tree trunk
protector to provide a safe anchor point.
- When extending the winch cable, ensure that at least five (5) wraps of cable/rope remain
on the drum at all times. Failure to do this could result in the cable/rope parting from the
drum under load. Serious personal injury or property damage may result.
WARNING! If replacing steel wire rope with any kind of synthetic rope, make sure the rope
can withstand the maximum capacity of your winch.
- Cable winches are provided with a red marking to identify that five (5) cable wraps remain
on the winch drum. No recovery should be attempted beyond this marking.
- Winch dampeners should always be used while winching.
- Apply blocks behind the wheels when winching vehicles on an incline.

Copyright(C)Sherpa4x4|www.sherpa4x4.com.au|info@sherpa4x4.com.au 5
Battery:
Be sure that the battery is in good condition.
Always wear eye protection when working around a battery.
Ensure the engine is running when using the winch to avoid flattening the battery.
Winch Cable:
Be sure that the cable is in good condition and is attached to the winch properly.
DO NOT use the winch if the cable is frayed.
DO NOT move the vehicle to pull a load.
DO NOT replace the cable with a cable of lower strength.
The life of the cable is directly related to the use and care it receives. Following its first and
subsequent uses, a cable must be wound on to the drum under a load of at least 500lbs
(230kgs) otherwise the outer wraps will draw into the inner wraps and severely damage the
cable during winching. The first winch use should be a familiarisation run while in a relaxed,
nonrecovery situation. Spool out the cable until the red cable mark appears (around five
wraps on the drum), and then rewind the cable onto the drum under a load of 500lbs
(230kgs). Winching your vehicle up a slight incline is a good way to achieve this. This will
slightly tension and stretch the cable and create a tight cable wrap around the drum. Failure
to do so may result in cable damage and reduction in cable life.
DO NOT attempt to exceed the pulling limits of this winch.
DO NOT drive your vehicle to assist the winch in any way. Vehicle movement in
combination with winch operation may overload the cable/rope or winch by causing
damaging shock loads.
Shock loads when winching are dangerous. A shock load occurs when an increased
force is suddenly applied to the cable. A vehicle rolling back on a slack cable may
induce a damaging shock load.
These winches are for recovery use in vehicle, boat and nonindustrial applications.
NEVER use the winch in hoisting applications.
DO NOT use the winch to lift, support or transport personnel.
DO NOT attempt to move the winch by lifting the clutch handle.

Copyright(C)Sherpa4x4|www.sherpa4x4.com.au|info@sherpa4x4.com.au 6
WINCH INSTALLATION
Mounting Your Winch
The winch is to be mounted into a suitable steel mounting frame using the 4 point foot
mounting system in either a horizontal or vertical plane. Your winch should only ever be
installed with the rope/cable winding onto the drum on the lower side, closest to the
mounting bolts. Your winch is not designed or rated for the rope/cable winding onto the top
of the drum near the cross member supports.
Ensure your winch rope or cable is wrapping onto the drum as per the arrow stickers on your
winch. Typically, when looking at the vehicle front on, the winch motor will be installed on the
left hand side of the vehicle. Installing your winch backwards will result in the winch brake
failing to work.
It is very important that the winch is mounted on a flat surface so that the three sections
(motor, cable drum and gear housing) are properly aligned. Before commencing installation,
ensure the mounting facility being used is capable of withstanding the winches maximum
rated capacity. The fitment of winches and / or a frontal protection systems may affect the
triggering of SRS air bags. Check that the mounting system has been tested and approved
for winch fitment in air bag equipped vehicles.
The winch should be secured to the mounting plate with the steel bolts and spring washers
provided. The fairlead or hawse is to be mounted so as to guide the rope/cable onto the
drum evenly.
Your winch tie rod bolts may be loose from transport. These bolts should only be removed
one at a time so your winch holds together. Apply a drop of thread locker to each bolt and
tighten.
Winches are mounted in a high vibration environment. It is highly recommended both liquid
thread locker and spring washers are used on all connections. All connections should be
checked for tightness after 1,000km of travel.

Copyright(C)Sherpa4x4|www.sherpa4x4.com.au|info@sherpa4x4.com.au 7
SPECIAL MOUNTING NOTES FOR 25,000 lb Winches
The Stallion 25,000lb winch can achieve forces which test the limits of the mounting bolts
and winch foot construction. Care must be taken when mounting this winch to reduce the
opportunity for a mounting related failure. The winch is capable of winching itself to
catastrophic destruction if the below recommendations aren’t followed.
The winch achieves it maximum recovery rating (25,000lb) when the first wrap is winding
onto the drum. If you are planning on loading the winch to this limit, it is strongly suggested
the winch be mounted such that the winch foot and bolts be in compression when winching
with the mounting bolts in the horizontal plane.
Mounting your winch with the bolts in the horizontal plane with the bolt heads facing the
vehicle in front of you is the strongest mounting arrangement as it takes much of the
winching force off the mounting bolts and winch foot mounts. The rope/cable should enter
the drum on the lower side of the drum in keeping with the direction labels on the winch.
Ensure your mount is rated for the force that can be applied.
Mounting your winch with the bolts in the vertical plane and the bolt heads pointing to the
road is acceptable, however, note, you will be operating near the limits of the bolts and the
winch foot casting when fully loading the winch. Any unbalance in forces could exceed the
design limits of the winch mount and bolts. To limit the potential for a bolt shear failure, note
the following;
Think of the mounting plate as a knife wanting to cut through the bolts. A thicker plate
is better and for the 25,000lb winch a minimum 6mm (1/4”) plate should be used.
Using a thicker 8mm (5/16”) or 10mm (3/8”) plate significantly increases the shear
strength of the mounting bolts. Using a thicker plate only at the mounting holes
achieves the same improvement and may be a lower weight option if the mounting
plate is being fabricated especially for the winch. Never mount the winch to oversized
or slotted holes as this will increase the likelihood of a bolt shear failure.
See over

Copyright(C)Sherpa4x4|www.sherpa4x4.com.au|info@sherpa4x4.com.au 8
Correct torque tightening of your bolts becomes important when working at extreme
loads. Check your bolt head and match the recommended torque setting.
Bolt Grade Torque (Nm)
8.8 44
10.9 62
12.9 75
If you are planning on loading the winch to it’s limit, it is recommended that the load
be centred onto the drum to evenly distribute the force over all 4 mounting bolts
which are under a high shear stress. Uneven loading has potential to over stress the
mounting bolts when in shear.

Copyright(C)Sherpa4x4|www.sherpa4x4.com.au|info@sherpa4x4.com.au 9
Mount the Solenoid Box
NOTE: The Solenoid Box can be attached to the winch, or the vehicle in various ways
depending on your vehicle type, configuration and winch mounting point. A range of brackets
are offered to assist with mounting.
Keep in mind the outer enclosure of your control box is not waterproof and is only designed
to keep the bulk of the water and dirt off the internals. The internal solenoid is IP68 rated and
suitable for submersion in water.

Copyright(C)Sherpa4x4|www.sherpa4x4.com.au|info@sherpa4x4.com.au 10
Lubrication
All moving parts in the winch are lubricated with high temperature lithium grease at the time
of assembly. Under normal conditions, factory lubrication will suffice for many years of
service. If your winch is exposed to water crossings and extreme service, maintenance
inspections and frequency should be adjusted.
Lubricate the steel cable periodically using light penetrating oil. Inspect for broken strands
and replace the cable as necessary.
A small amount of lubricating oil can be applied to the engagement lever if stiffness or
engagement difficulties occur.
Cable Replacement
Unwind the new cable by rolling it along the ground, to prevent kinking. Remove old cable
and observe the manner in which it is attached to the cable drum flange. Spool the new
cable with a load of approximately 240kg. Winching the vehicle up a slight incline is a good
way to achieve tension while spooling your winch, remember to monitor winch motor and
cables temperatures when performing extended winching operations.

Copyright(C)Sherpa4x4|www.sherpa4x4.com.au|info@sherpa4x4.com.au 11
Winch Brake
The winch brake is located inside the gearbox. The winch brake will only operate in one
direction, ensure the winch is orientated and installed correctly with the cable pulling from
the lower position of the drum close to the mounting bolts as per the arrow labels provided
on your winch. Do not reverse the cable on your winch drum or the brake won’t work.
The winch brake is a ratchet style, a bit like a sprag clutch. It applies when a force is pulled
back against the winch. The harder you pull, the tighter the brake will grip. This style of brake
is incredibly strong and reliable for 4x4 applications which can see water submersion and
challenging environments. It also keeps the heat from the brake away from the drum and
sensitive synthetic fibres.
To apply the brake, the brake shoes need to ‘set’ and this is achieved by winching in,
stopping winching and allowing the weight of the vehicle to fall back, causing some counter
rotation of the winch drum. The brake should ‘set’ and hold the vehicle.
If winching down a hill, the winch brake won’t ‘set’ when the ‘winch out’ button is released
and users should always rely on their vehicles pedal brake as the primary method of braking
the vehicle. If the winch brake is not applying, it is likely due to winching out prior to
activation. To ‘set’ the brake, ‘winch in’ and allow the brake to reset.
If testing the winch brake on a small slope with minimal counter force, it is possible for the
drum to slowly rotate backwards and the brake not to ‘set’. This can also be seen if winching
on flat ground towards a fixed load, the winch may not hold tension once the winch button is
released. This is due to the low stretch and resulting low opposing force. This is normal as
the brake is designed to hold the weight of your vehicle on an incline when you need it.
The winch brake can be noisy as it tries to grip and some drum rotation before it grips is
normal. The brake design is such that it will provide years of trouble-free service without the
need to replace the brake shoes. The brake design is different to other winches and may
take users time to get use to how it operates.

Copyright(C)Sherpa4x4|www.sherpa4x4.com.au|info@sherpa4x4.com.au 12
Electrical Connection – Single Motor Winches up to 6.6hp
NOTE: It is recommended to always install a battery isolator switch in series on the +ve
cable of your winch. Single motor winches can draw ~450 Amp and isolator switches should
be rated for this at a minimum. Isolation should be provided on the active (Red) cable only.
1. Short black cable with YELLOW sleeve (C) connecting to Terminal C (YELLOW) of the
motor;
2. Short black cable with BLACK sleeve (D) connecting to Terminal D (BLACK) of the motor;
3. Short red cable with RED sleeve (B) connecting to Terminal B (RED) of the motor;
4. Earth thin cable (Terminal a) connecting to Terminal A of the motor;
5. Terminal A (BLACK long cable) connecting to Terminal A of the motor;
6. Negative “‐” (BLACK long cable) connecting to the negative (“‐”) terminal of battery;
7. Positive “+” (RED long cable) connecting to the positive (“+”) terminal of battery.
Note: Your winches direction of operation relative to your hand remote can be reversed by
swapping cables on Terminals C and D if required.
WARNING! Ensure all electrical connections are tight prior to use. Loose electrical
connections may result in sparks, poor winch performance and damage to the solenoid.

Copyright(C)Sherpa4x4|www.sherpa4x4.com.au|info@sherpa4x4.com.au 13

Copyright(C)Sherpa4x4|www.sherpa4x4.com.au|info@sherpa4x4.com.au 14
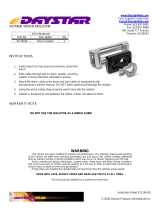
Winches with 8.9hp motors
Take care, failure to correctly connect the cables may result in motor damage.
ShortBlackw/Yellowsleeve
ShortBlackw/Blacksleeve
ShortRed
w/Red
sleeve
LongBlackandthinBlack

Copyright(C)Sherpa4x4|www.sherpa4x4.com.au|info@sherpa4x4.com.au 15
Rotating the Winch Gearbox
If the gearbox handle is not in an accessible location, the gearbox can be rotated to alternate
positions. Follow these instructions, a video has also been created to assist;
https://www.youtube.com/watch?v=SEEECTKVurw
1) Undo the two Allen key bolts in the cross members at the gearbox end.
2) Remove the gearbox and undo the six smaller black Allen key bolts on the gearbox.
3) On separation of the gearbox, take care to not damage the gearbox seal. Remove and
store.
4) Rotate the gearbox as required.
5) Refit and begin tightening the six black Allen key bolts.
6) Once the gearbox is almost back together with only a 1mm separation visible, stretch the
gearbox seal over the housing and allow it to drop into the 1mm gap. Tighten the gearbox
bolts.
7) Swap the cross member bars from the drive motor end to the gearbox end of the winch.
8) Lay the gearbox on a flat surface with the cross member bars pointing vertically up. Fit the
drum, taking care to ensure the gear adaptor is fits into the gearbox.
9) Fit the drive rod through the centre of the drum into the centre of the gearbox and ensure
it locates correctly, you will feel it drop roughly half an inch into the gearbox.
10) Place the drive coupling onto the other end of the drive rod. It should be recessed inside
the winch drum by ~30mm.
11) Carefully lower the winch drive onto the coupling and ensure it locates with the cross
member support bars.
10) Tighten the two Allen key bolts on the cross members to attach the winch drive.
11) Check everything is straight and fits properly. Check the Allen key bolts are done up
firmly. Check the winch barrel sits properly into the drive and gearbox. There should be an
even gap around the ends of the winch barrel.
NOTE:
For reliable winch performance, your battery must be kept in good condition.
Be sure battery cables are not drawn taught across any surfaces, consider cable
abrasion during installation.
Corrosion on electrical connections will reduce performance and may cause an
electrical short. Maintain as necessary.
In salty environments, use a silicon sealer to protect electrical connections from
corrosion.

Copyright(C)Sherpa4x4|www.sherpa4x4.com.au|info@sherpa4x4.com.au 16
Dual Motor Winches – IMPORTANT INFORMATION
Your dual motor winch will operate both motors when winching ‘in’ only. For winch ‘out’, only
the primary motor will operate.
Care must be taken not to change from winch ‘in’ to winch ‘out’ suddenly as the
secondary motor will still be running forward with inertia whilst the primary motor will be in an
energised reverse state. Such a sudden change in direction can cause damage to the winch
which is not covered by warranty. Ensure your winch has completely stopped before
changing direction in operation.
Wiring - Dual Motor Winches (Please refer to below diagram)
NOTE: It is recommended to always install battery isolator switches in series with your
winch. Dual motor winches can draw ~450 Amp per motor and isolator switches should be
rated for this at a minimum. Dual isolators are recommended, one per battery. Under high
load operations, the dual motors can pull up to 900 Amps. Due to the high amperage,
Sherpa 4x4 recommends wiring to dual batteries to spread the current draw.

Copyright(C)Sherpa4x4|www.sherpa4x4.com.au|info@sherpa4x4.com.au 17

Copyright(C)Sherpa4x4|www.sherpa4x4.com.au|info@sherpa4x4.com.au 18
WINCH OPERATION
Suggestions
The best way to become acquainted with how your winch operates is to make a few test
runs before you actually need to use it. Plan your test in advance. Remember you can hear
your winch as well as see it operating. Get to recognise the sound of a light steady pull, a
heavy pull, and sounds caused by load jerking or shifting.
Operating
1. Ensure the vehicle is secured by applying the parking brake or chocking the wheels.
2. Pull out a desirable length of winch cable/rope and connect to an anchor point. Warning!
You must leave at least five (5) wraps minimum on the drum.
Operate the clutch as follows:
a) To disengage the clutch, move the clutch lever to the “Disengaged” position. Cable/rope
can be pulled off the drum by hand.
b) To engage the clutch, move the clutch lever to the “Engaged” position. The winch is now
ready for pulling.
WARNING! The clutch must be engaged fully for pulling. If not engaged correctly damage
may occur.
3. Re‐check all cable rigging before proceeding.
4. Plug in the winch hand held remote switch. It’s recommended that the winching operation
takes place from the driver’s position to ensure safe operation.
5. To commence the recovery, start the vehicle engine, select neutral in transmission,
maintain engine speed at idle.
6. Operate the handheld remote switch to IN or OUT to retrieve the vehicle. Regularly check
the winch to ensure cable is winding onto the drum evenly.
Note: Due to the high amperage draw during winching, continuous high load winching should
be avoided. Winching for 30-60 seconds (depending on load) should be followed by a 5-10
minute period of cool down. It is recommended the operator monitors the winch motor
temperature to avoid overheating and damage.
WARNING!
ALWAYS USE A WINCH DAMPER
A safe distance must be kept during winch operation for your safety.
Never winch your vehicle in gear or in park as this will damage your vehicle’s transmission.
Never wrap the cable around the anchor or hook it back onto the cable/rope.

Copyright(C)Sherpa4x4|www.sherpa4x4.com.au|info@sherpa4x4.com.au 19
Keep hands, clothing, hair and jewellery clear of the drum area and cable when winching.
Never allow anyone to stand near the cable/rope, or in line with the cable behind the winch
while it is under load. If the cable should slip or brake, it can suddenly whip back towards the
winch, causing a hazard to anyone in the area. Always stand well to the side while winching.
DO NOT leave the controller plugged in when the winch is not in use. Keep the battery
isolation switch off when not in use.
MAINTENANCE
It is highly recommended that the winch be used regularly (around once a month). Simply
power the cable out 15m, freely spool 5m and then power back in. This will keep all
components lubricated and in good working condition so that the winch can be relied on
when needed.
Scheduled maintenance should be performed annually. If you are exposing your winch to
extreme service such as regular river crossing and exceptionally muddy environments,
increased maintenance frequency is recommended.
Contact the agent/distributor from whom you purchased your winch for technical assistance
and repairs.
A comprehensive range of spare parts are available. For further information, please contact
the agent/distributor from whom you purchased your winch.
WARNING!
The safety precautions and instructions discussed in these instructions cannot cover all
possible conditions and situations that may occur. It must be understood by the operator that
common sense and caution are factors, which cannot be built into this product, but must be
applied by the operator.

Copyright(C)Sherpa4x4|www.sherpa4x4.com.au|info@sherpa4x4.com.au 20
SHERPA 4x4 WINCH SERVICE RECORD
* Please complete this form each time the winch is serviced. Service schedule is every 12
months. New forms available at www.sherpa4x4.com.au
Winch Purchase Date:
Date of last service:
Date of this service:
Business / Company Performing Service:
Business / Company Address:
Business / Company Contact number:
/