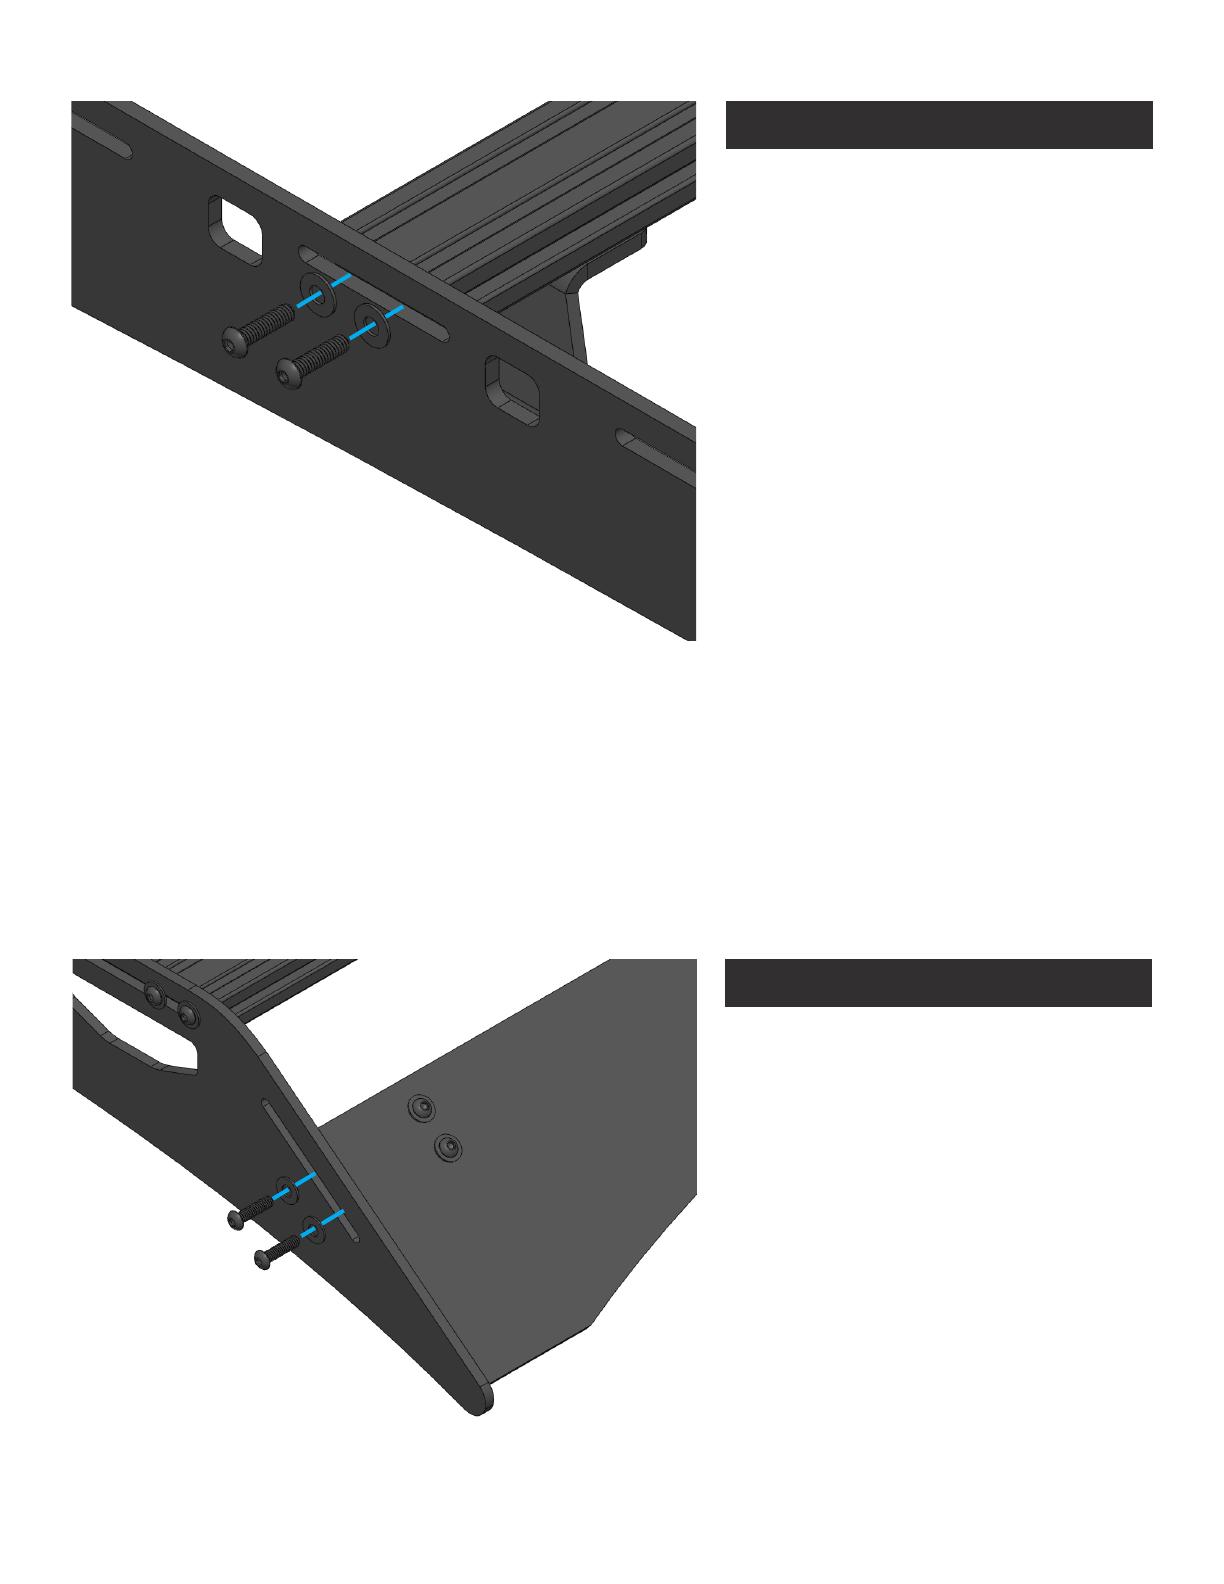
Sherpa SNOWMASS User manual

Type
User manual

Sherpa SNOWMASS is a versatile and durable roof rack system designed to seamlessly integrate with your vehicle's roof, providing a secure and reliable platform for carrying a wide range of cargo and accessories. With its robust construction and thoughtful design, the SNOWMASS empowers you to transport your gear effortlessly, whether you're embarking on outdoor adventures, weekend getaways, or daily commutes.

Sherpa SNOWMASS is a versatile and durable roof rack system designed to seamlessly integrate with your vehicle's roof, providing a secure and reliable platform for carrying a wide range of cargo and accessories. With its robust construction and thoughtful design, the SNOWMASS empowers you to transport your gear effortlessly, whether you're embarking on outdoor adventures, weekend getaways, or daily commutes.

THE SNOWMASS
INSTALL INSTRUCTIONS
REV.1
8 32 12 6 2 8 18
8
2
508 8
1
M8-1.00
(45mm)
2
REAR
MOUNTING
BRACKETS
2
MIDDLE
MOUNTING
BRACKETS
2
FRONT
MOUNTING
BRACKETS
6
RUBBER
SEALS
1/4”-20
(1”)
1/4”-20
(9/16”)
1/4”-20
(1/2”)
Large
Rubber Roof
Plugs
Standard
Rubber Roof
Plugs
Installed from
factory
1/4” Tnut 1/4” Flat
Washer
OEM
M8 Nut
M8 Bonded
Washer
BEFORE YOU BEGIN
USING TNUTS
The installation of this rack requires you to
drop your headliner. A guide to removing
the stock roof rack and headliner is
available on our YouTube page. If you are
not comfortable with this please contact a
reputable installer.
HARDWARE CHECKLIST
Exact hardware color counts may vary based on the options selected at checkout.
PRE-ASSEMBLY
Required Components:
6x 1/4”-20 x 1/2”
6x 1/4” Flat Washers
6x Tnuts
Drop 6 tnuts into the slots on the cross
member and line them up with the
holes in the fairing. Secure with 6 bolts
and washers.
ROOF DIAGRAM
Required Components:
2x M6 Bolts
2x M6 Bonded Washers
4x Roof Plugs
The roof of the RAV4 has several roof
holes that will not be used during the
install. 10 of these holes are sealed with
rubber plugs. Two of these plugs are
bigger than the others.
Locations marked in yellow receive the
standard plugs and the red will get the
two larger ones. Apply a small bead of
silicone around the outside edge of the
rubber roof plugs.
The blue dots mark holes that will be used
during the mounting process.
x8 ROOF PLUGS
x2 ROOF PLUGS
MOUNTING BOLT
RUBBER PLUG
LARGE RUBBER PLUG
STANDARD
LARGE
01
Required Components:
12x 1/4”-20 x 9/16”
12x 1/4” Flat Washers
12x Tnuts
Next we are going to assemble all of
the mounting crossmembers. Start
by dropping the tnuts into the slotted
prole of the extrusion, each bar
should have 4 tnuts.
Next attach the mounting brackets to
the crossmembers. There are 2 Front,
Middle and Rear brackets. The mounts
have a notched bottom corner that
should point towards the front of the
vehicle. Fasten the front leveling mounts
to the crossbar by threading 2 bolts and
2 washers through the leveling bracket
and into the tnut. Make sure you leave
these slightly loose so that you can move
the mount when centering the bars.
02
TORQUE SPEC: 22in-lb
Required Components:
8x M8 Bolts
8x M8 Bonded Washers
Next, install the front, middle and rear
mounting brackets. Remember the
notch on the bottom of the bracket
faces the front of the vehicle. Align the
rubber spacers with the factory holes
in your roof gutter and the mounting
bracket.
Position the mounting bracket over
the rubber spacer and secure them
with bolts and bonded washers passed
through the bracket, rubber, and into
the holes in the roof. Secure them with
the factory nut on the inside of the
vehicle. We recommend using blue
thread locker during this step.
The bonded washers should compress
and become flat, but not concave. Do
not over tighten these mounts.
ROOF
CUT-AWAY
DIAGRAM
ASSEMBLED
EXTERIOR
VIEW
03
Required Components:
12x 1/4”-20 x 1”
12x 1/4” Flat Washers
After the main support cross members
have been secured to the roof, center
the crossbars to the vehicle. This is
explained in detail in our install video.
Once the bars are all centered tighten
them down to the mount.
Align the small slots in the rack side
with the main support cross members.
Secure it using the bolts and washers.
Leave the bolts loose enough to move
the sideplate to the position that
matches the curve of the vehicle.
Once the rack is positioned correctly,
tighten down all of the hardware for
the rack sides, mounting hardware and
roof track bolts.
04
Required Components:
4x 1/4”-20 x 1”
4x 1/4” Flat Washers
Position the wind fairing in line with the
diagonal slot at the front of the rack.
Align the bottom of the fairing with
the tip of the roof rack and secure it
using 4 bolts and washers. The fairing
should not come in contact with the
roof of your vehicle.
05
Required Components:
20x 1/4”-20 x 1”
20x 1/4” Flat Washers
Secure all of the remaining cross
members to the rack system. Position
according to your load requirements.
When supporting heavy loads insure
that it is evenly supported by the rack
system and the crossbars are spaced
accordingly.
EXPLORE.
All products built and designed by Sherpa Equipment Company are intended for
off-road use and should be assembled, installed, and used according to Sherpa
Equipment Company’s recommendations. Sherpa Equipment Companies products
should be used safely with good judgment towards others and surroundings.
By installing Sherpa Equipment Companies products on your vehicle you assume
all liability. Sherpa Equipment Company will not be held liable for damages or loss
associated with the installation or use of its products. It is recommended that you
inspect your roof rack within the rst 100 miles of installation and every 500 miles
after.
  • Page 1 1
  • Page 2 2
  • Page 3 3
  • Page 4 4
  • Page 5 5
  • Page 6 6
  • Page 7 7
  • Page 8 8
  • Page 9 9

Sherpa SNOWMASS User manual

Type
User manual

Sherpa SNOWMASS is a versatile and durable roof rack system designed to seamlessly integrate with your vehicle's roof, providing a secure and reliable platform for carrying a wide range of cargo and accessories. With its robust construction and thoughtful design, the SNOWMASS empowers you to transport your gear effortlessly, whether you're embarking on outdoor adventures, weekend getaways, or daily commutes.

Ask a question and I''ll find the answer in the document

Finding information in a document is now easier with AI