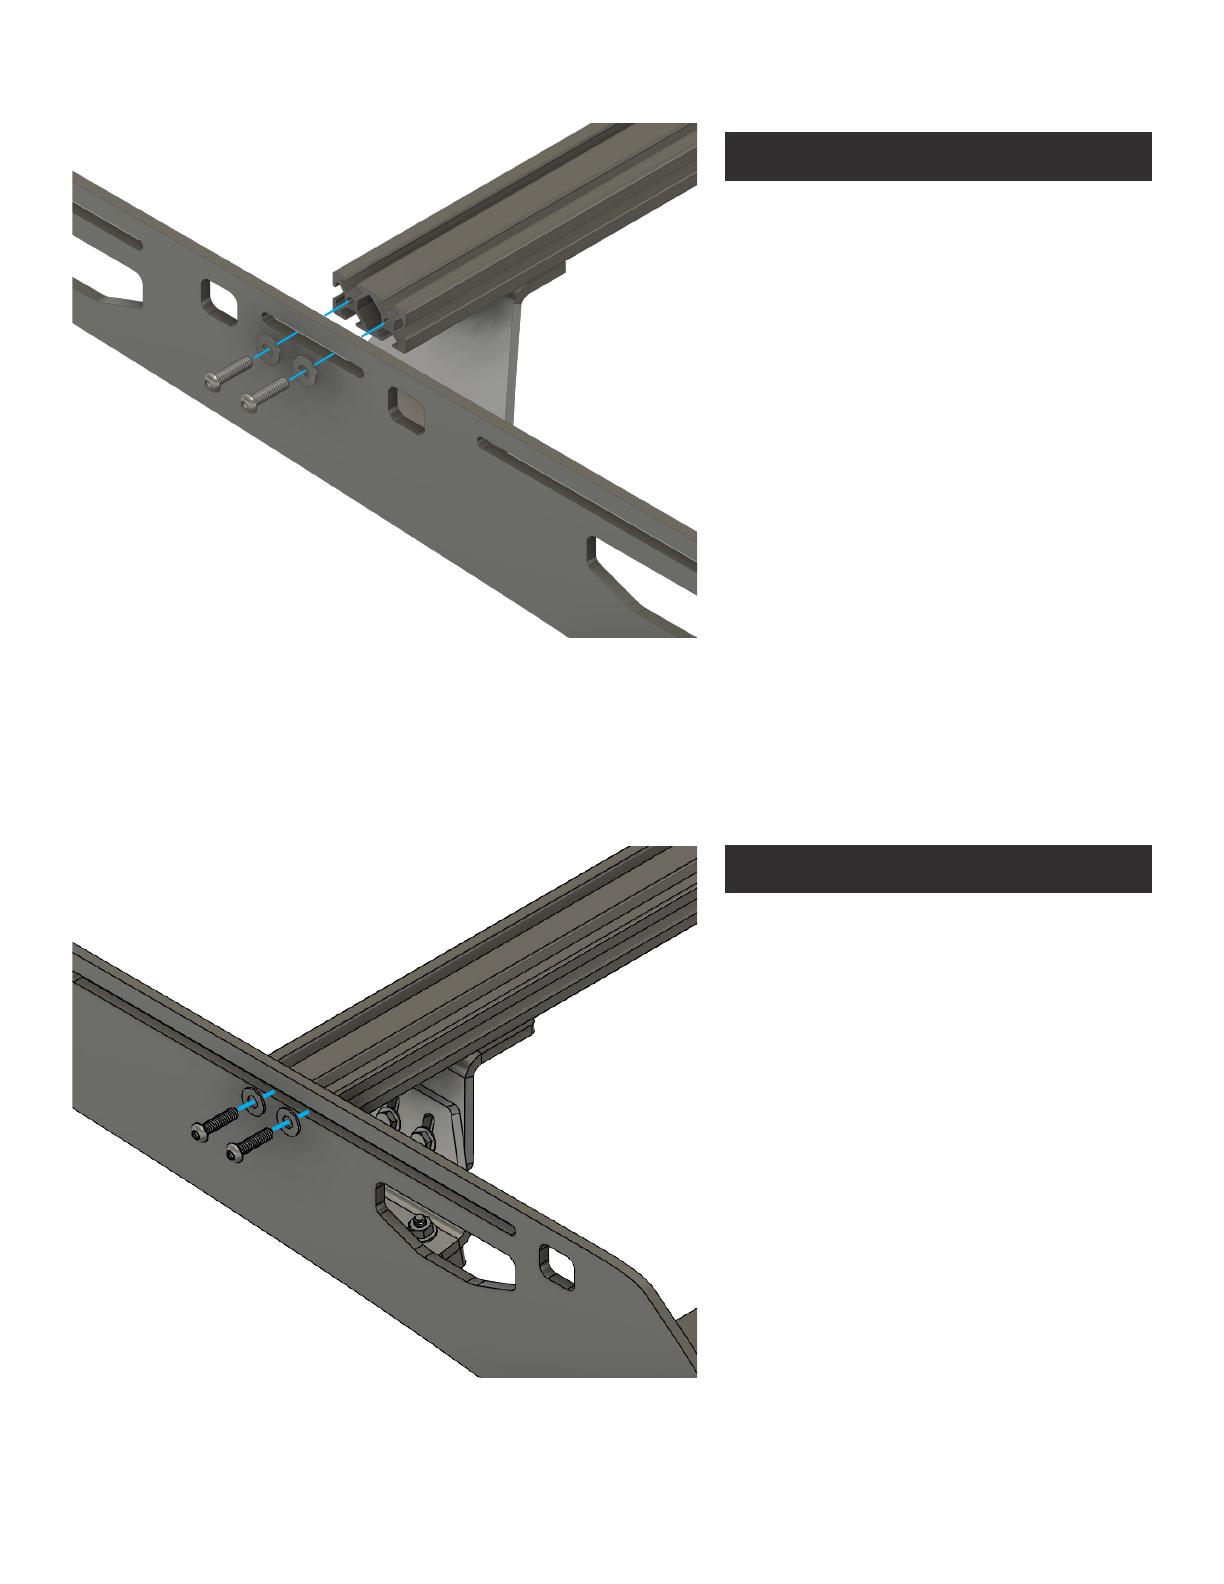
Sherpa The Yale Installation guide

Type
Installation guide

Sherpa The Yale is a versatile and durable roof rack system designed to enhance the functionality of your vehicle for various outdoor adventures. Its robust construction, featuring adjustable mounts, allows for secure mounting of cargo, bikes, kayaks, and other gear, making it an ideal companion for camping, biking, fishing, and more. The sleek design seamlessly integrates with your vehicle's aesthetics, providing a stylish and practical solution for your transportation needs.

Sherpa The Yale is a versatile and durable roof rack system designed to enhance the functionality of your vehicle for various outdoor adventures. Its robust construction, featuring adjustable mounts, allows for secure mounting of cargo, bikes, kayaks, and other gear, making it an ideal companion for camping, biking, fishing, and more. The sleek design seamlessly integrates with your vehicle's aesthetics, providing a stylish and practical solution for your transportation needs.

THE YALE
INSTALL INSTRUCTIONS
REV. 7
12
2 2 22 6
36
HARDWARE CHECKLIST
16 6 22
54 12
M6-1.00
(45mm)
MIDDLE
BRACKETS
REAR
BRACKETS
ADJUSTABLE
MOUNTS
FRONT
BRACKETS
RUBBER
SPACERS
1/4”-20
(1”)
1/4”-20
(5/8”)
1/4”-20
(1/2”)
1/4” TNut1/4” Flat
Washer
M6 Bonded
Washer
BEFORE YOU BEGIN
USING TNUTS
Remove your stock roof rack (if applicable).
Loosen all stock rack bolts before fully removing
any of them. This will prevent the capture plates
from working loose inside of the roof. Work slowly
when removing the stock rack as not to break the
plastic sleeves.
Exact hardware color counts may vary based on the options selected at checkout.
4
Carriage bolt
(1/4”-20 x1”)
4
Nylock nuts
PRE-ASSEMBLY
Required Components:
6x 1/4”-20 x 1/2”
6x 1/4” Flat Washers
6x Tnuts
Drop 6 tnuts into the slots on the cross
member and line them up with the
holes in the fairing. Secure with 6 bolts
and washers.
PRE-ASSEMBLY
Required Components:
4x 1/4”-20 x 1” Carriage bolt
12x 1/4” Flat Washers
4x Nylon Lock Nuts
Install the hardware as pictured
above, but leave the assembly loose
so that it can be adjusted during a
later step.
x2
PRE-ASSEMBLY
Required Components:
4x 1/4”-20 x 5/8” Hex bolt
4x 1/4” Flat Washers
4x T-nuts
Drop two t-nuts into the slotted
profile of the extrusion. Fasten the
front leveling mounts to the crossbar
by threading four bolts and washers
through the leveling bracket and into
the t-nuts. Repeat this step so that
both adjustable feet are mounted to
the same cross member.
PRE-ASSEMBLY
Required Components:
12x 1/4”-20 x 5/8”
12x 1/4” Flat Washers
12x 1/4” Tnuts
Secure top of the mounting brackets
to the three main cross members.
Leave the hardware that attaches the
mount to the crossbar loose. This will
make it easier when centering the bars
later.
01
TORQUE SPEC: 22in-lb
Required Components:
12x M8 Bolts
12x M8 Flat Washers
Next, install the three sets of mounting
brackets. There is one bracket that is
canted to one side. These are designed
to push the rear crossbar away from
the XM antenna at the back of the
truck. Align the rubber spacers with
the factory holes in your roof gutter.
The metal sleeves should slide over the
OEM white plastic tubes. The thin side
of the rubber should be positioned
towards the center of the vehicle.
Position the mounting bracket over
the rubber spacer and secure it with
12 bolts and bonded washers passed
through the bracket, rubber, and into
the holes in the roof.
The bonded washers should compress
and become flat, but not concave. Do
not over tighten these mounts.
03
Required Components:
4x 1/4”-20 x 1”
4x 1/4” Flat Washers
Position the crossbar with the
adjustable mounts in the forward most
side plate slot. This mount is designed
to better distribute the load at the
front of the rack.
To set the height of these mounts
correctly, push the base of the mount
downwards into the vehicle while
pulling up on the rack. Tighten the
bolts in the center of the mount in this
position. The goal is to make these
brackets as tight as possible (pressure)
to the vehicle.
02
Required Components:
12x 1/4”-20 x 1”
12x 1/4” Flat Washers
After the main support cross members
have been secured to the vehicle, you
can use a tape measure and center
all of the bars on the vehicle. We
recommend measuring from the inside
edge of the mount to the outside face
of the crossbar.
Once all the bars are centered, install
the side plates. Align the small slots in
the rack side with the ends of the main
support crossmembers. Secure it using
12 bolts and washers. Leave the bolts
loose enough to move the sideplate to
the position that matches the curve of
the vehicle.
Once the rack is positioned correctly,
tighten down all of the hardware for
the rack sides, mounting hardware and
roof track bolts.
04
04
Required Components:
4x 1/4”-20 x 1”
4x 1/4” Flat Washers
Position the wind fairing in line with
the diagonal slot at the front of the
rack. Align the bottom of the fairing
with the tip of the roof rack and secure
it using 4 bolts and washers.
05
Required Components:
16x 1/4”-20 x 1”
16x 1/4” Flat Washers
Secure all of the remaining cross
members to the rack system. Position
according to your load requirements.
EXPLORE.
All products built and designed by Sherpa Equipment Company are intended for o-road use and should be
assembled, installed, and used according to Sherpa Equipment Company’s recommendations. Sherpa Equipment
Companies products should be used safely with good judgment towards others and surroundings.
By installing Sherpa Equipment Companies products on your vehicle you assume all liability. Sherpa Equipment
Company will not be held liable for damages or loss associated with the installation or use of its products. It is
recommended that you inspect your roof rack within the first 100 miles of installation and every 500 miles after.
  • Page 1 1
  • Page 2 2
  • Page 3 3
  • Page 4 4
  • Page 5 5
  • Page 6 6
  • Page 7 7
  • Page 8 8
  • Page 9 9
  • Page 10 10
  • Page 11 11

Sherpa The Yale Installation guide

Type
Installation guide

Sherpa The Yale is a versatile and durable roof rack system designed to enhance the functionality of your vehicle for various outdoor adventures. Its robust construction, featuring adjustable mounts, allows for secure mounting of cargo, bikes, kayaks, and other gear, making it an ideal companion for camping, biking, fishing, and more. The sleek design seamlessly integrates with your vehicle's aesthetics, providing a stylish and practical solution for your transportation needs.

Ask a question and I''ll find the answer in the document

Finding information in a document is now easier with AI