Edelbrock E-Force Supercharger
Grand Sport Corvette
Part #1574, 1575 & 1576
WARNING!
The supercharger bypass valve is factory installed and adjusted intended to be vacuum
operated only. DO NOT move the solenoid actuator lever by hand or adjust the stop point.
Moving the lever manually will damage the solenoid and the system will not function prop-
erly. Damage to the bypass assembly from manual movement will not be covered under
manufacture warranty.
©2018 Edelbrock LLC
Part #1574, 1575, 1576
Brochure #63-1574
Rev. 3/29/18 - NP
Edelbrock GM LS3 Supercharger System for
2010-2013 Grand Sport Corvettes
PN 1574, 1575 & 1576
Installation Instructions
Page 5
E-MAIL EDELBROCK YOUR STOCK VEHICLE CALIBRATION AND VEHICLE INFORMATION
PLEASE COMPLETE THIS PROCEDURE PRIOR to starting the installation of your E-Force supercharger system. This
will allow our calibration team to complete your calibration file while the installation of your supercharger system
is being completed. Manufacturers regularly update the factory calibration, as a result, there is the possibility for
delays due to not having access to your current calibration file. This can normally be resolved in 1 business day.
FAILURE TO PROVIDE ALL OF THE INFORMATION BELOW WILL DELAY THE COMPLETION OF THE CALIBRATION FILE FOR
YOUR VEHICLE. TO LIMIT VEHICLE DOWN TIME, PLEASE SEND US THE REQUESTED INFORMATION BEFORE STARTING
THE SUPERCHARGER INSTALL.
Please e-mail the requested information below to calibra[email protected] with the E-mail Subject as “Calibration Update”. We
will complete your calibration and e-mail it back to you as soon as possible. MOST calibration updates will be sent back the same
business day. In rare cases, it could take up to 1-2 business days to complete. Please contact our Tech Hot Line at (800)416-8628 if
you have any questions or if you need assistance with this procedure.
Begin by downloading the SCT device updater software to your computer; it can be downloaded from: http://www.sctflash.com/
software/SCTDeviceUpdater.exe
Put the vehicle into ACC mode but do not start the engine.
Connect the supplied PCM cable from the programmer to the OBD-II connector.
Select PROGRAM VEHICLE, use the arrow keys to highlight UPLOAD STOCK and press SELECT. Follow the prompts on the screen.
If the upload fails, you will be asked to AUTO DETECT. Press SELECT and follow the prompts on the screen. If the auto detect fails,
please contact Edelbrock Tech Support @ 800-416-8628.
Once the stock calibration has loaded to the handheld programmer, disconnect the programmer from the OBD-II connector and
connect it to your PC using the supplied USB cable.
Open the SCT software and select the button on the lower left hand side that reads GET STOCK FILE FROM DEVICE. Follow the
instructions on the screen. NOTE: The stock calibration file will automatically be labeled using your VIN number followed
by “.sul “ (XXXXXXXXXXXXX.sul)
Once the download is complete, you can E-mail your stock vehicle calibration along with the vehicle information below to
[email protected] or call 800-416-8628 and our Tech Support staff will assist you with E-mailing the file. NOTE: The
subject line of your E-mail should read “Calibration Update”.
Once we have the stock calibration file, along with the requested information below, we can update the calibration to work with your
application. We will E-mail you the custom calibration which may be used until the release version of the calibration is available.
INFORMATION NEEDED:
E-Mail Address:
Vehicle Year:
Vehicle Make:
Vehicle Model (Specify if Z06, Z51, etc..):
Engine Size:
Transmission:
Fuel Octane (91 or 93 ONLY):
Supercharger System Part Number:
Supercharger Serial Number:
Programmer Serial Number:
A
A
A
A
B
FOR VEHICLES EQUIPPED WITH AUX. OIL COOLER,
DRILL HOLES MARKED A
& B.
FOR VEHICLES NOT EQUIPPED WITH AUX. OIL COOLER,
DRILL HOLES MARKED B ONLY.
LH
TEMPLATE, SHROUD,
C6 CORVETTE, LH
1.00
1.00
1.38
0.35
0.35
0.35
B
LINE UP TEMPLATE TO OUTSIDE OF
SHROUD USING THESE FEATURES
A
TEMPLATE, SHROUD,
C6 CORVETTE, RH
RH
DRILL HOLES MARKED A FOR ALL VEHICLES
0.35
1.38
A
LINE UP TEMPLATE TO SHROUD
USING THESE FEATURES
15
64
1
1
2
1
1
4
©2018 Edelbrock LLC
Part #1574, 1575, 1576
Brochure #63-1574
Rev. 3/29/18 - NP
Edelbrock GM LS3 Supercharger System for
2010-2013 Grand Sport Corvettes
PN 1574, 1575 & 1576
Installation Instructions
Page 1
Edelbrock LLC, 2700 California Street, Torrance, CA 90503
Toll-Free Tech Line: 1-800-416-8628
Thank you for purchasing the Edelbrock Supercharger System for the 2010-2013 Grand Sport Corvette. This Edelbrock
E-Force Supercharger System utilizes Eaton’s Gen VI 2300 TVS Supercharger rotors, featuring a 4-lobe design with a
160° twist for maximum flow, minimum temperature rise, quiet operation, and superior reliability. The inverted design
places the supercharger down low in the valley allowing for extra-long intake runners to maximize low end torque and part
throttle response. The air-to-water intercooler paired with the front-mount low temperature radiator ensures your engine
is breathing cool air even in the most extreme conditions. With its ground pounding low end torque and high efficiency
cooling system, the Edelbrock E-Force supercharger is the perfect match for your Grand Sport Corvette. This kit is 50 state
emissions legal with the supplied Edelbrock PCM calibration.
INTRODUCTION
TOOLS AND SUPPLIES REQUIRED
l Jack and Jack Stands
OR Service Lift
l Panel Puller
l Ratchet and Socket Set including: 7mm, 8mm, 10mm
(standard, deep and universal), 11mm, 12mm (deep),
13mm, 15mm, 18mm, 21mm (deep), 24mm
l Wrenches including: 8mm, 18mm, 27mm
l 18mm Line Wrench
l 12” Ratchet Extension Bar
l 1/2” Breaker Bar
l Flat Blade & Phillips Screwdrivers
l Compressed Air
l Torx-20 Driver
l Allen Wrenches including: 5mm, 6mm, 8mm
l 5/8” Fuel Line Removal Tool
l Torque Wrench
l Needle Nose Pliers
l Pliers
OR Hose Clamp Removal Tool
l Pneumatic or Power Drill
l Impact Wrench
l Loctite 609 Retaining Compound or equivalent
l O-ring Lube
l Anti-seize
l Masking Tape
l DT-47731 Transmission Cooler Quick Disconnect Tool
l J-42188 Ball Joint Separator
l J-42386-A Flywheel Holding Tool
©2018 Edelbrock LLC
Part #1574, 1575, 1576
Brochure #63-1574
Rev. 3/29/18 - NP
Edelbrock GM LS3 Supercharger System for
2010-2013 Grand Sport Corvettes
PN 1574, 1575 & 1576
Installation Instructions
Page 2
Due to the complexity of the Edelbrock E-Force Supercharging system, it is recommended that this system only be
installed by a qualified professional with access to a service lift, pneumatic tools, and a strong familiarity with automotive
service procedures. To qualify for the optional supplemental warranty, it is necessary to have this system installed by a
Certified ASE Technician, GM Dealership, or an Authorized Edelbrock Installer. Failure to do so will void and/or disqualify
any and all optional supplemental warranties offered with this system. Please contact the Edelbrock Technical Support
department if you have any questions regarding this system and/or how your installer of choice will affect any warranty
coverage for which your vehicle may qualify.
Proper installation is the responsibility of the installer. Improper installation will void all
manufacture’s standard warranties and may result in poor performance and engine or vehicle
damage.
SPECIAL NOTE FOR OWNERS OF THE 1575 599HP KIT
If you purchased the 599HP supercharger kit P/N: 1575, then your kit includes an upgraded in-tank ZO6 fuel pump to
support the additional horsepower over the standard, 554HP, kit P/N: 1574. Edelbrock strongly recommends that before
beginning the install of your 1575 supercharger kit, you take the vehicle to a Chevrolet dealership or experienced Corvette
repair facility for installation of this pump per the specified GM workshop manual procedure. Once installed, follow these
instructions to install the Edelbrock system.
NOTE: Competing systems often recommend, or utilize, voltage amplifiers for the purpose of increasing the output of
the stock fuel pump. While these systems do work, and will work in conjunction with the E-Force superchargers as well,
Edelbrock does not endorse their use, as they can significantly reduce the life of the stock fuel pump resulting in possible
engine damage. Edelbrock strongly feels that the increased effort to install the upgraded in-tank ZO6 fuel pump assembly,
included in the 1591 kit, is the proper way to address the need for increased fuel volume.
IMPORTANT WARNINGS
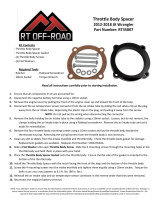
Before beginning the installation, use the enclosed checklist to verify that all
components are present in the box then inspect each component for damage
that may have occurred in transit. If any parts are missing or damaged, contact
Edelbrock Technical Support (800-416-8628), not your parts distributor.
WARNING: Installation of this supercharger will result in a significant change to the
performance characteristics of your vehicle. It is highly recommended that you take some
time to familiarize yourself with the added power and how it is delivered. This must be
done in a controlled environment. Take extra care on wet and slippery roads as the rear
tires will be more likely to lose traction with the added power. It is never recommended to
turn off your vehicles traction control system.
©2018 Edelbrock LLC
Part #1574, 1575, 1576
Brochure #63-1574
Rev. 3/29/18 - NP
Edelbrock GM LS3 Supercharger System for
2010-2013 Grand Sport Corvettes
PN 1574, 1575 & 1576
Installation Instructions
Page 3
91 octane or higher gasoline is required at all times. If your vehicle has
been filled with anything less, it must be run until almost dry and refilled
with 91 or higher octane gasoline twice prior to installation.
Failure to use the required 91 octane gasoline or higher could permanently
damage your engine. Any failures associated with not using premium 91
octane gasoline or higher, will be ineligible for warranty repairs.
IMPORTANT WARNINGS (CONTINUE)
Any equipment that directly modifies the fuel mixture or ignition timing of the engine can cause severe engine damage if
used in conjunction with the Edelbrock E-Force Supercharger System. This includes, but is not limited to: ignition boxes,
air/fuel controllers, OBDII programmers, and any other device that modifies signals to and/or from the ECU. Aftermarket
bolt-on equipment such as underdrive pulleys or air intake kits will also conflict with the operation of the supercharger
and must be removed prior to installation. Use of any of these products with the E-Force Supercharger could result in
severe engine damage.
Any previously installed aftermarket tuning equipment must be removed and the vehicle returned
to an as stock condition before installing the supercharger.
It is also recommended that you check the Edelbrock Tech Center Website for any updates to this installation
manual. Please refer to the lower right hand corner to verify that you have the latest revision of this
installation manual before beginning the installation.
Tech Center: http://www.edelbrock.com/automotive/misc/tech-center/
EDELBROCK AUTHORIZED INSTALLER DISCLAIMER
Authorized installers of Edelbrock products are independent companies over which Edelbrock has no right of control. Edelbrock
LLC makes no claims regarding the abilities, expertise or competency of individual employees of any authorized installer. Each
authorized installer is an independent company and makes its own independent judgments. Edelbrock LLC specifically disclaims any
responsibility to any party including third parties for the actions, or the failure to act, of individuals, agents or a company authorized in
the installation of Edelbrock LLC products.
©2018 Edelbrock LLC
Part #1574, 1575, 1576
Brochure #63-1574
Rev. 3/29/18 - NP
Edelbrock GM LS3 Supercharger System for
2010-2013 Grand Sport Corvettes
PN 1574, 1575 & 1576
Installation Instructions
Page 4
Bag #1
Bag #2
(2x) - M8 Washer
(3x) - M8 x 1.25 x 20mm
Hex Flange Bolt
(1x) - M10 x 1.5 x 75mm Hex Flange Bolt
(1x) - M10 x 1.5 x 45mm Socket Head Bolt
(3x) - M8 x 1.25 x 90mm Hex Flange Bolt
(1x) - M8 x 1.25 x 30mm
Hex Flange Bolt
(3x) - M6 x 1 x 16mm
Hex Flange Bolt
(2x) - M6 x 1 x 20mm
Hex Flange Bolt
(1x) - Nylon Body Pin
(1x) - Lower Intercooler Reservoir Bracket
(1x) - Upper Intercooler Reservoir Bracket
(2x) - 1/2” Hose Clamp
(6x) - 3/4” Hose Clamp
INSTALLATION HARDWARE IDENTIFICATION GUIDE
©2018 Edelbrock LLC
Part #1574, 1575, 1576
Brochure #63-1574
Rev. 3/29/18 - NP
Edelbrock GM LS3 Supercharger System for
2010-2013 Grand Sport Corvettes
PN 1574, 1575 & 1576
Installation Instructions
Page 5
Bag #3
(11x) - M8 x 1.25 x 25mm
Countersunk Socket Head Bolt
(8x) - M6 x 1 x 45mm
Hex Flange Bolt
(4x) - M6 x 1 x 12mm
Socket Head Bolt
(1x) - 15/64” High Speed Steel Drill Bit
(1x) - .2500” Reamer
Bag #4
(1x) - M16 x 2 x 120mm Hex Bolt
(1x) - GM Factory Harmonic Balancer Bolt
Drill Hole
Ream Hole
Bolt Hole
(1x) - 1/4” x 3/4” Steel Dowel
(1x) - Crank Pinning Drill Guide
(4x) - M6 x 1 x 16mm
Button Head Bolt
©2018 Edelbrock LLC
Part #1574, 1575, 1576
Brochure #63-1574
Rev. 3/29/18 - NP
Edelbrock GM LS3 Supercharger System for
2010-2013 Grand Sport Corvettes
PN 1574, 1575 & 1576
Installation Instructions
Page 6
Bag #5
Bag #6
(1x) - Barbed Quick Connect Fitting
(1x) - Air Inlet Tube PCV Grommet
(2x) - Air Inlet Tube Retainer Grommet
(4x) - Coil Cover Bracket
(1x) - Coil Cover
Dipstick Grommet
(4x) - Coil Cover Retainer Stud
(4x) - Coil Cover Standoff
©2018 Edelbrock LLC
Part #1574, 1575, 1576
Brochure #63-1574
Rev. 3/29/18 - NP
Edelbrock GM LS3 Supercharger System for
2010-2013 Grand Sport Corvettes
PN 1574, 1575 & 1576
Installation Instructions
Page 7
HOSE IDENTIFICATION GUIDE
Heat Exchanger to Intercooler
Reservoir to
Water Pump
PCV
Manifold to EVAP Solenoid
Intercooler to Reservoir
Water Pump to
Heat Exchanger
Brake Booster
Valve Covers to
Dry Sump (rear)
Air Inlet to Dry
Sump (front)
EVAP Solenoid
to Firewall
AUX Dry Sump
& Tee
©2018 Edelbrock LLC
Part #1574, 1575, 1576
Brochure #63-1574
Rev. 3/29/18 - NP
Edelbrock GM LS3 Supercharger System for
2010-2013 Grand Sport Corvettes
PN 1574, 1575 & 1576
Installation Instructions
Page 8
DRY SUMP ROUTING GUIDE
A: Air inlet to dry sump (Front)
B: Valve covers to dry sump (Rear)
C: PCV to fitting on bottom of air inlet, behind
throttle body.
D: Auxiliary hose & tee fitting: From auxiliary
dry sump tank to “B” hose.
A
B
C
D
2009 & Later
Vehicles Only
NOTE: The stock valley tray
baffle must be transferred to the
Edelbrock valley tray.
  • Page 1 1
  • Page 2 2
  • Page 3 3
  • Page 4 4
  • Page 5 5
  • Page 6 6
  • Page 7 7
  • Page 8 8
  • Page 9 9
  • Page 10 10
  • Page 11 11
  • Page 12 12
  • Page 13 13
  • Page 14 14
  • Page 15 15
  • Page 16 16
  • Page 17 17
  • Page 18 18
  • Page 19 19
  • Page 20 20
  • Page 21 21
  • Page 22 22
  • Page 23 23
  • Page 24 24
  • Page 25 25
  • Page 26 26
  • Page 27 27
  • Page 28 28
  • Page 29 29
  • Page 30 30
  • Page 31 31
  • Page 32 32
  • Page 33 33
  • Page 34 34
  • Page 35 35
  • Page 36 36
  • Page 37 37
  • Page 38 38
  • Page 39 39
  • Page 40 40
  • Page 41 41
  • Page 42 42
  • Page 43 43
  • Page 44 44