resideo THX321WFS2001W/U Installation guide

Type
Installation guide
C-Wire Adapter Guide
Online Guides
honeywellhome.com
Only use the C-Wire Adapter if
you previously answered No to
Step 12 of the Installation Guide
2
Read before installing.
Overview
This product replaces the need for a C-wire
(common wire) to power a thermostat.
Only install if you do not have a C-wire
available to connect to your thermostat.
BEFORE
AFTER
Thermostat
Thermostat
Furnace
Furnace
CWire
Adapter
3
1Confirm you have a G and Y wire
Look at your wires. Do you have
BOTH a G and Y wire labeled?
YES - This means your system is
compatible. Proceed to Step 2.
NO - Your system is not
compatible with the CWire
Adapter. Call 18557335465 to
find a pro-installer.
Compatibility Check
2
3
Relabel your G wire to be C
Use the provided labels.
Relabel your Y wire to be K
Use the provided labels.
Go to your furnace or heating system
This system is often located in your
basement, attic, or garage. Bring
labels, flashlight, screwdriver and
phone.
4
4
5
Remove cover of furnace or heating
system
Open the furnace or heating system’s
cover to find the control board.
Note: You may need to unscrew the
cover (top or bottom).
Leave the power off.
Locate the bundle of wires that
are the same as the ones at your
thermostat
G
C
R
W
Y
5
6Take a picture of the wiring
Take multiple pictures from different
angles to capture all of the letters
next to the terminals.
G
C
R
W or W1 (not in all systems)
Y or Y1
Be sure to include the terminal labels
and wires. You may need to reference
this image later.
Note: If you have wires connected to
2 R terminals, then you have a two-
transformer system. Call 1855733
5465 to find a pro installer.
G
C
R
W
Y
6
7Label the wires
Use the provided stickers to label
the wires connected to the following
terminals:
G
R
W or W1 (not in all systems)
Y or Y1
Note: If multiple wires are connected
to a terminal, only label the wires
running to your thermostat.*
EXAMPLE
C
W or W1
Y or Y1
R
G
W2
R
G
W
Y
*
7
8Disconnect the labeled wires
Be sure you have taken a photo of
your wires before disconnecting.
Disconnect only the wires that you
just labeled. Do not disconnect any
unlabeled wires.*
If unlabeled wires disconnect, replace
immediately.*
Note: You may need a screwdriver to
release wires from terminals.
EXAMPLE
C
W or W1
Y or Y1
R
G
W2
R
G
W
Y
*
8
9Connect wires to the C-Wire Adapter
Firmly depress the terminal tabs
and insert the labeled wires into the
“Thermostat” side of your CWire
Adapter.
Insert the wires into their
corresponding terminals as shown
below.
THERMOSTAT
EQUIPMENT
W
R
Y
G
W
G
Y
R
W
C
K
R
Wires Terminals
This will convert the G
into C and Y into K wires
at your thermostat.
9
10
11
Ensure the wires are connected
Gently tug on the wires to be sure they
are connected to the CWire Adapter.
Connect wires to control board
Take the wires from the “Equipment”
side of your CWire Adapter and
connect them to the control board.
Be sure to remove the plastic tips
and insert the wires into their
corresponding terminals as shown
below.
THERMOSTAT
EQUIPMENT
W
R
Y
G
EXAMPLE
C
W or W1
Y or Y1
R
G
W2
W
R
Y
G
C
10
12 Mount C-Wire Adapter
Use the included mount and adhesive
pad to mount the CWire Adapter
inside your furnace or heating system.
Note: Make sure your wires are not
over extended or strained.
a) Clean the surface
b) Firmly press the adhesive
c) Mount the CWire Adapter
Surface CWire
Adapter
Adhesive
Mount anywhere inside the furnace.
11
13
14
Close the cover to the furnace or
heating system
Be sure the cover is completely
closed. Some systems will not power
up if the cover is not fully closed.
Leave the power off.
You’ve connected the CWire Adapter.
Go back to the “Installing Your
New Thermostat” section of the
Installation Guide to complete the
installation.
9
33-00422ES-03
Resideo Technologies Inc.
1985 Douglas Drive North,
Golden Valley, MN 55422
1-800-468-1502
33-00422ES—03 M.S. Rev. 04-20 |
Printed in United States
www.resideo.com
© 2020 Resideo Technologies, Inc. All rights reserved.
The Honeywell Home trademark is used under license from
Honeywell International, Inc. This product is manufactured by
Resideo Technologies, Inc. and its affiliates.
Todos los derechos reservados. La marca comercial Honeywell
Home se utiliza bajo licencia de Honeywell International, Inc.
Este producto es fabricado por Resideo Technologies, Inc. y sus
afiliados.
Electrical Specifications
INPUT: 24V~@60Hz, 0.2A
Guías en línea
honeywellhome.com
Use el adaptador del cable C
solamente si respondió No
en el paso 12 de la Guía de
instalación
Guía del adaptador del cable C
2
Leer antes de instalar.
Descripción general
Este reemplaza la necesidad de un cable de
alimentación C (común) para alimentar el
termostato.
Instálelo solamente si no tiene un cable de
alimentación C disponible para conectar al
termostato.
ANTES
DESPUÉS
Termostato
Termostato
Caldera
Caldera
Adaptador del
cable C
3
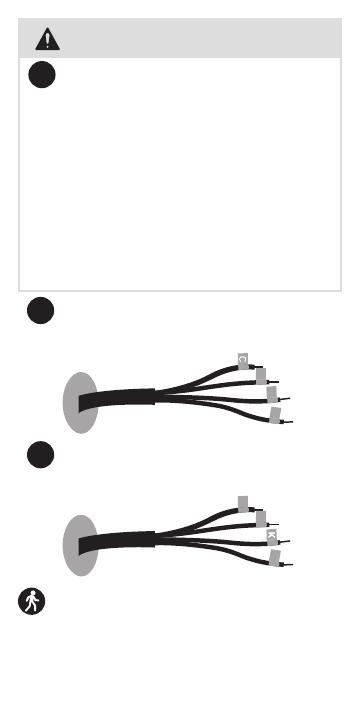
1Confirme si tiene un cable G e Y
Mire los cables. ¿Tiene un cable
etiquetado G e Y?
SÍ. Esto significa que su sistema
es compatible. Continúe con el
paso 2.
NO. Su sistema no es compatible
con el adaptador del cable C.
Llame al 18557335465 para
obtener un instalador profesional.
Verificación de compatibilidad
2
3
Reetiquete el cable G como C
Use las etiquetas suministradas.
Reetiquete el cable Y como K
Use las etiquetas suministradas.
Diríjase a su sistema de caldera o
calefacción
Este sistema suele encontrarse en
el sótano, el ático o el garaje. Traiga
consigo las etiquetas, una linterna, un
destornillador y el teléfono.
4
4
5
Quite la cubierta del sistema de
caldera o calefacción
Abra la cubierta del sistema de
caldera o calefacción para hallar la
tarjeta de control.
Nota: Es posible que necesite
desatornillar la cubierta (de la parte
superior o inferior).
Deje la alimentación
desconectada.
Ubique el conjunto de cables que
son iguales a los del termostato
G
C
R
W
Y
5
6Tome una fotografía del cableado
Tome varias fotografías desde
ángulos diferentes para capturar
todas las letras que se encuentran al
lado de los terminales.
G
C
R
W o W1 (no en todos los sistemas)
Y o Y1
Asegúrese de incluir los cables y
las etiquetas de los terminales. Es
posible que después necesite tomar
la imagen como referencia.
Nota: Si hay cables conectados a 2
terminales R, tiene un sistema de dos
transformadores. Llame al 1855
7335465 para obtener un instalador
profesional.
G
C
R
W
Y
6
7Etiquete los cables
Use las etiquetas autoadhesivas
suministradas para etiquetar los
cables conectados a los siguientes
terminales:
G
R
W o W1 (no en todos los sistemas)
Y o Y1
Nota: Si varios cables se conectan a
un terminal, etiquete solamente los
que van al termostato.*
EJEMPLO
C
W o W1
Y o Y1
R
G
W2
R
G
W
Y
*
7
8Desconecte los cables etiquetados
Antes de desconectarlos, asegúrese
de haber tomado una fotografía de
los cables.
Desconecte solamente los cables
que acaba de etiquetar. No
desconecte ningún cable que no esté
etiquetado.*
Si se desconecta algún cable que no
esté etiquetado, vuelva a colocarlo de
inmediato.*
Nota: Es posible que necesite un
destornillador para liberar los cables
de los terminales.
EJEMPLO
C
W o W1
Y o Y1
R
G
W2
R
G
W
Y
*
8
9Conecte los cables al adaptador del
cable C
Presione firmemente las pestañas
de los terminales e inserte los cables
etiquetados del lado del adaptador
del cable C etiquetado “Termostato.
Inserte los cables en los terminales
correspondientes, como se indica a
continuación.
TERMOSTATO
EQUIPO
W
R
Y
G
W
G
Y
R
W
C
K
R
Cables Terminales
Esto convertirá el cable
G en C y el Y en K en el
termostato.
  • Page 1 1
  • Page 2 2
  • Page 3 3
  • Page 4 4
  • Page 5 5
  • Page 6 6
  • Page 7 7
  • Page 8 8
  • Page 9 9
  • Page 10 10
  • Page 11 11
  • Page 12 12
  • Page 13 13
  • Page 14 14
  • Page 15 15
  • Page 16 16
  • Page 17 17
  • Page 18 18
  • Page 19 19
  • Page 20 20
  • Page 21 21
  • Page 22 22
  • Page 23 23
  • Page 24 24

resideo THX321WFS2001W/U Installation guide

Type
Installation guide

Ask a question and I''ll find the answer in the document

Finding information in a document is now easier with AI

in other languages