Page is loading ...

AD116441 LUXURY SQUARE SHOWER CURTAIN ROD
Fitting Instructions
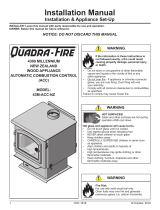
• Fixing Pack Contents
Fixing screw x 4
Wall plug x 4
Hex head key x 2 (small & large)
Spare grub screw x 2
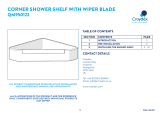
• Pack Contents
Wall bracket x 2
Wall bracket cover x 2
Hooks x 12
Straight Joint x 1
Wall bracket Wall bracket cover
Collar x 2
1.25m Rod x 2
• Tools Required
Drill Hooks
6mm masonry drill bit
6mm ceramic drill bit (optional)
Screwdriver
Pencil
Spirit level
Small hack saw Straight Joint Collar
Hex head keys (included in fixing pack)
Keep DIY tools out of the reach of children Rod
Home Safety Advice
Before drilling, check for hidden cables and pipework. If you are using an electric drill, take
extreme care of any surplus water in the vicinity of the working area. It is advisable to use a
residual current circuit breaker (RCCB). Always take care and use eye protection.
On tiled walls always use a ceramic drill bit and ensure that the drill hole passes through the
central tiled area. To prevent surface damage to the tile from drill slippage, mask the area around
the hole with tape before drilling.
Do not use this product as a grab bar.
We recommend that two people fit this product to ensure that it is fitted safely.

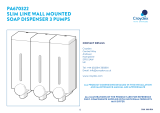
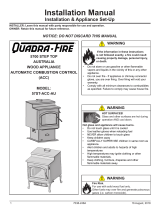
1.The rod is supplied as two 1.25m lengths which can be joined together
using the straight joint provided. Firstly lay the two rods down on a flat
level surface. One end of each of the rods has a hole pierced into it
approximately 50mm from the end. Insert the straight joint into one of
these ends so that the grub screw is central with the hole in the rod.
Using the larger of the two hex head keys, provided, rotate the grub
screw clockwise until the straight joint is clamped tightly in position (see
Fig. 1). Fig. 1
2. Assemble the second rod onto the straight joint making sure that the tube
ends are pushed tightly together, align the hole with the grub screw and again
clamp tightly in position (see Fig. 2).
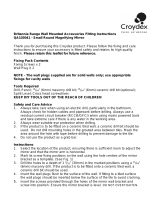
3. Select desired position of rod and mark centres of the mounting holes
using the wall brackets as a template (Fig. 3).
Make sure that the wall brackets are level with each other before drilling. Fig.2
4. Using a 6mm masonry drill, drill the holes in the marked positions
to a depth of 40mm. If drilling through tiles, please pre-drill using a
ceramic drill bit.
5. Insert the wall plugs to the surface of the wall. If fitting to a tiled surface,
the wall plug should be inserted below the surface of the tile to avoid
cracking.
6. Accurately measure the distance between the fixing surfaces. Carefully
cut one end of the assembled rod 42 mm shorter than the measured Fig. 3
distance between the fixing surfaces (see Fig. 4). Ensure the end of the rod
is cut square and the cut edge is de-burred.
7. Hang the wall bracket covers onto the wall brackets (see Fig. 5).
Fig. 4
8. Position the hooks and collars onto the rod making sure they are in
the correct orientation and that the pierced holes of the rod are at the
top.
Locate the rod between the wall brackets and slide each collar onto
the wall brackets making sure the collars locate into the square holes
of the wall bracket covers.
Align the wall bracket covers and then secure each collar in position by tightening
the grub screw closest to the wall (a). Once these are secured tighten the
second grub screw (b) in each collar onto the rod (see Fig. 6).
Fig. 5
8. Check that the wall brackets are level by placing a spirit level onto the
rod.
9. The rod is now ready to hang a curtain. If required lightly apply silicone
polish to the top of the rail to reduce hook friction.
Product Care
To retain the best quality finish, clean product regularly with a soft cloth and
mild detergents. Do not use abrasive or chemical cleaners as these will
damage the product. Fig. 6
Please retain these instructions for future reference.
Croydex Ltd, Central Way, Andover,
Hampshire, SP10 5AW, United Kingdom
Website: www.croydex.co.uk
E-Mail: [email protected]
R&R 001 R01
/