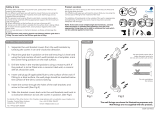
Page is loading ...

Please follow the fixing and care instructions to ensure your curtain rod is fitted safely and retains its
high quality finish.
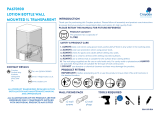
This instruction leaflet applies to the following products:
AD169441 Space Saver Rod Maximum gap width 6’ – Minimum gap width 58 ⅜"
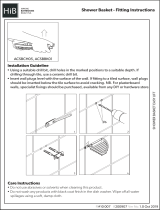
Fixing Pack Contents
(A) Fixing screws x 4 (D) Alignment guide x 1
(B) Wall plugs x 4 (E) O-ring x 2
(C) Hex head key x 1
Tools Required
Drill; ¼” masonry drill bit (1/4” ceramic drill bit optional); Cross-head screwdriver; Pencil; Spirit level;
Fine Tooth Hacksaw; Hex Head Key (Supplied)
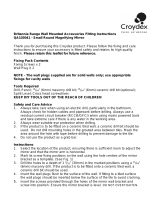
KEEP DIY TOOLS OUT OF THE REACH OF CHILDREN
Home Safety Advice
Always take care when using an electric drill, particularly in the bathroom. Always check for hidden
cables and pipework before drilling and take extreme care if there is any water in the working area.
It is advisable to use a residual current circuit breaker (RCCB).
Always wear suitable eye protection when drilling.
If the product is to be fitted on a ceramic tiled wall, a ceramic drill bit should be used. Always ensure
that the drill hole passes through the central tiled area rather than through the grouted area. To prevent
damage to the tile, mask the area around the hole with tape before drilling.
Note: The wall plugs supplied are for use on solid walls only. For cavity walls or drywall, use
specialist fixings that are available from all good DIY stores.
Fixing Instructions
1. Firstly, separate the swivel joint components by removing the cross head screw. (See Fig.1)
2. Select a suitable position for the Space Saver Rod and mark its fixing positions on the wall by
using the holes in the wall brackets as a template. The brackets have been designed to be fitted
with the fixing holes in a vertical position and the ‘Arrow’ pointing into the bath or shower tray.
(See fig 3). Remember to allow for sufficient curtain overlap in the bath/shower tray and also
ensure there is sufficient height above the rod to be able to rotate it. (See Fig.2)
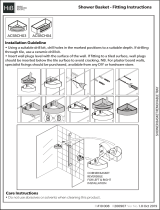
3. Check that the hole positions are level, then use a ¼” masonry drill bit to drill the holes to a depth
of 1 ¼”. If drilling through tiles, please pre-drill using a ceramic drill bit.
4. Insert the wall plugs to the surface of the wall. If fitting to a tiled surface, the wall plugs should be
inserted below the surface of the tile to avoid cracking. Fix the wall brackets in position using the
screws provided and rotate the swivel insert so that the flat surface faces upwards. (Fig.3 & 4)
5. The rod is supplied to a defined length which fits into a recess of 6’ (when the joint inserts are
fully extended) and into a 58⅜" recess (when the joints are fully inserted) into the rod. (See Fig.6)
The adjustability of the joint inserts will cater for measurements in-between these, if required.
R&R 039 R02
6. Place the rod, with the curve pointing into the room, in position on the wall brackets and align the
flexible joint assembly screw holes by either extending or inserting the joints into the tube. (See
Fig.6) Do not extend the joint further than the line shown in Fig.5. Do ensure the wall bracket
swivel joints are fully inserted into the wall brackets. (See Fig.4)

7. Mark the positions of the joint inserts and then place the rod carefully onto a flat surface. Position
the alignment guide onto the end of the joint with the flat face of the alignment guide facing
downwards. (See Fig.7) Rotate the joint until it is aligned with the rod and tighten the expansion
joint using the hex head key provided. (See Fig.8) Repeat for the opposite end.
8. Replace the rod to check the alignment of the flexible joint screw holes. If adjustment is required,
undo the expansion joint screw by 2 or 3 turns and hit the end of the hex head key with a
hammer. This will release the cone insert allowing correct adjustment to be made. DO NOT
FULLY UNWIND THE HEX HEAD SCREW.
9. Slide the wall bracket and the ball covers onto the rod, noting the orientation of the covers. (See
Fig.9) Place the O-ring over the end of the joint, locating it into the annular recess. (See Fig.10)
10. Assemble the rod to the wall bracket swivel inserts ensuring the curve of the rod is pointing into
the room. Place the plastic bush between the two halves of the flexible joint and screw them
tightly together. (See Fig.11 & 12)
11. Once the rod is in position carefully slide the ball cover over the flexible joint until it engages with
the O-ring. Slide the wall bracket cover over the wall bracket, aligning the two tabs at the back of
the cover with the two recesses in the wall bracket. (See Fig.13 &14) Twist the cover clockwise
to secure in position. (See Fig.15)
12. Hook the Rod Reacher onto the rod and rotate the rod to check the assembly is working
correctly.
Product Care Advice
To retain the best quality finish, clean product regularly with a soft damp cloth.
Do not use abrasive or chemical cleaners, as these will damage the product.
Please retain this leaflet for future reference.
Croydex Ltd, Central Way, Andover, Hants, SP105AW, UK
Tel: +44 (0) 1264 365881 ~ Fax: +44 (0) 1264 356437
website: www.croydex.com ~ Email: [email protected]
R&R 039 R02
/