
10300 Campus Point Drive
San Diego, California 92121 U.S.A.
Visit us at www.kyocera-wireless.com
For accessories, visit www.kyocera-wireless.com/store
82-K5033-4, Rev. 001
The Kyocera 7135
Smartphone
Reference Guide

This manual is based on the production version of the 7135 smartphone by Kyocera. Software changes may have
occurred after this printing. Kyocera reserves the right to make changes in technical and product specifications without
prior notice. The products and equipment described in this documentation are manufactured under license from
QUALCOMM Incorporated under one or more of the following U.S. patents:
FCC/IC Notice
This device complies with part 15 of the FCC rules. Operation is subject to the following two conditions: (1) This device
may not cause harmful interference, and (2) this device must accept any interference received, including interference
that may cause undesired operation.
The exposure standard for wireless mobile phones employs a unit of measurement known as the Specific Absorption
Rate, or SAR. The SAR limit set by the FCC is 1.6Watts per kilogram (W/kg). Tests for SAR are conducted using
standard operating positions specified by the FCC with the phone transmitting at its highest certified power level in all
tested frequency bands. Although the SAR is determined at the highest certified power level, the actual SAR level of
the phone while operating can be well below the maximum value. This is because the phone is designed to operate at
multiple power levels so as to use only the power required to reach the network. In general, the closer you are to a
wireless base station antenna, the lower the power output.
Before a phone model is available for sale to the public, it must be tested and certified to the FCC that it does not
exceed the limit established by the government-adopted requirement for safe exposure. The tests are performed in
positions and locations (e.g., at the ear and worn on the body) as required by the FCC for each model. The highest
SAR value for this model phone when tested for use at the ear is 0.89 W/kg and when worn on the body at the waist is
0.34 W/kg. (Body-worn measurements differ among phone models, depending upon available accessories and FCC
requirements). While there may be differences between the SAR levels of various phones and at various positions,
they all meet the government requirement for safe exposure.
4,901,307 5,056,109 5,099,204 5,101,501 5,103,459 5,107,225 5,109,390 5,193,094 5,228,054
5,257,283 5,265,119 5,267,261 5,267,262 5,280,472 5,283,536 5,289,527 5,307,405 5,309,474
5,337,338 5,339,046 5,341,456 5,383,219 5,392,287 5,396,516 D356,560 5,408,697 5,414,728
5,414,796 5,416,797 5,426,392 5,437,055 D361,065 5,442,322 5,442,627 5,452,473 5,461,639
5,469,115 5,469,471 5,471,497 5,475,870 5,479,475 5,483,696 5,485,486 5,487,175 5,490,165
5,497,395 5,499,280 5,504,773 5,506,865 5,509,015 5,509,035 5,511,067 5,511,073 5,513,176
5,515,177 5,517,323 5,519,761 5,528,593 5,530,928 5,533,011 5,535,239 5,539,531 5,544,196
5,544,223 5,546,459 5,548,812 5,559,881 5,559,865 5,561,618 5,564,083 5,566,000 5,566,206
5,566,357 5,568,483 5,574,773 5,574,987 D375,740 5,576,662 5,577,022 5,577,265 D375,937
5,588,043 D376,804 5,589,756 5,590,069 5,590,406 5,590,408 5,592,548 5,594,718 5,596,570
5,600,754 5,602,834 5,602,833 5,603,096 5,604,459 5,604,730 5,608,722 5,614,806 5,617,060
5,621,752 5,621,784 5,621,853 5,625,876 5,627,857 5,629,955 5,629,975 5,638,412 5,640,414
5,642,398 5,644,591 5,644,596 5,646,991 5,652,814 5,654,979 5,655,220 5,657,420 5,659,569
5,663,807 5,666,122 5,673,259 5,675,581 5,675,644 5,680,395 5,687,229 D386,186 5,689,557
5,691,974 5,692,006 5,696,468 5,697,055 5,703,902 5,704,001 5,708,448 5,710,521 5,710,758
5,710,768 5,710,784 5,715,236 5,715,526 5,722,044 5,722,053 5,722,061 5,722,063 5,724,385
5,727,123 5,729,540 5,732,134 5,732,341 5,734,716 5,737,687 5,737,708 5,742,734 D393,856
5,748,104 5,751,725 5,751,761 5,751,901 5,754,533 5,754,542 5,754,733 5,757,767 5,757,858
5,758,266 5,761,204 5,764,687 5,774,496 5,777,990 5,778,024 5,778,338 5,781,543 5,781,856
5,781,867 5,784,406 5,784,532 5,790,589 5,790,632 5,793,338 D397,110 5,799,005 5,799,254
5,802,105 5,805,648 5,805,843 5,812,036 5,812,094 5,812,097 5,812,538 5,812,607 5,812,651
5,812,938 5,818,871 5,822,318 5,825,253 5,828,348 5,828,661 5,835,065 5,835,847 5,839,052
5,841,806 5,842,124 5,844,784 5,844,885 5,844,899 5,844,985 5,848,063 5,848,099 5,850,612
5,852,421 5,854,565 5,854,786 5,857,147 5,859,612 5,859,838 5,859,840 5,861,844 5,862,471
5,862,474 5,864,760 5,864,763 5,867,527 5,867,763 5,870,427 5,870,431 5,870,674 5,872,481
5,872,774 5,872,775 5,872,823 5,877,942 5,878,036 5,870,631 5,881,053 5,881,368 5,884,157
5,884,193 5,884,196 5,892,178 5,892,758 5,892,774 5,892,816 5,892,916 5,893,035 D407,701
5,898,920 5,903,554 5,903,862 D409,561 5,907,167 5,909,434 5,910,752 5,911,128 5,912,882
D410,893 5,914,950 5,915,235 5,917,708 5,917,811 5,917,812 5,917,837 5,920,284 5,920,834
D411,823 5,923,650 5,923,705 5,926,143 5,926,470 5,926,500 5,926,786 5,926,786 5,930,230
5,930,692 Other patents pending.

Warning
Use only Kyocera Wireless Corp. approved accessories with Kyocera Wireless Corp. phones. Use of any unauthorized
accessories may be dangerous and will invalidate the phone warranty if said accessories cause damage or a defect to
the phone.
To comply with FCC radiation exposure requirements, use of this device for body-worn operational configurations is
limited to accessories tested and approved by Kyocera Wireless Corp. Other accessories used with this device for
body-worn operations must not contain any metallic components and must provide at least 22.75mm separation
distance including the antenna and the user’s body. Other belt-clips, holsters or similar accessories that have not been
tested for body-worn SAR may not comply with FCC RF exposure limit and should be avoided.
Caution
The user is cautioned that changes or modifications not expressly approved by the party responsible for compliance
could void the warranty and user’s authority to operate the equipment.
Apple and Macintosh are registered trademarks, and iMac is a trademark of Apple Computer, Inc. Kyocera is a
registered trademark of Kyocera Corporation. QCP is a trademark of Kyocera Wireless Corp. Microsoft, Windows, and
Windows NT are registered trademarks of Microsoft Corporation. Graffiti and HotSync are registered trademarks, and
Palm and the Palm Computing platform logo are trademarks of Palm, Inc., 3COM Corporation, or its subsidiaries.
Eudora is a registered trademark of the University of Illinois Board of Trustees, licensed to QUALCOMM Incorporated.
America Online and Compuserve are registered trademarks of America Online, Inc. WinFax is a registered trademark
of Symantec Corporation. Other product and brand names may be trademarks or registered trademarks of their
respective owners.
Copyright © 2002 Kyocera Wireless Corp. All rights reserved. Printed in the United States of America.
Portions of this document are Copyright © 1998 3Com Corporation or its subsidiaries. Reprinted with permission.
82-K5033-4, Rev. 001


v
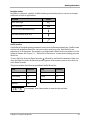
Contents
1 Introducing the Kyocera 7135 Smartphone . . . . . . . . . . . . . . . . . . . . . . . . . . . . . .1
What to do first . . . . . . . . . . . . . . . . . . . . . . . . . . . . . . . . . . . . . . . . . . . . . . . . . . . . . . . . . . .1
Turning the phone on and off . . . . . . . . . . . . . . . . . . . . . . . . . . . . . . . . . . . . . . . . . . . . . . .3
Phone features . . . . . . . . . . . . . . . . . . . . . . . . . . . . . . . . . . . . . . . . . . . . . . . . . . . . . . . . . . . .5
Palm applications . . . . . . . . . . . . . . . . . . . . . . . . . . . . . . . . . . . . . . . . . . . . . . . . . . . . . . . . .7
Accessories for your Kyocera 7135 Smartphone . . . . . . . . . . . . . . . . . . . . . . . . . . . . . . .8
Where to get more information . . . . . . . . . . . . . . . . . . . . . . . . . . . . . . . . . . . . . . . . . . . . .9
Where to go next . . . . . . . . . . . . . . . . . . . . . . . . . . . . . . . . . . . . . . . . . . . . . . . . . . . . . . . . . .9
2 Making and Receiving Calls . . . . . . . . . . . . . . . . . . . . . . . . . . . . . . . . . . . . . . . . .11
Dialing calls on the keypad . . . . . . . . . . . . . . . . . . . . . . . . . . . . . . . . . . . . . . . . . . . . . . . .11
Making a call from Speed Dial . . . . . . . . . . . . . . . . . . . . . . . . . . . . . . . . . . . . . . . . . . . . .12
Making a call from the Address Book . . . . . . . . . . . . . . . . . . . . . . . . . . . . . . . . . . . . . . .13
Redialing recent calls . . . . . . . . . . . . . . . . . . . . . . . . . . . . . . . . . . . . . . . . . . . . . . . . . . . . .14
Checking your own phone number . . . . . . . . . . . . . . . . . . . . . . . . . . . . . . . . . . . . . . . . .16
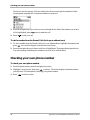
Making a data connection . . . . . . . . . . . . . . . . . . . . . . . . . . . . . . . . . . . . . . . . . . . . . . . . .17
Answering calls . . . . . . . . . . . . . . . . . . . . . . . . . . . . . . . . . . . . . . . . . . . . . . . . . . . . . . . . . .17
Answering calls “hands-free” . . . . . . . . . . . . . . . . . . . . . . . . . . . . . . . . . . . . . . . . . . . . . .18
Ending calls . . . . . . . . . . . . . . . . . . . . . . . . . . . . . . . . . . . . . . . . . . . . . . . . . . . . . . . . . . . . .19
Adjusting sounds . . . . . . . . . . . . . . . . . . . . . . . . . . . . . . . . . . . . . . . . . . . . . . . . . . . . . . . .19
Seaching for contacts . . . . . . . . . . . . . . . . . . . . . . . . . . . . . . . . . . . . . . . . . . . . . . . . . . . . .21
Using power-save mode . . . . . . . . . . . . . . . . . . . . . . . . . . . . . . . . . . . . . . . . . . . . . . . . . .23
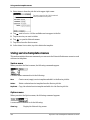
Viewing the phone status bar . . . . . . . . . . . . . . . . . . . . . . . . . . . . . . . . . . . . . . . . . . . . . .24
3 Using the Organizer . . . . . . . . . . . . . . . . . . . . . . . . . . . . . . . . . . . . . . . . . . . . . . . .25
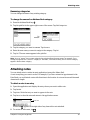
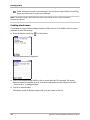
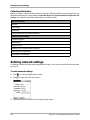
Selecting applications . . . . . . . . . . . . . . . . . . . . . . . . . . . . . . . . . . . . . . . . . . . . . . . . . . . . .25
Entering information . . . . . . . . . . . . . . . . . . . . . . . . . . . . . . . . . . . . . . . . . . . . . . . . . . . . .27
Using application controls . . . . . . . . . . . . . . . . . . . . . . . . . . . . . . . . . . . . . . . . . . . . . . . . .34
Using menus . . . . . . . . . . . . . . . . . . . . . . . . . . . . . . . . . . . . . . . . . . . . . . . . . . . . . . . . . . . .34
Choosing fonts . . . . . . . . . . . . . . . . . . . . . . . . . . . . . . . . . . . . . . . . . . . . . . . . . . . . . . . . . . .36
Using categories . . . . . . . . . . . . . . . . . . . . . . . . . . . . . . . . . . . . . . . . . . . . . . . . . . . . . . . . .36
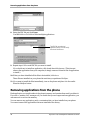
Attaching notes . . . . . . . . . . . . . . . . . . . . . . . . . . . . . . . . . . . . . . . . . . . . . . . . . . . . . . . . . .39
Marking private entries . . . . . . . . . . . . . . . . . . . . . . . . . . . . . . . . . . . . . . . . . . . . . . . . . . .40
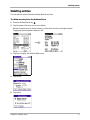
Installing applications . . . . . . . . . . . . . . . . . . . . . . . . . . . . . . . . . . . . . . . . . . . . . . . . . . . .40
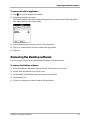
Removing applications from the phone . . . . . . . . . . . . . . . . . . . . . . . . . . . . . . . . . . . . .42
Removing the Desktop software . . . . . . . . . . . . . . . . . . . . . . . . . . . . . . . . . . . . . . . . . . .43
4 Transferring Information . . . . . . . . . . . . . . . . . . . . . . . . . . . . . . . . . . . . . . . . . . . .45
Installing Palm Desktop for the 7135 Smartphone . . . . . . . . . . . . . . . . . . . . . . . . . . . . .45
Synchronizing data using the sync cradle . . . . . . . . . . . . . . . . . . . . . . . . . . . . . . . . . . . .48
Synchronizing data remotely . . . . . . . . . . . . . . . . . . . . . . . . . . . . . . . . . . . . . . . . . . . . . .50
Synchronizing data using the infrared port . . . . . . . . . . . . . . . . . . . . . . . . . . . . . . . . . .54

vi Kyocera Smartphone Reference Guide
Creating a user profile . . . . . . . . . . . . . . . . . . . . . . . . . . . . . . . . . . . . . . . . . . . . . . . . . . . .58
Modifying synchronization options . . . . . . . . . . . . . . . . . . . . . . . . . . . . . . . . . . . . . . . . .60
Customizing a conduit . . . . . . . . . . . . . . . . . . . . . . . . . . . . . . . . . . . . . . . . . . . . . . . . . . . .61
Transferring information between Palm devices . . . . . . . . . . . . . . . . . . . . . . . . . . . . . .63
Troubleshooting HotSync operations . . . . . . . . . . . . . . . . . . . . . . . . . . . . . . . . . . . . . . .65
Beaming information . . . . . . . . . . . . . . . . . . . . . . . . . . . . . . . . . . . . . . . . . . . . . . . . . . . . .66
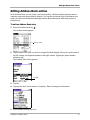
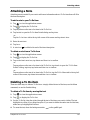
5 Address Book . . . . . . . . . . . . . . . . . . . . . . . . . . . . . . . . . . . . . . . . . . . . . . . . . . . . .69
Creating Address Book entries . . . . . . . . . . . . . . . . . . . . . . . . . . . . . . . . . . . . . . . . . . . . .69
Making calls from the Address Book . . . . . . . . . . . . . . . . . . . . . . . . . . . . . . . . . . . . . . . .70
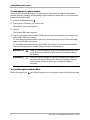
Editing Address Book entries . . . . . . . . . . . . . . . . . . . . . . . . . . . . . . . . . . . . . . . . . . . . . .71
Beaming entries to other devices . . . . . . . . . . . . . . . . . . . . . . . . . . . . . . . . . . . . . . . . . . .75
Deleting entries . . . . . . . . . . . . . . . . . . . . . . . . . . . . . . . . . . . . . . . . . . . . . . . . . . . . . . . . . .77
Using Address Book menus . . . . . . . . . . . . . . . . . . . . . . . . . . . . . . . . . . . . . . . . . . . . . . .78
6 Call History
and the Recent Calls List . . . . . . . . . . . . . . . . . . . . . . . . . . . . . . . . . . . . . . . . . . . .81
Opening lists of your recent calls . . . . . . . . . . . . . . . . . . . . . . . . . . . . . . . . . . . . . . . . . . .81
Making a call from Call History . . . . . . . . . . . . . . . . . . . . . . . . . . . . . . . . . . . . . . . . . . . .82
Viewing your calls . . . . . . . . . . . . . . . . . . . . . . . . . . . . . . . . . . . . . . . . . . . . . . . . . . . . . . .83
Deleting calls . . . . . . . . . . . . . . . . . . . . . . . . . . . . . . . . . . . . . . . . . . . . . . . . . . . . . . . . . . . .85
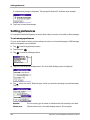
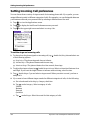
Setting up your preferences in Call History . . . . . . . . . . . . . . . . . . . . . . . . . . . . . . . . . .85
Using the menus in Call History . . . . . . . . . . . . . . . . . . . . . . . . . . . . . . . . . . . . . . . . . . .86
7 Date Book . . . . . . . . . . . . . . . . . . . . . . . . . . . . . . . . . . . . . . . . . . . . . . . . . . . . . . . .89
Scheduling events in the Date Book . . . . . . . . . . . . . . . . . . . . . . . . . . . . . . . . . . . . . . . . .89
Scheduling repeating events . . . . . . . . . . . . . . . . . . . . . . . . . . . . . . . . . . . . . . . . . . . . . . .93
Deleting an event . . . . . . . . . . . . . . . . . . . . . . . . . . . . . . . . . . . . . . . . . . . . . . . . . . . . . . . .95
Changing the Date Book view . . . . . . . . . . . . . . . . . . . . . . . . . . . . . . . . . . . . . . . . . . . . .96
Using the Date Book menus . . . . . . . . . . . . . . . . . . . . . . . . . . . . . . . . . . . . . . . . . . . . . .100
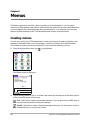
8 Memos . . . . . . . . . . . . . . . . . . . . . . . . . . . . . . . . . . . . . . . . . . . . . . . . . . . . . . . . .103
Creating memos . . . . . . . . . . . . . . . . . . . . . . . . . . . . . . . . . . . . . . . . . . . . . . . . . . . . . . . .103
Reviewing and editing memos . . . . . . . . . . . . . . . . . . . . . . . . . . . . . . . . . . . . . . . . . . . .107
Beaming a memo . . . . . . . . . . . . . . . . . . . . . . . . . . . . . . . . . . . . . . . . . . . . . . . . . . . . . . . .109
Deleting a memo . . . . . . . . . . . . . . . . . . . . . . . . . . . . . . . . . . . . . . . . . . . . . . . . . . . . . . . .109
Using Memo menus . . . . . . . . . . . . . . . . . . . . . . . . . . . . . . . . . . . . . . . . . . . . . . . . . . . . .110
9 Messages . . . . . . . . . . . . . . . . . . . . . . . . . . . . . . . . . . . . . . . . . . . . . . . . . . . . . . .113
Setting up the Messages application . . . . . . . . . . . . . . . . . . . . . . . . . . . . . . . . . . . . . . .113
Checking your messages . . . . . . . . . . . . . . . . . . . . . . . . . . . . . . . . . . . . . . . . . . . . . . . . .114
Erasing messages . . . . . . . . . . . . . . . . . . . . . . . . . . . . . . . . . . . . . . . . . . . . . . . . . . . . . . .118
Setting preferences . . . . . . . . . . . . . . . . . . . . . . . . . . . . . . . . . . . . . . . . . . . . . . . . . . . . . .120
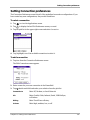
10 Setting Up Network Connections . . . . . . . . . . . . . . . . . . . . . . . . . . . . . . . . . . . .123
Getting started with network connections . . . . . . . . . . . . . . . . . . . . . . . . . . . . . . . . . .123
Entering network settings . . . . . . . . . . . . . . . . . . . . . . . . . . . . . . . . . . . . . . . . . . . . . . . .124
Creating and using service templates . . . . . . . . . . . . . . . . . . . . . . . . . . . . . . . . . . . . . .130

vii
Using service template menus . . . . . . . . . . . . . . . . . . . . . . . . . . . . . . . . . . . . . . . . . . . .132
Troubleshooting network connections . . . . . . . . . . . . . . . . . . . . . . . . . . . . . . . . . . . . .133
Creating a login script . . . . . . . . . . . . . . . . . . . . . . . . . . . . . . . . . . . . . . . . . . . . . . . . . . .133
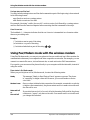
Using Fax/Modem mode with the wireless modem . . . . . . . . . . . . . . . . . . . . . . . . . .136
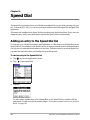
11 Speed Dial . . . . . . . . . . . . . . . . . . . . . . . . . . . . . . . . . . . . . . . . . . . . . . . . . . . . . .141
Adding an entry to the Speed Dial list . . . . . . . . . . . . . . . . . . . . . . . . . . . . . . . . . . . . . .141
Making calls using Speed Dial . . . . . . . . . . . . . . . . . . . . . . . . . . . . . . . . . . . . . . . . . . . .143
Editing the Speed Dial list . . . . . . . . . . . . . . . . . . . . . . . . . . . . . . . . . . . . . . . . . . . . . . . .143
Deleting entries . . . . . . . . . . . . . . . . . . . . . . . . . . . . . . . . . . . . . . . . . . . . . . . . . . . . . . . . .145
Using Speed Dial menus . . . . . . . . . . . . . . . . . . . . . . . . . . . . . . . . . . . . . . . . . . . . . . . . .146
12 Setting Phone Preferences . . . . . . . . . . . . . . . . . . . . . . . . . . . . . . . . . . . . . . . . .147
About preferences . . . . . . . . . . . . . . . . . . . . . . . . . . . . . . . . . . . . . . . . . . . . . . . . . . . . . . .147
Setting Accessory preferences . . . . . . . . . . . . . . . . . . . . . . . . . . . . . . . . . . . . . . . . . . . . .148
Setting Dialing preferences . . . . . . . . . . . . . . . . . . . . . . . . . . . . . . . . . . . . . . . . . . . . . . .149
Setting Display preferences . . . . . . . . . . . . . . . . . . . . . . . . . . . . . . . . . . . . . . . . . . . . . . .150
Setting Flip preferences . . . . . . . . . . . . . . . . . . . . . . . . . . . . . . . . . . . . . . . . . . . . . . . . . .151
Setting Incoming Call preferences . . . . . . . . . . . . . . . . . . . . . . . . . . . . . . . . . . . . . . . . .152
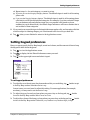
Setting Keypad preferences . . . . . . . . . . . . . . . . . . . . . . . . . . . . . . . . . . . . . . . . . . . . . . .153
Setting Phone Alert preferences . . . . . . . . . . . . . . . . . . . . . . . . . . . . . . . . . . . . . . . . . . .154
Setting Phone Service preferences . . . . . . . . . . . . . . . . . . . . . . . . . . . . . . . . . . . . . . . . .155
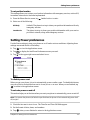
Setting Power preferences . . . . . . . . . . . . . . . . . . . . . . . . . . . . . . . . . . . . . . . . . . . . . . . .157
Setting Security preferences . . . . . . . . . . . . . . . . . . . . . . . . . . . . . . . . . . . . . . . . . . . . . .158
Setting Voice Dialing preferences . . . . . . . . . . . . . . . . . . . . . . . . . . . . . . . . . . . . . . . . . .158
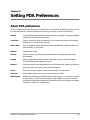
13 Setting PDA Preferences . . . . . . . . . . . . . . . . . . . . . . . . . . . . . . . . . . . . . . . . . . .159
About PDA preferences . . . . . . . . . . . . . . . . . . . . . . . . . . . . . . . . . . . . . . . . . . . . . . . . . .159
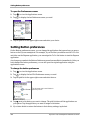
Setting Button preferences . . . . . . . . . . . . . . . . . . . . . . . . . . . . . . . . . . . . . . . . . . . . . . . .160
Setting Connection preferences . . . . . . . . . . . . . . . . . . . . . . . . . . . . . . . . . . . . . . . . . . .161
Setting the Date and Time . . . . . . . . . . . . . . . . . . . . . . . . . . . . . . . . . . . . . . . . . . . . . . . .164
Using the Digitizer . . . . . . . . . . . . . . . . . . . . . . . . . . . . . . . . . . . . . . . . . . . . . . . . . . . . . .165
Setting Format preferences . . . . . . . . . . . . . . . . . . . . . . . . . . . . . . . . . . . . . . . . . . . . . . .165
Setting General preferences . . . . . . . . . . . . . . . . . . . . . . . . . . . . . . . . . . . . . . . . . . . . . . .166
Setting Network preferences . . . . . . . . . . . . . . . . . . . . . . . . . . . . . . . . . . . . . . . . . . . . . .168
Setting Owner preferences . . . . . . . . . . . . . . . . . . . . . . . . . . . . . . . . . . . . . . . . . . . . . . .172
Setting ShortCuts preferences . . . . . . . . . . . . . . . . . . . . . . . . . . . . . . . . . . . . . . . . . . . . .172
14 To Do List . . . . . . . . . . . . . . . . . . . . . . . . . . . . . . . . . . . . . . . . . . . . . . . . . . . . . . .175
Creating To Do items . . . . . . . . . . . . . . . . . . . . . . . . . . . . . . . . . . . . . . . . . . . . . . . . . . . .175
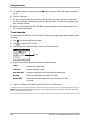
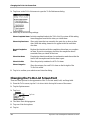
Setting Item Details . . . . . . . . . . . . . . . . . . . . . . . . . . . . . . . . . . . . . . . . . . . . . . . . . . . . . .177
Attaching a Note . . . . . . . . . . . . . . . . . . . . . . . . . . . . . . . . . . . . . . . . . . . . . . . . . . . . . . . .179
Deleting a To Do item . . . . . . . . . . . . . . . . . . . . . . . . . . . . . . . . . . . . . . . . . . . . . . . . . . . .179
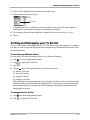
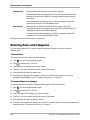
Sorting and Managing your To Do list . . . . . . . . . . . . . . . . . . . . . . . . . . . . . . . . . . . . .181
Changing the To Do List Screen Font . . . . . . . . . . . . . . . . . . . . . . . . . . . . . . . . . . . . . .182
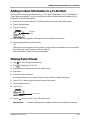
Adding Contact Information to a To Do Item . . . . . . . . . . . . . . . . . . . . . . . . . . . . . . .183
Making Items Private . . . . . . . . . . . . . . . . . . . . . . . . . . . . . . . . . . . . . . . . . . . . . . . . . . . .183
Beaming Items and Categories . . . . . . . . . . . . . . . . . . . . . . . . . . . . . . . . . . . . . . . . . . . .184

viii Kyocera Smartphone Reference Guide
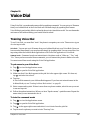
15 Voice Dial . . . . . . . . . . . . . . . . . . . . . . . . . . . . . . . . . . . . . . . . . . . . . . . . . . . . . . .185
Training Voice Dial . . . . . . . . . . . . . . . . . . . . . . . . . . . . . . . . . . . . . . . . . . . . . . . . . . . . . .185
Making and answering calls with Voice Dial . . . . . . . . . . . . . . . . . . . . . . . . . . . . . . . .186
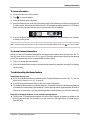
16 Troubleshooting . . . . . . . . . . . . . . . . . . . . . . . . . . . . . . . . . . . . . . . . . . . . . . . . .187
Where to find help . . . . . . . . . . . . . . . . . . . . . . . . . . . . . . . . . . . . . . . . . . . . . . . . . . . . . .187
Resetting the phone . . . . . . . . . . . . . . . . . . . . . . . . . . . . . . . . . . . . . . . . . . . . . . . . . . . . .189
Troubleshooting tips . . . . . . . . . . . . . . . . . . . . . . . . . . . . . . . . . . . . . . . . . . . . . . . . . . . . .190
Phone care . . . . . . . . . . . . . . . . . . . . . . . . . . . . . . . . . . . . . . . . . . . . . . . . . . . . . . . . . . . . .193
Safety information . . . . . . . . . . . . . . . . . . . . . . . . . . . . . . . . . . . . . . . . . . . . . . . . . . . . . . .196

Chapter 1 Introducing the Kyocera 7135 Smartphone 1
Chapter 1
Introducing the Kyocera 7135
Smartphone
Congratulations on your purchase of the Kyocera 7135 smartphone.
Your new phone combines many leading-edge technologies, giving you the convenience of a
CDMA digital phone, an electronic organizer, a media player, an MP3 player, and many other
applications in a single handset.
The Kyocera smartphone looks and works like other phones and electronic organizers you may
already have used. But it is much more, since it is both a phone and an organizer. Because these
features are completely integrated, you can use the telephone features and the organizer features
together or independently. You can use the organizer applications without turning the phone on
at all.
This chapter introduces your phone and provides an overview of its features.
What to do first
Before first use, you must install the main battery and fully charge it. You must also allow enough
time for the internal backup battery to charge completely. You will need the following:
■ Kyocera 7135 smartphone
■ battery
■ phone power cable
■ sync cradle (optional)
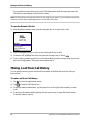
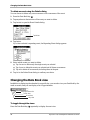
To install the battery
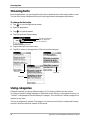
Before using the phone for the first time, you must install and fully charge the battery.
1. With the phone turned off, use the stylus or your finger to open
the battery compartment on the lower back of the phone. Lift off
the battery compartment cover.
2. Slide the battery into the compartment with the Kyocera label
facing up toward you and the arrow pointing toward the bottom
of the phone. The end of the battery with three copper-colored
depressions goes toward the bottom of the phone.

2 Kyocera 7135 Smartphone Reference Guide
What to do first
3. Apply gentle pressure until the battery snaps into place. Then replace the battery cover by
inserting the top of the battery cover first. Apply gentle pressure to the bottom of the battery
cover to snap it closed.
Note: In addition to the main battery you just installed, your phone has an internal backup battery. During
shipment, this backup battery may have become discharged. If so, the phone will not power up immediately
after you install the main battery. Just connect the phone to the power cable or place it in the cradle as
explained in the next section.
To charge the batteries
Both the batteries—the main battery you just installed and the internal backup battery—are
recharged when the phone is connected to power. You can charge the batteries using either the
power cable or the sync cradle.
To charge the batteries using the power cable
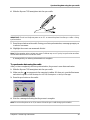
1. Insert the small round plug of the power cable (a) into the
round port on the base of the phone. Plug the other end into
an AC power outlet.
The message “Phone is charging” appears on the screen. Before
your first use of the phone, wait until the message “Charging is
complete” appears. If the battery is completely drained, it may
take 2–3 hours to charge the first time.
2. Unplug the phone from the power cable.
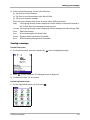
To charge the batteries in the sync cradle
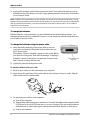
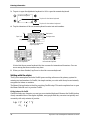
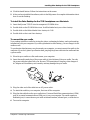
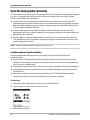
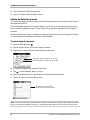
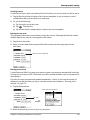
1. Place the sync cradle on a flat surface near your computer.
2. Insert the small round plug of the power cable (a) into the base of the sync cradle. Plug the
cable’s other end into a power outlet.
3. To attach the sync cradle to your computer:
■ Turn off the computer.
■ Plug the data cable from the sync cradle into a Universal Serial Bus serial communications
(COM) port (b) or the RS-232 serial port (c) on your computer. The sync cradle requires a
dedicated port; it cannot share a port with an internal modem, IR port, or other device.
■ Turn on the computer.
Insert small round
plug here

Chapter 1 Introducing the Kyocera 7135 Smartphone 3
Turning the phone on and off
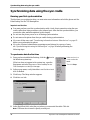
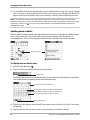
4. Slide the base of the phone into the sync cradle.
The message “Phone is charging” appears on the screen.
Before your first use of the phone, wait until the message
“Charging is complete” appears. If the battery is completely
drained, it may take 2-3 hours to charge the first time.
Once the main battery is charged, you can use the Kyocera
7135 Smartphone in or out the cradle for all functions.
Leaving the phone in the cradle when not being used is a
convenient way to keep the battery charged.
5. If you purchased an extra battery, it can be recharged in the cradle at the same time. Slide the
battery into the rear port with the Kyocera label facing up.
The light on the sync cradle shows the battery’s status in the rear port.
■ No light—No battery installed.
■ Red—Battery charging.
■ Green—Battery fully charged.
■ Slow flashing red—Battery is not making contact or there is a charging problem. Reset the
battery. If the problem is not resolved, contact your service provider.
■ Fast flashing red—An incorrect charging accessory is being used to charge the battery. Use
only the Kyocera 7135 sync cradle or the correct power cable.
Note: The first port filled is the first port charged. If you insert an extra battery into the rear port before
placing the phone in the front port, the extra battery is charged first.
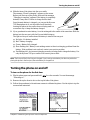
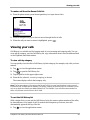
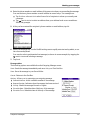
Turning the phone on and off
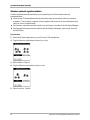
To turn on the phone for the first time
1. Flip the phone open and press and hold for a few seconds. You see the message
“Powering on”.
2. Remove the stylus from its slot on the top left side of the phone.
3. Follow the procedures in the welcome screens to calibrate the phone. Use the stylus to tap the
screen when instructed.

4 Kyocera 7135 Smartphone Reference Guide
Turning the phone on and off
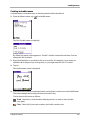
4. Follow the instructions and tap the Graffiti writing area below the screen.
5. When finished calibrating the screen, tap Done. The phone is now ready to use.
Note: To prevent scratches, never use a pen, pencil, or other sharp object to tap or write on the screen.
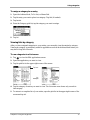
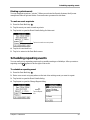
To turn the phone on and off anytime
1. Press and hold down for a few seconds. Status messages appear on the screen.
2. When the phone is on and it finds a signal, the home screen appears.
Hold To Power Off.
If no signal is
found
If a signal is
found
Hold To Power On. Powering On.
Powering Off.
Phone is ON.
Phone is
searching or OFF.
Phone is OFF.
The home screen gives
information about
battery power and signal
strength. From this
screen, access menus
by pressing the
navigation key

Chapter 1 Introducing the Kyocera 7135 Smartphone 5
Phone features
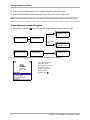
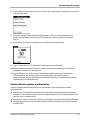
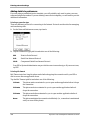
Phone features
Getting to know the function keys
Note: The Date book, Address book, messages, and Web keys can be customized to represent any function.
PDA key takes you to the Application Launcher screen.
Dialer key shows the main screen of the phone.
Dropdown menu key allows you to perform selected functions in the application you
are using.
Find key allows you to search for files and applications on your smartphone.
Date book key opens the date book to schedule appointments and view entries by hour,
day, or month.
Address book key opens the address book where contact names, phone numbers, email
addresses, and other information are stored.
Messages key opens your Messages In-box to view text messages and access voice mail.
Web key opens the EIS Web application to browse the Internet. View HTML Web pages
with images, with support for downloads, Javascript, and SSL.
Navigator key scrolls through lists and menus. Press the key up or down to highlight an
item. Press the center of the key to select the item.
Send/Talk key starts or answers a call.
Clear key erases the last character entered from the keypad or an application.
Speakerphone key turns speakerphone on and off.
End/Power key turns the phone on and off, ends a call, or returns to the home screen.
Shift key changes the text mode in text entry.
Space key enters a space during text entry.
Backlight button turns the phone screen and PDA on and off. Press and hold the backlight
button to turn the backlight on and off. You can still see the screen. A press of the
backlight turns the PDA off until you press any key.

6 Kyocera 7135 Smartphone Reference Guide
Phone features
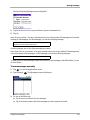
Getting to know your phone
When the phone is turned on
■ You can send and receive calls. If there is an incoming, outgoing, or active phone call,
information about the call appears on the screen.
■ If you are using another application (like Mail) when the phone rings, you can answer the call
and your smartphone saves any unfinished work automatically.
When the phone is turned off
■ You can use all the organizer features, but you cannot send or receive calls, send or receive
email, or search the Web.
Using the navigation key
The navigation key is pressed up and down. The center of the key is the OK button; pressing this
selects any highlighted item.
■ Press the navigation key up or down to move through lists, text, or applications on
the screen.
■ Press in the center of the navigation key to select an item.
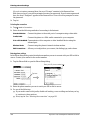
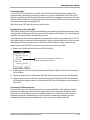
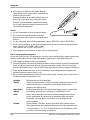
Stylus
—Slide the stylus out of its slot. Hold like a pen
to write on the screen. Never use a pen, pencil, or
other sharp object on the screen.
Infrared port
—Point the infrared port at other devices
to beam data.
LED (light-emitting diode)
Green = Home area
Amber = Roaming
Red = No signal
Antenna
—Extend during calls.
Headset jack
—Plug in the 2.5 mm headset cable here.
Volume up and down
—Press these buttons to increase
or decrease phone volume.
Backlight button
—Press the button to turn the phone
screen on and off. Press and hold to turn the
backlight on and off.
Power port
—Plug in the power cable here to recharge
the battery.
Data port/MP3 Port
—Plug in the data cable here to
download data and MP3s.
Expansion slot
—Insert a media card here to expand
available memory on your smartphone.
9
1
2
3
4
5
6
7
8
9
10

Chapter 1 Introducing the Kyocera 7135 Smartphone 7
Palm applications
Status indicators
The phone screen shows the following information when the phone is on.
Checking LED status
The LED indicates the following states:
■ Green—Home. The phone is in its home area. The light flashes when a call is received, and
remains green during a call.
■ Amber—Roaming. The phone is in roaming mode. The light flashes when a call is received,
and remains amber during a call.
■ Red—No signal available. The phone is searching for a signal. On the top line of the screen,
the status bar displays icons that show the phone’s current status.
■ No light—The phone is off.
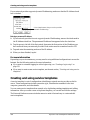
Palm applications
In your phone package, you find a CD-ROM containing third-party applications for sending
email, browsing the Internet, using web clipping services, downloading MP3 files, and others.
Many other applications are available on the Internet. For help with these applications, contact
their source. For example, if you need help with Eudora®, go to the Eudora web site
(www.eudora.com).
To use Palm applications
It does not matter whether the phone is turned on or off. You can use the Palm applications at
any time.
The phone is operating in CDMA digital mode. If this icon is not present, the phone is either
in analog mode or there is no service.
The phone is outside its home area (roaming).
This icon shows the current signal strength. The more lines, the stronger the signal.
When this icon appears, you can make and receive calls. If the signal strength is very low,
you may not be able to complete a call.
Geographic Positioning System (GPS) is enabled to share your location with emergency
services as well as your service provider.
Geographic Positioning System (GPS) shares your location with emergency services only.
The phone is not receiving a signal. You cannot make or receive calls.
A call is in progress.
You have a text message, voice mail, or page.
This icon shows how much power remains in the battery. The more black bars, the greater
the charge.
Speakerphone is enabled.

8 Kyocera 7135 Smartphone Reference Guide
Accessories for your Kyocera 7135 Smartphone
Easy access to Palm applications during calls
If you’re talking on the phone and need to check information in another application (like Date
Book or Memo Pad), simply open the application you want to use. Your call is not affected by
opening any of the applications on your Kyocera 7135 Smartphone.
You can use the on-screen keyboard or stylus to add or change information (like appointments,
addresses, memos, etc.) during a call.
Note: The Kyocera 7135 Smartphone headset makes entering information during a phone call even simpler.
If you are already using a Palm device
If you are already familiar with Palm organizers, you’ll find the Kyocera 7135 Smartphone
operates the same way, with a few exceptions. Many applications like the Address Book are
enhanced so you can make phone calls directly from them.
■ Icons—Most icons and buttons are identical to those on your Palm organizer. Only the
Calculator icon is replaced with the Dialer icon. Tap this icon to view the phone’s main
screen. You’ll find the Calculator on the applications screen.
■ Transferring data—You can transfer all data from your existing Palm device to your new
Kyocera smartphone. Before doing so, however, be sure to read “Transferring information
between Palm devices” on page 63.
There are several ways to transfer data.
■ Synchronize the data—Follow this procedure only if you are not planning to use your Palm
device anymore. See “If you have two Palm devices with the same user name” on page 65.
■ Copy the data—Follow this procedure if you intend to use both devices on an ongoing basis.
Since every Palm handheld device must have a unique name, serious synchronization
problems may occur if you synchronize two Palm devices with the same user name.
Accessories for your Kyocera 7135 Smartphone
You can purchase a number of accessories for your phone, including:
For the full line of accessories, visit our Web site at
http://www.kyocerasmartphone.com/store
■ Keyboard ■ Headsets
■ Adapters ■ Phone cases
■ Batteries ■ Cables
■ Chargers ■ Data products

Chapter 1 Introducing the Kyocera 7135 Smartphone 9
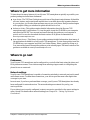
Where to get more information
Where to get more information
To learn about the many features of your Kyocera 7135 smartphone as quickly as possible, your
product package includes these documents.
■ User Guide—The 7135 User Guide gives a quick tour of the phone’s major features. It identifies
all icons, buttons, and controls and explains how to use both phone and organizer features.
As you explore, you’ll notice there are many ways to use your phone. Each procedure begins
with a graphic telling you whether the phone should be on or not.
■ Reference Guide—This guide contains detailed information about the Kyocera 7135
smartphone and it’s applications. To view the guide, insert the CD-ROM in your computer
and select the PDF file. You can read and search through the guide on your computer or
print it out.You can also download the latest versions of all phone documentation at
www.kyocerasmartphone.com.
■ User Guide Library—This library of user guides contains detailed information about many of
the applications available for your Kyocera 7135 smartphone. To view these guides, insert the
CD-ROM into your computer and click User Guides Library. Select a guide by clicing on it.
You can read and search through the guides or print selected pages. The latest versions of the
guides are available at
www.kyocerasmartphone.com.
Where to go next
Preferences
Your Kyocera 7135 smartphone can be configured to your individual taste using the phone and
PDA preferences screens. Your choices range from selecting ringer sounds to configuring the
phone for use on a network.
Network settings
Your Kyocera 7135 Smartphone is capable of connecting wirelessly to network services for email
and Internet access. To make these connections, your service provider must offer digital data
coverage in your area.
In most cases, if you have purchased data coverage, your Kyocera 7135 Smartphone has already
been configured for network services. The network settings are entered for you by your
service provider.
If your phone is not correctly configured, contact your service provider for the correct settings to
enter yourself. For details about network settings, see Chapter 10—“Setting Up Network
Connections”.

10 Kyocera 7135 Smartphone Reference Guide
Where to go next

Kyocera 7135 Smartphone Reference Guide 11
Chapter 2
Making and Receiving Calls
On your Kyocera 7135 smartphone, you can make calls in many different ways (for example, from
your Address Book or from the Call History list). You can also receive pages, check voice mail,
and make data connections to the Internet.
This chapter explains how to use your Kyocera 7135 smartphone as an integrated phone and
message manager.
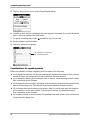
Dialing calls on the keypad
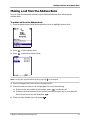
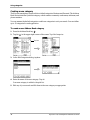
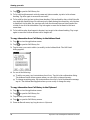
To dial a call from the keypad
1. Extend the antenna and wait for the signal strength icon to appear.
2. Press the keys to enter the phone number.
As you dial, you can access information in your Speed Dial list and Address Book.
■ Speed Dial—The phone automatically checks your Speed Dial list and displays the
matching information. For example, if you set up 12 as a Speed Dial number, that entry
appears when you press 12. For details on setting up Speed Dial numbers, see “Adding an
entry to the Speed Dial list” on page 141.
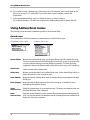
■ Address Book—As you press the digit(s), the following options appear at the bottom of the
screen: Save, Find, Time Pause, and Hard Pause. To check your Address Book, use the
navigation key to find and highlight Address Book. Then press the navigation key in.
Use the navigation key to scroll down through the options. They are View Address Book,
Add New Contact, View Speed Dial List, and View Voice Dial List. Once you have
highlighted your selection, press the navigation key. Select View Address Book. All the
phone numbers beginning with the digit(s) you have entered appear on the screen.
Press the navigation key down to until the one you want to call is highlighted.
3. When you have entered or selected the correct number, press to make the call.
4. When you have finished your call, press .
If you make an error while dialing
1. If you press the wrong key while dialing, press to remove the last digit you entered.
2. To remove all the digits you have entered, press and hold or press .

12 Kyocera 7135 Smartphone Reference Guide
Making a call from Speed Dial
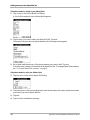
Making a call from Speed Dial
You can designate up to 99 phone numbers from your Address Book to be on your Speed Dial list.
You can then call these numbers just by pressing the one or two-digit Speed Dial number
(1 through 99). Because Speed Dial is linked to the Address Book, when you change a phone
number in the Address Book, it automatically updates in the Speed Dial list.
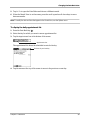
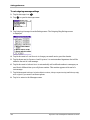
To add numbers to your Speed Dial list
1. Tap to view the Applications screen.
2. Use the navigator key or tap the scroll bar to move through applications. Tap to open
Speed Dial.
3. Tap on an empty speed dial location, then tap Add.
You are asked if you want to look up the phone number in your Address Book or create a new
entry. If the contact is not in your Address Book, tap New Entry and follow the on-screen
instructions. If the contact is listed in your Address Book, proceed with step 4.
Note: Speed Dial #1 has been assigned to voice mail. You cannot move, add, or delete this entry.
4. Tap Lookup.
5. Tap the entry you want to add to the Speed Dial list. Then tap Add. If the entry has more than
one phone number, select the one you want. The entry is added to the next available Speed
Dial number.
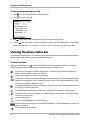
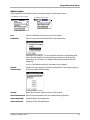
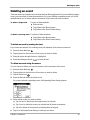
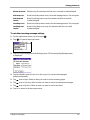
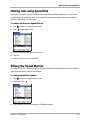
To make a call using Speed Dial
If you know the Speed Dial number
Press the Speed Dial number assigned to your contact on the keypad and press .
Note: Press the Speed Dial number on the keypad and hold down the final digit for a few seconds to place
the call.
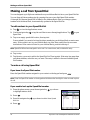
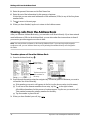
If you need to look up the Speed Dial number
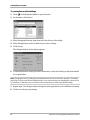
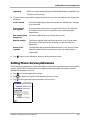
1. From the phone screen, press the navigator key up or down
to highlight
Address Book.
2. Press .
3. Press the navigator key up or down to select View Speed
Dial List.
4. Press .
Page is loading ...
Page is loading ...
Page is loading ...
Page is loading ...
Page is loading ...
Page is loading ...
Page is loading ...
Page is loading ...
Page is loading ...
Page is loading ...
Page is loading ...
Page is loading ...
Page is loading ...
Page is loading ...
Page is loading ...
Page is loading ...
Page is loading ...
Page is loading ...
Page is loading ...
Page is loading ...
Page is loading ...
Page is loading ...
Page is loading ...
Page is loading ...
Page is loading ...
Page is loading ...
Page is loading ...
Page is loading ...
Page is loading ...
Page is loading ...
Page is loading ...
Page is loading ...
Page is loading ...
Page is loading ...
Page is loading ...
Page is loading ...
Page is loading ...
Page is loading ...
Page is loading ...
Page is loading ...
Page is loading ...
Page is loading ...
Page is loading ...
Page is loading ...
Page is loading ...
Page is loading ...
Page is loading ...
Page is loading ...
Page is loading ...
Page is loading ...
Page is loading ...
Page is loading ...
Page is loading ...
Page is loading ...
Page is loading ...
Page is loading ...
Page is loading ...
Page is loading ...
Page is loading ...
Page is loading ...
Page is loading ...
Page is loading ...
Page is loading ...
Page is loading ...
Page is loading ...
Page is loading ...
Page is loading ...
Page is loading ...
Page is loading ...
Page is loading ...
Page is loading ...
Page is loading ...
Page is loading ...
Page is loading ...
Page is loading ...
Page is loading ...
Page is loading ...
Page is loading ...
Page is loading ...
Page is loading ...
Page is loading ...
Page is loading ...
Page is loading ...
Page is loading ...
Page is loading ...
Page is loading ...
Page is loading ...
Page is loading ...
Page is loading ...
Page is loading ...
Page is loading ...
Page is loading ...
Page is loading ...
Page is loading ...
Page is loading ...
Page is loading ...
Page is loading ...
Page is loading ...
Page is loading ...
Page is loading ...
Page is loading ...
Page is loading ...
Page is loading ...
Page is loading ...
Page is loading ...
Page is loading ...
Page is loading ...
Page is loading ...
Page is loading ...
Page is loading ...
Page is loading ...
Page is loading ...
Page is loading ...
Page is loading ...
Page is loading ...
Page is loading ...
Page is loading ...
Page is loading ...
Page is loading ...
Page is loading ...
Page is loading ...
Page is loading ...
Page is loading ...
Page is loading ...
Page is loading ...
Page is loading ...
Page is loading ...
Page is loading ...
Page is loading ...
Page is loading ...
Page is loading ...
Page is loading ...
Page is loading ...
Page is loading ...
Page is loading ...
Page is loading ...
Page is loading ...
Page is loading ...
Page is loading ...
Page is loading ...
Page is loading ...
Page is loading ...
Page is loading ...
Page is loading ...
Page is loading ...
Page is loading ...
Page is loading ...
Page is loading ...
Page is loading ...
Page is loading ...
Page is loading ...
Page is loading ...
Page is loading ...
Page is loading ...
Page is loading ...
Page is loading ...
Page is loading ...
Page is loading ...
Page is loading ...
Page is loading ...
Page is loading ...
Page is loading ...
Page is loading ...
Page is loading ...
Page is loading ...
Page is loading ...
Page is loading ...
Page is loading ...
Page is loading ...
Page is loading ...
Page is loading ...
Page is loading ...
Page is loading ...
Page is loading ...
Page is loading ...
Page is loading ...
Page is loading ...
Page is loading ...
Page is loading ...
Page is loading ...
Page is loading ...
Page is loading ...
Page is loading ...
Page is loading ...
Page is loading ...
Page is loading ...
Page is loading ...
Page is loading ...
Page is loading ...
Page is loading ...
Page is loading ...
Page is loading ...
Page is loading ...
Page is loading ...
Page is loading ...
Page is loading ...
Page is loading ...
Page is loading ...
Page is loading ...
Page is loading ...
Page is loading ...
Page is loading ...
Page is loading ...
Page is loading ...
-
 1
1
-
 2
2
-
 3
3
-
 4
4
-
 5
5
-
 6
6
-
 7
7
-
 8
8
-
 9
9
-
 10
10
-
 11
11
-
 12
12
-
 13
13
-
 14
14
-
 15
15
-
 16
16
-
 17
17
-
 18
18
-
 19
19
-
 20
20
-
 21
21
-
 22
22
-
 23
23
-
 24
24
-
 25
25
-
 26
26
-
 27
27
-
 28
28
-
 29
29
-
 30
30
-
 31
31
-
 32
32
-
 33
33
-
 34
34
-
 35
35
-
 36
36
-
 37
37
-
 38
38
-
 39
39
-
 40
40
-
 41
41
-
 42
42
-
 43
43
-
 44
44
-
 45
45
-
 46
46
-
 47
47
-
 48
48
-
 49
49
-
 50
50
-
 51
51
-
 52
52
-
 53
53
-
 54
54
-
 55
55
-
 56
56
-
 57
57
-
 58
58
-
 59
59
-
 60
60
-
 61
61
-
 62
62
-
 63
63
-
 64
64
-
 65
65
-
 66
66
-
 67
67
-
 68
68
-
 69
69
-
 70
70
-
 71
71
-
 72
72
-
 73
73
-
 74
74
-
 75
75
-
 76
76
-
 77
77
-
 78
78
-
 79
79
-
 80
80
-
 81
81
-
 82
82
-
 83
83
-
 84
84
-
 85
85
-
 86
86
-
 87
87
-
 88
88
-
 89
89
-
 90
90
-
 91
91
-
 92
92
-
 93
93
-
 94
94
-
 95
95
-
 96
96
-
 97
97
-
 98
98
-
 99
99
-
 100
100
-
 101
101
-
 102
102
-
 103
103
-
 104
104
-
 105
105
-
 106
106
-
 107
107
-
 108
108
-
 109
109
-
 110
110
-
 111
111
-
 112
112
-
 113
113
-
 114
114
-
 115
115
-
 116
116
-
 117
117
-
 118
118
-
 119
119
-
 120
120
-
 121
121
-
 122
122
-
 123
123
-
 124
124
-
 125
125
-
 126
126
-
 127
127
-
 128
128
-
 129
129
-
 130
130
-
 131
131
-
 132
132
-
 133
133
-
 134
134
-
 135
135
-
 136
136
-
 137
137
-
 138
138
-
 139
139
-
 140
140
-
 141
141
-
 142
142
-
 143
143
-
 144
144
-
 145
145
-
 146
146
-
 147
147
-
 148
148
-
 149
149
-
 150
150
-
 151
151
-
 152
152
-
 153
153
-
 154
154
-
 155
155
-
 156
156
-
 157
157
-
 158
158
-
 159
159
-
 160
160
-
 161
161
-
 162
162
-
 163
163
-
 164
164
-
 165
165
-
 166
166
-
 167
167
-
 168
168
-
 169
169
-
 170
170
-
 171
171
-
 172
172
-
 173
173
-
 174
174
-
 175
175
-
 176
176
-
 177
177
-
 178
178
-
 179
179
-
 180
180
-
 181
181
-
 182
182
-
 183
183
-
 184
184
-
 185
185
-
 186
186
-
 187
187
-
 188
188
-
 189
189
-
 190
190
-
 191
191
-
 192
192
-
 193
193
-
 194
194
-
 195
195
-
 196
196
-
 197
197
-
 198
198
-
 199
199
-
 200
200
-
 201
201
-
 202
202
-
 203
203
-
 204
204
-
 205
205
-
 206
206
-
 207
207
-
 208
208
-
 209
209
-
 210
210
-
 211
211
-
 212
212
-
 213
213
-
 214
214
-
 215
215
-
 216
216
-
 217
217
-
 218
218
-
 219
219
-
 220
220
-
 221
221
-
 222
222
-
 223
223
-
 224
224


KYOCERA 7135 User guide
- Type
- User guide
- This manual is also suitable for
Ask a question and I''ll find the answer in the document
Finding information in a document is now easier with AI
Related papers
-
KYOCERA 7135 User manual
-
-
-
-
-
-
-
-
-
