Page is loading ...

Included Components Quantity
1. Console (1)
2. Mounting Bracket (1)
3. 14 X 1 ¾” Screw (3)
4. 8 X ¾” Screw (4)
Important Information
• Please refer to Section 1 on pages 1-3, for the Jeep CJ-7 and Wrangler
ONLY.
• Please refer to Section 2 on Page 4, for the 1976-83 Jeep CJ-5 ONLY.
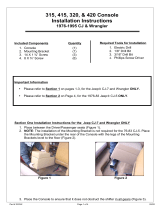
Section One – Installation Instructions
1. Position the Console in the desired position between the Driver/Passenger
seats (Figure 1).
2. Position the Mounting Bracket under the rear of the Console with the legs
of the Mounting Brackets level to the floor (Figure 2).
NOTE: The installation of the Mounting Bracket will not be required for the
76-83 CJ-5.
Figure 1 Figure
2
Required Tools for Installation
1. Electric Drill
2. 1/8” Drill Bit
3. 3/16” Drill Bit
4. Phillips Screw Driver
Rugged Ridge II
Locking console
Installation Instructions
1976-1995 CJ & Wrangler 13103.XX – 3161X

Section One – Installation Instructions continued
3. Adjust the position of the Console front to back and ensure that the shifter
clearance for all gears is not obstructed by the Console position (Figure
3).
4. Using a pen, mark the position of the Mounting Bracket on the bottom of
the Console. (Figure 4).
Figure 3 (13101.xx console shown) Figure 4
5. Once the position is marked, remove the Console from the vehicle and set
on a clean working table.
6. Reposition the Mounting Bracket over the marks previously made in Step
4.
7. Secure the Mounting Bracket to the Console using the (2) 8 X ¾” Sheet
Metal Screws provided (Figure 5). Note that you will need to pop the
plastic cup holder out to get access to the very back of console
(Figure 7 - 8).
8. Re-Position the Console between the Driver and Passenger seats.
NOTE: Position the Console as far forward as possible without interfering
with the shifter.
9. Locate the (4) mounting holes on the Mounting Bracket.
10. Using the mounting holes as a drilling guide, drill (4) holes through the
floor of the vehicle using 1/8” drill bit (Figure 6).
CAUTION: Take care not to cut or trip any wires/lines that might
be in the area.
Shifter
Console
Mounting Bracket
Pen

11. Secure Console and Mounting Bracket to the floor of the vehicle using
the (4) 8 X ¾” Sheet Metal Screws provided.
Figure 5 Figure6
Figure 7 Figure 8
Section One – Installation Instructions continued
12. Drill one hole in the center and as far forward as possible through the
bottom of the Console and the floor of the vehicle using a 3/16” drill bit
(Figure 9).
Hole
Location
Mounting
Holes

13. Secure using (1) 14 X 1 ¾” Sheet Metal Screw provided.
NOTE: For more support you opt to install (2) Sheet Metal Screws in the front
of the console.
13101.xx console used in image. For 13103.XX open the front locking
Compartment to gain access to front of console.
Figure 9
Ensure that all Screws are securely fastened to the vehicle
prior to traveling.
Section Two- Installation Instructions
1. Position the Console in the desired position between the Driver and
Passenger seats as shown in Figure 1.
2. Adjust the position of the Console front to back and ensure that the shifter
clearance for all gears is not obstructed by the Console position (Figure 2)
NOTE: Position the Console as far forward as possible without interfering
with the shifter.
3. Remove the rear cup holder to gain access to the rear most section of the
console. Drill (2) holes through the rear of the Console and floor of the
vehicle using 3/16” drill bit.
4.
Figure 1 Figure2

CAUTION: Take care not to cut or trip any wires/lines that might be
in the area.
5. Secure the Console to the floor of the vehicle using the (2) 14 X 1 ¾”
Sheet Metal Screws provided.
6. Open the front most lockable storage lid to gain access to the front of
console. Drill one hole in the center and as far forward as possible through
the bottom of the Console and the floor of the vehicle using a 3/16” drill bit
(Figure 4).
7. Secure using (1) 14 X 1 ¾” Sheet Metal Screw provided.
NOTE: For the console to the floor support, you opt to install (2) 14 X 1
¾” Sheet Metal Screws instead of (1).
Ensure that all Screws are secure
Made in China
/