Page is loading ...

18 Gbps True 4K60 4:4:4 8 x8 HDMI Matrixng
AC-MX42-AUHD
Quick Start Guide
The AC-MX42-AUHD is a true 4x2 HDMI matrix switch. Supporting HDMI 2.0(a/b), HDCP 2.2, up to 4K
video resolution, and up to 18 Gbps bandwidth. This switch allows any source (Blu-ray, UHD Blu-ray,
satellite receiver, game consoles, PCs, etc ... ) to be shown on any of the connected displays. This
matrix equalizes and amplifies the output to ensure the HDMI signal can be transmitted through long
HDMI cables without loss of quality.The AC-MX42-AUHD is ideal for bypassing AVR’s that do not support
full 18Gbps. You can bypass uncompressed HDMI to the display while running down-scaled video into
a legacy AVR. Only video is reduced and audio remains untouched, making it an ideal component for
systems where high bit rate audio is critical. Conference room all-star. The auto-switching feature
makes this unit an ideal, affordable, component for any conference room system. Ideal for feeding a
video signal into a video conferencing codec with very little setup.This is an ideal solution for digital
entertainment centers, HDTV retail, show sites, data centers, schools, conference and training
centers and more!
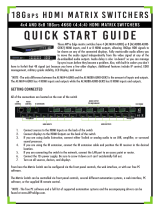
This quick start guide will be going through:
• Installation
• Front/rear Panel Control
• EDID management
• IR & RS-232 Control
• LAN Control
• troubleshooting
Quick Installation:
1.Connect the HDMI input sources (Blu-ray, Set Top Box, etc...) to the AC-MX42-AUHD.
2.Connect the HDMI output devices (AVR, Display, Distribution Amplifier, Extender) to the
AC-MX42-AUHD.
3.Power on the sources.
4.Connect the power supply into the AC-MX42-AUHD.
5.Turn on output devices/displays.
6.Use the front panel controls, supplied IR remote or free LAN (IP: 192.168.001.239) to
control the matrix.

Front Panel Control and commands
Buttons
• “OUT 1 SELECT” button - Toggles the active source for OUTPUT 1
• “OUT 2 SELECT” button- Toggles the active source for OUTPUT 2
• “AUDIO OUTPUT SELECT” button - Toggles which OUTPUT the extracted audio follows (2CH &
Toslink are mirrored)
• “OUT 1 SCALER SELECT” button - Toggles (On/Off) the output scaler for OUTPUT 1
1. ON - Signal will be scaled to 1080P
2. OFF - Scaler is disabled
Button Commands
• Enable/Disable “Auto-Switching” - Simply PRESS & HOLD the OUTPUT SELECT button for 4
seconds to toggle “Auto-Switching”
1. When the LED is flashing “Auto-Switching” is enabled.
2. You can enable only one output to auto switch, or both - when both are
enabled, they will be mirrored.
• AVR Mirror Mode - When enabled both outputs will be mirrored and switch regardless of
the command sent
1. PRESS & HOLD OUTPUT 2 SELECT and AUDIO OUTPUT SELECT buttons for 5 seconds to
Enable/Disable
2. All 4 Red LEDs will flash, both outputs are now mirrored and will switch
together when an output command is sent to output 1 or output 2.
• EDID is ideally set from the Web Interface, but can be set from the front panel (will be
walked through later in the guide)
• Sense switch mode- This mode switches to the input that has been sent the most recent
hot plug. This can be turned on by holding either of the output buttons for 5 seconds.
• Cascade mode can be enabled by holding down out 1 scaler select for 5 seconds.
• Enable/Disable DHCP - Press & hold audio output for 5 seconds
1. On - Out 1 LEDs Blink
2. Off - Out 2 LEDs Blink
Controlling the Matrix
Web Interface
To connect to the Matrix Switch and access the Web interface:
1. Connect the LAN port on the rear of the Matrix Switch into an active access
point or router
2.Make sure your computer is on the same network
3. Open any web browser and type in the IP address of the Matrix Switch. *NOTE
- The default IP address is: 192.168.001.239
out 1 select out 2 select
Audio output select
OUT 1 SCALER SELECT

Web interface Continued
Sense Switch: Use this area to route inputs to outputs
Video Scaler Mode:
This will set the scaler mode for OUTPUT 1, the options are:
•BP = Bypass - Scaler is disabled (Default)
•4K-2K = 1080P - If incoming signal is 4K, it will be downscaled to 1080P or 1900x1200
depending on the input format.
Audio Status:
Enable or Disable extracted Audio, the options are:
•ON = Extracted audio ports are ON (Default)
•OFF= Extracted audio ports are muted.
Audio Binding:
Bind the audio to a specific OUTPUT. The audio will always follow one output, this
means the audio switches with the video of the output you designate, the options are:
•OUT1 = Extracted audio will follow OUTPUT 1 (Default)
•OUT 2= Extracted audio will follow OUTPUT 2
YOu can also Controll Edid and System settings by switching the tabs located on the
to of the web interface.

EDID Management:
The BEST/EASIEST WAY to setup EDID’s is to use the web interface. However, we know that
may not always be an option. Since there is no screen on the device, you will have to rely
on the LED’s to complete EDID setup. Please
follow the steps below (This might take one or two tries to get used too.)
1.Press and hold both “Out 1” and “Out 2” buttons for 5 seconds.
a. All LED flash one time. You are now in EDID management state.
2.In the EDID management state, press the
“Out 1” button to toggle to the input you
want to set the EDID for. (1=IN1, 2=IN2, 3=IN3, 4=IN4)
3.Press the “Out 2” button to toggle through
the EDID index.
4. Once you land on the EDID you want to use,
press and hold the “Out 2” button for 3
seconds. All LEDs will flash one time indicating success
5. NOTE: When in the EDID management state, if you are inactive for 10 seconds it will
return to the normal state automatically. All LEDs flash one time.
6. NOTE 2: We have a video available online or upon request if desired. Contact us or
request at support.avproedge.com
IR Control: For IR Control there is an IR Window on the front face of the device.
RS-232 Control:
In order to connect your computer to the swtich by rs-232 you need to make your own cable with one
end a phoenix connector and the other end a rs-232 port. Your computer doesn’t have a rs-232 input,
get a usb converter (as shown below), and plug the usb end into any computer

The EDID options are:
1. 1080P_2CH
2. 1080P_6CH
3. 1080P_8CH
4. 1080P_3D_2CH
5. 1080P_3D_6CH
6. 1080P_3D_8CH
7. 4K30HZ_3D_2CH
8. 4K30HZ_3D_6CH
9. 4K30HZ_3D_8CH
10. 4K60HzY420_3D_2CH
11. 4K60HzY420_3D_6CH
12. 4K60HzY420_3D_8CH
13. 4K60HZ_3D_2CH
14. 4K60HZ_3D_6CH
15. 4K60HZ_3D_8CH
16. 1080P_2CH_HDR
Troubleshooting
(we recommend every integrator has a fox and hound testing and trouble-
shooting kit to ensure quality hdmi connection)
Verify Power - The LEDs on the front of the matrix should be lit up when power is
applied. Check power supply connections to device and power
Verify Connections - Check all cables are properly connected
Issues with one INPUT/OUTPUT- Swap ports to see if the issue stays with the port or
with the device
• Follows the device, then it may be an EDID issue. Default out of the box is
4k 60HZ 3d 2ch hdr. Try another canned EDID
• Try \another canned EDID or use the COPY FROM OUTx command to copy the
Issues with 4k but 1080 or less working
• Verify all connected devices are capable of the signal you are sending
17. 1080P_6CH_HDR
18. 1080P_8CH_HDR
19. 1080P_3D_2CH_HDR
20. 1080P_3D_6CH_HDR
21. 1080P_3D_8CH_HDR
22. 4K30HZ_3D_2CH_HDR
23. 4K30HZ_3D_6CH_HDR
24. 4K30HZ_3D_8CH_HDR
25. 4K60HzY420_3D_2CH_HDR
26. 4K60HzY420_3D_6CH_HDR
27. 4K60HzY420_3D_8CH_HDR
28. 4K60HZ_3D_2CH_HDR
29. 4K60HZ_3D_6CH_HDR
30. 4K60HZ_3D_8CH_HDR
31. User EDID 1
32. User EDID 2
33. User EDID 3

Have a question or need assistance?
Don’t hesitate to contact us!
SUPPORT: +1 605-274-6055
USA TOLL FREE: 877-886-5112
EMAIL: support@avproedge.com
/


