
GB
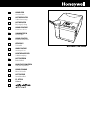
HUMIDIFIER
User Instructions
DE
LUFTBEFEUCHTER
Gebrauchsanweisung
DK
LUFTBEFUGTER
Betjeningsvejledning
ES
HUMIDIFICATORE
Instrucciones de Uso
FI
ILMANKOSTUTIN
Käyttäjän Opas
FR
HUMIDIFICATEUR
Instructions d’Utilisation
HU
KÉZIKÜNYV
Felhasználói
IT
UMIDIFICATORE
Istruzioni per l’uso
NL
LUCHTBEVOCHTIGER
Gebruiksaanwijzing
NO
LUFTFUKTEREN
Brukerhåndbok
PL
NAWILŻACZ POWIETRZA
Podręcznik użytkownika
PT
HUMIDIFICADOR
Manuel do Usuário
SE
LUFTFUKTARE
Användarhandbok
TR
SA
BH-860E / BH-862E

2
2 3
ENGLISH
6
CONTENTS
DEUTSCH
10
INHALT
DANSK
14
INDHOLD
ESPAÑOL
18
ÍNDICE
SUOMI
22
SISÄLLYSLUETTELO
FRANÇAIS
26
CONTENU
MAGYAR
30
TARTALOMJEGYZÉK
ITALIANO
34
INDICE
NEDERLANDS
38
INHOUD
NORSK
42
INNHOLD
POLSKI
46
SPIS TREŚCI
PORTUGUÊS
50
CONTEÚDO
SVENSKA
54
INNEHÅLL
TÜRKÇE
58
İÇİNDEKİLER
65
BH-860E / BH-862EBH-860E / BH-862E

4
4 5
1 2
3
4
6
5
9
8
13
11
12
14
10
7
15
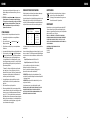
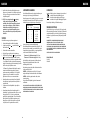
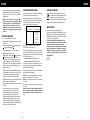
BH-860/861E Humidifier - Exploded View
*To order new parts: www.kaz.com
*
BH-860E / BH-862EBH-860E / BH-862E

6
6 7
EXPLANATION OF OPERATION PANEL
1. ELECTRONIC HUMIDISTAT
for continuous adjustment of the desired humidity. The
optimum value between 40% and 60% is easy to adjust. You
press the button
11
and
12
together and after some seconds
on the LCD display the current value of humidity starts to flash.
Now it is possible to adjust with the button
12
or with the
button
11
the value of humidity you want. After a few seconds
your chosen humidity value disappears and the display switches
over to the current humidity value of your room.
2. WATER LEVEL INDICATOR
If the red indicator lamp
10
is lit, this normally means that
water has to be refilled in the tank or that there is too much
water in the atomizing chamber and this must be skimmed off.
Should the indicator lamp stay on continuously despite a
correct water level, there is a malfunction. In this case, the
unit must be brought to the nearest service point.
3. NIGHT REDUCTION
The humidifier is equipped with an additional switch for
night operation. This lowers the noise level by reducing the
fan speed and also reduces the amount of humidity. This is
possible when you press the button
13
. On the LCD display
will appear a little moon. When you press a second time the
button
13
, the night reduction is switched off and the little
moon on the display disappears.
4. CONTINUOUS
When you press the button
8
, it is possible to switch the
unit over to a continuous run. That means that the unit will
operate without the humidistat control until the tank is
empty. On the LCD display will appear a circle. When you
press again the button
8
, the unit will switch over to the
automatic humidistat control mode and on the LCD display
the circle will disappear.
5 DESIRED HUMIDITY
When a comfortable humidity level is reached, lower the
humidity level (Humidistat) setting slowly until the electronic
for fog production shuts off. The desired humidity sign
on the display will appear, indicating that the humidity
setting has been reached. The electronic humidistat will
automatically restart the electronic for fog production each
time the humidity level falls below this setting. This “ON/OFF”
cycle will continue periodically while the humidifier is in use.
OPERATION
1. Place the unit on a level, dry surface that is insensitive to
water. Ensure that the air-filter vents
1
have enough room
for suction. The atomizer nozzle
3
must be unimpeded
in blowing off and must not be directed against objects or
surfaces in the immediate vicintity.
2. Remove the tank lid
4
and fill the water tank
5
with cold,
fresh tap water.
3. IMPORTANT: Please do not overfill the tank you can
damage the unit. Please fill tank only to the “max.” sign
shown on the scale. In case that the scale is missing in the
tank, the water level must be at least 1 cm under the edge
of the tank.
4. Before mounting the enclosed decalcifying filter
6
on the
tank filter neck, remove the packing sheeting. Attach the
decalcifying filter on the tank filter neck, align it along the
guide rail inside the tank and press it down to the stop. When
the filter is now under the water, please press the knob of the
integrated valve of the filter down to allow the air bubbles
to escape. Please do this procedure everytime you replace
the filter. We recommend to press the knob of the integrated
valve also once in a week for better function of the filter.
5. Replace the tank lid
4
on the water tank
5
.
6. Mount the atomizer nozzle
3
and turn it in the desired
direction.
7. Connect the unit to the power supply system with the plug.
8. Set the humidity control to your favorite value for continuous
adjustment of the desired humidity. The optimum value
between 40% and 60% is easy to adjust. You press the button
11
and
12
together and after some seconds on the LCD
display the current value of humidity starts to flash. Now it
is possible to adjust with the button or with the button the
value of humidity you want. After a few seconds your chosen
humidity value disappears and the display switches over
to the current humidity value of your room. This setting is
automatically maintained by your humidifier, which means: if
the air is too dry the humidifier will sense and automatically
cycle on. When the desired humidity is attained, the unit
switches off automatically.
9. If the water tank
5
is empty, the unit switches to a standby
position. This is indicated by the red signal light
10
“Add
water”. In this case, add water.
10. If you have a unit with night lowering, you can set this mode
of operation with the button
13
. The humidity discharged as
well as the noise produced are thereby lowered.
11. During the first hours of operation, the mist emitted may
have a peculiar smell. This will disappear after a while and is
caused by the granulate of the decalcifying filter that is fresh
from production.
ENGLISH
SAFETY NOTES
1. The unit must only be used to humidify the room air.
Inappropriate use can lead to hazards and damages for which
no liability is assumed.
2. Should the unit or the power cable have suffered damages
during transport (e.g. through violent impact), please do not
put it into operation under any circumstances. It must be
checked by an authorized service outlet.
3. This appliance is not intended for use by persons (including
children) with reduced physical, sensory, or mental
capabilities, or lack of experience and knowledge, unless they
have been given supervision or instruction concerning the
use of the appliance by a person responsible for their safety.
Children should be supervised to ensure that they do not play
with the appliance.
4. If the supply cord is damaged, it must be replaced by the
manufacturer, its service agent or similarly qualified persons in
order to avoid a hazard.
5. Never operate the unit or pull the plug with wet hands.
6. The unit must only be placed on a level, dry surface that is
insensitive to water.
7. Compare the data on the rating plate with those of your
power supply- they must be identical.
8. Always fill the unit with fresh, cool tap water only.
9. Never operate the unit without water.
10. Do not add aromas or additives to the water.
11. Never operate the unit without the decalcifying filter or when
the filter is used up. Exchange the decalcifying filter after 5
months at the latest.
12. Before cleaning, always pull the power plug.
13. During cleaning, take care that no water enters inside the
unit. When you empty the unit of the restwater, please take
care that the water does not run into the hole of the airflow
which is on top of the atomizing chamber
15
. If water goes
into this hole, the entire unit can be damaged. Please empty
the water on the opposite side of the airflow hole of the
atomizing chamber. Never dip the unit in water or put it in the
dishwashing machine.
14. If the machine has been put out of operation for a longer
period of time, rinse the water tank and the atomizing
chamber well before filling.
15. If the unit shows defects in functioning, please do not put it
into operation any more. It must be checked by an authorized
service outlet.
16. Repairs must only be made by authorized service outlets.
COMPONENTS
1
Air filterAir filter
2
Air filter flapAir filter flap
3
Atomizer nozzleAtomizer nozzle
4
Tank lidTank lid
5
Water tankWater tank
6
Decalcifying filter
7
ON/OFF switchON/OFF switch
8
Continuous operationContinuous operation
9
LCD displayLCD display
10
Indicator lamp “refill water”Indicator lamp “refill water”
11
Button minus (for less humidity)Button minus (for less humidity)
12
Button plus (for more humidity)Button plus (for more humidity)
13
Low-working night operationLow-working night operation
14
Lid of atomizing chamberLid of atomizing chamber
15
Atomizing chamberAtomizing chamber
FIRST USE
Before using the unit for the first time, you should note the
following points:
1. Remove all packing material from the unit (also the sheeting
from the decalcifying filter).
2. Please check your water hardness with the enclosed test strips
as described on Page 8 of the operating instructions.
ENGLISH

8
8 9
ENGLISHENGLISH
DISPOSAL
Please do not dispose of this product in the household
waste at the end of its useful life. Disposal can take
place at your local retailer or at appropriate collection
points provided.
This regulation is valid only in EU member states.
CONDITION OF PURCHASE
As condition of purchase the purchaser assumes responsibility for
the correct use and care of this KAZ product according to these user
instructions. The purchaser or user must himself or herself decide
when and for how long this KAZ product is in use.
WARNING: IF PROBLEMS ARISE WITH THIS KAZ PRODUCT, PLEASE
OBSERVE THE INSTRUCTIONS IN THE GUARANTEE CONDITIONS. DO NOT
ATTEMPT TO OPEN OR REPAIR THE KAZ PRODUCT YOURSELF, AS THIS
COULD LEAD TO TERMINATION OF THE GUARANTEE AND CAUSE DAMAGE
TO PERSONS AND PROPERTY.
TECHNICAL MODIFICATIONS RESERVED
BH860E / BH862E
220-240V~
50Hz 46W
12. IMPORTANT: Should the water level in the atomization
chamber
15
extend beyond the uppermost sensor float, the
unit will interrupt the atomization process. In this case, switch
the unit off, check the correct fit of the float with its sealing
rubber, scoop out the atomizing chamber with a small vessel,
and put the unit back into operation.
CLEANING
We recommend that you clean the unit once a week.
1. Pull the power plug before cleaning.
2. Remove the tank lid
4
, the atomizer nozzle
3
, and the
decalcifying filter
6
.
3. Empty the residual water before cleaning.
4. Remove the float by means of its handle and clean the float.
5. Fill approx. one half of the water tank
5
with water(the
atomizing chamber
15
is automatically filled as well).
To assist the cleaning action, we recommend that you
add approx. 10 drops of Dimanin A* (do not add soap or
detergents).
After cleaning the water tank with a brush or a soft cloth,
flush it well and remount the float.
* “DIMANIN A” IS A CHLORINEFREE DISINFECTANT THAT IS ALSO
USED IN SWIMMING POOLS.
CAUTION: KEEP OUT OF THE REACH OF CHILDREN, DO NOT
SWALLOW! AVOID DIRECT EYE CONTACT! IN THE RECOMMENDED
DILUTION, IT IS NEITHER HARMFULL TO THE SKIN NOR TO THE
EYES.
6. Now replace the decalcifying filter, fill the unit with the
water, and replace the tank lid and the atomizer nozzle.
7. Connect the unit to the power supply and put into operation.
8. In addition to the weekly cleaning, you should carry out the
following procedure every 6 weeks at the latest:
Remove the decalcifying filter from the unit and briefly put it
in hot, not boiling, water (approx. 70˚C) in order to counteract
any formation of germs.
If the air filter is soiled,open the air-filter flap, dust it,
and replace. In case of heavy soiling, the air filter must be
exchanged (available from your dealer).
CHECKING THE WATER HARDNESS
Please check your water hardness (total hardness) with the
enclosed test strips as follows:
Dip the strip with all its test zones into a glass filled with fresh tap
water (do not hold under running water!). After 2 minutes, you
can determine the degree of hardness of your tap water according
to the following table.
No. of test zones
Green Violet Total Hardness
4 0 under 3º dH
3 1 4-7º dH
2 2 8-15º dH
1 3 16-22º dH
0 4 over 23º dH
To determine the value more precisely, you can also enquire at
your local waterworks.
The decalcifying filter enclosed can be used for water hardnesses
of up to 15˚ dH. The useful life of the decalcifying filter depends
on the hardness of the water, and it must be exchanged
accordingly:
useful life for 0-10˚ dH: approx. 5 months
useful life for 10-15˚ dH: approx. 3 months
If the unit is put out of operation for a longer period of time (e.g.
after the summer interval), the decalcifying filter must also be
newly exchanged.
With extreme grades of watter, an additional filter must be used,
of which there are 2 kinds:
K FILTER serves to pre-soften the water. It prolongs the useful
life of the standard decalcifying filter to approx. 2-3 months.
A FILTER is connected in series with the K-filter if salt content
is high. The additional filters are renewable and thus have a long
useful life.
IMPORTANT NOTE: IF A USEDUP DECALCIFYING FILTER IS USED, OR IF
AN ADDITIONAL. FILTER IS NOT USED, MINERALS MAY BE EMITTED THAT
APPEAR AS WHITE DEPOSITS IN THE ROOM.
Page is loading ...
Page is loading ...
Page is loading ...
Page is loading ...
Page is loading ...
Page is loading ...
Page is loading ...
Page is loading ...
Page is loading ...
Page is loading ...
Page is loading ...
Page is loading ...
Page is loading ...
Page is loading ...
Page is loading ...
Page is loading ...
Page is loading ...
Page is loading ...
Page is loading ...
Page is loading ...
Page is loading ...
Page is loading ...
Page is loading ...
Page is loading ...
Page is loading ...
Page is loading ...
Page is loading ...
Page is loading ...

Kaz Europe SA
Place Chauderon 18
CH - 1003 Lausanne
Switzerland
www.kaz.com
The Honeywell trademark is used by Kaz, Inc.
under licence from Honeywell International Inc.
BH-860E / BH-862E
P/N 31IMH860193
© 2009, Kaz Europe SA – Rev 2, 08MAY2009
-
 1
1
-
 2
2
-
 3
3
-
 4
4
-
 5
5
-
 6
6
-
 7
7
-
 8
8
-
 9
9
-
 10
10
-
 11
11
-
 12
12
-
 13
13
-
 14
14
-
 15
15
-
 16
16
-
 17
17
-
 18
18
-
 19
19
-
 20
20
-
 21
21
-
 22
22
-
 23
23
-
 24
24
-
 25
25
-
 26
26
-
 27
27
-
 28
28
-
 29
29
-
 30
30
-
 31
31
-
 32
32
-
 33
33
-
 34
34


Honeywell BH-860E Owner's manual
- Category
- Humidifiers
- Type
- Owner's manual
Ask a question and I''ll find the answer in the document
Finding information in a document is now easier with AI
in other languages
- italiano: Honeywell BH-860E Manuale del proprietario
- français: Honeywell BH-860E Le manuel du propriétaire
- español: Honeywell BH-860E El manual del propietario
- Deutsch: Honeywell BH-860E Bedienungsanleitung
- Nederlands: Honeywell BH-860E de handleiding
- português: Honeywell BH-860E Manual do proprietário
- dansk: Honeywell BH-860E Brugervejledning
- polski: Honeywell BH-860E Instrukcja obsługi
- Türkçe: Honeywell BH-860E El kitabı
- svenska: Honeywell BH-860E Bruksanvisning
- suomi: Honeywell BH-860E Omistajan opas
Other documents
-
 HACE MJS-601 User manual
-
 JDS Labs ODAC Operating instructions
-
 MALTEC Nawilżacz Powietrza Jonizator Dyfuzor WT-3400KW Operating instructions
-
 Ufox HK2 LUFTFUKTER, HVIT User manual
-
 POINT POHU5055 LUFTFUKTER Owner's manual
-
Meaco MeacoMist Standard User manual
-
 Ufox U3S LUFTFUKTER, HVIT User manual
-
 Miniland Baby ozonball 89026 User manual
-
DeLonghi DD95 Owner's manual
-
Solac HU1055 Operating instructions


