Page is loading ...

TM
Inside:
- Introduction
- Installation and Setup
- Configuring mediaHUB
- Encoding Files
TM
create. move. play. save.
purely digital
TM
Quick Start Manual
mediaHUB
TM
Media Ingest and Prep Station
w/mediaControl Application

Intentionally Left Blank

© 2007 Adtec Digital All rights reserved.
This document may not, in whole or in part, be copied, photocopied,
reproduced and translated, or reduced to any electronic medium or
machine-readable form without prior consent in writing from Adtec
Digital.
All examples with names, company names, or companies that appear
in this manual are imaginary and do not refer to, or portray, in name or
substance, any actual names, companies, entities, or institutions. Any
resemblance to any real person, company, entity, or institution is purely
coincidental.
Every effort has been made to ensure the accuracy of this manual.
However, Adtec Digital makes no warranties with respect to this
documentation and disclaims any implied warranties of merchantability
and fitness for a particular purpose. Adtec Digital shall not be liable for
any errors or for incidental or consequential damages in connection
with the furnishing, performance, or use of this manual or the examples
herein. The information in this document is subject to change without
notice.
Trademarks
mediaHUB™ and mediaControl™ are trademarks of Adtec Digital.
Other product and company names may be trademarks or registered
trademarks of their respective companies.
Document Name: (CAT-014-H-2.0)
Date: 07_07
Products Covered: mediaHUB
mediaHUB-PRO
mediaHUB-FW

2
Table of Contents
Chapter 1 - Introduction
Overview ..............................................................
4
Applications ...........................................................4
Benefits ................................................................
4
Availability ...........................................................
5
What’
s Included .....................................................5
System Requirements .............................................
5
Front Panel Diagram ...............................................
6
Back Panel Diagram ................................................7
Chapter 2 - Installation and Setup
Setting up the mediaHUB Serve
r ..............................8
mediaControl Application Installation ........................8
mediaControl Application .........................................9
Chapter 3 - Configuring mediaHUB
Connections ........................................................ 10
Source ................................................................ 10
Application .......................................................... 11
Transfers ............................................................. 12
Chapter 4 - Encoding Files
Quick Encode Instructions ..................................... 14
VTR Source Encode ......................................... 14
Live F
eed Encode ............................................ 15
Appendix
A - Contacting Customer Support .................... 17
B - mediaHUB Technical Reference .................... 19
C - Configuring ODBC .................................... 20

3
NOTES:

Chapter 1 - Introduction
4
Chapter 1 - Introduction
Overview
mediaHUB is a realtime standard definition MPEG 2 video,
MPEG and Dolby audio encoder. With the ability to capture standard
definition video and multiple stereo audio streams in realtime,
mediaHUB allows users to view a confidence decode of the video as well
as audio track selection while capturing. When capture is completed,
mediaHUB provides review, accept and transfer options. Transfers can
be made to the local host computer, a remote FTP server and directly
to one or many Adtec video servers. mediaHUB includes control of
professional VTRs over serial RS-422 or FireWire for accurate selection
of acquisition material. Live feeds from satellite or newsroom sources
can also be recorded on command by mediaHUB. If you work in a non-
linear editor like Final Cut, you can export directly to mediaHUB without
rolling tape in real time. Regardless of your source, mediaHUB provides
broadcast quality MPEG 2 SD encoding for the best on-air presentation.
Applications
Commercial Insertion: Encode commercials from tape or directly
from Final Cut for digital program insertion (DPI) or linear insertion.
Review encoded files from any source before they are released to the
enterprise.
Video On Demand (VOD): Encode commercials from tape or
directly from Final Cut for Video On Demand (VOD) compliant to the
Cable Labs ADI specification.
Program Acquisition: Encode long form material from tape or
satellite based on time, serial, Ethernet or GPI control.
Multimedia: Create files that provide the best quality playback on
any Adtec digital media player or server.
Non-Linear Editing: Use mediaHUB to offload the rendering process
in Final Cut for real-time production of your work. Useful when
creating content for video servers or DVD content distribution.
Benefits
Ingest with less work: mediaHUB is designed to make the tedious task of
media ingest more streamlined and accurate with configurable work profiles
that set up parameters with just one click. All you have to do is select your
source material, encode and review while mediaHUB transfers the approved
file where you want it automatically.
See what you encode: Real-time confidence decode of the ingested material
lets you immediately see and hear what you have captured with control
to switch audio channels, abort and re-encode right away. After content is
encoded, it can also be reviewed as many times as you want before final
approval and transfer.
Control with accuracy: mediaHUB can control VTR sources from RS-422 and
FireWire for accurate mark in/out of material to ensure that you get what you
want.
Get the highest quality MPEG 2 SD: When it comes to the best on-air look,
mediaHUB delivers with CableLabs VOD compliant files or ramp up to full
frame D1 quality MPEG 2 standard definition video encoded from low bit rates
up to 15Mbps with concurrent multiple Dolby Digital 2/0 (AC-3) and mixed
MPEG 1 Layer 2 Musicam audio tracks.
Ingest what you need: mediaHUB interoperates with Adtec’s commercial
insertion enterprise server, adManage. As a content management server,
adManage provides mediaHUB with a prioritized list of commercials scheduled
for ad insertion. Once the file is encoded and accepted, the adManage
database is updated with valuable metadata including actual duration, ingest
time, operator and optional expiration date.
Crash record anytime: For live “crash recording” from satellite or newsroom
sources, simply press encode, connect a GPI interface or schedule a time and
duration with mediaHUB to automate the encode process.
Encode right from Final Cut Pro: If you spend most of your day in Final
Cut, you will appreciate the way mediaHUB offloads your work using Print To
Video (Pro and Express) for near frame accurate or Edit to Tape (Pro only)
frame accurate media acquisition over FireWire.
Create DPI-ready files: Whether you currently splice local content into a
digital transport stream or you are planning for DPI in the future, mediaHUB
can create files that work in switched SDI, analog ad insertion and DPI ad
servers from Adtec or other vendors.

5Chapter 1 - Introduction
Feature Highlights
Encode Features
- SDI: SDI input video with embedded SMPTE 259M AES-EBU channel 1,
2, 3, 4 audio.
- Analog: Composite or YC video
- Dual Stereo analog audio input.
- Dual Stereo Digital AES-EBU audio input.
- Supports mixed, SDI embedded, Analog, AES-EBU, or Firewire audio
inputs.
- Firewire (DV25): Video, audio and VTR control on one Firewire cable.
- Non-Linear Editors (NLE): Final Cut Print To Video via Firewire or SDI,
Composite or YC if third party card (Decklink Pro or equivalent) is available.
- VOD Compliant to MD-Sp-VOD-CEP-101-040107 excluding HD.
VTR Control Features
- Frame accurate Sony Protocol compatible RS-422 control.
- FireWire protocol compatible. Note: Some FireWire decks are not frame
accurate and may provide +/- 1 to 3 frame accuracy.
- Source control with Play, Stop, FF, RW, Jog, Shuttle, Set In/Out, Goto
In/Out and Duration.
Decode Features
- Composite video and analog audio decode.
- Real time confidence decode during encode with abort.
- Decode playback of encoded file.
- Monitor video from composite or S-Video (YC).
- Select audio track 1 or 2 to quality control both audio tracks.
Availability
MEDIAHUB: Media ingest and prep station w/RS422 control, preview decode,
MPEG & Dolby stereo audio w/300GB IDE drive.
MEDIAHUB-FW: Media ingest and prep station w/RS422 control, FireWire in,
preview decode, SDI, MPEG & Dolby stereo audio, w/300GB IDE drive.
MEDIAHUB-PRO: Media ingest and prep station w/RS422 deck control,
preview decode, SDI, MPEG & Dolby stereo audio w/300GB IDE drive.
What’s Included
mediaHUB: Media Ingest & Prep Station
mediaControl Application control & configuration software
Connection Kit: Ethernet cable and serial 9 pin adapter (PN:
TERMINALKIT1)
Audio: Five euro audio removable screw terminal (RST)connectors
Audio/video cable: AV break out cable with S-Video, SPDIF,
Composite video BNC pigtails (PN: Media Cable ) BNC Composite
Video, RCA S/PDIF Audio), power cord, Ethernet cable, serial adapter
Manual (CAT-014-H-2.0)
System Requirements
mediaHUB configuration and control application requires one of
the following:
Windows XP and 2000 or Linux computer: Intel or AMD 32 bit
processor at 2 GHz; 512MB memory; 1024x768 32 Bit color capable
graphics card; TCP/IP compatible computer network.
Macintosh OS-X (10.2 or greater) computer: G4 32 bit processor
at 1 GHz, G5 64 bit processor (any); 512MB memory; 1024x768 32 Bit
color capable graphics card; TCP/IP compatible computer network.

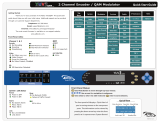
Front Panel Diagram
Figure 1.1

Ethernet
10/100 Base T Ethernet.
Connect to PC for
access to the adCode
application from the
same network.
Terminal
Serial port typically
used for diagnostics.
Ethernet
Busy LED -
Illuminates when
Ethernet activity
occurs - yellow
Ethernet
Link LED - Illuminates
when connected to a
network
Ethernet
Link LED - Illuminates
when connected to a
network - green
IEEE 1394
Not Used
Audio Out 5.1
Left - Right - Center - L Surr - R Surr - Sub
Stereo:
Unbalanced
analog stereo audio
out (1/8” female)
DVI-I OUT: Digital Video Interface
(DVI
-I) supports both digital
(DVI-D) and analog (DVI-A
) outputs
for VGA and Component (RGB/YUV)
with an optional cable. Refer to
Appendix E for pinout specifications.
S-Video OUT: 7-Pin
Media Port for Video out
configurable to
Composite (BNC), or
S-Video (4-pin mini-din
Y/C). Cable required for
VGA, YUV and RGB.
Encoder RS422
Connect to media
source. Must be Sony
protocol tape deck
interf
ace.
LTC
Not Used
RS232
Not Used
USB 2.0
Not Used
Gigabit Ethernet
Not Used
CBVS-Out:
Reserved
for future use.
C IN
(Lowest Quality)
Composite IN Video Source
YC IN
( Mid Quality)
S Video Source
SDI IN
(Broadcast Quality)
Serial Digital Input
Vi
deo and embedded
AES audio source
.
Firewire
(Professional Quality)
DV25 IEEE 1394
Video and audio
source
.
Power - AC Line Input
Standard 3 pin computer
power plug. ( Auto range
70-240 VAC Input )
GP IO
Not Used
AES Audio (OUT/IN)
Digital audio
compressed or
uncompressed input
s
1 2
Audio Channels IN
Analog balanced audio input.
Stereo pairs (ch1 & ch2)
1
2
SPDIF:
Digital audio
(RCA) configurable as
Compressed (for 5.1
AC-3 audio) or
Uncompressed (PCM 2
channel).
Back Panel Diagram
Figure 1.2

Chapter 2 - Installation and Setup
8
Chapter 2 - Installation and Setup
This chapter covers the setup of the mediaHUB Server and
installation of the mediaControl Application.
Setting up the mediaHUB Server
The mediaHUB server should be installed into a one-rack unit 19”
rack slot. Power should be applied to the unit and configured with a
valid IP address via the front panel. Powering on and off the mediaHUB
server is simply done by plugging or unplugging the unit. There is no
on/off switch or button.
To set the IP address:
- Press the “Mode” button
- Enter the IP address of the Server using the “Select” and arrow buttons.
* Make sure that the mediaHUB server is on the same network as the
control application computer.
- Press “Enter”
- Power down unit
With the power disconnected, connect the appropriate cables
for your setup. Refer to the diagrams on the previous pages for port
information. Once your cables are connected, apply power to the unit.
Confirm that the IP address is correct on your unit and that the Link
LED on the front of the unit is lit before launching the mediaControl
application.
Note: Multiple input sources may be connected at the same time. For
example, you can connect a VTR via the RS422 at the same time that
you have a live feed source connected via FireWire.
mediaControl Application Installation
For Windows: The mediaControl software can be installed on
Windows XP and 2000 machines. Refer to the system requirements
in Chapter 1 for additional information. Insert the installation CD
into your computer. The install program will automatically launch. If
it does not, locate the CD drive via “My Computer” and double-click
the mediaControl Installer icon. The wizard will walk you through the
installation process. After installation, the icon for the application can be
found on the desktop and in the start menu in the Adtec > mediaControl
folder.
For MAC: The mediaControl software can be installed on MAC OSX
(10.2 or greater). Refer to the system requirements in Chapter 1 for
additional information. Insert the installation CD into your computer.
When the CD appears on the Desktop, double-click on the icon and then
on the mediaControl Installer icon. The wizard will take you through the
installation process. After installation, the launch icon for the application
can be found on the dock and in the Applications/Adtec/bin/ folder.
Getting Started
Launch the mediaControl application. On the following page
is an overview of the mediaControl application (Figure 2.1). Take a
few minutes to review the layout as terms defined there will be used
through out the manual.

Figure 2.1
mediaControl Application

Chapter 3 - Configuring mediaControl
10
Chapter 3 - Configuring mediaHUB
Connections
To connect to your mediaHUB server, launch the mediaControl
application. By default. mediaControl attempts to establish the last
connection prior to shutdown. Since this is the first time you are
launching the application, click on the cancel button when it makes
this attempt. Once the application has launched, click on ‘Connect’ in
the navigation panel. You will be able to create a connection from this
screen. Each connection you create with mediaControl maintains its own
preferences and settings.
To create a new Connection, click on the New button.
Enter a Description for this connection. This is typically a simple
name for the server. It is best to limit this name to 15 characters so
that it is easy to manage in the navigation window. (ex. mediaHUB 1)
Enter the IP address of the mediaHUB server in the IP Address
input box and click the Save button.
To connect to the server, click on the Connect button on this
screen or double click on the connection description in the navigation
panel. When you are connected, you will see the words CONNECTED
TO [Description] appear in the top left section of the screen.
Source
Sources can be any Sony protocol tape deck, a DV-25 firewire
source or a live feed such as satellite or a newsroom source.
To configure your source, click on the Source link in the navigation
panel.
Control Interface: Select the type of source input you will be using.
None: should be selected if you are recording from a live feed (crash
recording) or have no control of input.
VTR: should be selected when connecting a Sony protocol tape deck via
the encoder RS422 on the back of the mediaHUB server.
FireWire: should be selected when your source is a VTR connected via
FireWire on the DV-25 port on the back of the mediaHUB server.
FireWire NLE: Should be selected if using mediaHUB with a Non Linear
Editor.
Note: To have source control over the VTR via the mediaControl
application, your VTR control switch must be set to Remote.
PreRoll: Select the number of seconds to pass before encoding begins. This
enables the source tape deck to become stable prior to encoding.
Select your preferences and click on the Save button. Once you
have a correctly connected source, you will see its status noted in the
Source Status on the Encode panel of the application.

11Chapter 3 - Configuring mediaControl
Application
Using mediaHUB in conjunction with adManage will streamline your
encode process for files to be distributed via adManage. When properly
configured, mediaHUB will query adManage and provide a prioritized list
of files that are scheduled for ad insertion. When the file is encoded and
accepted, the adManage database is updated with valuable metadata
including actual duration, ingest time, operator and optional expiration
data.
To configure mediaHUB to work with adManage you will need to
modify your ODBC settings as well as your mediaControl application
settings. Refer to Appendix C for help with setting up ODBC first. When
that is complete, click on the Application link in the navigation window.
In the adManage Data Source input box, you need to enter the
name of your Data Source as outlined in the ODBC settings as the DSN
Name. Checking the following checkboxes enables these items while
unchecking them turns them off.
Note: Enabling adManage prior to correctly configuring the ODBC
settings will keep the application from launching correctly.
Enable adManage: Allows mediaHUB to talk to adManage
Enable adManage Security: Requires users of mediaControl to login
using their adManage username and password before being able to access
mediaHUB.
Enable adManage Updates: Enables mediaHUB to make database updates
in adManage for Meta Data ( Advertiser Name, Description, Duration, etc.)
Enable adManage Encoding List: Turns on a query of adManage for
files that need to be encoded and lists them in Encode List window of the
mediaControl Encode Panel.
The duration markers located in the Source tab of the
mediaControl application main panel can be customized from this screen
as well. For each button, modify the duration and title to reflect your
needs. Click on the Save button to save your changes.
From the mediaControl application main panel, you will be able to
view the following information for each file within the Encode List. Some
of these fields can be changed and can be saved back into adManage.
All of this information is pulled from the traffic schedules of the
adManage content management server.
Content ID: The name of the file to be encoded or the name of already
encoded files. adManage requires that the Content ID be no more than 8
characters in length with no spaces.
Advertiser/Program: The name of the advertiser or program.
Description: A brief description of the encoded file or spot.
Expiration Date: Defines when this file can expire. This date is used by the
adManage Content Expiration Service to help maximize the use of available
disk space on each ad inserter.
Never Expire: Check this box if you do not want this file to expire.
Encoded Date/Time: The date and time stamp when the file is encoded.
Schedule Date/Time: This denotes when the file is scheduled for play.
Scheduled Channel/Headend: This shows which channel and headend the
file is scheduled for next.
Operator: This is a meta data field to assist in keeping track of work flow.

Chapter 3 - Configuring mediaControl
12
Transfers
The final configuration that needs to be made before you can
encode a file involves the file transfer parameters. After you have
encoded a file, you will be asked to accept or reject the file. The
mediaControl application looks to the file transfer configuration to know
how to treat the newly encoded file. Click on the Configure > Transfer
link in the navigation panel. On this screen you can setup multiple
transfer options.
On Accept: Select what you want done with the file once it has been
reviewed and accepted.
Leave: This option will save the file to the mediaHUB server only.
Copy: This option will save the file on the server and transfer a copy of the
file to a location you can designate.
Move: This option will transfer the file from mediaHUB to the location you
designate leaving no copy on the mediaHUB server.
If you select to Copy or Move the encoded file, you will need to designate a
transfer method and path.
Transfer Method: The current method of transfer is FTP from mediaHUB
to your client computer. Additional options may become available in future
releases.
Source IP Address: This is the IP address of the mediaHUB Server.
Source Port: This is the port of the mediaHUB server used for FTP.
Server Username: The FTP username.
Sever Password: The FTP password.
Local Media Path: This path is the location on your control computer where
files will be saved.
Server Media Path: This field denotes the path to which files should be
saved on the mediaHUB server.

13Chapter 3 - Configuring mediaControl

Chapter 4 - Encoding Files
14
Chapter 4 - Encoding Files
Quick Encode Instructions
Once the connection and source have been configured correctly,
you are ready to encode a file. There are three basic steps to encoding
the file: Make a connection, set up your source, encode the file and
review it. Recording from a VTR and Crash Recording vary and are
described separately.
VTR Source Encode
Make a Connection - Step 1
- Connect to the mediaHUB server
- Confirm that your mediaHUB Server reports back as CONNECTED.
Set up your Source - Step 2
Prior to encoding a file, you will be using the main panel of the application
to verify and control your source.
- Confirm that the Interface, Mode, Cassette, Activity, Video, Audio Only
and 2nd Video settings under Status correctly reflect the type of encode
you wish to make.
- Position the VTR to the start point of the material using the shuttle
controls and click on the Set IN button.
- Set your encode duration. You can enter it manually or use the quick
duration buttons (15s, 30s, 60s or 120s). This will automatically fill the
OUT input box.
Encode - Step 3
- Enter a name for the file you wish to encode in the Content ID input
box in the Encde Control panel. Some Adtec products require files names
of up to 8 characters, but mediaHUB can support up to 32 characters in the
content ID. Do not include the file extension as mediaHUB automatically
appends the file name with the proper extension. The Content ID is all that
is required to encode a file.
- Click the ENCODE button. The status of the encode is shown in the
top of the tab. The activity status, the length of the encode, the encoding
parameters and the bits per second of the encode is shown.
Review - Step 4
- While the file is being encoded, you have the ability to abort the encode
by clicking on the Reject button within the Encode Control Panel at any
time.
- To view a confidence decode, you will need to have a monitor set up
specifically for the decoded file to play through and it should be connected
to the YC or C Out decoder port and the Audio 1 Out port if audio is
present. Unless you have the decode delay turned off, the decode will
automatically begin playback. Use the controls at the top of the screen to
control the playback.
- If the file is as you intended, you can accept the file by clicking on the
Accept button. Accepting the file will save the file for you. The location of
the saved file depends on the Transfer setting previously configured. - If it
is not as intended, then click the Reject button and start the process again
beginning with Step 2.

15Chapter 4 - Encoding Files
Live Feed Encode
Connect - Step 1
- Connect to the mediaHUB server.
- Confirm that your mediaHUB Server reports back as CONNECTED.
Source - Step 2
Prior to encoding a file, you will be using the main panel of the application
to verify and control your source.
- Confirm that the Interface setting reads as NONE :Schedule encode
mode.
- The current time will be displayed in the Current Position input box.
- Enter the time you wish to start your encode into the In input box.
- Set your encode duration. You can enter it manually or use the quick
duration buttons (15s, 30s, 60s or 120s). This will automatically fill the
OUT input box.
Encode - Step 3
- Verify the status information at the top of the Panel.
- Enter a name for the file you wish to encode in the Content ID input
box. Some Adtec products require files names of up to 8 characters, but
MediaHUB can support up to 32 characters in the content ID. Do not
include the file extension as mediaHUB automatically appends the file name
with the proper extension. The Content ID is all that is required to encode
a file.
- Click the ENCODE button. This will schedule your encode to occur at
the time designated. A popup box will appear letting you know that the
encode has been scheduled. You can only schedule one encode at a time.
- Once the file begins encoding, the status of the encode is shown in the
top of the panel. The activity status, the length of the encode, the encoding
parameters and the bits per second of the encode is shown. When the file
has completed encoding, you may review it before accepting or rejecting it.
Review - Step 4
- While the file is being encoded, you have the ability to abort the encode
by clicking on the Reject button within the Review tab at any time.
- To view a confidence decode, you will need to have a monitor set up
specifically for the decoded file to play through and it should be connected
to the YC or C Out decoder port and the Audio 1 Out port if audio is
present. Unless you have the decode delay turned off, the decode will
automatically begin playback. Within the Review tab, you have standard
VTR controls to manage the file.
- If the file is as you intended, you can accept the file by clicking on the
Accept button. Accepting the file will save the file for you. The location of
the saved file depends on the File Transfer setting previously configured.
- If it is not as intended, then click the Reject button and start the process
again beginning with Step 2.

Appendix
16
Appendix
A - Contacting Customer Support
B - mediaHUB Technical Reference
C - Configuring ODBC

17Appendix
A - Contacting Customer Support
Technical Support and Customer Service includes troubleshooting
product/system functional operations concerning Adtec equipment
,embedded systems and single device issues; Service Order generation,
processing and tracking; Warranty claim processing; and on-site
system evaluation and maintenance. Technical Support plans do not
include customer training programs. Programs incorporating customer
training are defined in the Training Services Policy. Customer Services
technicians provide limited instruction during a support call/email/fax in
order to facilitate checking for proper equipment operation.
Telephone and Email Support
Telephone: 615.256.6619
Email: [email protected]
Internet: www.adtecinc.com/supportrequest/
Adtec Digital offers telephone, email and fax support, warranty
and service related inquiries during normal business hours (9:00 AM
to 5:00PM Central Standard Time CST, Monday thru Friday, except
holidays. Support Requests can also be submitted on-line.
All inquiries will be processed in the order in which they are
received and by the criteria outlined in the Call Response Order.
Inquiries and inquiry responses made after 5:00 PM (CST) weekdays,
Saturday, Sunday or on an Adtec recognized holiday will be processed
the next business day in the order received.
Callers on hold and returned calls will be prioritized by the
following criteria:
• Priority-24 Subscription Customers
• Standard-Priority Subscription Customers
• All customers that have purchased Installation & Training, within 90 days of
the installation
• Adtec Certified Operators (ACO)
• Limited Level Support, Warranty & Service Requests
• Multi-device system installations that have purchased Installation & Training
from Adtec
• Distributors
• System Integrators
• Multi-device systems
• Single device users
Information needed for Support
To help expedite the troubleshooting process, please be prepared
to provide the following information to the support representative.
Product(s) affected: Please provide a list of the Adtec Products
involved including the Revision Number for each affected product.
Description of the Problem: Please include a detailed description
of the problem. Include the approximate time and day the problem
occurred, the spot ID of the material being inserted and what the
operator reported about the incident. It is also helpful to note any
recent changes to the system. More information is always better than
too little information.
Your Contact Data: Please include contact information so we
can reach you to discuss how to fix the problem, additional
troubleshooting steps that are required or to gather more complete
information regarding the problem. Please include your facility name
(or call letters), your name, title, email address, telephone number,
hours of work, and other contact persons if you are not available.
Advanced Support Plans
In addition to our basic Inquiry Response Policy, Adtec offers
two advanced levels of priority inquiry support: Standard-Priority
and Priority-24. The Standard-Priority & Priority-24 plans provide
guaranteed* response times with the Priority-24 plan offering after
hours and holiday support. Standard-Priority support is included with
the Adtec Certified Operator (ACO) training. Contact Adtec Sales to
upgrade your current support plan.
SUPPORT PLAN PRIORITY –24 STANDARD-
PRIORITY
LIMITED
Hours 24 Hours/Day
7 Days/Week
“9 AM – 5 PM
(CST), Excluding
Weekends &
Holidays”
9 AM – 5 PM
(CST) Excluding
Weekends &
Holidays
Call Response
Time: Guaranty*
Same Day: 2
Hours (1st in
order of call list)
Same Day: 4
Hours (2nd in
order of call list)
48 Hours
Discounted Site
Visits
25% 10% None
Discounted Training
25% 10% None
Repair Service:
Guaranty*
1 Day Turnaround 3 Day Turnaround
None
One month free service extension will be awarded if Adtec fails to
meet its service guarantee.

Appendix
18
Standard-Priority Support Plan
Customers can improve upon our normal call processing times
and can expedite inquiry support responses through our subscription
Standard-Priority service plan. Under this plan all telephone inquiries
are guarantied** a telephone response of no more than 4 hours after
they are received (within the designated hours of operation). Telephone
inquiries received by 4:00 PM (CST) on weekdays, excluding Adtec
holidays are guarantied a same-day telephone response. However,
inquiry responses may be made after hours until 8:00 pm (CST).
Email and fax inquiries are limited in scope to normal business hours,
excluding holidays. Standard-Priority customers are entitled to a 10%
discount on site visit and training charges after the initial system/
product installation and training. Standard-Priority customers also
receive a 3-day turnaround time guaranty* on warranty and non-
warranty repairs on Adtec manufactured equipment, excluding Studio
Encoders.
Priority - 24 Support Plan (24 Hour)
In addition to our Standard-Support plan, after hours, weekend
and holiday support is available with the Priority-24 support plan. This
plan is a subscription only service available for service inquiries 24
hours a day, 7 days a week. All telephone inquiries are guarantied* a
telephone response of no more than 2 hours. Email and fax inquiries
are limited in scope to normal business hours, excluding holidays. Calls
after 5:00 PM will be forwarded to a Customer Services representative
on call. Priority-24 customers are entitled to a 25% discount on site
visit and training charges after the initial system/product installation
and training. Priority-24 customers also receive a 1- day turnaround
time guaranty* on warranty and non-warranty repairs on Adtec
manufactured equipment, excluding Studio Encoders.
/