Page is loading ...

METRA. THE WORLD’S BEST KITS.™
© COPYRIGHT 2004-2011 METRA ELECTRONICS CORPORATION
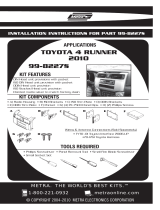
APPLICATIONS
1-800-221-0932
metraonline.com
INSTALLATION INSTRUCTIONS FOR PART 99-7343
2011 Hyundai Sonata
(For models equipped without Nav and with auto climate controls)
99-7343
•ISODINheadunitprovisionwithpocket
•DDINheadunitprovisions
•Paintedblackandsilvertomatchfactorydash
WIRING & ANTENNA CONNECTIONS(SoldSeparately)
Wire harness:
•70-73042010Kia/HyundaiHarness
•70-73052010Kia/HyundaiAmpBypassHarness
Antennaadapter:
•NotRequired
PanelRemovalTool•PhillipsScrewdriver•SocketWrench
C
A
G HF
B D E
•A)RadioHousing•B)(2)A/CVentTrimPanels
•C)DDINBrackets•D)DisplayBrackets
•E)Pocket•F)(12)1/2”Phillipsscrews
•G)(2)#8X1/4”PanHeadscrews
•H)(4)#8X3/8”TrussHeadscrews
TOOLS REQUIRED
KIT FEATURES
KIT COMPONENTS

Table of Contents
Dash Disassembly
–HyundaiSonata2011 3-4
Kit Assembly
–HyundaiSonata2011 5-6
–ISODINheadunitprovisions 7
–DOUBLEDINheadunitprovisions 7
KNOWLEDGE IS POWER
Enhance your installation and fabrication skills by
enrolling in the most recognized and respected
mobile electronics school in our industry.
Log onto www.installerinstitute.com or call
800-354-6782 for more information and take steps
toward a better tomorrow.
Metra recommends MECP
certified technicians
99-7343
Caution
Metra recommends disconnecting the negative battery terminal before beginning any
installation. All accessories, switches, and especially air bag indicator lights must be
plugged in before reconnecting the battery or cycling the ignition.
*NOTE: Refer Also to the instructions included with the aftermarket radio.

1. Unclipandremovethe2trimpanels
surroundingtheshifterandpocket.
(FigureA)
2. Remove(2)Phillipsscrewsatthe
bottomleftandrightsideoftheradio
trimpanel.(FigureB)
3. Unclipandremovetheradiotrimpanel
includingclimatecontrolandvents.
(FigureC)
4. Remove(4)Phillipsscrewssecuring
theradio.(FigureD)
5. Remove(4)Phillipsscrewssecuring
thedisplaythenremovethefactory
bracketsfromthedisplay.(FigureD)
Continued on next page
3
Dash Disassembly
99-7343
(Figure B)
(Figure C)
(Figure D)
(Figure A)

4
6. UnclipandremovetheHazardswitch
fromtheradiopanel.(FigureE)
7. Remove(2)Phillipsscrewssecuring
thepassengerairbaglightassembly.
(FigureE)
Dash Disassembly
99-7343
(Figure E)
8. Remove(4)Phillipsscrewssecuring
theclimatecontroltotheradiopanel.
(FigureE)
9. Remove(8)Phillipsscrewssecuring
thea/cventsthenunclipandremove
themfromthefactorypanel.(FigureE)

5
Kit Assembly
99-7343
(Figure B)
(Figure A) (Figure C)
1. Snapthea/cventsintothea/cvent
trimpanels.(FigureA)
2. Attachtheleftandrighta/cventtrim
panels and the climate controls to
themainradiohousingpanelusingthe
provided(10)#8X1/2”Phillipsscrews
and(2)#8X1/4”Panheadscrews.
(FigureB)
NOTE: #8X1/4” Pan head screws
must be installed in the
indicated locations.
3. Snapthehazardswitchintothemain
radiohousing.(FigureC)
Continued on next page

99-7343
6
Kit Assembly
(Figure A)
4. Attachthepassengerairbaglightto
themainradiohousingusing(2)
#8X1/2”Phillipsscrews.(FigureA)
5. Attachthedisplaybracketstothe
displayandmountitbackintothedash
inthefactorylocation.(FigureB)
Continued on next page
(Figure B)

1. Locatethefactorywiringharnessin
thedash.Metrarecommendsusingthe
propermatingadapterfromMetra
orAXXESS.Re-connectthenegative
batteryterminalandtesttheunitfor
properoperation.
2. AttachtheDDINbracketstothe
aftermarketradiousingthescrews
supplied with the radio, then secure
theassemblytothepocketusingthe
(4)supplied#8Trussheadscrews.
(FigureA)
3. Mounttheassemblyintothesubdash.
4. Reassembledashinreverseorder
ofdisassembly.
1. Locatethefactorywiringharnessinthe
dash.Metrarecommendsusingthe
propermatingadapterfromMetraor
AXXESS.Re-connectthenegative
batteryterminalandtesttheunitfor
properoperation.
2. AttachtheDoubleDINbracketstothe
aftermarketradiousingthescrews
supplied with the radio, then mount the
unitinthesubdash.(FigureB)
3. Reassembledashinreverseorder
ofdisassembly.
ISO DIN head unit provisions
Double DIN head unit provisions
99-7343
(Figure A)
(Figure B)
7

METRA. THE WORLD’S BEST KITS.™
© COPYRIGHT 2004-2011 METRA ELECTRONICS CORPORATION
1-800-221-0932
metraonline.com
INSTALLATION INSTRUCTIONS FOR PART 99-7343
REV. 3/16/11
/