Page is loading ...

Simple Assembly Instructions - Please keep for future reference
IMPORTANT
1
. Read these instructions carefully and
familiarise yourself with the procedure
before assembling the unit.
2
. Check that you have all the component
parts following the list on the back
cover and familiarise yourself with
each part before proceeding.
3
. Take all the fittings out of the plastic bag
and separate them into their groups.
4
. Ensure you have enough space to lay out
all the parts before assembly.
Grey And Chrome Tidy Rail With Two Rails
5
. To avoid scratching it is recommended
that you assemble the unit on a soft
level surface.
9-07
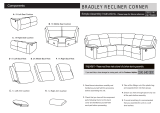
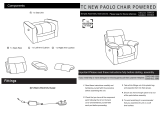
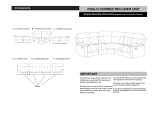
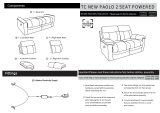
Components
6
. Phone After Sales 08456 400 800
J
4 x Castor
A
1 x Hanger
B
2 x Lower Side Support
C
1 x Top Crossbar
D
2 x Upper Side Support (Inserted inside component B)
E
2 x Bottom Crossbar
F
2 x Connector
G
2 x Leg Section
H
2 x Lock
8755027

Assembly Instructions Assembly Instructions
Stage 2 – Fitting the RailStage 1 – Fitting the Feet
There are many different
kinds of Screws and
Panels. Ensure you check all
before assembly.
Check Before Assembly
NOTE: It would be useful to ask
someone to help you at this
stage.
1. Insert Bottom Crossbar E into
the Leg Section. G.
See fig. 1.
NOTE: It would be useful to ask
someone to help you at this
stage.
3. Insert Castors J into the Feet G .
See fig. 3.
2. Insert Bottom Tubes B into the
Feet G .
See fig. 2.
1.
Insert Top Crossbar
C
into the
Connectors F .
See fig. 4.
2. Insert Upper Side Support D
into the Connectors
F
.
See fig. 5.
fig. 3
G
J
fig. 1
E
G
G
fig. 4
C
F
F
fig. 5
F
F
DD
G
B
fig. 2
G
G

Assembly Instructions Assembly Instructions
Stage 4 – Finishing the UnitStage 3 – Fitting the Hanger
Care and Maintenance
Safety
To avoid any risk of suffocation to animals or children dispose of the plastic
bags immediately.
Fitting
From time to time please ensure there are no loose screws on the product.
Cleaning
As with all surfaces clean with a damp cloth and mild detergent, do not use bleach
or abrasive products.
NOTE: It would be useful to ask
someone to help you at this
stage.
1.
Insert Hanger
A
into the Lock
H
.
See fig. 6.
NOTE: It would be useful to ask
someone to help you at this
stage.
NOTE: Before use always make
sure the unit is secure.
1. Carefully place the unit in the
desired location. See fig.11
fig.11
2. Insert Locks H into the Bottom
Side Support B .
See fig. 7.
3.
Insert Locks
J into the bottom
of Upper Side Support .
H
D
4.
Set the height of the unit:
Using the holes on Upper Side
Support D . Ensuring the Locks
H are loosened See fig.8., slide
the Upper Side Support D to the
desired height and tighten the
Locks H to fix in position.
See fig. 9 . & fig. 10.
Adjustment Range:99.5 ~ 167 cm.
fig. 7
B
D
H
fig. 6
HA
H
fig. 9
Locked
fig. 8
Unlocked
fig. 10
NOTES : Align all the holes of the
componets , before locking.
B
D
H
&
/