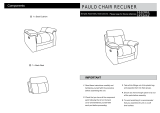
CAUTION:
Beware of entrapment. Keep
hands and fingers clear of the
Tilt Mechanism when operating
the controls.
Ensure that children or pets are
not playing or lying in the way
when the Tilt Mechanism is
operated.
Prevent children from playing
on the furniture or with the
controls.
Care and Maintenance
Safety
To avoid any risk of suffocation to animals or children dispose of the plastic
bags immediately.
Cleaning
As with all surfaces clean with a damp cloth and mild detergent, do not use
bleach or abrasive products.
Fitting
From time to time please ensure there are no loose screws on the product.
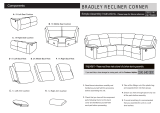
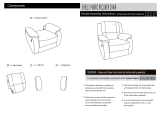
Finally carefully place the unit in the
desired location.
See fig
fig.
NOTE: It would be useful
to ask someone to help
you at this stage.
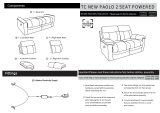
Back and Foot Rest
Adjustment
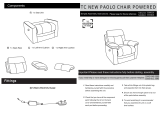
This Chair features a
reclining back rest and
raised foot rest. You need to
be sitting in the chair to
activate the features.
See fig.6.
See fig.6.
3
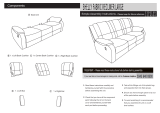
Adjust the recliner to your
own requirements.
if you need help or have damaged or missing parts,call the Customer Helpline:
0345 640 0800/0345 601 2895
489-499 Avebury Boulevard Milton Keynes MK9 2NW,Argos Limited
1
Press the "Adjustment Lever-
front button
recline and the foot rest will
"
, the chair will
2
position.
Press the "Adjustment Lever-
.The sofa return to
back button
"
the normal
WASTE EL ECT RI CA L PR OD UCTS
SH OU LD NO T BE DI SP OS E D OF
WI TH HO US EHO L D WAS TE .PL E ASE
RECYCL E WHERE FAC IL ITI ES
EXI ST .
CH ECK WI TH YO UR
LOCAL AUTH OR ITY
FOR RECYAL
ING ADVI CE .
NOTE:It would be useful to ask
someone to help you at this
Sta e.
g
automatically lift up.
7.Back and Foot Rest Adjustment
8
WARNING:If the supply
cord is damaged,it must be
replaced by the manufacturer,
its service agent or similarly
qualified persons in order to
avoid a hazard.
.
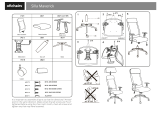
6.Remove and unpack the fittings which
are stored under the Seat Unit
A
See fig. 6.
8.
fig. 7
A
C
C
J
J
fig. 6
.8.