Page is loading ...

MSA 314 (L) Rev. 4 © MSA 2013 Prnt. Spec. 10000005389(A) Mat. 10115063
Doc. 10115063
The warranties made by MSA with respect to the product are voided if the product is
not used and maintained in accordance with the instructions in this manual. Please
protect yourself and your employees by following the instructions. Please read and
observe the WARNINGS and CAUTIONS inside. For any additional information rela-
tive to use or repair, write or call 1-877-672-3473 (FIRE) during regular working hours.
This manual must be carefully read and followed by all persons who
have or will have the responsibility for using or servicing this Rescue
Belt Escape System. This Rescue Belt II will perform as designed only
if used and serviced according to the instructions; otherwise it could
fail to perform as designed, and persons who rely on the Rescue Belt II
could sustain serious personal injury or death.
National standards and state, provincial, and federal laws require the
user to be trained before using this product. Use this manual as part
of a user safety training program that is in accordance with depart-
ment guidelines. These instructions must be provided to users before
each use of the product and retained for reference by the user.
FireHawk
Rescue Belt II
INSTRUCTIONS FOR USE AND CARE
WARNING
®

INTRODUCTION
INTRODUCTION
The FireHawk Rescue Belt II is a personal escape system
integrated into an MSA air mask. Rescue belts listed in
this manual are NIOSH CBRN approved only when used
in conjunction with an MSA CBRN approved air mask. The
Rescue Belt II is designed to provide the user a means of
escape from an elevated position. Use of the Rescue Belt
II must be in accordance with the user’s fire department
procedures. The Rescue Belt II is an EMERGENCY device
which must only be used when all other escape options
have been exhausted.
This FireHawk Rescue Belt II is NFPA 1983 approved for
use as a personal escape system for emergency escape
when installed on MSA approved air masks. It can also be
used as a stand alone product, when it is not installed on an
air mask. The Rescue Belt II is only approved by NIOSH
when used in conjunction with an MSA approved air mask.
This personal escape system meets the requirements for
escape belts with optional flame resistance and fire
escape systems of NFPA 1983, Standard on Life Safety
Rope and Equipment for Emergency Services, 2012
Edition, which includes testing at a 310 pound weight
capacity.
LIMITATIONS
Read and follow all limitations carefully.
Misuse can result in death or serious injury.
• Use as a single person, one time use escape device,
unless used for training. Units used for training may be
reused; however, MUST be used in conjunction with an
independent fall protection system.
• The combined weight of the user and all equipment
must not exceed 310lbs.
• Remove from service if used in an escape, exposed to
chemicals, or does not meet inspection criteria.
• Use ONLY as a complete system. NEVER alter this
device or use the components with other systems.
• Do Not use to hang tools or other equipment.
TRAINING
• An independent fall protection system with
safety line and full body fall protection har-
ness MUST be used in conjunction with this
Rescue Belt II during training.
• Remove the Rescue Belt II from training ser-
vice when it does not comply with the
inspection criteria described in this manual.
• Rescue belts used for training purposes
MUST be designated for training use ONLY
and marked as such.
Misuse can result in death or serious injury.
Wear gloves when using this device.
WARNING
CAUTION
2
MSA 314 (L) Rev. 4 - 10115063
TABLE OF CONTENTS
Introduction..............................................................................................................................................................................2
Limitations ...............................................................................................................................................................................2
Training....................................................................................................................................................................................2
Inspection Before Use .............................................................................................................................................................3
Operation and Use ..................................................................................................................................................................4
Installing the FireHawk Rescue Belt II on the Air Mask ..........................................................................................................5
Removing the FireHawk Rescue Belt II from the Air Mask .....................................................................................................7
Repacking the Rope in the FireHawk Rescue Belt II..............................................................................................................7
Re-installing the Quick-Release ..............................................................................................................................................8
Cleaning and Storage..............................................................................................................................................................9
Useful Life..............................................................................................................................................................................10
Replacement Kits ..................................................................................................................................................................10
Sample Rescue Belt Usage and Inspection History .............................................................................................................12
WARNING
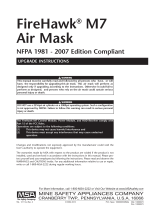
P/N
Fits Waist
Size
Rope Material Anchor Type
Rope
Length
Air Mask Type
10119391 36” - 59” Aramid Crosby Hook 50 ft M7 and M7XT
10119392 36” - 59” Aramid Carabiner 50 ft M7 and M7XT
10119369 36” - 59” Aramid/Nylon Crosby Hook 50 ft M7 and M7XT
10119370 36” - 59” Aramid/Nylon Carabiner 50 ft M7 and M7XT
10119395 36” - 59” Aramid Crosby Hook 50 ft AirHawk II
10119390 36” - 59” Aramid Carabiner 50 ft AirHawk II
10119393 36” - 59” Aramid/Nylon Crosby Hook 50 ft AirHawk II
10119394 36” - 59” Aramid/Nylon Carabiner 50 ft AirHawk II
10156308 36” - 59” Aramid Lightening Hook 50 ft M7 and M7XT
10156310 36” - 59” Aramid/Nylon Lightening Hook 50 ft M7 and M7XT
10156312 36” - 59” Aramid Lightening GT Hook 50 ft M7 and M7XT
10156314 36” - 59” Aramid/Nylon Lightening GT Hook 50 ft M7 and M7XT

INSPECTION BEFORE USE
Training must only be performed under direct supervision
of a trained professional and in accordance with local fire
department guidelines. A trained professional must identi-
fytraining structures and anchor points. An independent fall
protection safety line (such as MSA Dyna-Lock, SRL, or
equivalent) and a full body fall protection harness (such as
MSA TechnaCurv Harness or equivalent) MUST be used
in conjunction with the Rescue Belt II during training. Also,
Replacement Kit (P/N 10118506) should be purchased to
designate the Rescue Belt II as training equipment and to
keep rope ends from fraying.
To order training equipment contact MSA Customer
Service Center at 1-800-672-2222.
It is the responsibility of the purchaser and user of this
product to:
• Learn through PERSONAL instruction from a rescue
instructor who is well versed in all phases of technical
rescue. Never attempt to use this product until you
have received such instruction and are deemed com-
petent in its use by the instructor.
• Use this product only in accordance with local fire
department procedures.
• Read all the product information and labels and follow
them.
• Use good judgment and do not exceed the limitations
of the user’s skill or the equipment.
Additional information regarding escape rope and belts
can be found in NFPA 1500, Standard on Fire Department
Occupational Safety and Health Program and NFPA 1983,
Standard on Life Safety Rope.
INSPECTION BEFORE USE
Inspect the Rescue Belt II in anticipation of deployment in
an emergency situation. Also, inspect it before use in a
training situation.
If the unit exhibits any of the indicated conditions, immedi-
ately remove it from service. See the Service section of
this manual for appropriate component replacement.
1. Waist Belt
a. Inspect the webbing of the belt for damage (cuts,
abrasion, discoloration, or signs of UV or chemical
damage).
b. Inspect the yellow stitching for signs of abrasion,
damage from heat, and for loose or missing stitches.
c. Inspect hardware for burrs, cracks, wear, corrosion,
or other damage. Ensure the waist belt buckle
opens and closes properly.
2. Rope
a. Open the flap on the lumbar pad and inspect the
first 24 inches of rope. (Inspect the entire length of
rope if the rescue belt was used in training.)
b. Inspect the sewn eye on the rope for signs of
abrasion, loose stitching, or other damage.
c. Inspect the rope for signs of damage such as
stiffness, discoloration, or abrasion.
d. If it is suspected that the rope was exposed to any
harmful chemicals, replace the rope. Damage to the
rope by chemicals can be invisible to the eye.
3. Descender Assembly
a. Verify that the descender is securely stowed in the
lower elastic loop within the lumbar pad.
b. Verify that the rope is not twisted around the
descender in a manner that would impede its
removal during use.
c. Verify that the rope is tightly routed through the
descender and that there are no loops of slack in
the rope between the holes in the descender.
4. Hook/Carabiner
a. Verify that the hook or carabiner is securely stowed
and that it can be easily deployed during use.
i. If present, the Crosby or Lightening Hook should
be inserted into the upper elastic loop such that the
eye of the hook is oriented into the lumbar pad and
the hook portion curves around the stowed descender.
ii. If present, insert the Lightening GT Hook so that the
eye of the hook is oriented into the lumbar pad, and
the hook portion curves around the stowed descender.
NOTE: The Lightening GT Hook should not be clipped
into any of the sewn loops within the lumbar pad.
iii.If present, the carabiner should be placed in the
lumbar pad above the descender.
NOTE: The carabiner should not be clipped to any of the
sewn loops withing th elumbar pad.
b. If present, verify that the gate of the carabiner opens
and closes properly.
5. Lumbar Pad
a. Inspect the lumbar pad to verify that all webbing
loops are securely attached and that there is no
damage to any of the stitching.
b. Inspect the entire surface of the lumbar pad for
discoloration, severe abrasion damage, holes, or
signs of heat or chemical damage.
c. Inspect the seams to verify that there is no loose
stitching or holes.
d. Verify that the flap on the lumbar pad opens and
closes properly.
e. Once all the previous inspection procedures have
been followed, ensure that the tail of the rope with
the stopper knot protrudes from the flap of the
lum-bar pad between the two snaps so that it can
easily be located during an emergency situation.
f. Ensure the tail of the rope with the stopper knot pro-
trudes from the flap opening between the two
snaps on the flap so that it can easily be located
during an emergency.
3
MSA 314 (L) Rev. 4 - 10115063

OPERATION AND USE
6. Quick-Release Mechanism
a. Verify that the quick-release webbing is properly
connected to the rescue belt. The sewn fold on the
webbing should protrude completely through the
slots in the Nomex plate in the center of the lumbar
pad. The Velcro hook and loop fastener should be
securely fastened.
b. Verify that the snaps are able to be easily released
by tugging on the ends of the quick-release strap.
Ensure that the snaps are securely fastened before
use.
c. Verify that the lumbar support straps located in the
top center of the lumbar pad are properly routed
through the quick-release webbing straps and that
the ends of these straps are fully engaged with the
sewn fold on the webbing of the quick-release strap.
d. Verify that the tri-bars are securely engaged with the
lower slots on the backplate.
7. Lumbar attachment strap
a. Verify that the tri-bar(s) are securely engaged with
the center slot(s) on the backplate.
8. Accessory pouches
a. Verify that the quick-release webbing is properly
routed through any accessory pouches installed on
the air mask.
9. Regulator Holder
a. Verify that the Firehawk Regulator holder is securely
installed on the waist belt. THE REGULATOR
HOLDER MUST NOT BE INSTALLED ON THE
QUICK-RELEASE STRAPS. This will impede the
function of the quick-release mechanism. Refer to
the Installing the FireHawk Rescue Belt II on the Air
Mask section for detailed assembly instructions.
OPERATION AND USE
Donning
Refer to the user instructions for donning the air mask.
Instructions are supplied with the air mask.
1. While donning the air mask, secure the Rescue Belt II
around the waist by connecting the hook buckle to the
adjusting D-ring. Adjust the webbing to a snug fit. The
waist belt buckles should be in the center of the waist.
2. Tuck the excess webbing of belt between the regulator
holder and the waist belt by pulling outward on the reg-
ulator holder and stowing the folded excess webbing
under the regulator holder.
Using the FireHawk Rescue Belt II for
Emergency Escape
Wear gloves when using this device.
1. Locate the point of escape and a suitable anchor point.
Ensure that the waist belt is fastened securely around
the waist.
2. Ensure the anchor and exit point are free of sharp
edges which could cause the rope to fail.
The anchor MUST be capable of supporting the
user and all accompanying equipment. Proper
training is required to identify appropriate
anchor points and methods of attachment.
Failure to select a suitable anchorage and
secure the line properly can result in serious
personal injury or death.
3. Deploy the hook/carabiner and descender by pulling
forcefully on the knotted rope end protruding from the
right side of the Rescue Belt II. The flap on the lumbar
pad will open and the hook/carabiner and descender
will deploy from the lumbar pad at once.
4. Attach the hook/carabiner to a secure anchor.
5. Feed the rope through the descender until the window
or egress point can be reached by squeezing the lever
on the descender while paying out rope.
6. Prior to egress, ensure that the descender is posi-
tioned in the center of the waist.
7. While positioning at the point of egress, do not
squeeze the lever of the descender as this will allow
the rope to slip through the device.
8 Once positioned for egress, grip the rope entering the
descender firmly and maintain the grip throughout the
entire rappel. Squeeze the lever on the descender to
allow the rope to move freely through the device.
• DO NOT remove hand from the rope entering
the descender during descent. Doing so can
result in rapid descent.
• Never jump or allow slack line to develop
between the Rescue Belt II and the anchor.
This will cause excessive shock loads to
develop in the system, which can result in
damage to the rope or separation from the
anchor.
Misuse can result in death or serious injury.
9. Continue descending at a slow, controlled rate until a
safe area is reached.
CAUTION
4
MSA 314 (L) Rev. 4 - 10115063
WARNING
WARNING
User Instructions
FireHawk M7XT Air Mask 10128861
FireHawk M7 Air Mask 10082858
FireHawk M7 Responder 10086011
FireHawk MMR Air Mask 10023638
AirHawk II Air Mask 10088650

10. Once a safe area is reached, the rope can be separat-
ed from the air mask by releasing the termination knot
at the end of the rope and pulling the remaining rope
t
hrough the descender. The termination knot is
released by pulling on the end of the rope. If this sepa-
ration method is used, Replacement Kit (P/N
10118506) should be purchased in order to replace the
releasable knot components. Alternately, the waist belt
can be removed from the air mask by pulling the quick-
release straps and removing the
rescue belt.
OPERATION AND USE
In emergency situations, the FireHawk Rescue Belt II can
be used while detached from the air mask. The Rescue
Belt II should only be detached from the air mask in emer-
gency situations when all other options have been
exhausted.
To detach the FireHawk Rescue Belt II from
the air mask while wearing the air mask:
1. Locate the reflective pull tabs on the left and right
sides of the Rescue Belt II.
2. Pull the reflective pull tabs to release the snaps.
3. Continue to pull the quick-release straps outward and
away from the body to disengage the hook and loop.
4. Continue to pull the quick-release straps until the air
mask has been released from the Rescue Belt II.
5. Loosen the pull straps of the air mask and release the
chest strap (if present).
6. Remove the facepiece.
7. Remove the air mask.
8. The Rescue Belt II can be used as a stand alone
escape system. Follow the usage instructions above to
escape.
Using the FireHawk Rescue Belt II for Work
Positioning
NOTE: The FireHawk Rescue Belt II includes a D-ring,
approved for use as a positioning attachment, per NFPA
1983, 2012 Edition.
Wear gloves when using this device.
• Positioning attachments, such as lanyards
or carabiners, must not exceed 24 inches in
length when measured from the inside edge
of the positioning D-ring on the Rescue Belt
II to the furthest inside edge of the attach-
ment hardware.
• Positioning attachment hardware must be
rated to exceed the weight of the user.
• The positioning attachment D-ring must not
be used as a fall arrest attachment point.
Misuse can result in death or serious injury.
1. Connect the positioning attachment to the D-ring locat-
ed on the front of the Rescue Belt II.
2. Connect the positioning attachment to a secure
a
nchor.
3. Verify that both points of attachment are securely fas-
tened before weighting the positioning attachment.
INSTALLING THE FIREHAWK RESCUE BELT II
ON THE AIR MASK
NOTE: The following steps assume that the pull straps,
waist belt, rescue belt, and lumbar pad have been
removed from the carrier and harness assembly.
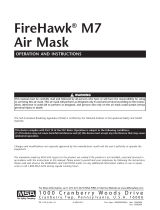
1. Verify that the quick-
release strap is proper-
ly installed on the lum-
bar pad assembly.
2. Verify that lumbar
attachment web is
installed as shown. The
tri-bars should protrude
beyond the edges of
the 2 vertical straps in
the center of the lum-
bar pad.
NOTE: If installing the Rescue Belt II on an AirHawk II Air
Mask or an NFPA 1981, 2002 Edition air mask, an alter-
nate lumbar attachment adapter is required. To install this
adapter, the quick-release must be deployed and re-
installed to capture the adapter. Refer to the Re-installing
the Quick-Release section of this manual before proceed-
ing with the following steps.
3. Orient the air mask
as shown.
OPERATION AND USE
5
MSA 314 (L) Rev. 4 - 10115063
CAUTION
WARNING

INSTALLING THE FIREHAWK RESCUE BELT II
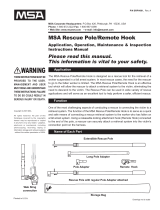
4. Install each of the tri-
bars from the lumbar
attachment straps into
the two center slots on
the backplate. Verify
that the tri-bars are
fully engaged by tug-
ging on the lumbar
attachment strap.
NOTE: If the ExtendAire
®
II Emergency Breathing
System is installed on the
air mask, install the hose
restraint in the right center
slot in the backplate first,
before installing the tri-bars
from the rescue belt. Install
the left tri-bar of the rescue
belt once the right side has
been securely installed with
the hose restraint in place.
NOTE: If installing the Rescue Belt II on an AirHawk II or
NFPA 1981, 2002 Edition
air mask, install the tri-bar
on the lumbar attachment
adapter in the single right
center slot of the back-
plate.
5. Install the left tri-bar into
the bottom left slot on
the backplate.
NOTE: If the ExtendAire II
Emergency Breathing
System is installed on the
air mask, the left tri-bar of
the rescue belt will share
the left slot on the back-
plate with the attachment
loop of the ExtendAire II
hose pouch.
6. Insert the right tri-bar of the rescue belt into the outer
right slot of the back plate.
NOTE: If the Quick-Fill hose pouch is installed on the air
mask, the right tri-bar of the rescue belt will share the right
slot on the backplate with the attachment loop of the
Quick-Fill hose pouch.
7. Attach the right and left pull straps from the rescue belt
to the adjuster buckles on the shoulder straps. Ensure
that the pull straps are not twisted.
8. If the air mask has the ExtendAire II pouch or Quick-Fill
pouch installed, the pull straps and quick-release
straps must be routed through the webbing loops on
the back of the pouch. If these pouches are not
installed, skip the following steps.
a. Disengage the snap on
the quick-release
webbing by pulling on
the end of the quick-
release strap with the
reflective patch.
b. Route the quick-release
webbing strap through
the bottom webbing loop
on the back side of the
pouch.
6
MSA 314 (L) Rev. 4 - 10115063

REMOVING THE FIREHAWK RESCUE BELT II
c. Re-install the snap.
The Rescue Belt II
uses directional
snaps to prevent
accidental disengage-
ment if the release
strap was to snag. To
mate the directional
snap, locate the dot
on the snap. Engage
the portion of the
snap on the side
opposite the dot first
and then push down
on the dot side.
d. Route the pull strap
through the top web-
bing loop on the
back side of the
pouch before weav-
ing the pull strap
through the adjuster
buckle on the shoul-
der strap.
REMOVING THE FIREHAWK RESCUE BELT II
FROM THE AIR MASK
1. Orient the air mask as
shown.
2. Remove right and left tri-bars from the backplate.
3. Remove the center tri-bar(s) from the backplate.
4. Remove the pull straps from the right and left shoulder
straps.
REPACKING THE ROPE IN THE FIREHAWK
RESCUE BELT II
The FireHawk Rescue Belt II is designed for one time,
emergency escape use only. The FireHawk Rescue Belt II
may be re-used in a controlled training environment where
a backup fall arrest system is used. Rescue belts used in
training must be designated for training use only. The rope
must be inspected prior to each use. The rope must be
reinstalled in the lumbar pad prior to each use to prevent
snags or entanglement hazards.
The FireHawk Rescue Belt II must be removed from the
air mask before repacking the rope. Refer to the Removing
the FireHawk Rescue Belt II from the Air Mask section of
this manual.
1. Completely remove the rope from the lumbar pad.
2. Slide the descender
along the rope by hold-
ing down the black
lever on the descender,
until the descender is
approximately 12 inch-
es from the hook/cara-
biner.
3. Flake the rope into a pile. To do this, start at the end of
the rope closest to the hook/carabiner and begin laying
the rope on top of itself until the other end of the rope
has been reached.
4. Verify that the warning labels are in place at the last 15
and 10 feet of rope.
5. Verify that the
releasable termination
knot is at the end of the
rope and that all labels
are in place.
6. Fold back the flap on the lumbar pad and insert the
releasable termination knot deep into the compartment
closest to the waist belt.
7. Continue to insert 6-12 inch increments of rope into the
lumbar pad and allow the rope to settle naturally as
more rope is inserted. Push the rope deep into the
pouch so that it evenly fills the entire lumbar pad until
all of the rope has been installed.
7
MSA 314 (L) Rev. 4 - 10115063

DO NOT coil the rope. DO NOT feed large
amounts of rope into the lumbar pad at
once. Doing so may cause the rope to knot or
bind during escape. Misuse can result in death
or serious injury.
8. Fold the descender strap in half and rotate the descen-
der so that it points toward the opening in the lumbar
pad. The rope between the descender and the hook/
carabiner should lay over the top of the descender.
9. Insert the descender
and rope into the lower
loop of elastic webbing
inside the lumbar pad
until the elastic loop is
near the exposed end
of the descender.
10. Crosby or
Lightening Hooks:
Insert the eye of the
hook into the top loop
of elastic webbing in
the lumbar pad and
position the hook such
that it wraps around the
exposed portion of the
descender.
Lightening GT Hook
Position the hook so that it wraps around the exposed por-
tion of the descender.
NOTE: The Lightening GT Hook should not be clipped to
any of the sewn loops within the lumbar pad.
Carabiner
Place the carabiner in the lumbar pad above the descen-
der.
NOTE: The carabiner should not be clipped to any of the
sewn loops within the lumbar pad.
11. Position the tail of rope with the stopper knot along the
waist belt and between the 2 snaps.
12. Fasten the snaps. The
Rescue Belt II uses
directional snaps to
p
revent accidental dis-
engagement. To mate
the directional snaps,
locate the dot on the
snap. Engage the por-
tion of the snap on the
side opposite the dot
first and then push
down on the dot side.
13. The stopper knot in the
rope should be
exposed when the flap
on the lumbar pad is
closed.
RE-INSTALLING THE QUICK-RELEASE
The FireHawk Rescue Belt II is designed for one time,
emergency use only. The FireHawk Rescue Belt II may be
re-used in a controlled training environment where a back-
up fall arrest system is used. Rescue Belts used in training
must be designated for training use only. If the quick-
release was deployed as part of an emergency bail out,
remove the Rescue Belt from service. If the quick-release
was deployed as part of a training exercise, proceed to the
following steps to re-install the quick-release.
1. Remove the pull straps
from the shoulder
straps of the air mask
and identify the right
and left straps (left
strap shown).
2. Orient the lum-
bar pad as
shown.
REMOVING THE RESCUE BELT II FROM THE AIR MASK
8
MSA 314 (L) Rev. 4 - 10115063
WARNING

CLEANING AND STORAGE / USEFUL LIFE
3. Install the left strap by
orienting it as shown.
Fold the webbing at the
edge of of the Velcro
hook fastener tape such
that the Velcro hook
fastener tape faces
down.
4. Insert the folded web-
bing under the second
webbing loop from the
left on the lumbar pad.
Continue to route the
folded webbing under
the stiff Nomex plate
and back out through
the left slot in the
Nomex plate.
5. Continue to pull the webbing through the left slot in the
Nomex plate until the sewn fold in the webbing has
pulled completely through the slot.
6. Fold over the left lum-
bar support strap locat-
ed on the top edge of
the lumbar pad. Insert
the folded webbing
strap through the slot in
the left lumbar support
strap until the sewn fold
in the webbing strap
completely passes
through the slot.
7. Pull the tri-bar to the left until the sewn fold in the quick
release-strap has been pulled tight against the left slot
in the Nomex plate.
8. Pull on the quick-release webbing directly below the tri-
bar until the slack in the webbing to the right of the
sewn fold has been pulled tight against the sewn fold.
Do not pull the sewn fold through the slot in the Nomex
plate.
9. Mate the Velcro hook and loop fastener tape on the
quick-release strap with the lumbar pad.
10. Fasten the snap on the
under side of the left
most webbing strap of
the lumbar pad. The
Rescue Belt II uses
directional snaps to
prevent accidental dis-
engagement. To mate
the directional snaps,
locate the dot on the
snap. Engage the por-
tion of the snap on the
side opposite the dot first and then push down on the
dot side.
11. Repeat these steps for the right quick-release webbing
strap.
12. Feed the lumbar
attachment webbing
under the lumbar sup-
port straps of the lum-
bar pad
NOTE: This step is not necessary if installing the
FireHawk Rescue Belt II on an AirHawk II or NFPA 1981,
2002 Edition air mask.
NOTE: If installing the res-
cue belt on an AirHawk II
or NFPA 1981, 2002
Edition air mask, the right
lumbar support strap of the
lumbar pad must be routed
through the lumbar attach-
ment adapter before feed-
ing the sewn fold of
the quick-release strap
through the slot on the right
lumbar support strap of the
lumbar pad.
CLEANING AND STORAGE
Clean the FireHawk Rescue Belt II with mild soap and
water. Do not use bleach or harsh chemicals to clean the
Rescue Belt II or any of its components. Allow the Rescue
Belt II to air dry. Do not dry with heat or UV sources.
Store the FireHawk Rescue Belt II away from heat,
moisture, light, chemicals or their vapors, or other
degrading elements. Prior to using a rescue belt which has
been stored for a long period of time, an inspection of the
components should be performed.
9
MSA 314 (L) Rev. 4 - 10115063

REPLACEMENT KITS
When storing an air mask with the FireHawk Rescue Belt
II installed at cold temperatures, it is recommended that
the waist belt be adjusted to the smallest waist size. At
e
xtreme cold temperatures, the waist pad materials may
become stiff and could impede the adjustment of the
waist belt during donning at these temperatures.
USEFUL LIFE
The useful life of the FireHawk Rescue Belt II is 10 years
when properly stored, or carried on an air mask, in an
environment not exposed to UV or degrading elements as
indicated above. The useful life of the belt assembly and
rope on Rescue Belt II units used for training varies
depending on the frequency of use as follows:
Excessive and/or weekly use: 3-6 months
Occasional Use: 1-2 years
Seldom Use: 2-5 years
The date of manufacture can be found on the waist belt
label and on the rope label located near the sewn eye of
the rope.
Remove the Rescue Belt II from service when it reaches
the useful life above, or sooner if it fails to meet the
inspection criteria. Replacing the belt assembly and/or
rope will restore the useful life for those components.
SERVICE
All service for the FireHawk Rescue Belt II is end-user ser-
viceable. Replacement kits can be found in the Replace-
ment Kits section of this manual.
Installing replacement 10 and 15 foot labels:
1. Completely remove the FireHawk Rescue Belt II from
the air mask.
2. Remove the entire length of rope from the lumbar pad.
3. Remove the damaged 10 and 15 foot indicator labels.
4. Measure 10 feet from the end of the rope and install
the 10 foot indicator label by removing the adhesive
backing and folding the label in half around the rope
and adhering the label to itself.
5. Measure 15 feet from the end of the rope and repeat
the same procedure for the 15 foot indicator label.
6. Refer to the Repacking the Rope in the Rescue Belt II
section of this manual.
Replacing the releasable termination knot at
the end of the rope:
1. Completely remove the FireHawk Rescue Belt II from
the air mask.
2. Remove the entire length of rope from the lumbar pad.
3. Untie the releasable termination knot at the end of the
rope.
4. Remove all labels and discard the spacer.
5. Place one end of the “replacement” tape flush up
against the end of the rope. Adhere this end to the
rope and tightly wrap the tape around the rope over-
lapping the first pass. Wrap until all tape is used.
6. Insert the end of the
r
ope through the
spacer and slide the
new spacer
approximately 8 inches
from the end of the
rope.
7. Tie the releasable
termination knot as
shown. Be sure the
spacer is captured by
the knot.
10
MSA 314 (L) Rev. 4 - 10115063
10118503 Waist Belt Adjuster Buckle
10118505 10/15 ft Labels (packs of 10 each)
10118506 Releasable Knot Replacement Kit
10118507 Lumbar Attachment, FireHawk M7XT / M7 Air Mask
10118508 Lumbar Attachment, AirHawk II Air Mask
10118509 Waist Belt Extender
10118510 Quick-Release Strap, Right
10118511 Quick-Release Strap, Right
10118512 Lumbar Pad
10118513 Waist Belt (less Adjuster Buckle)
10118514 Rope, Aramid, 50 ft, Hook
10118516 Rope, Aramid, 50 ft, Sewn Eye (less Carabiner)
10118518 Rope, Aramid/Nylon, 50 ft, Hook
10118520 Rope, Aramid/Nylon, 50 ft, Sewn Eye (less Carabiner)
10118522 Descender Assembly
10120214 Carabiner
10120371 Regulator Mount, Firehawk
10119369
Rescue Belt II, FireHawk M7XT / M7, 50’, Aramid/Nylon Rope,
Hook
10119370
Rescue Belt II, FireHawk M7XT / M7, 50’, Aramid/Nylon Rope,
Carabiner
10119391 Rescue Belt II, FireHawk M7XT / M7, 50’, Aramid Rope, Hook
10119392
Rescue Belt II, FireHawk M7XT / M7, 50’, Aramid Rope,
Carabiner
10119393 Rescue Belt II, AirHawk II, 50’, Aramid/Nylon Rope, Hook
10119394 Rescue Belt II, AirHawk II, 50’, Aramid/Nylon Rope, Carabiner
10119395 Rescue Belt II, AirHawk II, 50’, Aramid Rope, Hook
10119396 Rescue Belt II, AirHawk II, 50’, Aramid Rope, Carabiner

REPLACEMENT KITS
8. Apply the blank
releasable knot label by
i
nserting the label
through the loop in the
knot and wrapping the
label around the rope
that leads to the end of
the rope. Wrap the
label so that it adheres
to itself.
9. Place the “pull to
release” label
approximately 3 inches
from the end of the
rope. Fold the label in
half and remove the
adhesive backing.
Wrap the label around
the rope and adhere
the label to itself.
10. Refer to the Repacking the Rope in the FireHawk
Rescue Belt II section of this manual.
Replacing the adjuster buckle on the waist belt
1. Remove the adjuster buckle from the waist belt.
2. Insert the end of the
waist belt up and over
the knurled sliding bar
and back out toward
the lumbar pad.Ensure
that the buckle is
oriented with the round
side of the adjuster
facing down.
Replacing the quick-release straps
Refer to Re-installing the Quick-Release section of this
manual.
Replacing the waist belt
1. Completely remove the FireHawk Rescue Belt II from
the air mask.
2. Remove the entire length of rope from the lumbar pad.
3. Remove the adjuster buckle and regulator holder from
the left side of the waist belt.
4. Remove the waist belt from the lumbar pad assembly.
5. Remove the descender strap from the waist belt.
6. Install the descender strap on to the replacement waist
belt as shown. Ensure that the waist belt passes
through both loops of webbing on the descender strap
a
nd that the descender is oriented as shown.
7. Using permanent ink, place a check mark in the box
on the label that corresponds to the correct part
number. Refer to the label marking on the waist belt
being replaced.
8. Insert the free end of
the waist belt into the
lumbar pad assembly.
The waist belt must
pass through the stiff
webbing loop on the
right side of the interior
of the lumbar pad. The
waist belt should exit
the lumbar pad by
passing through the
opening on the left side
of the lumbar pad.
9. Install the adjuster buckle on to the free end of the
waist belt. Refer to Replacing adjuster buckle on the
waist belt section of this manual.
10. Install the regulator
holder on the free end
of the waist belt. The
regulator holder must
be oriented so that the
plastic holder tab faces
up.
11. Refer to the Repacking the rope in the FireHawk
Rescue Belt II section of this manual.
Replacing the rope
1. Completely remove the FireHawk Rescue Belt II from
the air mask.
2. Remove the entire length of rope from the lumbar pad.
3. Remove the releasable termination knot from the rope.
4. Remove the rope from the descender.
11
MSA 314 (L) Rev. 4 - 10115063

REPLACEMENT KITS
5. Install the replacement
rope into the descen-
der. The rope should be
r
outed through the
descender as shown.
When routing the rope
through the descender,
use care not to damage
the 10 and 15 foot indi-
cator labels on the
rope.
6. Tie the releasable termination knot at the end of the
rope and install the appropriate labels. Refer to
Replacing the releasable termination knot at the end of
the rope section of this manual.
7. Install the rope into the lumbar pad. Refer to the
Repacking the rope in the FireHawk Rescue Belt II
section of this manual.
Replacing the descender assembly
1. Completely remove the FireHawk Rescue Belt II from
the air mask.
2. Remove the entire length of rope from the lumbar pad.
3. Remove the adjuster buckle and regulator holder from
the left side of the waist belt.
4. Remove the waist belt from the lumbar pad assembly.
Part #
Serial #
Date in Service:
5. Remove the descender strap from the waist belt.
6. Remove the releasable termination knot from the rope.
7. Remove the rope from the descender and discard the
d
escender assembly. When removing the rope from
the descender, use care not to damage the 10 and 15
foot indicator labels on the rope.
8. Install the rope into the
descender. The rope
should be routed
through the descender
as shown. When rout-
ing the rope through
the descender, use
care not to damage the
10 and 15 foot indicator
labels on the rope.
9. Tie the releasable termination knot at the end of the
rope and install the appropriate labels. Refer to
Replacing the releasable termination knot at the end of
the rope section of this manual.
10. Install the rope into the lumbar pad. Refer to the
Repacking the rope in the FireHawk Rescue Belt II
section of this manual.
12
MSA 314 (L) Rev. 4 - 10115063
SAMPLE-RESCUE BELT USAGE AND INSPECTION HISTORY
Inspect the Rescue Belt II for damage or excessive wear before and after the Rescue Belt is worn, and at least monthly. If
any doubt exists as to the integrity of the Rescue Belt, remove from service immediately.
Date Used Location Type of Use Exposure Inspected Comments
Date By (initials/badge#)

5. Instale la cuerda de
reemplazo en el
dispositivo de descenso.
La cuerda deberá pasar
por el dispositivo de
descenso como se
muestra. Cuando pase
la cuerda por el
dispositivo de descenso,
tenga cuidado de no
dañar la etiquetas
indicadoras de 3 y
4,5 metros (10 y 15 pies) en la cuerda.
6. Amarre el remate desatable en el extremo de la cuerda
e instale las etiquetas apropiadas. Consulte la sección
Reemplazo del remate desatable en el extremo de la
cuerda en este manual.
7. Instale la cuerda en la almohadilla lumbar. Consulte la
sección Reempaque de la cuerda en el cinturón de
rescate FireHawk II en este manual.
Reemplazo del conjunto del dispositivo de
descenso
1. Retire completamente el cinturón de rescate FireHawk II
de la máscara de aire.
2. Retire toda la cuerda de la almohadilla lumbar.
3. Retire la hebilla de ajuste y el soporte del regulador del
lado izquierdo del cinturón.
4. Retire el cinturón del conjunto de la almohadilla lumbar.
5. Retire la correa del dispositivo de descenso del cinturón.
6. Suelte el remate desatable de la cuerda.
7. Retire la cuerda del dispositivo de descenso y deseche
el conjunto del dispositivo de descenso. Cuando retire la
cuerda del dispositivo de descenso, tenga cuidado de
no dañar las etiquetas indicadoras de 3 y 4,5 metros
(10 y 15 pies) en la cuerda.
8. Instale la cuerda en el
dispositivo de descenso.
La cuerda deberá pasar
por el dispositivo de
descenso como se
muestra. Cuando pase
la cuerda por el
dispositivo de descenso,
tenga cuidado de no
dañar las etiquetas
indicadoras de 3 y
4,5 metros (10 y
15 pies) en la cuerda.
9. Amarre el remate desatable en el extremo de la cuerda
e instale las etiquetas apropiadas. Consulte la sección
Reemplazo del remate desatable en el extremo de la
cuerda en este manual.
10. Instale la cuerda en la almohadilla lumbar. Consulte la
sección Reempaque de la cuerda en el cinturón de
rescate FireHawk II en este manual.
JUEGOS DE REEMPLAZO
36
MSA 314 (L) Rev. 4 - 10115063
EJEMPLO DEL HISTORIAL DE USO E INSPECCIÓN DE UN CINTURÓN DE RESCATE
Inspeccione el cinturón de rescate II para detectar daños o desgaste excesivo antes y después de usar el cinturón de
rescate y al menos todos los meses. Si tiene dudas sobre la integridad del cinturón de rescate, retírelo del servicio de
inmediato.
Fecha de uso Ubicación Tipo de uso Exposición Inspeccionado Comentarios
Fecha
Por (iniciales/número de distintivo)
Número de pieza
Número de serie
Fecha de puesta en servicio:
/