Legrand QLINK Installation guide

Type
Installation guide

This manual is also suitable for

1
NOTE: Before you begin, dry t shade to verify it will t. Adjust depth to establish proper clearance
for shade in full open position and so that full up position is not in front of opening.
a. If shade was ordered to same size as opening, place bracket in corner of window jamb.
b. If shade was ordered to a smaller size than opening, center shade in window opening.
Dual Bracket
Place brackets in top corner of window
opening.
Find and mark center of opening. Mark top of window
jamb on each side of window 1/2 the bracket-to-bracket
dimension for the shade. Align outside edge of bracket
with mark.
Tools Required
Measuring Tape
Pencil with eraser
Calculator
Level
Ladder
Flat Head Screw Driver
#2 Phillips Screw Driver
Power Drill with:
3/32” Drill Bit
#2 Phillips Drive Bit
Stud Finder (Optional)
IMPORTANT
Read and understand all instructions before installing.
Always wear personal protection equipment including
safety glasses and gloves. Use a ladder per its
manufacturer’s instructions. Work safely!
QADVANCED DUAL BRACKETS
INSTALLATION INSTRUCTIONS
PARTS
Ensure that all parts are present.
Right Bracket
Left Bracket
Window
x3
Window
Side Mount
Sideview
Window
Top Mount
Sideview
Rear Mount
Sideview
NOTE: Verify shade travel path is clear of all obstructions.
C
L
1b
1a
OR
2
Inside Mount (Side, Top, and Rear Mount) – Cont’d
3
Dry t top shade and check vertical side
gaps and if shade is level. Adjust brackets if
necessary by loosening screw and moving
bracket down in slot. Once level, remove
shade and tighten screw.
TOP MOUNT: Mark center of slotted front
hole on top of bracket. Drill 3/32
"
pilot hole
on mark. If necessary, use wall anchor (not
included). Secure brackets with one screw
using a 1/4
"
driver.
SIDE MOUNT: Mark bottom of slotted hole
on side of bracket. Drill 3/32
"
pilot hole on
mark. If necessary, use wall anchor (not
included). Secure brackets with one screw
using a 1/4
"
driver.
TOP MOUNT: Drill second 3/32
"
pilot hole. If
necessary, use wall anchor (not included).
Secure brackets with second screw using a
1/4
"
driver.
SIDE MOUNT: Drill second 3/32
"
pilot
hole. If necessary, use wall anchor (not in-
cluded). Secure brackets with second screw
using a 1/4
"
driver.
OR
OR
3
2
4
3
1 3
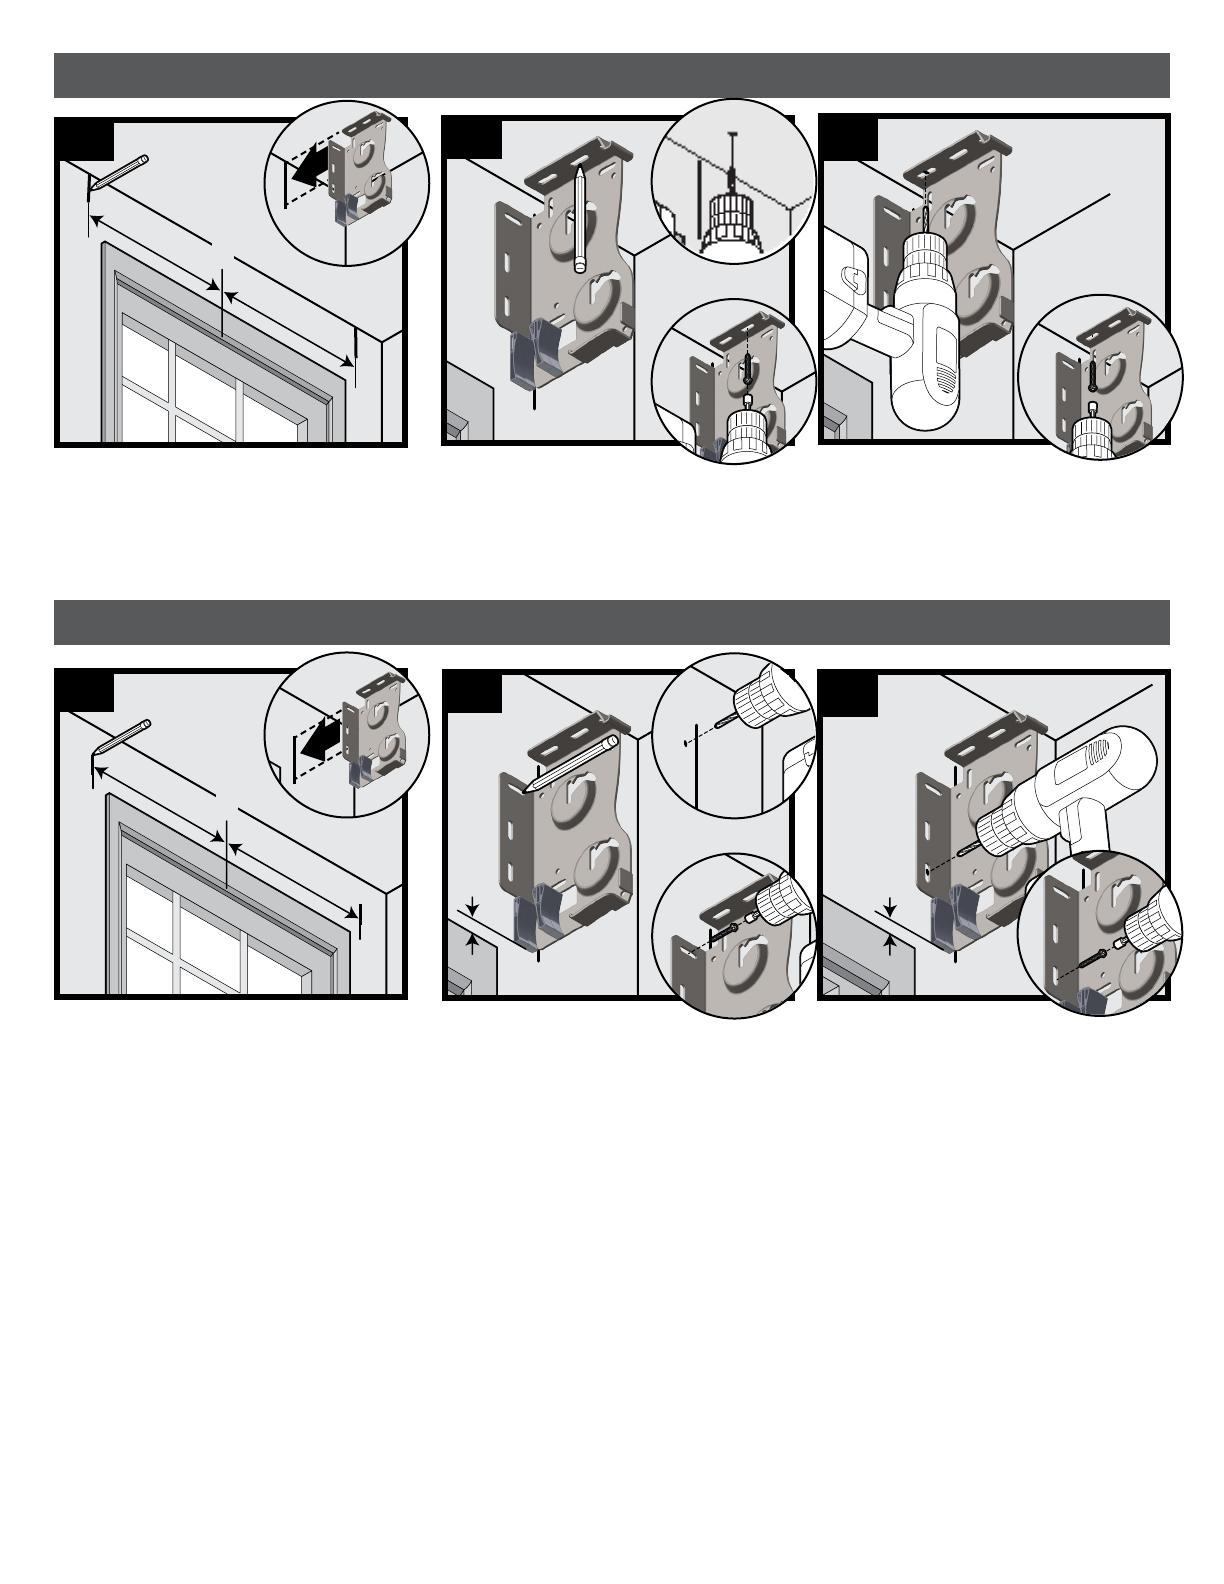
Outside Mount (Top Mount)
Outside Mount (Rear Mount)
Mark center of opening. Make marks on wall
on each side of window 1/2 the bracket-to-
bracket dimension for the shade. Align outside
edge of bracket with mark.
Mark center of slotted front hole on top of
bracket. Drill 3/32
"
pilot hole on mark. If
necessary, use wall anchor (not included).
Secure brackets with one screw using a 1/4
"
driver.
Dry t top shade and check vertical side gaps
and if shade is level (see Step 3 on page 2).
Drill second 3/32
"
pilot hole. If necessary, use
wall anchor (not included). Secure brackets
with screw using a 1/4
"
driver.
Mark center of opening. Make marks on wall
on each side of window 1/2 the bracket-to-
bracket dimension for the shade. Align outside
edge of bracket with mark.
Mark bottom of slotted top hole on top of
bracket. Drill 3/32
"
pilot hole on mark. If
necessary, use wall anchor (not included).
Secure brackets with one screw using a 1/4
"
driver.
Dry t top shade and check vertical side gaps
and if shade is level (see Step 3 on page 2).
Drill second 3/32
"
pilot hole. If necessary, use
wall anchor (not included). Secure brackets
with screw using a 1/4
"
driver.
C
L
0.5
"
0.5
"
C
L
0.5
"
1
2
2
3
3
1
4
QMotion Customer Support
www.QMotionsShades.com
Toll Free 1-877-849-6070
3400 Copter Road • Pensacola, FL 32514
  • Page 1 1
  • Page 2 2
  • Page 3 3
  • Page 4 4

Legrand QLINK Installation guide

Type
Installation guide
This manual is also suitable for

Ask a question and I''ll find the answer in the document

Finding information in a document is now easier with AI