Legrand Qfree Installation guide

Type
Installation guide

Legrand Qfree is a versatile roller shade system that offers precise light control, enhanced privacy, and effortless operation. With its innovative design, Qfree seamlessly integrates into various window shapes and sizes, making it suitable for both residential and commercial applications. The motorized operation allows for convenient control via remote control or smart home integration, ensuring seamless integration into your daily routine.

Legrand Qfree is a versatile roller shade system that offers precise light control, enhanced privacy, and effortless operation. With its innovative design, Qfree seamlessly integrates into various window shapes and sizes, making it suitable for both residential and commercial applications. The motorized operation allows for convenient control via remote control or smart home integration, ensuring seamless integration into your daily routine.

Qfree Installation Instructions
Tools required
Pencil
Power Drill
Level
(4) Wall Anchors
3/32” (2mm) Drill Bit
Screw Driver
(4) #6 (M3.5) Screws
Measuring Tape
STEP 2 Align bracket with your
mark 1/2” above your window
opening. Mark the sloed hole.
Drill pilot hole at the boom of the
mark. Repeat on opposite side.
STEP 3 Use a screw drvier or pow-
er drill to install bracket with a
screw. Repeat on widow’s opposite
side.
*Follow the above instrucons for
ceiling mount applicaons.*
(Insert picture)
Pre-winding Instrucons
1. Remove the shade from the
bracket at the end of the shade
that has the power spring(s).
You can leave the shade
aached to the bracket at the
other end.
2. Hook the prewind wrench
around the sha coming out of
the roller shade and rotate the
wrench in the opposite direcon
that the material comes o of
the shade.
3. Remove the shade from the
bracket at the end of the shade
that has the power spring(s).
You can leave the shade
aached to the bracket at the
other end.
4. Hook the prewind wrench
around the sha coming out of
the roller shade and rotate the
wrench in the opposite direcon
that the material comes o of
the shade.
Removing Pre-winds
1. Between the shade and the
bracket, hook the wrench
around the sha coming out
of the shade.
2. While rmly grasping the
wrench li the shade up and
out of the bracket.
3. Allow the wrench to rotate
unl the tension is o of the
wrench. Be careful not to let
the wrench go.
4. Remove the wrench and re-
seat the shade back into the
bracket.
Inside Mount
Standard/Reverse Roll
STEP 1 Posion the bracket ush
against the window and head
jamb. Bracket mounng depth of
at least 2” is recommended. Mark
the sloed hole. Repeat on win-
dow’s opposite side.
STEP 2 Use a 3/32” (2mm) drill bit
to drill a pilot hole at the boom
of your marks.
STEP 3 Use a screw driver or pow-
er drill to install brackets with
screws. Repeat on window’s op-
posite side.
Outside Mount
Standard/Reverse Roll
STEP 1 Measure and mark half of
the window width. Measure and
mark half of the shades bracket to
bracket width on each side of win-
dow.
Troubleshooting Tips
***If you notice something out of the ordinary with the look or performance of your shade, please take a photograph/video of the concern, and advise
our Customer Service team. ***
I cannot set the upper limit on my shade Qfree shades do not have the ability to adjust the
upper limit..
My shade has lile tension and will not roll up all of the
way
Apply pre-winds using the Pre-Winding Instrucons
below.
My shade is raising too fast Remove pre-winds using the instrucons below.
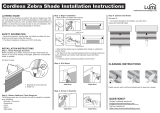
Installing Your Shade
STEP 1 Hang the shade inside of
the bracket in the correct roll di-
recon.
STEP 2 Safely adjust the shade to
be level. Use a level to ensure the
shade is sing level, and note if
the brackets or shade should be
adjusted accordingly.
STEP 3 If shade is level, remove
the shade and drill your nal holes
to secure each bracket with a sec-
ond screw.
STEP 4 You can now install your
shade.
Preloading
STEP 1 Preloading is necessary for
the shade to roll up. With the
shade in the brackets, pull it down
12 inches. The mechanism inside
will lock posion into posion,
allowing the shade to hang.
STEP 2 Disengage shade from
brackets and manually roll the
fabric onto the tube.
STEP 3 Re-install the shade into
the brackets.
Universal Brackets
IMPORTANT
Universal Brackets are delivered
pre-configured for the intended
installation type. Reconfiguring
the brackets is not recommended.
The following information is to aid
you in understanding how to install
the brackets for each configura-
tion.
TOP MOUNT - STANDARD
ROLL
The Rubber Stopper is on the
opening’s window side. The Spin-
dle Slot opens toward the room.
Spindle
Slot
Rubber Stopper
BACK MOUNT - STANDARD
ROLL
The Rubber Stopper is on the
opening’s window side. The Spin-
dle Slot opens toward the room.
Back Mounts are typically used for
outside mount shades.
Spindle Slot
Rubber Stopper
SIDE MOUNT - STANDARD
ROLL
The Rubber Stopper is on the
opening’s window side. The Spin-
dle Slot opens toward the room.
MOUNT - REVERSE ROLL
The Rubber Stopper is on the open-
ing’s room side.
The Spindle Slot opens toward the
window.
Leave at LEAST 1” between the
shallowest point in the opening and
the bracket to allow Spindle place-
ment.
Spindle
Slot
Rubber Stopper
Fascia Brackets
TOP MOUNT - STANDARD ROLL
The Rubber Stopper is on the
opening’s window side. The Spin-
dle Slot opens toward the room.
Spindle Slot
Rubber Stopper
BACK MOUNT -
STANDARD ROLL
The Rubber Stopper is on the
opening’s window side. The Spin-
dle Slot opens toward the room.
Back Mounts are typically used for
outside mount shades.
Spindle Slot
Rubber Stopper
SIDE MOUNT - STANDARD ROLL
The Rubber Stopper is on the
opening’s window side. The Spin-
dle Slot opens toward the room.
MOUNT - REVERSE ROLL
The Rubber Stopper is on the
opening’s room side.
The Spindle Slot opens toward
the window.
Leave at LEAST 1” between the
shallowest point in the opening
and the bracket to allow Spindle
placement.
Spindle Slot
Rubber Stopper
BACK MOUNT - REVERSE
ROLL
The Rubber Stopper is on the
opening’s room side. The Spindle
Slot opens toward the window.
Back Mounts are typically used
for outside mount shades.
Spindle Slot
Rubber Stopper
SIDE MOUNT - REVERSE ROLL
The Rubber Stopper is on the
opening’s room side.
The Spindle Slot opens toward
the window.
Leave at LEAST 1” between the
shallowest point in the opening
and the bracket to allow Spindle
placement.
Pocket Installation
TOP MOUNT - STANDARD
ROLL
The Rubber Stopper is on the
opening’s window side. The Spin-
dle Slot opens toward the room.
MOUNT - REVERSE ROLL
The Rubber Stopper is on the
opening’s room side.
The Spindle Slot opens toward the
window.
Leave at LEAST 1” between the
shallowest point in the opening
and the bracket to allow Spindle
placement.
  • Page 1 1
  • Page 2 2

Legrand Qfree Installation guide

Type
Installation guide

Legrand Qfree is a versatile roller shade system that offers precise light control, enhanced privacy, and effortless operation. With its innovative design, Qfree seamlessly integrates into various window shapes and sizes, making it suitable for both residential and commercial applications. The motorized operation allows for convenient control via remote control or smart home integration, ensuring seamless integration into your daily routine.

Ask a question and I''ll find the answer in the document

Finding information in a document is now easier with AI