If you have any trouble installing your Baldwin product, feel free to call our toll-free Consumer Help Line at 1-800-566-1986. Hours: 6 a.m. – midnight (east coast standard), 7 days a week. 3.
Exploded View
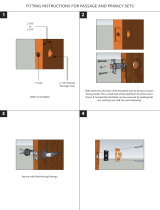
1
• Check the thickness of the door. This lockset works on 1
3
⁄8" and 1
3
⁄4" thick
doors only.
• Follow the step-by-step sequence to ensure proper
operation of your Baldwin lockset.
• If your door is pre-drilled, see latchset installation step 1. If it is not
pre-drilled, see door preparation step 1.
Caution: Images Full Dummy
and Half Dummy trim are not designed to be installed on a door with a
2
1
⁄8" face bore. If your door is pre-bored, contact our Consumer Help Line
at 1-800-566-1986 for assistance.
•
Important! If you are removing an old lock and replacing it with a
Baldwin lockset, you must install the Baldwin strikeplate provided.
Failure to do so could void your warranty. You may need to plug
existing holes left by the old strikeplate screws with wood dowels and
re-drill the pilot holes for the new strikeplate.
• If the hand (direction of the latch bolt) of a privacy latch must be
changed for the intended application, see latchset installation step 1.
• Pressing in the privacy button from the inside locks Baldwin privacy
latches. The outside knob or lever is rigid when the latch is locked. From
the inside, turning the knob or pressing down on the lever opens the door.
The privacy latch can’t be locked from the outside. If the button is
inadvertently pressed in while exiting the room, the privacy button will
release when the latch bolt hits the strikeplate. Contact our Consumer
Help Line at 1-800-566-1986 if you have any questions concerning the
operation of your Baldwin hardware.
• 2
3
⁄8" backset privacy latches for use with knobs are supplied with
privacy buttons for 1
3
⁄8" thick doors. If you are installing these latches
on a 1
3
⁄4" thick door you will need to install the privacy button
extender.
• We recommend spreading cardboard over floor to prevent scratching parts
and marring floor.
• Always wear protective eyewear.
Determining the Backset
Prior to installation you must verify
that you have purchased the correct
backset. Backset is the distance from
the edge of the door to the center of
the hole in the face of the door.
There are two common backsets:
2
3
⁄8" and 2
3
⁄4". This lock is shipped
with a 2
3
⁄8" or a 2
3
⁄4" backset.
Note: The illustrations in these instructions depict the outside handle
being installed on the right of the door.
For installation of the outside handle on the left of the door, proceed as if
all illustrations were reversed.
Before You Begin
Knob
Rosette
Outside Adapter
Inside Adapter
Spindle
Privacy Version
#8-32 x 1
1
/
4
" Flat Head Screws
Rosette
Face Plate
Privacy Button
Privacy Version
Set Screw
Allen Wrench
Knob/Lever
Privacy Button Extension
Privacy Version
Set Screw
Alignment Bushings
#8 x
3
⁄4" Combination Screws
Strike Plate
Emergency Key
Privacy Version
Threaded Stud
Privacy Version
(2) #8-32 x 1
1
⁄4"
Flat Head Screws
(4) #8 x
3
⁄4"
Combination
Screws
Privacy Version
If it is necessary to enter a locked
room, place the emergency key
supplied through the hole in the
rosette on the outside and press in.
This will push the privacy pin into
the unlocked position, allowing
access to room from outside.
(2) Set Screws
Handleset
Installation
Fasteners
Strikeplate
Installation
Fastener