Page is loading ...

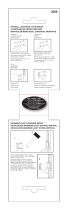
English ------------------------ 1-9
Deutsch ------------------------ 10-18
Français------------------------ 19-27
Español ------------------------ 28-36
Italiano ------------------------ 37-45
PSCMF1
V1.0
MEDIUM FULL-MOTION TV CORNER WALL MOUNT
Thank you for choosing our product! We strive to provide the best quality and
services for our customers. Would you kindly share your experience on Amazon if
you are satisfied? Should you have any issues, please don't hesitate to contact us.
Telephone:800-5566-806 Mon-Fri 10am - 6pm (PST) (USA)
Email:[email protected] (US/CA/DE/UK/FR/IT/ES/JP/AU)

Tools Needed
Hammer
P1
Getting Started
WARNING! SEVERE PERSONAL INJURY AND PROPERTY DAMAGE CAN RESULT FROM IMPROPER
INSTALLATION OR ASSEMBLY. READ THE FOLLOWING WARNINGS BEFORE BEGINNING.
If you do not understand the instructions or have any concerns or questions, please contact a
qualified installer.
Do not install or assemble if the product or hardware is damaged or missing. Not all parts and
hardware included must be used. If you require replacement parts, contact customer service at
This product has been designed for use on a vertical inner corner wall constructed of wood studs,
or concrete, or brick.Wood studs being defined as a wall consisting of a minimum of 2” x 4” studs
with a maximum of 1/2” of wall covering (drywall, lath, plaster).
This product may contain moving parts. Use with caution.
Please check www.perlesmith.com for more products and company information.
Stud
Finder
Tape
measure
1/2 in.
(12.7 mm)
7/32 in.
(5.5 mm)
Wood Drill
Screw
driver
Pencil
Level
(included
inside the box)
Drill
3/8 in.
(10 mm)
Concrete Drill

P2
Arm and
Wall Plate
Hardware Included
01
x1
03
x1
Hardware Wall /Product)
This product contains
small items that could be a choking hazard if
swallowed. Before starting assembly, verify
all parts are included and undamaged. If
any parts are missing or damaged, do not
return the damaged item to your dealer;
please contact our customer service team.
Never use damaged parts!
NOTE: Not all parts and hardware included
will be used.
WARNING:
TV Bracket Front Plate
02
x2
TV Screws / Washers
Philips Screws
M6 x 15mm
M6 x 30mm
Philips Screws
M4 x 12mm
M4 x 30mm
Washers
Ø6mm
M4-5-6
Spacers
L10mm
x4
x4
x4x4
Philips Screws
M8 x 15mm
M8 x 45mm
x4
x4 x8 x4
M-EM-A M-B M-C M-D
M-F M-G
M-H
Spacers
L5mm
x8
M-I
5/16 x 2½ in
Lag Bolts
x4
Wall
Anchor
x4
DA
Washers
Ø8mm
Allen Wrench
x4
B
x1
C
(ST8x65mm)

STEP 1-1 Select TV
Screw Diameter
P3
Thread screws by hand into the threaded holes on the back of your TV to select which screw
diameter fits your TV.
M6M4
M8
STEP 1-2 Select TV
Screw Length
Correct
Correct
Too Long
Too Short
Measurement
Width
Height
Max 400mm (15 3/4 in)
Max 400mm (15 3/4 in)

02
M-F
M-H
M-I
M-G
M-D
M-B
02
M-E
M-H
M-CM-A
02
02
P4
STEP 1-3
Attach the TV Bracket
(a) Flat Back
Position your TV brackets over your TV hole pattern - making sure the brackets are centered
and level over the TV hole pattern.
Secure the brackets using your screw/washer/spacer selection:
(a) for Flat Back
(b) for Round Back / Extra space
CAUTION: Ensure TV bracket is securely fastened before moving on to the next step.
(b) Round Back /
Extra Space

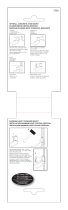
STEP 2A
Wall Plate Installation (Concrete or brick)
CAUTION:
Avoid potential personal injury
or property damage! All lag bolts
A
MUST BE
firmly tightened to prevent unwanted movement
of the wall plate
01
.
CAUTION: Ensure the wall plate is securely fastened to the wall before continuing
on to the next step.
2A-1 2A-2
01
Position the wall plate at your desired
height , level the wall plate and mark the
pilot hole locations x4.
keep both the wall
plates at the same height.
Drill pilot holes x4
P5
2.75in 70 mm
Ø 10 mm
Ø 10 mm
UP
01
Level

Concrete Wall
Concrete Wall
D
2A-3
A
B
D
STEP 2B
Wall Plate Installation (Wood stud)
CAUTION:
CAUTION:
Avoid potential personal injury
or property damage! All lag bolts
A
MUST BE
firmly tightened to prevent unwanted movement
of the wall plate
01
.
CAUTION: Ensure the wall plate is securely fastened to the wall before continuing
on to the next step.
2B-1
● Drywall covering the wall must not exceed 5/8 in. (16 mm)
● Minimum wood stud size: common 2 x 4 in. (51 x 102 mm) nominal 1½ x 3½ in. (38 x 89 mm)
Locate the studs that form the
corner. Verify and mark the
center of the studs by finding
the stud edges using an awl, a
thin nail, or an edge-to-edge
stud finder.
P6
01
Level
UP
2
01
A
DB
01
Install wall plate using lag bolts and washer and anchor .
Tighten the lag bolts until they are pulled firmly against the wall plate
A

2B-2
Position the wall plate at
your desired height and line up
the holes with your stud center
line. Level the wall plate and
make the holes x4. keep both
the wall plates at the same
height.
01
Drill pilot holes x4 using a 7/32 in. (5.5 mm)
diameter drill bit.
IMPORTANT:
Pilot holes must be
in. (70 mm).
Be sure to drill into the center of the stud.
drilled to a depth of
P7
2B-4
UP
2B-3
7/32 in.
Ø5.5 mm
in. (70 mm)
Level
A
B
01
Level
UP
2
01
A
B
01
Install wall plate using lag
bolts and washer .
Tighten the lag bolts until
until they are pulled firmly
against the wall plate
A

STEP 3
P8
S1
[S1]
S1
01
Hang front plate onto arm and wall bracket and using a screwdriver to
secure with preassembled screws
01
03
STEP 4
Hang TV with
brackets
02
01
onto the arm and wall plate
02
01
STEP 5
Secure TV with brackets
against the front plate with
the pre-assembled screws
[S2]
02
03
[S2]
02
Screwdriver
03

P9
[S1]
TO ADJUST TV LEVEL, loosen the two screws [S1] on the
rear of the arm plate, adjust level, and retighten to secure.
To adjust the tilt in both sides, loosen both tilt nuts and move panel to
desired position. Tighten both tilt nuts to hold desired tilt.
TIGHTEN
TIGHTENLOOSEN
C C
± 3°
/