Page is loading ...

RAMPAGE
P R O D U C T S
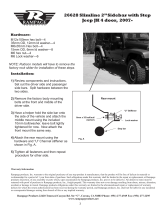
76336 Locking Hood Latch
07-up Wrangler 2Dr &4Dr
Tools required:
13mm Deep Socket (1/4” drive) 4mm Allen Wrench
10mm Socket 6” 1/4” drive extension
Socket wrench as required
Included:
2 x Hood lock assemblies (w/rubber pad) 4 x Small pan head bolts
2 x Hood catch (w/rubber pad) 4 x Small Nylock nuts
2 x Large nut 4 x Small star washers
2 x Large star washer 4 x Flat washers
Please read all instructions before beginning
Installation:
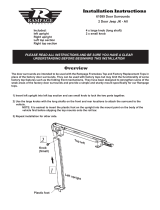
Step 1
Remove the factory hood latch assemblies from the vehicle on both sides.
Step 2
Install the hood latch assembly onto the vehicle on
the passenger side. Carefully use fingers to install
large star washer and spin large nut onto the stud for
the latch. Use a small 1/4” drive 13 mm deep socket
to reach the nut and tighten.
NOTE: Be sure the rubber pad is properly installed
between the latch base and the body and that it will
separate the hood from the body when the hood is
closed.
Latch Assembly
Rubber Pad
Step 3
Install the driver side latch assembly as in step 2.
Use a 6 inch 1/4” drive extension to aid in access to
the nut as shown at right.
1

Warranty Information
Rampage products, Inc. warrants to the original purchaser of any step product it manufactures, that the product will be free of defects in material or
workmanship for a period of 1 year from date of purchase. Such obligations under this warranty shall be limited to the repair or replacement, at Rampage
products discretion, of any assembly or parts which, upon examination by Rampage products, Inc. proves to be defective. All defective items must be
returned with proof of purchase to Rampage products, Inc., freight prepaid. This warranty does not cover damage resulting from abuse, misuse, alteration,
accident or damage in transit. Rampage products obligations under this warranty are limited to the aforementioned repair or replacement of warranty
defects for which the return authorization has been received during the warranty period, and Rampage products, Inc. shall not be liable for any incidental
or consequential damages arising from breech of this or any implied warranty.
Rampage Products 22420 Temescal Canyon Rd. Ste “C”, Corona, CA 92883 Phone: (951) 277-4949 Fax: (951) 277-2295
www.rampageproducts.net
Step 4
Install the hood catch onto the hood of the
vehicle using the Allen head bolts, small star
washers and small Nylock nuts.
IMPORTANT, place the small star washers
under the head of the bolts on top of the catch
not inside the hood.
Use the flat washers and the nylocks to fasten
the catch. The slots should allow some
adjustment to the catch
Step 5:
Repeat for other side.
CAUTION: Be sure to check the tightness of all fasteners periodically to ensure the hood stays
latched properly while driving. Be sure the latch is tight and the locks are locked as
instructed above. Use of this product is at the consumers risk and Rampage is not liable for
damaged caused by improper installation or use.
Use Instructions:
Fold latch down and hook over catch on hood with hood closed and then fold latch assembly down
solidly. Use key to lock the assembly in the hooked position. Check the lock to be sure it is hooked
properly by pulling up on the rear section.
2
76336 ins 30311
/