Page is loading ...

RAMPAGE
P R O D U C T S
88632 Retractable Rock slider
Jeep JK 2 door, 2007-
NOTE: Before installation please read and understand these instructions. Please be sure all
of the components are included in the package. Please be sure to have a helper to assist you
for the initial installation of the step assemblies.
(4x) 8mm bolts (4x) 8mm ID washer
(8x) 6mm ID washer
(8x) 6mm bolts (8x) 6mm nut
(1x) left side assy. (1x) Right side assy.
(4x) 8mm Pinch clip
Parts List
Installation
Ratchet wrench with extension 10mm socket 10mm wrench 13mm socket
2 x 19mm wrench’s
Tools Required
Preparation:
Main pivot bolt.
1
Thank You for purchasing this product!
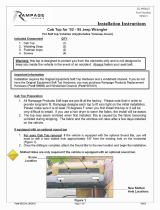
Installation should be done with all of the brackets as shown here. This
is the down position for the step. Access to the pinch weld fasteners is
difficult if the brackets are in the up position. The Step assemblies should be
supplied with the brackets in this position held in place by tightening of the
main pivot bolts. These bolts will be loosened after the rest of the
installation is complete. If they are not tight when you install please do
the following:
Have a helper hold the mounting bracket in the position shown to the right
and tighten the main pivot bolt to keep the bracket from rotating. The gas
strut is a very high pressure device and should not be removed unless
replacement is required. Once the step is installed the bolts will need to be
loosened for proper operation.

Have an assistant help support the step in place on the vehicle
while installing a front or rear bolt. Now put the other bolt in
place. Leave them loose for now.
Step 1
Vehicle floor
8mm bolt/washer
Step 2
If the vehicle had factory step or rocker guard on it the pinch
clips will be installed on the floor of the vehicle already. If it did
not then they will need to be installed in the openings under the
vehicle as shown. Look for the square holes with a round hole
next to it. These mounting locations will require the pinch clips.
Slip them into the square holes and onto the round hole as
shown to the right.
(4x) 8mm Pinch clip
Vehicle floor
Vehicle floor
(4x) 8mm bolts
Step 3
6mm bolt/washer
Pinch weld
2
Install the 6mm bolts through a flat washer, the pinch weld and the holes in
the first bracket. Secure with the 6mm nuts on the inside of the bracket.
Continue this process for the other two mounting locations.
Once all the bolts are in finish tightening to secure the assembly.
Repeat steps 1-3 for the other side.

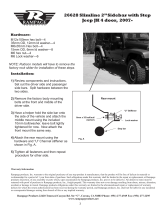
Set up and Operation
As a final step you need to remove the 6mm bolts or release the main pivot bolts holding the gas struts in position .
Use a pair of 19mm wrenches to loosen the pivot bolts enough to allow free movement of the brackets. (Fig 1)
NOTE: Although tested and adjusted at the factory it may be necessary to loosen the main pivot bolts
slightly if the operation of the step seems to bind. Use the 19mm wrenches to loosen the bolts.
Your Rampage Retractable Rocksliders can be run in either the up or down positions at any time. The high
pressure struts will keep them in the up position when not latched down even in harsh driving conditions. They can
be pushed down using your feet when exiting the vehicle as needed. Once latched it will require downward
force to release the latch mechanism. Place your hand on the bar and latch as shown below and push down on
the bar until you can comfortably pull the release lever, then let the struts push the bar up. (Fig 2)
Pivot bolt
Push down on bar
while releasing the latch
Fig 1
Fig 2
Care and Maintenance
Properly maintained this product will provide many years of trouble free use. There are a few simple tasks that
should be performed on a regular basis to ensure proper operation.
1) The pivot bolts and latch are provided with a generous amount of grease to lubricate the moving mechanisms of
the steps. Over time this grease may become dirty or need to be serviced. This can be done by simply
lubricating the pivot bolts with a product such as WD-40 or Tri-Flow. Periodically check the operation of the
steps to be sure they are moving freely and if not, lubricate them.
2) It is recommended that the mechanisms of the steps be kept clean and any obstructions removed regularly to
ensure proper operation.
3) The gas struts should provide many years of trouble free operation however if they are damaged or need to be
replaced this can be done as follows:
Place a screw driver under the metal clip on the end of the strut and pry up. The clip does not need to be
removed but pried far enough to remove the end from the ball stud. When re-installing the strut ends simply
snap back on the ball studs. Please contact Rampage for replacement parts as needed.
Warranty Information
Rampage products, Inc. warrants to the original purchaser of any step product it manufactures, that the product will be free of defects in material or
workmanship for a period of 1 year from date of purchase. Such obligations under this warranty shall be limited to the repair or replacement, at
Rampage products discretion, of any assembly or parts which, upon examination by Rampage products, Inc. proves to be defective. All defective
items must be returned with proof of purchase to Rampage products, Inc., freight prepaid. This warranty does not cover damage resulting from
abuse, misuse, alteration, accident or damage in transit. Rampage products obligations under this warranty are limited to the aforementioned repair
or replacement of warranty defects for which the return authorization has been received during the warranty period, and Rampage products, Inc.
shall not be liable for any incidental or consequential damages arising from breech of this or any implied warranty.
Rampage Products 9225 Stellar Ct. Ste “C”, Corona, CA 92883Phone: (951) 277-4949 Fax: (951) 277-2295
www.rampageproducts.net
3
/