Page is loading ...

1
900 XT PRO TILE SAW
OWNER’S MANUAL
61900Q
10 in.
254mm
READ AND FOLLOW ALL SAFETY AND
OPERATING INSTRUCTIONS BEFORE USING THIS SAW.
LIRE ET SUIVRE TOUTES LES DIRECTIVES
DE SÉCURITÉ ET D’OPÉRATION AVANT D’UTILISER CETTE SCIE.
LEA Y SIGA TODAS LAS INSTRUCCIONES
DE FUNCIONAMIENTO Y SEGURIDAD ANTES DE USAR ESTA SIERRA.
•
A
L
W
A
Y
S
W
E
A
R
S
A
F
E
T
Y
G
O
G
G
L
E
S
•
T
O
U
J
O
U
R
S
P
O
R
T
E
R
D
E
S
L
U
N
E
T
T
E
S
D
E
S
É
C
U
R
I
T
É
•
S
I
E
M
P
R
E
U
T
I
L
I
C
E
G
A
F
A
S
D
E
S
E
G
U
R
I
D
A
D
SCIE À CARREAUX PRO
MANUEL D’UTILISATION
SIERRA ELÉCTRICA PROFESIONAL
MANUAL DE OPERACIÓN
For Instructions in french and spanish,
please go to www.qep.com
Pour des instructions en français et en
espagnol, s’il vous plaît aller à www.qep.com
Para instrucciones en francés y en español,
por favor vaya a www.qep.com

2
SECTION PAGE
PRODUCT SPECIFICATIONS..................................................................................................................... 2
CALIFORNIA PROPOSITION 65................................................................................................................. 2
SAFETY GUIDELINES - DEFINITIONS ......................................................................................................
3
POWER TOOL SAFETY ............................................................................................................................. 4
TILE SAW SAFETY ..................................................................................................................................... 5
ELECTRICAL REQUIREMENTS AND SAFETY..........................................................................................
7
TOOLS NEEDED FOR ASSEMBLY............................................................................................................. 8
CARTON CONTENTS.................................................................................................................................. 8
KNOW YOUR TILE SAW............................................................................................................................. 10
ASSEMBLY AND ADJUSTMENTS.............................................................................................................. 13
OPERATION................................................................................................................................................ 19
MAINTENANCE........................................................................................................................................... 23
TROUBLESHOOTING................................................................................................................................. 24
PARTS LIST................................................................................................................................................. 25
MOTOR
Type ................................. Universal
Amps ............................... 15
Voltage ............................ 120
Hz ................................... 60
RPM (no load) ................. 4500
Overload Protection ........ NO
TABLE
Table Size ........................
17-5/16 in. x 14-13/16 in.
(440 mm x 375 mm)
Table Extension ............... Yes, right side of main table
SAW
Blade Size .................................. 10 in. (254 mm)
Arbor Size ................................... 5/8 in. (16 mm)
Blade Type .................................. Continuous rim diamond
Material Usage ............................ Porcelain, ceramics,
marble, stone
CUTTING CAPACITIES:
Bevel Range ............................... 0° - 45° right
Maximum Depth of Cut at 90° ..... 3-3/4 in. (95.2 mm)
Maximum Depth of Cut at 45° ..... 2-3/8 in. (61 mm)
Maximum Rip Cut ........................ 24 in. (609.6 mm)
Maximum Diagonal Cut ............... 18 in. (455 mm)
WARNING
!
•
•
•
WARNING
!
WARNING
!

3
WARNING ICONS
Precautions that involve your safety.
Do not attempt action
WEAR EYE PROTECTION: Always wear safety goggles or safety glasses with side shields.
Always wear respiratory and hearing protection.
To reduce the risk of injury, user and all
bystanders must read and understand instruction manual before using this product.
Failure to keep your
hands away from the moving part and cutting surface will result in serious personal injury.
Indicates an imminently hazardous situation which, if not avoided, will result in
death or serious injury.
WARNING: Indicates a potentially hazardous situation which, if not avoided, could result in
death or serious injury.
CAUTION: Indicates a potentially hazardous situation which, if not avoided, may result in minor
or moderate injury.
CAUTION: Used without the safety alert symbol indicates potentially hazardous situation
which, if not avoided, may result in property damage.
CAUTION
WARNING
!
!
CAUTION
!

4
Safety is a combination of common sense, staying alert
and knowing how to use your power tool.
•
•
1. and become familiar with the entire
Instruction Manual. LEARN the tool’s
application, limitations and possible hazards.
2. and in working order.
3. .
Form the habit of checking to see that keys and
adjusting wrenches are removed from the tool before
turning ON.
4. KEEP WORK AREA CLEAN. Cluttered areas and
benches invite accidents.
5. .
Do not use power tools in damp locations, or expose
them to rain or snow. Keep work area well lit.
6. . All visitors and bystanders
should be kept a safe distance from work area.
7. with padlocks,
master switches or by removing starter keys.
8. It will do the job better
and safer at the rate for which it was designed.
9. . Do not force the tool or an
attachment to do a job for which it was not designed.
10. . Make sure
your extension cord is in good condition. When
using an extension cord, be sure to use one heavy
enough to carry the current your product will draw.
An undersized cord will result in a drop in line
voltage and in loss of power which will cause the tool
to overheat. The table on page 6 shows the correct
size to use depending on cord length and nameplate
ampere rating. If in doubt, use the next heavier
gauge. The smaller the gauge number, the heavier
the cord.
11. WEAR PROPER APPAREL. Do not wear loose
clothing, gloves, neckties, rings, bracelets or other
jewelry which may get caught in moving parts.
Nonslip footwear is recommended. Wear protective
hair covering to contain long hair.
12. ALWAYS WEAR EYE PROTECTION. Any
power tool can throw foreign objects into
the eyes and could cause permanent eye
damage. ALWAYS wear Safety Goggles
(not glasses) that comply with ANSI Safety standard
WARNING
!
Z87.1. Everyday eyeglasses have only impact–
resistant lenses. They ARE NOT safety glasses.
NOTE: Glasses or goggles not in compliance with
ANSI Z87.1 could seriously injure you when they
break.
13. .
Sawing operation produces dust.
14. SECURE WORK. Use clamps or a vise to
hold work when practical. It is safer than
using your hand and it frees both hands to
operate the tool.
15.
before servicing, and when changing accessories
such as blades, bits and cutters.
16.
STARTING. Make sure switch is in the OFF position
before plugging the tool in.
17. .
Consult this Instruction Manual for recommended
accessories. The use of improper accessories may
cause risk of injury to yourself or others.
18. . Serious injury
could occur if the tool is tipped or if the cutting tool is
unintentionally contacted.
19. . Before further
use of the tool, a guard or other part that is damaged
should be carefully checked to determine that it will
operate properly and perform its intended function
– check for alignment of moving parts, binding of
moving parts, breakage of parts, mounting and
any other conditions that may affect its operation.
A guard or other part that is damaged should be
properly repaired or replaced.
20.
Do not
walk away from a running tool until the blade comes
to a complete stop and the tool is unplugged from
the power source.
21. . Keep proper footing and
balance at all times.
22. . Keep tools sharp
and clean for best and safest performance. Follow
instructions for lubricating and changing accessories.
23. use power tool in presence of ammable
liquids or gases.
24. operate the tool if you are under the
inuence of any drugs, alcohol or medicationn that
could affect your ability to use the tool properly.
25. Dust generated from certain materials can be
hazardous to your health. Always operate saw in
well-ventilated area and provide for proper dust
removal.
26. to reduce
the risk of induced hearing loss.

5
1.
2. against the miter
gauge or quick-locking cutting guide.
3.
to support or guide the
workpiece.
4. or have any part of your body in
line with the path of the wet tile saw blade.
5. behind or over the wet tile saw for
any reason.
6.
against the direction of rotation only.
7.
without rst turning the
saw OFF and unpluging it from the wall outlet. Turn
power switch OFF immediately to prevent motor
damage.
8. to the rear
and the sides of the wet tile saw for long or wide
workpieces.
9. and hand
positions where a sudden slip could cause your
hand to move into the saw blade.
10. to clean plastic parts.
Solvents could possibly dissolve or otherwise
damage the material. Only a soft, damp cloth should
be used to clean plastic parts.
11. MOUNT your tile saw on a bench or stand before
performing any cutting operations. Refer to
WARNING
!
12.
Remove dust frequently. Clean out dust from the
interior of the saw to prevent a potential re hazard.
13.
Do not leave the saw until it comes
to a complete stop.
14. (work thrown back towards
you) by keeping the blade sharp, the miter gauge
and cutting guides parallel to the saw blade and
by keeping the guards in place, aligned and
functioning. Do not release work before it has
passed all the way through the saw blade. Do not
rip work that is twisted, warped or does not have a
straight edge to guide it along the guides.
15. Find and read all the warning labels from the tool
(shown below)
Laser warning label
Laser aperture label

6
Use a separate electrical circuit for your tool. This circuit
must not be less than #14 wire and should be protected
with a 15 Amp time delay fuse. Before connecting the
motor to the power line, make sure the switch is in the
off position and the electric current is rated the same as
the current stamped on the motor nameplate. Running
at a lower voltage will damage the motor.
Make sure
your extension cord is in good condition. Use an
extension cord heavy enough to carry the current your
product will draw. An undersized cord will cause a drop
in line voltage resulting in loss of power, overheating
and burning out of the motor. The table below shows
the correct size to use depending on cord length and
nameplate ampere rating. If in doubt, use the next
heavier gauge. The smaller the gauge number, the
heavier the cord.
Make sure your extension cord is properly wired and in
good condition. Always replace a damaged extension
cord or have it repaired by a qualied technician before
using it. Protect your extension cords from sharp
objects, excessive heat and damp or wet areas.
This tool is intended for use on a circuit that has a
receptacle like the one illustrated in Fig. 1. Fig. 1 shows
a three-pronged electrical plug and receptacle that has a
grounding conductor. If a properly grounded receptacle
is not available, an adapter (Fig. 2) can be used to
temporarily connect this plug to a two-contact grounded
receptacle.
grounding provides a path of least
resistance for electric currents and reduces the risk of
electric shock. This tool is equipped with an electrical
cord that has an equipment-grounding conductor
and a grounding plug. The plug must be plugged
into a matching receptacle that is properly installed
and grounded in accordance with all local codes and
ordinances.
If it will not
t the receptacle, have the proper receptacle installed
by a qualied electrician.
IMPROPER CONNECTION of the equipment grounding
conductor can result in risk of electric shock. The
conductor with the green insulation (with or without
yellow stripes) is the equipment grounding conductor.
If repair or replacement of the electrical cord or plug is
necessary, do not connect the equipment grounding
conductor to a live terminal.
with a qualied electrician or service person
if you do not completely understand the grounding
instructions, or if you are not certain the tool is properly
grounded.
WARNING
!
WARNING
!
WARNING
!
(When using 120 volts only)
More Than Not More Than 25 50 100 150 ft.
(7.62 15.24 30.48 45.72 m)
AWG- American Wire Gauge
0 6 18 16 16 14
6 10 18 16 14 12
10 12 16 16 14 12
12 16 14 12 Not Recommended

7
The adapter (Fig. 2) has a rigid lug extending from it that
MUST be connected to a permanent earth ground, such
as a properly grounded receptacle box.
In all cases, make certain the receptacle is properly
grounded. If you are not sure, have a qualied
electrician check the receptacle.
To avoid the possibility of the appliance plug or
receptacle getting wet, position the tile saw to one side
of a wall-mounted receptacle to prevent water from
dripping onto the receptacle or plug. The user should
arrange a “drip loop” in the cord connecting the saw to a
receptacle (see Fig. 3). The “drip loop” is that part of the
cord below the level of the receptacle, or connector if an
extension cord is used, to prevent water traveling along
the cord and coming in contact with the receptacle.
If the plug or receptacle does get wet, DO NOT unplug
the cord. Disconnect the fuse or circuit breaker that
supplies power to the tool. Then, unplug and examine
for presence of water in the receptacle.
1. Use only extension cords that are intended for
outdoor use. These extension cords are identied
by a marking “Acceptable for use with outdoor
appliances; store indoors while not in use.” Use only
extension cords having an electrical rating not less
than the rating of the product.
Do not use damaged extension cords. Examine
extension cord before using and replace if damaged.
Do not abuse extension cords and do not yank on
any cord to disconnect. Keep cord away from heat
and sharp edges.
Always disconnect the extension cord from the
receptacle before disconnecting the product from
the extension cord.
2.
To reduce the risk of electrocution, keep all
connections dry and off the ground. Do not touch
plug with wet hands.
3. Ground Fault Circuit Interrupter (GFCI) protection
should be provided on the circuit(s) or outlet(s) to
be used for the tile saw. Receptacles are available
having built-in GFCI protection and may be used for
this measure of safety.
Three-Pronged Plug
Grounding Prong
Properly Grounded
Three-Pronged Receptacle
Grounding Lug
Make sure this is
connected to a
known ground.
Two-Pronged
Receptacle
Adapter
CAUTION
!
DRIP
LOOP
WARNING
!

8
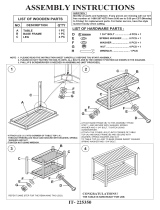
CARTON CONTENTS
Carefully unpack the tile saw and all its parts, and
compare against the list below and the illustration on the
next page. With the help of an assistant place the saw
on a secure surface and examine it carefully.
• To avoid injury from unexpected starting or electrical
shock, do not plug the power cord into a source of
power during unpacking and assembly. The cord
must remain unplugged whenever you are adjusting /
assembling the tile saw.
• The tile saw is heavy and should be lifted with care.
If needed, get the assistance of someone to lift and
move the tile saw.
• If any part is missing or damaged, do not attempt to
assemble the tile saw, or plug in the power cord until
the missing or damaged part is correctly replaced.
WARNING
!
Flat bladed screwdriver
Adjustable wrench and/or
10 mm wrench
Phillips screwdriver
Framing square
Blade wrench
ITEM
A. Cutting head assembly
1
B.
Motor support arm
1
C. Rip/Angle guide assembly
1
D.
Water pump
1
E. Hardware bag: two wrenches,
8 mm hex key, 3 mm hex key,
anti-splash guard securing
screws, AAA batteries
1
F. Hardware bag: side anti-splash
guard, rear anti-splash guard,
drain plug and water lter,
blade elevation locking knob
1
G. 10 in. Diamond blade
1
H. Cutting table assembly 1
I. Water pan
1
J. Rear water catch tray
1
K. Side water catch tray (A)
1
L. Side water catch tray (B)
1
M. Stand assembly
1
N. Stand hardware bag 1
O. Wheels 2
P. Leg tube
1
Universal wrench
8 mm hex key
3 mm hex key

9
B CA
D E F G
H I
J K L
M N
O P

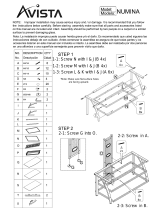
10
Rear anti-splash guard
Side anti-splash guard
Side Water
catch tray (B)
Side Water catch tray (A)
Wheel
Diamond blade
On/Off switch
Cutting table assembly
Motor support arm
Rear water catch
tray
Stand
Blade tilting locking knob
Blade elevation locking knob
Motor
Handle
Rip/Angle guide
assembly
Extension table
Saw frame assembly
Locking knob
Water pump
Water lter
Drain plug
Water pan
Wrench storage
Power cord clamps
Blade wrench
Universal wrench

11
• Unpack all parts, and group them together by type
and size. Refer to the parts list (page 8-9) in order to
verify the correct quantities.
• Release the hook (1) from the stop screw (2).
•
_
Attach the bent leg tube (3) to
the both sides of the stand leg (4) using four screws,
four washers, and four nuts,
as shown.
• Tighten the four nuts (Fig. A) with a phillips
screwdriver and a 10 mm wrench.
•
_
Attach one wheel to the rear
leg using the long hex bolt (1), the two at washers
(2), the sleeve (3) and the lock nut (4), as shown.
NOTE: Verify that the side of the wheel that has more
ribs (5) is facing inward toward the stand.
• Tighten using the Universal wrench for the lock nut
(4) and the attached blade wrench provided for the
bolt (1).
NOTE: Do not overtighten, because doing so will not
allow the wheels to turn.
• Repeat the above steps for the other wheel to the
rear leg.
• Lift up the left side of the stand as shown. (Fig. C)
• Unfold the left side leg set (3) by releasing the
locking levers (2) from slot A to slot B, then rest the
left side of the stand onto the oor.
• Release the hook (1) from the stop screw. (Fig. C)
• Lift the right side frame of stand slowly upward to
its highest position, (Fig. E) the locking knob (4) will
rebound to left automatically to secure the stand.
(Fig. D) To properly lock the stand, the red lever
MUST be secured in the slot on this cover plate.
WARNING
!
3
4
1
2
1
2
3
4
2
5
Rear of Stand
1 1 1
1
1
2
3
A
B
C
Right Side
SETTING UP
1 1 1
1
Locking handle release direction
4
5

12
• Lift the saw body and place it on the stand, aligning
the four mounting grooves (1) of the bracket (2) on
the top of the stand.
• Insert the four locking knobs through the hole
located on the base frame and the holes of the
brackets (2).
• Tighten the four locking knobs.
• Place the stand on a level surface. Loosen the
upper wing nuts (3) and turn the leveling pads (4)
clockwise or counter-clockwise to adjust the height
of the bent leg tube.
• Turn the stand adjustment knob (5) located on the
left front stand leg clockwise or counter-clockwise to
adjust the stand until all legs are contacting the oor.
NOTE: Before using the saw, verify that the tile saw is
securely locked in position, and that the left front stand
adjustment knob (5) and two leveling pads (4) have
stabilized the tile saw.
• Lift the right side of tile saw slightly, raise the cover
plate on the right side of stand, pull the locking knob
right out as the release direction, and then move the
saw slowly close to the wheel (5). (Fig. D)
• Rotate the hook to the stop screw to secure the legs
of the stand in position. (Fig. C)
• Rest the right side of the saw onto the oor.
• Fold the left side leg set (3) close to the base by
releasing the two left side locking levers (2) from the
slot B to the slot A.
• Fold the stand slowly downward as shown. (Fig. G)
• Repeat the steps of 1 to 3 on the section “FOLDING
THE STAND”.
• Unfold the left side leg set (3) by releasing the two
left side locking levers (2) from the slot B to the
slot C. (Fig. C)
• Move the saw to the desired location for operation
or store the saw in a dry environment by using the
left side leg set as handle.
WARNING
!
WARNING
!
1
2
5
Front of Stand
1
1
TRANSPORTING
1
1
4
3

13
•
Install the motor support arm onto base frame. Thread
the two bolts (from bag E) into the side holes of the
motor support arm.
•
Thread the bolt into the inner hole of the motor support
arm.
• Tighten all three bolts using an 8 mm hex key.
• Remove the nut and the washer from the
pivot rod (5).
• Attach the cutting head assembly (1) onto the
motor support arm aligning the hole (2) of the motor
support arm (3).
• Place the washer and the nut on the pivot
rod (5), as shown.
• Tighten the nut by using the provided universal
wrench. Then, turn this nut counter-clockwise by
1/2 turn or one turn to adjust the spring torsion.
• Place the blade elevation locking knob (4) through
the washer and the slot of the motor support arm
(3). Tighten the locking knob.
• Loosen the blade cover locking knob (1) and open
the blade cover (2). (Fig. J)
1
2
3
5
4
• Press the arbor lock button (8) on the motor under
the handle, holding it in rmly. (Fig. L)
• Loosen the arbor bolt (3) and take the arbor bolt and
the outer blade ange (4) off. (Fig. K)
• Place the blade onto the shaft (5).
• Make sure the blade ts ush against the inner
ange (6) and the rotation arrow is pointing in the
correct direction.
• Place the blade wrench on the arbor bolt (3-Fig. K).
• Press the arbor lock button (8) on the motor under
the handle, holding it in rmly while turning the
blade counter-clockwise. When arbor lock engages,
continue to press arbor lock button (8) in while
tightening the arbor bolt securely by turning the
blade wrench clockwise. (Fig. L)
• Close the blade cover back its original position and
tighten the blade cover locking knob (1). (Fig. J)
• Attach the rear anti-splash
guard on the rear of the
cutting head assembly.
• Thread the screw (Bag "E")
and tighten it by using the
Phillips screwdriver.
1
3
4
5
6
8
2

14
• Attached the side anti-splash guard (1) on the blade
cover.
• Thread two supplied screws (Bag "E") and tighten
them by using the Phillips screwdriver.
• Slide the water pan (1) on the right & left tracks
located under the water splash plate (2) in the base
frame. The water pan drain hole should be located
under the blade.
NOTE: To remove the water pan, rst lift up slightly on
the water splash plate (2) then pull out the water pan.
• Attach the side water attachment (1) on the right
of the cutting table assembly, aligning the slot (2)
under the extension wing.
• Align the left side of the side water attachment (3) to
the right side of the side water attachment (1) and
overlap the side water attachment as shown.
1
1
2
• Align two slots located on the rear left and right ends
of the base frame with the arms of the rear water
catch tray and gently push in.
NOTE: Make sure that the arms of two ends of the rear
water catch tray thoroughly pass through the frame
slots.
• Place the drain plug (1) and water lter (2) in the
water pan (3) as shown. (Fig. R)
• Connect the end of the water tube (4) to the nozzle
(6), located on the top of the water pump (5).
• Place the water pump (5) in the corner of the water
pan, near the water lter. (Fig. R)
• Insert the pump power cord (7) into the power cord
socket (8). (Fig. S)
1
2
3
Front
Right Side

15
•
•
• Place a 90° framing square at on the cutting table
surface with one end against the table fence.
• Push the cutting table along the cutting blade to
determine if the groove along the 90° framing square
is consistently ush against the blade throughout the
length of the stroke.
• If the groove is not consistent, see the next steps.
• Disconnect the saw from the power source.
• Loosen the blade tilting locking knob (1) and make
sure the cutting blade is in the maximum vertical
position. Tighten the locking knob (1).
• Place a 90° framing square on the cutting table
surface.
• If the cutting blade is not 90° to the groove (2),
loosen the lock nut (3) with the 10 mm hex wrench
and turn the bolt (4) in or out accordingly. Until the
blade is ush with the framing square, while moving
down the center of the groove.
• Make sure that the cutting blade does not touch
either side of the groove (2) in the cutting table by
pushing the table past the cutting blade.
• Loosen the locking handle (1).
• Place the Rip/Angle guide body (2) on the front rail
(3) of tile table to the desired position.
• Tighten the locking handle (1).
1
2
3
4
1
3
2
5
4
6
5
7
8
5
1
2
3
WARNING
!
WARNING
!
Framing Square

16
• Disconnect the saw from the power source.
• Loosen the blade tilting locking knob (1) and move
the cutting blade to the maximum bevel position,
then tighten the locking knob (1).
• Place the combination square to the cutting table
surface.
• If the cutting blade is not 45° to the groove (2), turn
the bolt (3) in or out accordingly by using the 3 mm
hex key.
• Loosen the blade tilting locking knob (1), move the
cutting blade until it is 45° to the cutting table surface
and tighten the locking knob (1).
• Make sure that the cutting blade does not touch
either side of the groove (2) in the cutting table by
pushing the table past the cutting blade.
1
3
2
• Loosen the blade elevation locking knob (1).
• Adjust the cutting head down until the outer rim of
the cutting blade is at least 3/16 in. (5 mm) below
the cutting table surface.
• While holding the upper arm in that position, tighten
the blade elevation locking knob (1).
• Recheck the cutting blade depth by pushing the
cutting table front to back past the cutting blade
and make sure the cutting blade does not touch the
grooves of the cutting table.
The maximum depth travel of the cutting head was set
at the factory. Check to make certain that the cutting
head extends to 3/16 in. (5 mm) below the cutting table
surface. If the maximum depth needs readjusting:
• Loosen the blade elevation locking knob (1).
• Move the cutting head down until the cutting blade
extends just 3/16 in (5 mm) below the cutting table
surface.
• Loosen the wingnut (4).
• Turn the locking knob (2) in or out accordingly.
• Make sure the cutting blade does not touch either
side of the groove (3) in the cutting table by pushing
the table past the cutting blade.
• Tighten the wingnut (4).
• Tighten the blade elevation locking knob (1).
• Unplug your tile saw.
• Loosen the screw (1) and open the battery cover (2).
• Insert the two supplied AAA batteries in the case
as per the diagram below. If replacing the batteries,
take out the old batteries and place with new AAA
batteries. Dispose of old batteries properly.
• Close the battery cover (2) and tighten the screw (1).
WARNING
!
1
2
1
2
3
4

17
• To turn laser on, press on/off rocker switch (1) to "I"
position.
• To turn laser off, press on/off rocker switch (1) to "O"
position.
NOTE: Your tool is equipped with the Laser Guide using
a Class IIIa laser beam. The laser beam will enable you
to preview the saw blade path on the stock to be cut
before starting the tile saw. This laser guide is powered
by two AAA 1.5 volt batteries.
If you choose to use the laser guide, the laser beam
must be correctly aligned with the blade to ensure
straight, even cutting. Your tool is equipped with the
Laser Guide cutting guide using Class IIIa laser beam.
The laser beam will enable to preview the saw blade
path on the stock to be cut before starting the tile
saw. This laser guide is powered by two AAA 1.5 volt
batteries. The laser on/off switch must be turned on for
the laser line to show.
WARNING
!
1
•
•
•
•
•
•
•
cutting line
blade
laser beam
laser beam
WARNING
!
tile
cutting line

18
Procedure C (Fig. BB, EE)
NOTE: The pattern line should ush with the left side of
the cutting line.
• Turn slightly the adjustment screw (4) for adjusting
the laser beam alignment. If the laser beam is on
the right side of the pattern line, turn the adjustment
screw (4) clockwise; if the laser beam is on the left
side of the pattern line, turn the adjustment screw (4)
counterclockwise.
• After laser adjustment, recheck the laser beam
alignment.
• Replace the black caps (1) back.
NOTE: The caps (1) prevent water from getting into
the laser assembly.
NOTE: If you have any problem or question on the laser
guide, please call the Service Center.
Left side of the laser assembly
1
2
3
4
Counterclockwise
Clockwise
Pattern line
Laser beam
NOTE: All the adjustments for the operation of this
machine have been completed at the factory. Due to
normal wear and use, some occasional readjustments
may be necessary.
• Set the saw to a 0° miter and 0° bevel setting.
• Take a board and using a straight end, mark a
90° line on the top and front of the board. This line
will service as a “pattern line” for all laser beam
alighments. Place the board on the saw table.
• Carefully lower the saw head down to alignment the
saw blade with the pattern line. Position the saw
blade to the left, center or right side of the “pattern
line” depending on you preference for the laser
beam location.
• Turn on the laser guide. Your saw has been preset
with the laser beam to the left side of the blade.
• Looking at the front of the tile, if the laser beam is
not parallel to the “pattern line” please follow the
instructions listed before under Procedure A.
• Looking at the top of the tile, if the laser beam is
not parallel to the “pattern line” please follow the
instructions listed before under Procedure B.
• Looking at the top of the tile, if the laser beam is
not ush with the “pattern line”, please follow the
instructions listed before under Procedure C.
NOTE: There are three adjustment screws on the
laser guide. Use a 3 mm hex wrench to make any
needed adjustments
• Remove three black caps (1) to show the laser
adjustment screws (2, 3, 4). (Fig. BB)
Procedure A (Fig. BB, CC)
• Slightly turn the adjustment screw (2) to adjust the
verticial angle of laser beam on the front of the
board. When laser beam angled from left to right,
turn the adjustment screw (2) clockwise; if the laser
beam angles right to left, turn the adjustment
screw (2) counterclockwise until the laser beam is
parallel with the vertical pattern line.
Procedure B (Fig. BB, DD)
• Slightly turn adjustment screw (3) to adjust the
horizontal angle of laser beam on the top of the
board. If the laser beam is out of parallel from left to
right, turn the adjustment screw (3) clockwise; If the
laser beam is out of parallel from right to left, turn
the adjustment screw (3) counter-clockwise until the
laser beam is parallel with the vertical pattern line.
Pattern line
Laser beam
Counterclockwise
Clockwise
Counterclockwise
Clockwise
Laser beam
Pattern line

19
OPERATION
•
•
•
•
BASIC SAW OPERATIONS
WARNING
!
•
•
• To turn the LED light on, press light on/off rocker
switch (1) to “I” position.
• To turn he LED light off, press light on/off rocker
switch (1) to “O” position.
The ON/OFF switch has a black removable safety key.
With the key removed from the switch, unauthorized and
hazardous use by children and others is minimized and
the saw will not turn on.
• To turn the saw "ON", insert the key (2) into the slot
of the switch (3), and move the switch upward to the
"ON" position.
• To turn the saw "OFF", move the switch downward.
• To lock the switch in the OFF position, grasp the
sides of the safety switch key, and pull it out.
• With the switch key removed, the switch will not
operate to power the saw on.
WARNING
!
• If the switch key is removed while the saw is
running, it can be turned "OFF" but cannot be
restarted without inserting the switch key.
NOTE: The miter scale on the Rip/Angle guide can be
easily read, showing miter angles from 0° to 45° to the
left and the right. The positive stops are 0°, 15°, 30° and
45°.
• Loosen the locking handle (1) to move the guide
along the front rail to the desired position and
handle.
• Loosen the locking knob (2) to turn the guide to the
desired angle along the arc slot (3) and then tighten
the locking knob (2).
1
2
3
WARNING
!
1
2
3

20
NOTE: When transporting the tile saw, the cutting table
must be locked into one of the positive stops to prevent
the saw from damage.
• Loosen the cutting table locking handle (1)
counterclockwise and rotate the cutting table locking
lever (2).
• Move the cutting table to one of the positive locking
position and lock the table by rotating the table
locking lever (2) clockwise.
NOTE: The pin of the table locking lever (2) will lock
into a hole at one of the three positive stops (3).
NOTE: Always turn OFF when raising or pressing down
the cutting head.
• Loosen the blade elevation locking knob (1).
• Lift the handle (2) upward to raise the cutting head.
• When adjusting the cutting head to the desired
height, tighten the blade elevation locking knob (1)
to lock.
NOTE: When transporting or storing the tile saw, the
cutting head should always be locked in the low position.
• To tilt the blade for bevel cutting, loosen the blade
tilting locking knob (1) behind the motor head.
• Firmly grasp the handle (2) and tilt the cutting head
by turning the handle (2) clockwise.
• Tighten the blade tilting locking knob (1).
• Please note that there are 2 slots in table that will
accept 22.5º and 45º angles.
• Attach the water tube to the water pump (1) and
insert the pump power cord into the power cord
socket. (See ASSEMBLING THE WATER PUMP)
• Fill the water pan with 5 gallons of water. The pump
should be submerged.
NOTE: Always place the pump in a clean water souce.
• Turn saw on. If the water ow need adjusted, use
the ow restrictor (2) on the water tube.
1
2
1
2
2
1
1
2
3
/