Page is loading ...

15 Kingbrook Parkway, Suite 100 Simpsonville, KY 40067 p. 877.866.3331 f. 502.719.8888 oxfordgarden.com
Ver. 06.30.20
WEXFORD TABLES
ASSEMBLY INSTRUCTIONS
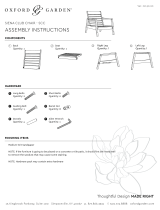
COMPONENTS
HARDWARE
FINISHING ITEMS
Medium Grit Sandpaper
NOTE: If the furniture is going to be placed on a concrete or tile patio, it should first be rinsed well
to remove the sawdust that may cause some staining.
NOTE: Table top size and surface and leg height may vary from illustrations but the assembly is the same for all Wexford tables.
Table Top
Quantity: 1
Leg
Quantity: 4
Skirt
Quantity: 4
Leg Stretcher
Quantity: 4
5
Square
Quantity: 1
6mm x 65mm Bolts
Quantity: 8
A
6mm x 70 mm Bolts
Quantity: 4
B
Long Bolts
Quantity: 4
C
Guiding Bolt
Quantity: 1
D
Barrel Nut
Quantity: 8
E
Flat Washer
Quantity: 8
F
Allen Wrench
Quantity: 8
G
Allen Wrench
Quantity: 1
H
Hex Head Wrench
Quantity: 1
I
B

Ver. 06.30.20
INSTRUCTIONS
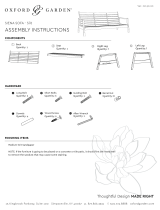
STEP 1
First lay table top on a clean & protected surface.
Next, lay skirt onto table top lining up the pre-drilled
holes. Secure skirt by using the 65 mm bolts with the
allen wrench provided.
STEP 2
Assemble ALL four legs by inserting the tenon of the
leg stretcher into the mortise of the leg. Secure leg
using the LONG bolt and barrel nut shown.
Ver. 2019.8.10
2
3
A
STEP 3
Insert the threaded rods on one leg into holes located on
one corner of table top. Repeat for ALL four legs.
DO NOT SECURE Leg assembly in this step.
STEP 4
Insert square into the assembled legs as shown.
Carefully separate the four legs to allow the square to be
inserted into place.
STEP 5
Using the short 70 mm bolt and barrel nut , secure
square to legs.
1
A
A
AAA
1
2
4
CE
3
4
C
E
Dguiding bolt
5
5
STEP 6
Secure legs to the table top using metal washer and
Hex Nut using the Hex Head wrench provided.
F
BE
B
E
G
F
G
How to align barrel nuts and bolts.
Insert a guiding bolt into the end of a barrel nut. Align the barrel nut inside of the component with the bolt used to
connect the components. Once the component bolt is aligned and threaded, simply pull the guiding bolt from
the end of the barrel nut.
/