Page is loading ...

MADISON BILLIARD TABLE INSTALLATION INSTRUCTIONS
Tools required by the installer:
3/8” and 1/2" Drive ratchet and Extension Small Hammer
9/16” and 1/2" Sockets for above Tape Measure
9/16” and 1/2” Combo end wrench 13MM Combo end Wrench (2)
# 2 and # 3 Phillips screwdriver 3/8” Electric drill/ driver
1/8” & 3/16” Drill bits Utility Knife
Level and shim material Stapler and staples
Material to fill slate seams (beeswax, water putty, bondo, etc.)
Prior to installation of the table please check for damaged or missing parts. Call Presidential Billiards at
866-728-2253 if there is a problem. The hardware is packed in several different packets. This coincides
with the steps in this installation instruction and will hopefully reduce your time to verify what hardware
is required where. It is suggested that you retain the bolts in their respective packets for ease of
installation.
STEP 1 TRESTLE AND LEG ASSEMBLY
The trestle assembly consists of a stretcher attached to legs.
1.1 Loosely attach legs to leg stretcher using 5/16” x 4” black bolt.
1.2 Attach large black plate of lower support rods to stretcher using 4 – 1/4 – 20 x 2” black bolts.
DO NOT ATTACH TO LEG AT THIS TIME. DO NOT TIGHTEN LEG BOLTS TO
STREACHER AT THIS TIME.
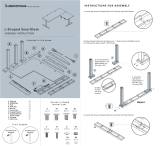
STEP 2 FRAME ASSEMBLY
*Caution – Do not tighten any frame assembly bolts until all are in place!!
You will build frame assembly first and place on leg assembly.
2.1 Place the leg/trestle assembly in the location selected for the table.
2.2 Build beam assembly using 3/8 x 4 1/2" bolts, fender washers and barrel nuts.
2.3 Loosely attach beam assembly to legs using 5/16 x 4” bolt and fender washer.
2.4 Square frame and tighten all bolts including leg streacher.
2.5 Attach slate block to beam using 5/16 x 3 1/2” bolts and washers.
2.6 Attach small plate of support rods to underside of legs using 5/16” x 1 1/2" bolt and washer.
Do not tighten rods at this time.

STEP 3 INSTALL THE SLATE
3.1 Level the table frame to the floor.
3.2 Place the three pieces of slate on the crossbeams. Measure to make sure that the slate
overhangs the main beams and the cross beams by the same amount. This will square the
slate to the frame.
3.3 Secure the slate to the cross beams, using the #14 screws from the hardware package. (Pre-drill
with 3/16” drill bit)
3.4 Finalize the slate leveling process using flat shims and/or wedges. Fill the seams and screw holes
and install the bed cloth.
STEP 4 ATTACH THE CUSHION RAILS AND BLINDS
4.1 Unpack the cushion rails & apply the cloth. (It is recommended that the cloth be installed in a
shop environment prior to installing the table in the customer’s home or business).
4.2 Lay out the rails upside down on a clean level surface & build a picture frame assembly utilizing
the draw bolts (5/16” x 6 3/4” bolts, and 5/16” nuts for side pockets and Halfmoons, 5/16 x 3
1/2” and nut for corner pockets) from the hardware package. Do not over tighten corners, they
may crack. (The picture frame rail assembly is fully assembled upside down on a clean level
surface.)
4.3 Check the fit-up of the cushion rails at corners. If adjustment is needed loosen bolts and correct
as needed.
4.4 Loosely attach blinds using the 1/4" x 1/2” bolts, 1” washer and “L” brackets to rails. Center
blinds on all sides.
4.5 Attach corners using the 1/4" x 3/4” bolts and 1” washer. Check alignment and tighten all bolts.
4.6 Carefully turn over and place the completed assembly on the table. Loosely attach with 5/16” x
2” bolts & dome washers from hardware package.
4.7 Hand tighten the cushion rails. NO IMPACT TOOLS PLEASE!
4.8 Tighten metal rods to underside of cabinet and adjust turnbuckle until tight.
STEP 5 INSTALL THE POCKETS
5.1 Install the pockets from beneath and secure in place with round head brads. (2 per pocket)
Note: Before installing pockets, they may need to be trimmed to the fit correctly in the
pocket. Trim in small increments as to not trim too much. Once trimmed, use a Sharpie to
blacken the edge.
Should there be any problems please contact us at:
Presidential Billiards, L.P. Tel: 281-572-4522
20221 Caroline Way 866-728-2253
New Caney, TX 77357 Revised: 8/21/2017

MADISON INSTALLATION HARDWARE & PARTS
Step1 Trestle and Leg Assembly
1.1
4
5/16 x 4" Black Bolt
3164BF
1.2
4
1/4”– 20 x 2” Decorative head bolt
BB142050
1
4mm Hex Key
HKS-M4
Step 2 Frame Assembly Hardware
2.2
8
3/8” – 16 x 4 3/4" bolts
12122
8
3/8" x 1.250” Zinc Finish Fender Washers
NE46481
8
3/8 Barrel nut
NU0016
2.3
8
5/16” - 18 x 4” bolts
3164BF
8
3/8" x 1.250" Zinc Finish Fender Washers
NE46481
2.5
16
5/16” - 18 x 3 ½” bolts
NU00961
16
5/16” Flat Washer
NE3526
2.6
4
5/16” – 18 x 1 1/2" Bolts
NU1092
4
5/16” Flat Washers
NE3526
Step 3 Slate Assembly
3.3
17
# 14 x 2 ½” Slate screws
NU3940
Step 4 Rail and Blind Assembly
4.2
2
5/16” - 18 x 6 3/4” bolts
NU4921
4
5/16” Flat Washer
NE3526
4
5/16” - 18 hex nuts
NU0012
8
Half moon washers
NE1965
4
5/16” - 18 x 3 ½” bolts
NU00961
4
5/16 -18 Hex Nut
NU0012
4.4
4.5
16
5/16 – 18 x 1 1/4" Bolts
16
5/16 Flat Washer
NE3526
16
5/16 - 18 hex nuts
NU0012
4.6
18
307AHB 5/16 – 18 x 2” Z
NU4915
18
3/8 Dome Washers LW Zinc
NE3527
Step 5 Pocket Hardware
14
3/4” Round head nails
TACKS
14
Small “L” Brackets
NE4646
28
1/4”-20 x 1/2” Phillips Pan Head
NU1848
28
1/4” x 1” Fender Washer
NE4648
/