Page is loading ...


■ is the trademark of MCNEX Co. Ltd.
■ The model and services of this product are the trademarks of the owner.
■ MCNEX Co. Ltd. owns the copyright of this document.
■ Copying, distributing, reproducing or modifying any part of this document is prohibited without an official approval
of MCNEX Co. Ltd.
■ Before using this product, please register the product number attached on the back of the product warranty of this
manual as well as on the product for the best customer support and after services. On the website.
(If not registered, it requires the purchase receipt for seamless A/S.)
Thank you for purchasing this product.
Before using this product... www.mcnmate.com
■ This manual has been produced as of today/the present (by current standards). Best efforts were put for
completeness and accuracy. However, there may be editorial errors or omissions, and there is no guarantee for this.
The responsibility for using this document entirely depends on the user.
■ Any change(s) in the product specifications or manual for improvement in the product performance may take place
without notice.
■ The images in this manual may look a little differently depending on the printer or a change in specifications.
■ We do not take any responsibility for loss or radio/TV interference caused by the user’s misusage or remodeling
of the camera out of its original purpose. Please be aware that you may be legally punished by‘the Private Act
and related statutes’if you intentionally record others.
■ This device as a home appliance (B grade), Electromagnetic compatibility device is mainly suitable for use in the
home and can be used in all areas. The radio/wireless equipment may cause a mixed radio signal so cannot
provide services related with life-saving.
Important Notes
Date of Publication: November 2014 Publisher: MCNEX Co. Led.
02

Table of Contents
01 Warnings and Cautions 1. Safety Warnings
2. Safety Cautions
03 Parts of Product 1. Components
2. Names and Functions
1. Product Features
04 Installation 1. Product Installation
2. Network Connection
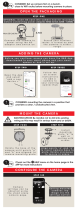
05 Viewer Monitoring 1. Camera Registration
2. Live Video
3. Playback
4. Settings
06 Mobile Monitoring 1. Camera Registration
2. Live Video
3. SD Card Playing
4. Settings
06 Others 1. Product Specification
2. Troubleshooting
3. A/S Guidelines
4. Warranty
02 Product Features
03


1. Safety Warnings
The following precautions are to prevent unexpected risks or damage by using the product safe and correct /
correct use / the product.
The precautions are divided into two types,“Warning”and“Caution”, meaning as follows:
This graphic symbol is a symbol for attention on the operations and items that might cause a hazard. So, please
read and follow the instructions carefully to prevent any risk. If you do not follow the instructions, the user takes
all the responsibility.
If this sign is violated, it may cause a serious injury or death.
If this sign is violated, it may cause a minor injury or damage to the product.
Warning
Caution
!
!
!
05

1. Warnings for Safety
■ Before using the product, please read the instructions thoroughly, and follow the operating guidelines and warnings
enclosed and indicated with this manual.
■ Do not touch the power cable with wet hands when plugging or unplugging. It can cause an electric shock.
■ Plug the power cable all the way in so that it’s not wobble, and do not use a damaged cable which can cause a
fire/electric shock.
■ Use the supplied power adapter only. Use of a unauthorized adapter may cause a damage to the product.
The power adapter must be used for home-rated power.
■ Install the product and power cable out of reach of children, and Place them away from infant beds or any other
children’s furniture. Install the power cable especially out of children’s reach.
■ This product has been designed for indoor use, not for medical purposes, and requires supervision of an adult.
■ Install the product in a well-ventilated place.
■ Do not touch any uninsulated, exposed part of the power adapter when plugging or unplugging.
■ Do not place the product or power cable near any hear sources.
■ Do not leave any sharp objects near the adapter cable to prevent cable damage.
■ This product is not intended to replace human supervisory ability of children.
■ This product does not have a function of immediately notifying adults of any unexpected and sudden movements of
children, so it requires a regular inspection and supervision management by staff.
■ Because this product as a Wi-Fi and Network product is used with transceivers of the antenna, keep the distance of
longer than 20 cm between the antenna of the product and the user to satisfy the RF exposure specifications.
■ Do not operate the product with wet hands. This may cause an electric shock or product malfunction.
!WARNING
06

2. Safety Cautions
■ Use genuine McnMate products and parts only. Using a non-genuine product or part can cause a product damage.
■ Make sure the Micro SD card turned off before inserting or taking it out.
■ If the storage space in the Micro SD card is full, the oldest video is automatically deleted. Therefore, keep important
recording files on a separate storage device.
■ When changing the mounting position of the product, the camera angle can be changed, so check the images after
mounting the camera and adjusting its angle. If it is attached to the wrong location, normal recording may not be done.
■ Keep the front of the lens clean.
■ The best temperature for its functioning is between -20 ~ +55℃. Keep this temperature to prevent any problem
especially in hot summer or cold winder.
■ Do not use the product in a place with high temperature or humidity.
■ Please contact the customer service immediately if you suspect a problem with the product or its function. Otherwise,
the symptoms may get worse, and you may not be able to get normal customer support.
■ This product record images using a camera, so the quality may depredate depending on the conditions.
The degradation of image quality may be caused by a large difference in the shades of the object, severe backlight
during daytime and in the middle of the night.
■ Do not clean the product with chemicals or detergents. Please wipe it gently with a soft cloth to prevent any color
change of the product case.
■ Keep the product and cables from dust. Dusk can cause the product malfunction or error.
!CAUTION
07


■ Clear Video Recording
Sony Exmor sensor provides clear images.
■ High Definition Video Recording
FHD (1920x1080) provides high-quality images of 30 fps.
■ Remote Monitoring
Wherever the Internet connection is available, remote monitoring is available on any smart phone device (Android, iOS) or PC.
■ Real-time Alarm
As motions and sounds are detected, real-time alarming is sent to your smartphone.
■ Two-way Audio
A built-in microphones and speaker enable communication in both directions.
■ SD Card Storage
When an event occurs, the real-time images can be stored on the SD card inserted in the product.
■ IR LED
IR LED can be used to enable monitoring objects in low light.
■ Easy Installation
The product can be installed without any additional setup program at the website www.smartiview.com, and the images
can be monitored through the Web viewer.
Features
09


Components
■ Make sure the components as shown in the pictures below are all included.
(Contact your dealer if something is missing.)
■ The components of this product are subject to change without notice for improvement of product
performance or quality.
■ Please download the manual and VMS program from www.mcnmate.com.
Main body
Quick Guide
Network cables
Plastic anchors
Adapter
Tapping screws
1. Components
11


■ Main body
2. Names and Functions
① Power / Network status LED
② Ambient light sensor
③ Camera lens
④ High-intensive IR LED
⑤ Speaker
⑥ Microphone
⑦ Network connection port
⑧ WPS / Reset button
⑨ Micro SD card slot
⑩ Power connection port
⑪ Mounting bracket
⑫ Angle-adjustment nut
Indicates the operating (power / network) status of the product.
Switches to night-vision mode depending on the brightness detected around the camera.
Record the front
Built-in IR LED for night time
Outputs the audio transmitted from outside using the built-in speaker.
Inputs audio using the built-in microphone.
Used for wired network connection (PoE power available)
1 second: pairing the camera with a wireless router
10 seconds: reset to the factory condition of the camera settings
Insert / take out the Micro SD card (note the insertion direction)
Power cable port
Used for desk, wall or ceiling installation
Fix the recording position after loosening the screws and securing / tightening direction.
13


Holding the hook on the back of the
bracket body, open the gap below it
to separate the bracket body and mount.
1. Wall-mounting with screws
■ Remove
■ Assembly
After aligning it to the right direction, first
set the hole on the opposite of the arrow
on the bracket mount with the hook on
the bracket body, and then push to
complete the assembly.
■ Installation
Get the screw (M3 x 20) and
the anchor (Ø 5 x 25) ready.
If the wall is wooden, place the arrow
toward 12 o’clock of the bracket mount
on the wall, chose one of the four holes
and fix the screws into the two holes
(in diagonal direction) with a screwdriver.
1)
2)
1. Product Installation
A
B
A
B
15

3)
4)
5)
6)
If the wall is concrete, first place the bracket
mount with the arrow pointing at 12 o’clock
and mark two (in diagonal) of the four holes
as shown in the illustration.
Insert the anchors in the two holes and hit
them lightly with a rubber hammer to insert
them to the wall.
Fix the screws into two holes with a
screwdriver.
1. Product Installation
Drill with a 6 mm concrete bit into the depth
of about 3 cm. Remove the scrapings in the
holes.
DRILL
Be careful of an injury when drilling.
When the installation is complete,
remove the protective plastic on the lens.
16

Loading
Loading complete/Network not connected
Network connected/Normal operation
WPS on
Upgrading firmware
3. Power connection
■ Plug the power adapter into a wall outlet and connect the camera with the power and network cables
as shown in the picture.
- Use the supplied power adapter only. Using an adapter other than specified may result in the malfunction of the product.
- It takes about 1 minute for the camera to completely turned on.
- Once the camera is completely on, the red light flashes and then stays on.
4. Network connection
■ Connect the network cable with the network connector
on the camera as shown.
2. How to insert / remove Micro SD card
Cautions in the use of the Micro SD card
- It is recommended to regularly inspect or replace the
Micro SD card (formatting it every fortnightly recommended).
- When removing the card from the product, make sure the
power is turned off. If you remove the card with the power on,
it may cause an error or failure.
- Inserting the card too hard or in the other direction may cause
a damage to the card.
- The capacity of the Micro SD card is up to 32G.
!
1. Product Installation
l0
Insert
Remove
MIC
RESET
DC IN 5V
NETWORK
Red
Flashing red(500ms)
Green
Flashing green(200ms)
Purple(red+green)
17

Using the router set to DHCP (Dynamic Host
Configuration Protocol) server recommended.
1) Network Cable Connection
If you do not have a wireless router, the camera
can be connected directly to the router using a
network cable.
① When the power is connected,
the red light comes on; when it’s complete,
the green light flashes.
② Connect the camera and the router with a
network cable.
③ When the network is properly connected,
the green on the LED status indicator stops
flashing. If not, repeat from step ②.
Cautions
- The wireless network connection may fail depending on the communication conditions, and network delay or interruption may occur
depending on the network conditions.
- The father it is from the wireless router, the longer the connection takes.
- Do not access to unauthorized network. Services may not be provided for certain Internet services that require user authentication.
In this case, contact your service provider.
- Contact your network administrator or service provider for network settings and password in more detail.
- Refer to the router manual or contact the router manufacturer for router or wireless connection in more detail.
- Some routers may have a compatibility problem.
- If the camera is installed on a network environment with multiple wireless connections, some image packets may be lost according
to the network traffic load.
!
5. Network connection and settings
2. Network Connection
Wireless router
Internet
services
18

Available only with a wireless router that supports WPS.
2. Network Connection
2) WPS Connection
Using the WPS function with a single push of a button, you can connect the camera to your wireless router.
① When the power is connected, the red light comes on; when it’s complete, the green light flashes.
② Press the WPS button on back of the camera and hold it for one second. Then, press the WPS button
on the wireless router within two minutes.
③ When the network is properly connected, the green on the LED status indicator stops flashing. If not,
repeat from step ②.
WPS button
Wireless router
MIC
RESET
DC IN 5V
NETWORK
RESET
WPS button
19

2. Network Connection
3) Wi-Fi Connection without WPS
To connect to a wireless router without WPS, change the network settings to‘wired’and try wireless network.
① When the power is connected, the red light comes on; when it’s complete, the red light flashes.
② Connect the camera and the router with a network cable.
③ Register and select the camera as described in the Web Monitoring Site on page 21.
④ Set up the wireless network as described in the Wireless Network Settings on page 29. When the network is
properly connected, the green on the LED status indicator turns on.
⑤ When the wireless network setting is completed, remove the network cable.
Wireless router
Internet
services
20
/