Page is loading ...

TROJAN
M Y S PAC E M Y T I M E
®
#
1
HOME
FITNESS
SO
U
TH A
FR
I
C
A
’
S
SI
N
CE
1
9
81
CAUTION
READ ALL PRECAUTIONS AND
INSTRUCTIONS IN THIS MANUAL
BEFORE USING THIS EQUIPMENT
KEEP THIS MANUAL FOR
FUTURE REFERENCE
1 YEAR
warranty
CALL
0861 8765
26
0
8 6
1
T R O J
A
N
WINNER, SHARON HAARHOFF,
USES TROJAN HOME FITNESS
EQUIPMENT AS PART OF
HER DAILY FITNESS
PROGRAM
SHARON HAARHOFF
AS SEEN ON
TV
DUAL 510
ELLIPTICAL
ELLIPTICAL CARE
INSTRUCTIONS AND ASSEMBLY MANUAL

INDEX PAGE
1. SAFETY INSTRUCTIONS 3
2. PRE ASSEMBLY CHECK LIST 4
3. HARDWARE LIST 5
4. ASSEMBLY STEPS 7
5. LUBRICATION AND TRANSPORT 8
6. COMPUTER FUNCTIONS 9
7. FITNESS TIPS & TECHNIQUES 19
8. CONDITIONING GUIDELINES 20
9. WARM -UP AND COOL-DOWN 21
10. FREQUENTLY ASKED QUESTIONS 22
11. PARTS LIST 23
12. EXPLODED DRAWING 25
13. TROJAN 1 YEAR LIMITED WARRANTY 26
14. TROJAN REPAIRS PROCEDURE 28

1064M-3
1. SAFETY INSTRUCTIONS
WARNING :
To reduce the risk of serious injury, read the following safety instructions before using the TROJAN DUAL 510
ELLIPTICAL.
IMPORTANT: THIS UNIT IS INTENDED FOR HOUSEHOLD USE ONLY
DANGER: To reduce the risk of electric shock, always unplug the elliptical from the electrical outlet immediately after
using and before cleaning.
1. Use the TROJAN DUAL 510 ELLIPTICAL only on a level surface
2. Keep children and pets away from this equipment at all times.
3. The TROJAN DUAL 510 ELLIPTICAL should not be used by persons weighing more than 120 kgs
4. The TROJAN DUAL 510 ELLIPTICAL should be used by only one person at a time.
5. Be careful to maintain your balance while using, mounting, dismounting, folding, unfolding or assembling the TROJAN
DUAL 510 ELLIPTICAL. Loss of balance may result in a fall and serious bodily injury.
6. Use the TROJAN DUAL 510 ELLIPTICAL only as described in the manual.
7. Before using this equipment to exercise, always do stretching exercises to properly warm up.
8. Always make sure all bolts and nuts are tightened prior to each use.
9. If dizziness, nausea, chest pains, or any other abnormal symptoms are experienced while using this equipment, STOP
the workout at once. CONSULT A PHYSICIAN IMMEDIATELY.
10. Never leave the TROJAN DUAL 510 ELLIPTICAL unattended when plugged in. Unplug from the power outlet when
not in use and before removing or replacing parts.
11. Never operate the TROJAN DUAL 510 ELLIPTICAL if it has a damaged cord or plug, if it is not working properly, if it
has been dropped and damaged, or exposed to water.
12. Do not pull the TROJAN DUAL 510 ELLIPTICAL by the power supply cord or use the cord as a handle. Keep cord
away from heated surfaces and open ames.
13. Handicapped individuals should have medical approval and close supervision when using the TROJAN DUAL 510
ELLIPTICAL
WARNING
Before starting any exercise or conditioning program you should consult with your personal physician to see if you
require a complete physical exam. This is especially important if you are over the age of 35, have never exercised before,
are pregnant, or suffer from any illness.

1064M-4
2. PRE ASSEMBLY CHECK LIST
Thank you for choosing the TROJAN DUAL 510 ELLIPTICAL. We take great pride in producing this quality product and
hope it will provide many hours of quality exercise to make you feel better, look better and enjoy life to its fullest.
Yes, it is a proven fact that a regular exercise program can improve your physical and mental health. Too often, our busy
lifestyles limit our time and opportunity to exercise. The TROJAN DUAL 510 ELLIPTICAL provides a convenient and
simple method to begin your assault on getting your body in shape and achieving a healthier lifestyle.
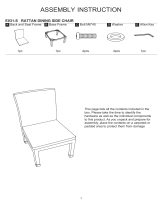
Before reading further, please familiarise yourself with the parts that are labelled.
Read this manual carefully before using the Trojan Dual 510 Elliptical.
Consol
Water Bottle Holder
Handle Bar
Consol Mast
Wheel
Connecting Arm
Pedal Arm
Rear Stabiliser Cover
Cushion (Foot Pad)
Handpulse
Consol Mast Cover
Pedal

#94. 3/8”x
19 x1.5T
Flat Washer
1064M-5
3. HARDWARE LIST
STEP 01
STEP 02
#94. 3/8”x 19 x1.5T
Flat Washer (2pcs)
#78. M5 x 10mm
Phillips Head Screw (4pcs)
#75. 5/16” x 15mm
Button Head Socket Screw (6pcs)
#97. 5/16” x 23 x 1.5T
Flat Washer (2pcs)
#114. 3/8”x 23 x2T
Curved Washer (1pc)
#119. 3/8” x 3”
Hex Head Screw
#70. 5/16” x 15mm
Hex Head Screw (2pcs)
#101. £r17
Wave Washer (2pcs)
#120. 3/8” x2T
Split Washer (3pcs)

1064M-6
HARDWARE LISTS
STEP 03
#71. 5/16 x 32mm
Hex Head Bolt (2 pcs)
#84. £r3.5x12mm
Self Tapping Screw (8pcs)
#98. 5/16” x 20 x 1.5T
Flat Washer (2pcs)
#108. Combination M5 Allen Wrench
& Phillips Head Screw Driver (1 pc)
#105. 5/16” x 7T
Nyloc Nut (2 pcs)
#79. M5 x 15mm
Phillips Head Screw (12pcs)
#94. 3/8” x 19 x 1.5T
Flat Washer (2pcs)
#110. 12mm Wrench (1pc)
#76. 3/8 x 2-1/4”
Button Head Socket Screw (6pcs)
#89. 3/8” x 7T
Nyloc Nut (2 pcs)
#114. 3/8” x 23 x 2T
Curved Washer (4pcs)
#111. 13/14mm Wrench (2pcs)

1064M-7
4. ASSEMBLY STEPS
Unpacking the unit
1. Using a razor knife (Box Cutter) cut the outside bottom edge of the box along the dotted Line. Lift Box over the
unit and unpack.
2. Carefully remove all parts from carton and inspect for any damage or missing parts. If damaged parts are found, or
parts are missing, contact your dealer immediately.
3. Locate the hardware package. The hardware is separated into steps. Remove the tools rst, then remove the hard-
ware for each step as needed to avoid confusion.
Step 1: Consol Mast assembly
1. Locate the Consol Mast (10) and Consol Mast Cover (41) and slide the Cover onto the Mast as far as it will go.
Make sure the Consol Mast Cover (41) is facing the correct way.
2. At the top opening of the Main Frame (1), there is a Computer Cable (32) tied with a guide wire. Unravel the wire
and feed the Computer Cable (32) it into the bottom of the Consol Mast (10) with the other side coming out of
the top opening.
3. Install the Consol Mast (10) into the receiving bracket on the top of the Main Frame (1). Pull on the Computer
Cable, lightly, at the top of the mast while installing. This will ensure the cable does not get pinched or shorted
during mast assembly.
4. Attach one 3/8” x 2T Split Washer (120) and one 3/8” x 23 x 2T Curved Washer (114) onto one of the 3/8” x 3”
Hex Head Screw (119) and install this into the front of the Consol Mast. Attach two 3/8” x 19 x 1.5T Flat Washers
(94) and two 3/8” x 2T Split Washers (120) onto two 3/8” x 3” Hex Head Screws (119) and install them into the
left side of the receiving bracket of the Consol Mast (10).
NOTE: The Computer Cable runs through the Consol Mast (10). Be careful not to damage or pinch this cable
during this procedure as damage to the Consol Assembly could result.
5. Use the 13/14mm Wrench (111) to tighten the three
screws rmly. These bolts should be tightened as much
as possible. Snap the consol mast cover into place.
6. There are three connectors at the top opening of the
Consol Mast (10), two Hand Pulse Wires (37) and one
Computer Cable (32). Connect these to the mating
connectors on the back of the Consol Assembly (31).
7. Store the excess wiring by pushing it back into the
Consol Mast (10) as you carefully install the Consol
Assembly (31) onto the mounting plate of Consol
Mast (10). Secure the consol with four M5 x 10mm
Phillips Head Screws (78), using the Combination M5
Allen Wrench & Phillips Head Screw Driver (108).

1064M-8
STEP 02
Step 2: Handle Bar assembly
1. Attach two Wave Washers (101) onto the Left and Right sides of the Handle Bar axle.
2. Slide the Lower Left and Right Handle Bars (4&5) onto the appropriate side of the axle. There is a small sticker on
each lower handlebar that shows “L” (Left) or “R” (Right).
3. Attach two 5/16” x 23 x 1.5T Flat Washers (97) onto two 5/16” x 15mm Hex Head Screws (70), and install in the
threaded holes in the ends of the axle.
4. Attach two Handle Bars (13, left) and (14, right), onto the Lower Left and Right Handle Bars (4&5) and fasten with
six 5/16”x 15mm Button Head Socket Screws (75), using the Combination M5 Allen Wrench & Phillips Head Screw
Driver (108).

1064M-9
STEP 03
STEP 3: Connecting Arm & Rear Rail assembly
1. Align the hole in the Rod End bearings, at the end of the Connecting Arms (7,8) with the hole in the bracket of the
Lower Handle Bars (4,5). There is a sleeve spacer already installed in the Rod End and held in place with a twist tie.
Make sure these spacers do not fall out during assembly. The Rod End bearing should be positioned to the inside of
the bracket on the Lower Handle Bars. Secure with two 5/16” x 32mm Hex Head Screws (71) through the left and
right Lower Handle Bar brackets and the Rod End. Install two 5/16” x 20 x 1.5T Flat Washers (98), two 5/16” x 7T
Nyloc Nuts (105) and the 5/16” x 32m/m Hex Head Screws (71), tightening rmly using the 12mm Wrench (110)
and 13/14 mm Wrench (111).
2. Attach both Rail Stabilisers (16) to the rear end of the Main Frame (1) and secure with 2 two 3/8” x 2-1/4” Button
Head Socket Screws (76), two 3/8” x 19 x 1.5T Flat Washers (94) and two 3/8” x 7T Nyloc Nuts (89), using 13/14
mm Wrench (111) and the Combination M5 Allen Wrench & Phillips Head Screw Driver (108).
3. Install the Rail Assembly (15) between the rear end of the Rail Stabilisers (16) and secure with four 3/8” x 2-1/4”
Button Head Socket Screws (76) and 3/8” x 23 x 2T Curved Washers (114), using the Combination M5 Allen
Wrench & Phillips Head Screw Driver (108).

1064M-10
STEP 04
STEP 4: Cosmetic Covers assembly
1. Install the Connecting Arm Covers (59 & 60) over the connection of the Rod End and Lower Handle Bars (4 & 5)
with four M5 x 15mm Phillips Head Screws (79) and two 3.5x12mm Self Tapping Screws (84), using the
Combination M5 Allen Wrench & Phillips Head Screw Driver (108).
2. Install both the Wheel Covers (52) on the Pedal Arms (2& 3) above the Wheels with the four M5x15mm Phillips
Head Screws (79).
3. Install the Front Handle Bar Covers (54 & 56) and Rear Handle Bar Covers (55 & 57) over the Handle Bar axle
connections with the six 3.5x12mm Self Tapping Screws (84).
4. Install the two Middle Stabiliser Covers (61) on the joint of the Rail Stabilisers (16) and the Rail Assembly (15).
Secure the covers with two M5 x 15mm Phillips Head Screws (79).
5. Install the Rear Stabiliser Covers (62 & 63) on the rear end of the Rail Stabilisers (16) and secure them with two
M5 x 15mm Phillips Head Screws (79).

1064M-11
LUBRICATION
1. Pour 2ml of the lubricant under the middle of Rail. You must lubricate every three months.
2. If the user feels the exercise is not smooth or there is noise during exercising, please pour 2ml of the lubricant on
the middle of Rails.
TRANSPORT
• The elliptical is equipped with two transport wheels which are engaged when the rear of the elliptical is lifted.
5. LUBRICATION AND TRANSPORT

1064M-12
6. COMPUTER FUNCTIONS
Power up
The Elliptical is supplied with an external power supply. When power is connected to the Elliptical, the consol will
automatically power up. If there is no input to the consol for 20 minutes the consol will go to stand-by mode. In stand-by
mode the consol display will turn off. To turn the consol on press any key.
When initially powered on, the consol will perform an internal self-test. During this time all the lights will turn on. When
the lights go off the dot matrix display will show a software version (i.e. VER 1.0) and the message window will display
an odometer reading. The odometer reading displays how many hours the elliptical has been used and how many virtual
kilometers the elliptical has done. The time in hours will be to the left and the odometer in kilometers will be displayed
to the right.
The odometer will remain displayed for only a few seconds, then the consol will go to the start up display. The dot matrix
display will be scrolling through the different workout proles of the programs and the message window will be scrolling
the start up message. You may now begin to use the consol.

1064M-13
Consol Operation
Quick Start mode
This is the quickest way to start a workout. After the consol powers up you just press the Start key to begin, this will
initiate the Quick Start mode. In Quick Start, the Time will count up from zero and the workload may be adjusted
manually by pressing the Up or Down button. The dot matrix display will show a 400m track with a lap counter in the
center to monitor your progress.
Basic information and functions:
The Message Window will initially be displaying the Time, Program name and Distance (in km). Each time the Enter
button is pressed the next set of information will appear, three sets of data in all. The next set of information displayed
is: Speed (in kph), RPM (pedaling speed) and Watts (indication of work level). The third set displayed is: Calories, Level
(work level from 1-20) and Pulse (heart rate in beats per minute). Pressing the Display key one more time will set the
display to scan mode where the data will change every 4 seconds.
The Elliptical has a built-in heart rate monitoring system. Simply grasping the hand pulse sensors on the stationary handle
bars will start the heart Icon blinking (this may take a few seconds). The Pulse Display Window will display your heart
rate, or Pulse, in beats per minute.
The Stop/Reset button actually has several functions. Pressing the Stop/Reset key once during a program will Pause the
program for 5 minutes. To resume your workout during Pause just press the Start key. If the Stop/Reset button is pressed
twice during a workout the program will end and a summary of your workout is displayed. If the Stop/Reset key is held
down for 3 seconds the consol will perform a complete Reset. During data entry for a program the Stop/Reset key
performs a Previous Screen function. This allows you to go back one step in the programming each time you press the
Stop/Reset key.
There is an Audio Input Jack on the front of the consol and built-in speakers. You may plug any low-level audio source
signal into this port. Audio sources include MP3, i-pod, portable radio, CD player or even a TV or computer audio signal.
Programming the consol
Each of the programs can be customized with your personal information and changed to suit your needs. Some of
the information asked for is necessary to ensure the readouts are correct. You will be asked for your Age and Weight.
Entering your Age and Weight aides the calculation of a more accurate Calorie reading (This cannot be used for medical
purposes).
A message about Calories: Calorie readings on every piece of exercise equipment, whether it is in a gym or at home,
are not accurate and tend to vary widely. They are meant only as a guide to monitor your progress from workout to
workout. The only way to measure your calorie burn accurately is in a clinical setting connected to a host of machines.
This is because every person is different and burns calories at a different rate.
Entering a program/changing settings
Press each program key to scroll through the program selections. The prole for each program will be displayed in the
dot matrix window. Press the enter key to select a program and begin customizing the settings. If you want to workout
without entering new settings then just press the Start key.
This will bypass the programming of data and take you directly to the start of your workout. If you want to change the
personal settings then just follow the instructions in the message window. If you start a program without changing the
settings, the default settings will be used.
6. COMPUTER FUNCTIONS

1064M-14
NOTE: Age and Weight default settings will change when you enter a new number. So the last Age and Weight entered
will be saved as the new default settings. If you enter your Age and Weight the rst time you use the Elliptical you will not
have to enter it every time you work out unless either your Age or Weight changes or someone else enters a different
Age and Weight.
Programming:
Manual
The Manual program works as the name implies, manually. This means that you control the workload yourself and not the
computer.
1. Press the Manual program button then press the Enter key.
2. The message window will ask you to enter your Weight. You may adjust the weight setting using the Up and Down
keys, then press the Enter key to accept the new number and proceed on to the next screen.
3. You are now asked to enter your Age. You may adjust the age setting using the Up and Down keys then press enter
to continue.
4. Next is the Time. You may adjust the Time and press enter to continue.
5. Now you are nished editing the settings and can begin your workout by pressing the Start key. You can also go back
and modify your settings by pressing the Stop key to go back one level of the programming screen.
6. Once the program starts the elliptical will be set to level one. This is the easiest level and it is a good idea to stay at
level one for a while to warm up. If you want to increase the work load at any time press the Up key. The Down key
will decrease the workload.
7. During the Manual program you will be able to scroll through the data in the message window by pressing the Enter
key.
8. When the program ends the message window will show a summary of your workout. The summary will be displayed
for a short time, then the consol will return to the start-up display.
Preset Programs
The Elliptical has ve different programs that have been designed for a variety of workouts. These ve programs have
factory preset proles for achieving different goals.
Hill
The Hill program simulates going up and down a hill. The resistance in the pedals will steadily increase and then
decrease during the program.
Fat Burn
The Fat Burn program is designed, as the name implies, to maximize the burning of fat. There are many schools of
thought on the best way to burn fat but most experts agree that a lower exertion level that stays at a steady workload
is the best. The absolute best way to burn fat is to keep your heart rate at around 60% to 70% of its maximum potential.
This program does not use heart rate but simulates a lower, steady exertion workout.
Cardio
The Cardio program is designed to increase your Cardio vascular function. This is exercise for your heart and lungs. It
will build up your heart muscle and increase blood ow and lung capacity. This is achieved by incorporating a higher level
of exertion with slight uctuations in work.
Strength
The Strength program is designed to increase muscular strength in your lower body. This program will steadily increase
in resistance to a high level and then keeps you there. This is designed to strengthen and tone your legs and glutes.
6. COMPUTER FUNCTIONS

1064M-15
Interval
The Interval program takes you through high levels of workout intensity followed by periods of low workout intensity.
This program increases your endurance by depleting your oxygen level followed by periods of recovery to replenish
oxygen. Your cardio vascular system gets programmed to use oxygen more efciently this way.
Programming Preset Programs:
1. Select the desired program button then press the Enter key.
2. The message window will ask you to enter your Weight. You may adjust the weight setting, using the Up and Down
keys, then press the Enter key to accept the new number and proceed on to the next screen.
3. You are now asked to enter your Age. You may adjust the age number using the Up and Down keys, then press enter
to continue.
4. Next is Time. You may adjust the Time and press enter to continue.
5. Now you are asked to adjust the Max Level. This is the peak exertion level you will experience during the program
(at the top of the hill). Adjust the level and then press enter.
6. Now you are nished editing the settings and can begin your workout by pressing the Start key. You can also go back
and modify your settings by pressing the Stop key to go back one level, or screen.
7. If you want to increase or decrease the workload at any time during the program press the Up or Down key. This will
change the entire program prole.
8. During the program you will be able to scroll through the data in the message window by pressing the Enter key.
9. When the program ends the message window will show a summary of your workout. The summary will be displayed
for a short time, then the consol will return to the start-up display.
Custom User Dened Programs
The customizable User programs allow you to build and save your own workout. You can build your own custom
program by following the instructions below.
1. Select the User program (U1 or U2) then press enter.
2. The message window will ask you to enter your Weight. You may enter your weight using the Up and Down keys,
then press the Enter key to accept the new number and proceed on to the next screen.
3. You are now asked to enter your Age. You may adjust the age number using the Up and Down keys, then press enter
to continue.
4. Next is Time. You may adjust the Time and press enter to continue.
5. Now the rst column will be blinking and you are asked to adjust the level for the rst segment of the workout. When
you nish adjusting the rst segment, or if you don’t want to change, then press enter to continue to the next
segment.
6. The next segment will show the same level as the previously adjusted segment. Repeat the same process as the last
segment then press enter. Continue this process until all twenty segments have been set.
7. The message window will then tell you to start (and save the program) or enter to modify the program. Pressing Stop
will exit to the start up screen.
8. If you want to increase or decrease the workload at any time during the program press the Up or Down key. This
will only affect the workload for the present position in the prole. When the prole changes to the next column it
will return to the preset work level.
9. During the User 1 or User 2 program you will be able to scroll through the data in the message window by pressing
the
Enter key.
10. When the program ends the message window will show a summary of your workout. The summary will be displayed
for a short time, then the consol will return to the start-up display.
6. COMPUTER FUNCTIONS

1064M-16
6. COMPUTER FUNCTIONS
Maintenance:
1. Wipe down all areas in the sweat path with a damp cloth after each workout.
2. If a squeak, thump, clicking or rough feeling develops the main cause is most likely one of two reasons:
i. The hardware was not sufciently tightened during assembly. All bolts that were installed during assembly need
to be tightened as much as possible. It may be necessary to use a larger wrench than the one provided if you
cannot tighten the bolts sufciently. 90% of calls to the service department for noise issues can be traced to
loose hardware or the rear rails being dirty.
ii. Dirt build-up on the rear rails and polyurethane wheels are also a source of noise. Noise from build-up on the
rails can cause a thumping sound that you think is coming from inside the main body of the machine. Clean the
rails and wheels with a lint free cloth and rubbing alcohol. Stubborn build-up can be removed with your
thumbnail or a non-metallic scraper, like the back edge of a plastic knife. After cleaning, apply a small amount of
lubricant on the rails with your ngers or a lint free cloth. You only need a thin coat of lubrication, wipe off any
excess.
3. If squeaks or other noises persist, check that the unit is properly levelled.
Maintenance Menu in consol software:
The consol has built in maintenance/diagnostic software. The software will allow you to change the consol settings, for
example, from English to Metric and turn off the beeping of the speaker when a key is pressed. To enter the Maintenance
menu (may be called Engineering mode, depending on version) press and hold down the Start, Stop and Enter keys.
Keep holding the keys down for about 5 seconds and the message window will display “Engineering mode”. Press the
enter button to access the menu below. Press the up and down keys to navigate the menu.
a. Key test - will allow you to test all the keys to make sure they are functioning
b. Display test - tests all the display functions
c. Functions - press enter to access settings, use up/dn keys to scroll
i.
ODO reset - reset the odometer
ii.
Units - set to English or Metric display readings
iii.
Sleep mode - turn on to have the consol power down automatically after 20 minutes of inactivity
iv.
Motor test - continually runs the tensioning gear motor
v.
Manual - allows stepping of the gear motor
vi.
Key tone - turn on or off the beep when a key is pressed
d. Security - allows you to lock the keypad so no unauthorized use is allowed

7. FITNESS TIPS AND TECHNIQUES
AEROBIC EXERCISE
Aerobic exercise is any sustained activity that sends oxygen to your muscles via your heart and lungs. Aerobic exercise
improves the tness of your lungs and heart - your body’s most important muscle. Aerobic exercise tness is promoted
by any activity that uses your large muscles (arms, legs, or buttock, for example). Your heart beats quickly and you breathe
deeply. An aerobic exercise should be part of your entire exercise routine.
WEIGHT TRAINING
Along with aerobic exercising which helps get rid of and keep off the excess fat that our bodies can store, weight train-
ing is an essential part of the exercise routine process. Weight training helps tone, build and strengthen muscle. If you
are working above your target zone, you may want to do a lesser amount of reps. And as always consult your physician
before beginning any exercise program.
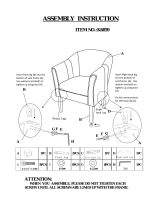
MUSCLE CHART
ELLIPTICAL
The exercise routine that is performed on the elliptical will develop the lower and upper body muscle group as well
as condition the circulatory system and provide a good aerobic workout . These muscle groups are highlighted on the
muscle chart below.
1064M-17

8. CONDITIONING GUIDELINES
How you begin your exercise program depends on your physical condition. If you have been inactive for several years, or
are severely overweight, you must start slowly and increase your time on the equipment; a few minutes per workout.
Initially, you may be able to exercise only for a few minutes in your target zone, however, your aerobic tness will improve
over the next six to eight weeks. Don’t be discouraged if it takes longer. It’s important to work at your own pace. Ulti-
mately, you’ll be able to exercise continuously for 30 minutes. The better your aerobic tness, the harder you will have to
work to stay in your target zone. Please remember these essentials :
• Have your doctor review your training and diet programs to advise you of a workout routine you should adopt.
• Begin your training program slowly with realistic goals that have been set by you and your doctor.
• Monitor your pulse frequently. Establish your target heart rate based on your age and condition.
• Set up your equipment on a at, even surface at least 3 feet from walls and furniture.
EXERCISE INTENSITY
To maximize the benets of exercising, it is important to exercise with the
proper intensity. The proper intensity level can be found by using your heart
rate as a guide. For effective aerobic exercise, your heart rate should be
maintained at a level between 65% and 85% of your maximum heart rate
as you exercise. This is known as your target zone. You can nd your target
zone in the table below.
During the rst few months of your exercise program, keep your heart rate near the low end of your target zone as you
exercise. After a few months, your heart rate can be increased gradually until it is near the middle of your target zone as
you exercise.
To measure your heart rate, stop exercising but continue moving your legs or walking around and place two ngers on
your wrist. Take a six-second heartbeat count and multiply the results by 10 to nd your heart rate. For example, if your
six-second heartbeat count is 14, your heart rate is 140 beats per minute. (A six-seconds count is used because your
heart rate will drop rapidly when you stop exercising.)
Adjust the intensity of your exercise until your
heart rate is at the proper level.
For more information on dieting and
training visit www.trojanhealth.co.za
1064M-18

1
2
3
4
5
1064M-19
9. WARM-UP AND COOL-DOWN
WORKOUT GUIDELINES
Each workout should include the following three parts:
A warm-up, consisting of 5 to 10 minutes of stretching and light exercise. A proper warm-up increases your body tem-
perature, heart rate, and circulation in preparation for exercise.
Training zone exercise, consisting of 20 to 30 minutes of exercising with your heart rate in your training zone. (Note:
During the rst few weeks of your exercise program, do not keep your heart rate in your training zone for longer than
20 minutes.)
A cool-down, with 5 to 10 minutes of stretching. This will increase the exibility of your muscles and will help to prevent
post-exercise problems.
EXERCISE FREQUENCY
To maintain or improve your condition, plan three workouts each week, with at least one day of rest between workouts.
After a few months of regular exercise, you may complete up to ve workouts each week, if desired. Remember, the key
to success is make exercise a regular and enjoyable part of your everyday life.
SUGGESTED STRETCHES
The correct form for several basic stretches is shown at the right. Move slowly as you
stretch, never bounce.
1. Toe Touch Stretch
Stand with your knees bent slightly and slowly bend forward from your hips. Allow
your back and shoulders to relax as you reach down toward your toes as far as pos-
sible. Hold for 15 counts, then relax. Repeat 3 times. Stretches: Hamstrings, back of
knees and back.
2. Hamstring Stretch
Sit with one leg extended. Bring the sole of the opposite foot toward you and rest it
against the inner thigh of your extended leg. Reach toward your toes as far as pos-
sible. Hold for 15 counts, then relax. Repeat 3 times for each leg. Stretches: Ham-
strings, lower back and groin.
3. Calf/Achilles Stretch
With one leg in front of the other, reach forward and place your hands against a
wall. Keep your back leg straight and your back foot at on the oor. Bend your
front leg, lean forward and move your hips toward the wall. Hold for 15 counts, then
relax. Repeat 3 times for each leg. To cause further stretching of the achilles tendons,
bend your back leg as well. Stretches: Calves, achilles tendons and ankles.
4. Quadriceps Stretch
With one hand against a wall for balance, reach back and grasp one foot with your
other hand. Bring your heel as close to your buttocks as possible. Hold for 15 counts,
then relax. Repeat 3 times for each leg. Stretches: Quadriceps and hip muscles.
5. Inner Thigh Stretch
Sit with the soles of your feet together and your knees outward. Pull your feet
toward your groin area as far as possible. Hold for 15 counts, then relax. Repeat 3
times. Stretches: Quadriceps and hip muscles.
For more information on dieting and training visit www.trojanhealth.co.za

1064M-20
10. FREQUENTLY ASKED QUESTIONS
Q1. My elliptical does not move as easily as indicated in manual
1. Ensure that you have placed the stabiliser with the wheels in front of the unit.
Q2. My consol does not work
1. Make sure you have connected it correctly
Q3. My consol is not clear and appears faded
1. Ensure that your unit is not in direct sunlight and you have removed the plastic cover from the screen.
If display does not improve, please contact 0861 876 526
Q4. My tension control is not working
1. Ensure that the cable has been connected correctly.
Q5. My pedals are not tting properly
1. Make sure you have inserted them on the correct side of the unit. Each pedal is marked L or R.
Q6. I cannot thread the main cable through the upright bar
1. Use the thin wire provided or a piece of string to assist you..
Q7. My consol is showing an “E2” error
1. The computer cable cannot be detected, please check if the cable has been connected properly.
Q8. My consol is showing an “E4” error
1. Body fat reading has exceeded the pre-programmed limit (upper limit 50%, lower limit 5%)
Please re-enter your age, weight and height on the computer and resume training.
If this does not solve the problem, please contact 0861 876 526
Q9. My consol is showing an “E1” error
1. The hand pulse sensors will not operate correctly if your skin is extremely dry. Moisten your hands and try again.
2. Avoid moving your hands while exercising and hold the the hands pulse sensors rmly while exercising. If you do movy
our hands while exercising, give the computer a few seconds to resample and display your correct heart pulse rate.
3. Clean the hand pulse sensors to ensure good contact between your body and the pulse sensor.
If the error still persists, please contact 0861 876 526
/