Page is loading ...

FaxFinder IP
®
IP Fax Server
Model: FF240-IP
Administrator User Guide

FaxFinder IP
®
Administrator User Guide
S000493A, Version A
Model: FF240-IP
Copyright © 2011, by Multi-Tech Systems, Inc.
This publication may not be reproduced, in whole or in part, without prior expressed written permission from
Multi-Tech Systems, Inc. All rights reserved.
Multi-Tech Systems, Inc. makes no representations or warranties with respect to the contents hereof and
specifically disclaims any implied warranties of merchantability or fitness for any particular purpose. Furthermore,
Multi-Tech Systems, Inc. reserves the right to revise this publication and to make changes from time to time in the
content hereof without obligation of Multi-Tech Systems, Inc. to notify any person or organization of such revisions
or changes. Check Multi-Tech’s web site for current versions of our product documentation.
Revisions
Level Date Description
A 06/08/11 Initial release.
Patents
This device covered by the following patents: 6,031,867; 6,012,113; 6,009,082; 5,905,794; 5,864,560; 5,815,567;
5,815,503; 5,812,534; 5,809,068; 5,790,532; 5,764,628; 5,764,627; 5,754,589; D394,250; 5,724,356; 5,673,268;
5,673,257; 5,644,594; 5,628,030; 5,619,508; 5,617,423; 5,600,649; 5,592,586; 5,577,041; 5,574,725; D374,222;
5,559,793; 5,546,448; 5,546,395; 5,535,204; 5,500,859; 5,471,470; 5,463,616; 5,453,986; 5,452,289; 5,450,425;
D361,764; D355,658; D355,653; D353,598; D353,144; 5,355,365; 5,309,562; 5,301,274, 6,219,708. Other patents
pending.
Trademarks
Multi-Tech Registered Trademarks: FF240-IP, Multi-Tech, and the Multi-Tech logo.
All other products and technologies are the trademarks or registered trademarks of their respective holders.
World Headquarters
Multi-Tech Systems, Inc.
2205 Woodale Drive, Mounds View, Minnesota 55112
Phone: 763-785-3500 or 800-328-9717 Fax: 763-785-9874
www.multitech.com
Contacting Multi-Tech Support
Online Support Portal: https://support.multitech.com
In order to better serve our customers, manage support requests and shorten resolution times, we have created
the online web portal allowing you to submit questions regarding Multi-Tech products directly to our technical
support team. Get answers to your most complex questions, ranging from implementation, troubleshooting,
product configuration, firmware upgrades and much more.
To create an account and submit a Support Case on the Portal, visit support.multitech.com.
Knowledge Base and Support Services: www.multitech.com/support.go
The Knowledge Base provides immediate answers to your questions and gives you access to support resolutions
for all Multi-Tech products. Visit our support area on the website for other support services.
Technical Support
Country By Email By Phone
Warranty
Warranty information can be found at: http://www.multitech.com/warranty.go

Multi-Tech Systems, Inc. FF240-IP Admin User Guide 3
CONTENTS
CHAPTER 1 – PRODUCT DESCRIPTION & SPECIFICATIONS ..................................................................... 5
P
RODUCT DESCRIPTION .................................................................................................................................. 5
S
AFETY WARNINGS ........................................................................................................................................ 5
T
ECHNICAL SPECIFICATIONS ............................................................................................................................. 6
CHAPTER 2 – GETTING STARTED ........................................................................................................... 7
FF240-IP
OPERATING MODES......................................................................................................................... 7
M
ECHANICAL MOUNTING ............................................................................................................................. 10
E
XTERNAL DESCRIPTIONS .............................................................................................................................. 11
Back Panel Connections ........................................................................................................ ............... 11
Front Panel
LEDs .................................................................................................................................. 11
I
NSTALLATION OVERVIEW .............................................................................................................................. 12
CHAPTER 3 – WEB MANAGEMENT INTERFACE ................................................................................... 18
L
OGIN SCREEN ............................................................................................................................................. 18
Forgot Password? ................................................................................................................................ 18
H
OME SCREEN ............................................................................................................................................ 19
S
TATUS & LOGS SECTION .............................................................................................................................. 20
System Statu
s....................................................................................................................................... 20
Fax Status ............................................................................................................................................. 21
Mail Queue .......................................................................................................................................... 24
Mail Log ............................................................................................................................................... 25
Inbound Fax Log ................................................................................................................................... 26
Outbound Fax Log ................................................................................................................................ 27
Call Log ................................................................................................................................................. 28
S
YSTEM CONFIGURATION SECTION ................................................................................................................. 29
Network ............................................................................................................................................... 29
SMTP .................................................................................................................................................... 30
Time ..................................................................................................................................................... 31
Printer .................................................................................................................................................. 32
Shares .................................................................................................................................................. 34
Certificates .................................................................................................................. ......................... 36
Save/Restore
........................................................................................................................................ 38
Software Up
date ............................................................................................................... ................... 39
Reboot ................................................................................................................................................. 40
Debug ................................................................................................................................................... 40
F
AX CONFIGURATION SECTION ....................................................................................................................... 41
SIP / T.38 Configuration
....................................................................................................................... 41
Inbound Routing .................................................................................................................................. 44
Outbound ............................................................................................................................................. 48
Outbound Approval ............................................................................................................................. 49
Cover Pages ......................................................................................................................................... 51
Store & Forward Fax (T
.37) .................................................................................................................. 53
Fax Log ................................................................................................................................................. 55
U
SERS SECTION ........................................................................................................................................... 56
C
ONTACTS SECTION ...................................................................................................................................... 60
Personal ............................................................................................................................................... 60
Global ........................................................................................................................ ........................... 61
Personal Groups ................................................................................................................................... 62

Multi-Tech Systems, Inc. FF240-IP Admin User Guide 4
Global Groups ...................................................................................................................................... 62
S
END A FAX SCREEN ..................................................................................................................................... 63
Send Fax ............................................................................................................................................... 64
L
OGOUT ..................................................................................................................................................... 66
CHAPTER 4 – CLIENT SOFTWARE INSTALLATION ................................................................................. 67
I
NSTALLATION ............................................................................................................................................. 67
Push Installation Me
thod .................................................................................................................... 71
S
ETTING THE USAGE RIGHTS FOR THE PRINTER ................................................................................................. 72
A
SSOCIATING CLIENT SOFTWARE AND USER WITH THE FF240-IP UNIT ................................................................. 72
Disassociating the Client from a Specifi
c FF240-IP Unit ...................................................................... 75
CHAPTER 5 – FAXFINDER-IP OPERATION ............................................................................................ 76
S
ENDING FAXES ........................................................................................................................................... 77
The Schedule Fax Screen (New Fax) .................................................................................................... 77
Send Fax with Clien
t Software ............................................................................................................. 81
Send Fax by Printing ............................................................................................................................ 81
Send Fax from Email (T.37) .................................................................................................................. 82
Send Fax from Web Interface .............................................................................................................. 82
Send Fax by Web
API ........................................................................................................................... 83
U
SING THE CLIENT SOFTWARE........................................................................................................................ 83
File Menu Command Descriptions
...................................................................................................... 83
Edit Menu Command Descriptions
...................................................................................................... 84
Tools Menu Command Des
criptions.................................................................................................... 86
Devices Tab (Main W
indow) ................................................................................................................ 87
Print Capture Tab (Main W
indow) ....................................................................................................... 89
U
SING THE MULTI-TECH TIFF VIEWER ............................................................................................................. 90
Toolbar Icons
....................................................................................................................................... 90
Importing Fax Images into Other A
pplication Programs ..................................................................... 91
APPENDIX A – TROUBLESHOOTING .................................................................................................... 92
APPENDIX B – CUSTOMIZATION ......................................................................................................... 95
W
EB SERVICES API ...................................................................................................................................... 95
T.37
ADVANCED USAGE ............................................................................................................................. 116
APPENDIX C – CREATING COVER PAGES ........................................................................................... 118
S
OME OF THE SOFTWARE KNOWN TO WORK .................................................................................................. 118
T
EXT FIELD NAMES AND DESCRIPTIONS ......................................................................................................... 118
APPENDIX E – REGULATORY COMPLIANCE ....................................................................................... 119
APPENDIX F - ENVIRONMENTAL INFORMATION ............................................................................... 121
APPENDIX G – END USER LICENSE AGREEMENT ................................................................................ 124
IMPORTANT
– READ BEFORE OPERATING ............................................................................................. 124
INDEX .............................................................................................................................................. 126

Multi-Tech Systems, Inc. FF240-IP Admin User Guide 5
Chapter 1 – Product Description &
Specifications
Product Description
The FaxFinder IP provides fax functionality to an IP-based telephony environment, eliminating the need
for analog-based phone connections dedicated to supporting analog fax applications.
We Supply
FF240-IP
• A FF240-IP with factory-installed software
• One power supply with power cord
• A product CD that contains: a software package
for client PCs and additional documentation
• A serial console cable
Safety Warnings
Internal Lithium Battery
• A lithium battery located within product provides backup power for the timekeeping
capability. The battery has an estimated life expectancy of ten years.
• When the battery starts to weaken, the date and time may be incorrect. If the battery fails,
the board must be sent back to Multi-Tech Systems for battery replacement.
• Lithium cells and batteries are subject to the Provisions for International Transportation.
Multi-Tech Systems, Inc. confirms that the Lithium batteries used in the Multi-Tech product(s)
referenced in this manual comply with Special Provision 188 of the UN Model Regulations,
Special Provision A45 of the ICAO-TI/IATA-DGR (Air), Special Provision 310 of the IMDG
Code, and Special Provision 188 of the ADR and RID (Road and Rail Europe).
Warning! There is danger of explosion if the battery is incorrectly replaced!
Ethernet Ports Caution
Caution: The Ethernet ports and command ports are not designed to be connected to a Public
Telecommunication Network.

Chapter 1: Product Description and Specifications
Multi-Tech Systems, Inc. FF240-IP Admin User Guide 6
Technical Specifications
FF240-IP
Connectors
1 RJ45 Console Serial Port, 1 RJ45 Ethernet Port,
2 USB Ports (inactive)
Size 9.1” W x 6.1” L x 1.7” H (23.11 cm x 15.49 cm x 4.32 cm)
Weight 2.6 lbs. (1.2 kg)
Input Voltage Requirements 12 V @ 5A
Maximum Power Consumption*
12 v Typical: 0.870 A / 10.65 W;
Max: 0.955 A / 11.65 W
Peak Reset:
Inrush Current: 15.40 AMPS
Operating Environment
-22° to 140° F (-30° to +60° C) – [UL listed @ 104° F/ 40° C]
relative humidity 20 to 90% noncondensing
Storage Temperature -40° to 185° F (-40° to +85° C)
EMC Approvals FCC Part 15 Class A, EN 55022 Class A, EN 55024
Safety Approvals UL\cUL 60950-1 ed.2, IEC 60950-1 ed.2 & EN (2006 +am.11)
Maximum T.38 Ports 8
Web Connections 50
File Upload Size** 50MB is the maximum with:
48MB max for the Send Fax Web page
36MB max for T.37, Client software and API
Warranty 2 years
* Multi-Tech Systems, Inc. recommends that the customer incorporate a 10% buffer into their power source when
determining product load.
** The difference in maximum size allowed is due to the data encoding for T.37, the client software and API
attachments.

Multi-Tech Systems, Inc. FF240-IP Admin User Guide 7
Chapter 2 – Getting Started
Introduction
This chapter shows example usage scenarios for inbound and outbound faxes as well as basic setup
instructions for your Multi-Tech Model FF240-IP. The setup process includes both cabling of the FF240-IP
unit and configuration of the FF240-IP server software. The FF240-IP server software resides on the
FF240-IP unit and does not need to be installed.
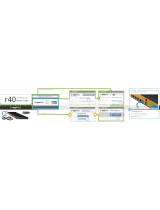
FF240-IP Operating Modes
When placed in the optimal environment, the Multi-Tech Systems FF240-IP can provide a host of useful
functions. Inbound routing, that is fax transmissions coming into the FF240-IP unit, can be sent to many
destinations, as shown below. Following that, there are some outbound fax examples showing different
ways that faxes can be sent by users.
Inbound Routing. Fax users receive faxes in the form of email attachments. Also, inbound faxes can be
automatically printed or stored in a shared folder for archiving or multiple user access.
The red arrows indicate an incoming fax; the green arrows show all the possible routing options and the
blue arrows show the incoming fax converted to an email.
Just like a telephone, the FF240-IP has phone numbers mapped to it. So a call from the analog fax
machine is routed to the FF240-IP just as any other call is routed. Once the fax is received on the FF240-
IP, it will use its inbound routing settings to send the fax to a printer, network share, email client or any
combination of these.

Chapter 2: Getting Started
Multi-Tech Systems, Inc. FF240-IP Admin User Guide 8
Outbound Routing. FaxFinder users on the network can send faxes directly from their Windows PC using
any application program that can print (if the Client software is installed). The application program must
be set so that the FF240-IP itself is its printing destination. In response to the ‘Print’ command, the
FF240-IP turns the ‘print file’ image into a fax. Store and Forward faxing (T.37) allows for emails to be
sent through the FF240-IP as a fax or users can simply log in to the web interface (Send Fax screen) and
send a fax from the unit directly. Graphic depictions of these outbound routing examples are shown
below.
T.37
In this example, the FF240-IP acts as a mail server. The red arrows show an email originating from a PC
and the green arrows show the FF240-IP sending that email to a phone number.
Send Fax screen
Here the red arrows indicate a user browsing to the FF240-IP and utilizing the Send Fax page. The green
arrows represent the FF240-IP sending that fax to a phone number.

Chapter 2: Getting Started
Multi-Tech Systems, Inc. FF240-IP Admin User Guide 9
Client software
Here the red arrows show the use of the Client software and the green arrows represent the FF240-IP
sending that fax to a phone number.
This example requires that the FaxFinder Client software be installed on a user’s Windows PC.
The Client software can be used in two ways:
1) Invoke it directly to send faxes.
2) Invoke it indirectly using the Print function from any application program that can print (e.g.
Microsoft Word) with the FaxFinder installed as an available printer.

Chapter 2: Getting Started
Multi-Tech Systems, Inc. FF240-IP Admin User Guide 10
Mechanical Mounting
Rack Mounting
Ensure proper installation of the unit in a closed or multi-unit enclosure by following the
recommended installation as defined by the enclosure manufacturer. Do not place the unit directly
on top of other equipment or place other equipment directly on top of the unit. If installing the unit
in a closed or multi-unit enclosure, ensure adequate airflow within the rack so that the maximum
recommended ambient temperature (40° C) is not exceeded. Ensure that the unit is properly
connected to earth ground by verifying that it is reliably grounded when mounted within a rack. If a
power strip is used, ensure that the power strip provides adequate grounding of the attached
apparatus.
When mounting the equipment in the rack, make sure mechanical loading is even to avoid a
hazardous condition. The rack used should safely support the combined weight of all the
equipment it supports.
Ensure that the mains supply circuit is capable of handling the load of the equipment. See the
power label on the equipment for load requirements.
This equipment should only be installed by properly qualified service personnel. Only connect like
circuits - connect SELV (Secondary Extra Low Voltage) circuits to SELV circuits and TN
(Telecommunications Network) circuits to TN circuits.
Note:
The ambient temperature of the rack interior must not exceed 40° Celsius.
19-Inch Rack Enclosure Mounting Procedure
Attaching the FF240-IP to the rail of an EIA 19-inch rack enclosure will likely require two persons.
Essentially, the technicians must attach the brackets to the FF240-IP chassis with the screws
provided and then secure unit to rack rails by the brackets. Because equipment racks vary, screws
for rack-rail mounting are not provided. Follow the instructions of the rack manufacturer and use
screws that fit.
1. Remove the side screws of the unit.
2. Position the rack-mounting brackets on the FF240-IP using the screw holes.
3. Secure the brackets to the FF240-IP using the screws that were removed.
4. Mount the FF240-IP in the rack enclosure per the rack manufacturer’s mounting procedure.

Chapter 2: Getting Started
Multi-Tech Systems, Inc. FF240-IP Admin User Guide 11
External Descriptions
Back Panel Connections
Descriptions of the connections available on the back of the FF240-IP unit.
Power Connector: Threaded connector for the provided power supply.
Console: RJ 45 connection for serial access and control of the FF240-IP units.
USB Ports (reserved for future use): These ports are inactive.
Reset: Pressing the reset button will reboot the unit.
LAN 1: RJ 45 receptacle for network connection.
Front Panel LEDs
Label Name Description
Speed Speed When lit, if the color is:
Green: Ethernet rate is 1000 Mbps;
Yellow: Ethernet rate is 100 Mbps
Unlit: Ethernet rate is 10 Mbps
Link/Act Link / Activity Lit when a physical link has been established with the Ethernet
network.
Blinking when there is activity.
HDD Hard Disk Drive When the internal hard drive is accessed, this LED will light
yellow.
When unlit, HDD is not being accessed.
Power Power Solid (constant) green if unit is on.

Chapter 2: Getting Started
Multi-Tech Systems, Inc. FF240-IP Admin User Guide 12
Installation Overview
Part A: Cabling – Connecting the FF240-IP to Power and Ethernet
Summary: Place the FF240-IP in a convenient location, and then connect the power supply to your AC
power outlet and then connect to the Ethernet network.
1. Connect FF240-IP to AC Outlet.
Plug the DC
power transformer into a power outlet or power strip. Secure the other end to the Power
Receptacle on your FF240-IP.
Caution: Use only the DC power transformer supplied with the FF240-IP. Use of any other transformer
voids the warranty and can damage the FF240-IP.
2. Verify Powering.
After power
is applied, the Power LED comes on immediately.
3. Connect FF240-IP to Ethernet
Network.
Plug one end of your RJ45 Ethernet cable into the FF240-IP’s Ethernet jack and the other end into your
network. This Ethernet cable is not included with your FF240-IP unit.
Caution: Before connecting to the Ethernet Network, make sure that the network to which you are
connecting the FF240-IP is not a 192.168.2.x subnet. Because the FF240-IP’s factory default IP
address is 192.168.2.1, connecting it to a network that has a different device at that same IP
address would cause data interference.
If it is a 192.168.2.x subnet, connect from the Administrative PC to the FF240-IP using an RJ 45
crossover cable until the FF240-IP’s IP address has been configured. Thereafter, connect the
FF240-IP into the network with an ordinary RJ 45 cable.

Chapter 2: Getting Started
Multi-Tech Systems, Inc. FF240-IP Admin User Guide 13
Part B: Configuring the FF240-IP Server
1. Setting Admin PC to Startup IP Address
To initially access the FF240-IP, you will need to connect the unit directly to a compatible computer.
This process is detailed below. After the first setup, you can change the IP address of the FF240-IP
unit to one that is capable of operating on the network where it will permanently reside. If the FF240-
IP is already attached to a network, the Client software can Auto-discover the IP address.
Alternatively, using the Command/Console port, you can use a terminal program (like HyperTerminal)
and type “ifconfig eth0 ‘IP address’”. After that you can temporarily use the web interface for access
and permanently set the IP address in the System Configuration section.
A. Connect a PC directly to your FF240-IP unit using an RJ 45 network cable (this may entail
disconnecting the PC from its current network).
B. Set the computer now connected to the FF240-IP to IP address http://192.168.2.x, where x can
be from 2 to 254 (the factory default for the FF240-IP is 192.168.2.1). Make sure you write down
your PC’s original network settings so you may re-enter them when finished.
Windows XP/2003
a. From the Windows desktop, right-click on
“My Network Places,” and select
“Properties.”
b. In the Network Connection screen, right-
click on “Local Area Connection.”
c. In the Local Area Connection Properties
screen, on the “General” tab, scroll to the
“Internet Protocol (TCP/IP)” entry and
select it. Click “Properties.”
d. In the Internet Protocol (TCP/IP)
Properties screen, record the existing IP
address. Then reset the IP address to
192.168.2.2.
Windows 2000
a. From the Windows desktop, right-click on
“My Network Places,” and select
“Properties.”
b. In the Network and Dialup Connections
screen, right-click on “Local Area
Connection” and select “Properties.”
c. In the Local Area Connection Properties
screen, select the “Internet Protocol
(TCP/IP)” entry. Click “Properties.”
d. In the Internet Protocol (TCP/IP)
Properties screen, record the existing IP
address. Then reset the IP address to
192.168.2.2.
Windows Vista
a. Click on Start and go to Network.
b. In the left-hand ‘Folders’ pane, Right-click on Network and select Properties.
c. For the Local Area Connection, click on the View Status link.
d. In the Status window, click on Properties. Click Continue when the permission window pops-
up.
e. In the Properties window, click once to highlight “Internet Protocol Version 4 (TCP/IPv4)” and
then click Properties below.
f. Here you can select the “Use the following IP address:” radio button, and then set the “IP
Address” to 192.168.2.2.
g. Click OK, then click Close and then Close again.

Chapter 2: Getting Started
Multi-Tech Systems, Inc. FF240-IP Admin User Guide 14
2. Logging In
A. Bring up a Web browser on your PC. In the browser address line, type the IP address of the
FF240-IP: type 192.168.2.1 and press Enter.
Note
: Your browser may show a warning message at this point. This is related to the certificate
issued by the FF240-IP. Browsers will not allow access without a valid certificate - the FF240-IP
does have a valid certificate, but it is self-signed (i.e. no third party verification), so your browser
displays a warning about this. You may safely continue (more details are given in step 5).
B. The Login screen will appear. At this point you can be assured that the FF240-IP is connected to
the network.
C. At the Login screen, enter admin (all lower case) in the Username field and admin (all lower case)
in the Password field.
D. Click the Login button. The Web Management Home screen will appear. From this screen, you
can access all of the FF240-IP Server software screens.
Note
: The FF240-IP units have real-time clocks. The default setting is to set the time via a timer
server (time.nist.gov). If the time is not accurate, a message may be issued by the web browser
that the certificate is invalid or expired. If this occurs, you should add an exception temporarily
until the IP Address and date/time are correctly set.
Once the date/time and IP Address are set, you will be able to generate a certificate with your
information (see Certificates section of Chapter 3).
3. Setting FF240-IP IP Addresses
A. Click on Sy
stem Configuration in the top navigation bar.
B. Network Configuration is the first sub-category found in the left-hand navigation frame. Fill in the
IP information that applies to your unit. The fields for “IP Address,” “Subnet Mask,” and “Default
Gateway” are required.
The Hostname contains the domain name for the FF240-IP. This is used
for T.37 store and forward faxing. Email clients must send the email with the ‘To’ address in the
format: FAX=7635551234@Hostname (where “Hostname” is the FF240-IP domain name). A
“Primary DNS” and “Secondary DNS” may be considered optional, but, in any case, do not leave
an invalid value in either of these fields.
C. Click Save. After the Save button has been clicked, it takes a moment for the FF240-IP to update
the addresses.
4. Resetting Admin PC to Its Regular IP Address
In ste
p #1 above, you recorded the original network configuration of the administrator’s PC and then
reset the IP address as required to allow communication with the FF240-IP unit. You may now set the
network settings of the administrator’s PC back to its original value or to any other value that will
allow you to communicate with the FF240-IP at its new IP address.

Chapter 2: Getting Started
Multi-Tech Systems, Inc. FF240-IP Admin User Guide 15
5. Log In After Reset
Having reset the IP address of the administrator’s PC, you must log into the FF240-IP Server software
again. Enter the new IP address of the FF240-IP into your browser, and then enter admin as Username
and admin as Password to log in again.
If the IP has been changed, your browser may show a warning message at this point. This is related to
the certificate issued by the FF240-IP (the default is for the IP address 192.168.2.1 – changing the IP
will cause an invalid certificate warning). Browsers will not allow access without a valid certificate
and the FF240-IP does have a valid certificate, but it is self-signed (i.e. no third party verification), so
your browser displays a warning about this. You may safely continue (Internet Explorer), or in the
case of Firefox, temporarily add the FF240-IP certificate to the exception list.
Firefox Add Exception Process:

Chapter 2: Getting Started
Multi-Tech Systems, Inc. FF240-IP Admin User Guide 16
6. Save your Configuration to a File on the Local PC
Now that you have setup the FF240-IP unit to the necessary configuration, it is a good idea to save the
parameters in case the unit needs to be restored after a factory default. This will save you time if you
want to test different settings or need to do some troubleshooting as you will be able to return to
these settings easily. Click on the System Configuration top navigation link and then click on the
Save/Restore link in the left-hand pane. In the Save/Restore Configuration window, click on the Save
Config link in the upper right hand corner to save what you have set so far. The file name
“config_nnnn.bin” (with the n’s replaced by the version number and current date) will appear in the
dialog for where you can store the file. This config file can then be used to restore the FF240-IP to this
configuration.
7. Sending Test Faxes
Set
up an email address for the Administrator by going to the Users section (top navigation bar) and
click on the Edit action item for the Administrator account to add an email address. Next go to the Fax
Configuration | Inbound Routing page and verify where the fax will be routed – if no settings are
changed, any incoming fax will be emailed to the Administrator email address (by default, all incoming
faxes are routed to the Administrator). Next set the SMTP parameters in the SMTP Configuration
section of the System Configuration.
A two step approach is recommended to verify faxing is working properly using FF240-IP. In the first
step, the FF240-IP sends a fax to itself to verify that the fax is sent/received and routed properly. If
this works properly, the next step is to configure the SIP/T.38 settings on FF240-IP to match your
SIP/T.38 network requirements and send test faxes again.
Sending a loop-back test fax:
A. Go to the Fax Configuration screen, enter the IP Address of your FF240-IP in the SIP
Proxy/Gateway field leaving default values in the other fields, and click Save to accept the
changes. This will cause all outbound faxes to be looped-back to FF240-IP. Next, go the Send Fax
screen, select "Enter Recipient Info" in the Find Recipient field, and enter the phone number 123-
456-7890 in the "Fax Number" field under Recipient Information. Enter some text in the Subject
and Comments fields under Cover Page Information, and then click the "Send Fax" button at the
bottom of the screen to send the fax.
B. Click on the Status & Logs link in the top navigation bar, and then click on the Fax Status link to
observe the status of the loop-back fax. You should see "sending" on one of the channels, and
"receiving" on another. When the fax completes, click on the Inbound Fax Log link in the left-
hand frame to see if the FF240-IP sends the email. If the email was sent successfully, the
“Inbound Fax Log” field will contain the message. Click on the Details link to see where it was
delivered. If the email is not delivered within 5 minutes, see the “Troubleshooting Appendix;”
specifically “What if I don’t get the email to me of the test fax that I sent?”

Chapter 2: Getting Started
Multi-Tech Systems, Inc. FF240-IP Admin User Guide 17
Sending a test fax on your SIP network:
A. Go to the Fax Configuration page and configure SIP Proxy/Gateway field with the IP address of
the SIP device the FF240-IP will communicate with when sending faxes. This could be a SIP proxy,
SIP Gateway or IP PBX. Enter the SIP Domain if required by your SIP device. If your SIP Device
requires authorization, enable the Authorization Required check box, and fill out the Username,
Password, Confirm Password fields as required. Enable Use Registrar and enter the Registrar IP
address if the FF240-IP must use a registrar for SIP call routing. Configure the Local, SIP Proxy,
and Registrar Port values if your SIP device requires something other than the normal default
5060 value. Configure the T.38 values as required by your SIP device, the default values are a
good starting point for most installations. You may need to reconfigure the Fax Method to T.30
Pass Through if your SIP device does not support T.38. You may configure FF240-IP to use some
or all of the extension digits passed to it by the SIP device for routing the incoming faxes by
modifying the Extension Digits and Extension Length fields. When you finish configuring SIP/T.38
values, click the Save button. Go to the Send Fax screen and send a fax to a remote fax machine
accessible through your SIP device. Configure the dial plan on your SIP device to properly route
incoming fax calls to FF240-IP, and then send a fax to FF240-IP from a remote fax machine.
B. View the status of the fax by viewing Fax Status and Inbound/Outbound Fax Log screens under
Status and Logs similar to what was done for the loop-back fax above.
C. Verify also that you can open the fax in a PDF viewer program on your computer. The PDF viewer
could be any commercial or open source PDF viewer. You can also choose to have your fax
messages delivered as TIFF files. The TIFF viewer program you use could be either the Multi-Tech
TIFF Viewer or a graphic file viewer included with or installed in your PC. (The Multi-Tech TIFF
viewer is included on the Product CD and installed with other client programs. During
installation, you can choose to associate all TIFF files with the Multi-Tech TIFF Viewer or leave
them associated with another program.) In your email program, double-click on the file attached
to the email message. The PDF or TIFF viewer program will come up automatically displaying the
fax file.
8. Adding Client-Users
It is important to
get the users added for the FF240-IP as the contact database is tied to the user
account for those users who will send faxes. The best case scenario would have all potential users
added before the users install the client software and begin to use the FF240-IP, that way, the contact
lists will be automatically populated with any contacts they already have that have been entered into
the FF240-IP unit for that user.
A. Click on the Users link in the top navigation bar to create entries for the other users in your office
who will send faxes through the FF240-IP. For each such FF240-IP client/user, enter the
Username, Password, phone numbers and email address in the appropriate fields.
B. Click on the Add
link in the upper right-hand corner of the Users window to create a new client
user. Ensure that you click on the Update button after each entry before creating the next one.
The new User will appear in the list of FaxFinder Users.
An alternative method for populating the User database is Comma Separated Value importation.
Note:
By default, there is an Administrator user that cannot be deleted, but you can click on the Edit
action item to change the information and password.

Multi-Tech Systems, Inc. FF240-IP Admin User Guide 18
Chapter 3 – Web Management
Interface
Introduction
In this chapter, we present the screens of the FF240-IP web management interface and describe the
sub-categories for each screen. The major sections are presented along the top navigation bar of the
web interface and most of these will activate a left-hand navigation window of sub-categories when
clicked. As with any secure browser-based user interface, a certificate is required to allow access. The
certificate used by the FF240-IP unit is self-signed, meaning that you will see a security warning when
you first access the unit from a browser. These warnings do not mean that the unit is not secure; it is
merely an indication that the validated certificate is not signed by a third party. Please select the option
to continue when you are presented this information.
Login Screen
When you enter the IP address of your FF240-IP unit in a browser, you will first see the certificate
warning as noted above. After continuing past the warning, you will be presented with the Login Screen.
When you first receive your unit, the default username is admin and the default password is admin.
Forgot Password?
Should you forget your password, a link is provided that you can click to have your password emailed to
you for access. Enter your username in the form provided and click the Send button to have the FF240-
IP email the password.

Chapter 3: Web Management Interface
Multi-Tech Systems, Inc. FF240-IP Admin User Guide 19
Home Screen
The FF240-IP Home screen displays the model name, software version and contact resources.

Chapter 3: Web Management Interface
Multi-Tech Systems, Inc. FF240-IP Admin User Guide 20
Status & Logs Section
System Status
System Status
The
System Status screen provides many key pieces of information that can be used diagnostically or
simply as a confirmation of correct settings.
Current Time
This field displays the
current time and date on the FF240-IP unit. The format for this display is
set in the System Configuration: Time screen.
Up Time
This displays
the running, total time that the FF240-IP has been in operation since the last
reboot/reset or disconnection of power.
Time Server Status
This in
dicates the status of the Time Server currently in use.
Time Server Status messages include: Disabled, Synchronizing, Synchronized at [time], and Failed
to synchronize: [error].
SIP Register Status
When
"Use Registrar" is checked in the Fax Configuration | SIP settings section, this shows the
status of the FF240-IP registering to the registrar.
Printer Status section
Printer Status
This displays
the current status of each printer that has been set up in the System Configuration:
Printers section.
Network Share Status section
Network Share Status
This displays
the current status of any network shares that have been configured in the System
Configuration: Shares section.
/