ZKTeco X7 User manual

Type
User manual

ZKTeco X7, a robust access control system, offers secure and convenient door access management. With its ability to connect with other devices and support doorbells, it provides enhanced security for your premises. The device facilitates user management, including adding, deleting, and authenticating users. It features tamper alarm and door sensor functions, triggering an alarm when the device is tampered with or the door is unexpectedly opened or improperly closed.

ZKTeco X7, a robust access control system, offers secure and convenient door access management. With its ability to connect with other devices and support doorbells, it provides enhanced security for your premises. The device facilitates user management, including adding, deleting, and authenticating users. It features tamper alarm and door sensor functions, triggering an alarm when the device is tampered with or the door is unexpectedly opened or improperly closed.

Version: 1.2.1
I
门磁
1. Equipment Installation
(4) Fix the device to the
back cover.
(5) Fix the screw.
(1) Remove the screw on
the bottom of device.
(2) Take away the back cover.
(3) Fix the back cover on the
wall according to the
mounting paper.
2. Structure and Function
Access Control System Function:
(1) When a registered user's identity is verified, the
Access Control device will send out signal to unlock
the door.
(2) The door sensor will detect the status of the lock. If
the door is unexpectedly opened or improperly
closed, the alarm will be triggered.
(3) It supports the exit button for opening the door
from inside.
(4) It supports door bell.
(5) If the Access Control device is dismantled, the alarm
will be triggered.
Lock
Lock Sensor
Exit Button
Bell
Alarm
II
Warning: No operation when power on!
(1) The system supports NO LOCK and NC LOCK. The NO LOCK (normally open at
power on) is connected with NO terminal, and the NC LOCK is connected with NC
terminal.
(2) To prevent the generation of self-inductance EMF which would affect the system,
when the electrical lock is linked to the Access Control System, it is required to
connect one FR107 diode (equipped in the package, do not reverse the polarities) in
parallel in order to release the self-inductance EMF.
(1) Device shares power with the lock (2) Does not share power with the lock
+12V
GND
BUT
GND
SEN
COM1
NC1
AL-
AL+
BELL-
BELL+
NO1
-
+
-
+
+
-
DC12V
+12V
GND
BUT
GND
SEN
COM1
NC1
AL-
AL+
BELL-
BELL+
NO1
-
+
-
+
+
-
DC12V
-
+
DC12V
I: device output current, U
LOCK
: lock voltage, I
LOCK
: lock current.
(3) One device controls one lock
+12V
GND
BUT
GND
SEN
COM1
NC1
AL-
AL+
BELL-
BELL+
NO1
+
-
+12V
GND
NC
PUSH
NO
GND
V1+ V1-
NC Lock
Exit Button
Access Control Device
Professional Access Control Power Supply
When Device share power with the lock:
U
LOCK
=12V, I-I
LOCK
>1A
and the lock is near to the device.
Device does not share power with the lock:
A. When U
LOCK
=12V I-I
LOCK
1A;
B. When U
LOCK
12V;
C. When the lock is far apart from the device.
3. Lock Connection
NC Lock
NC Lock
III
Only devices with an alarm ≤ DC 12V can be connected.
Input DC 12V, 500mA (50mA in idle status) Positive is connected with
+12V, negative is connected with GND (do not reverse the polarities).
4. Connected with Other Devices
5. Connect with Power
1
Instructions
Step 1: Power on after the device is completely installed on the wall.
Step 2: Authenticate administrator password and change it immediately. Adjust access
control parameters, which include changing passwords for door opening, and setting
unlocking duration, authentication mode, concealed mode, door sensor mode and
alarm etc.
Step 3: You may register and authenticate user accounts, cards or passwords.
Operation Instructions
1. User Management
1.1 Administrator Operation
To ensure data security of the device, users can operate the device only after the
administrator password is authenticated.
Administrator Authentication
1. Press [*]
(The indicator is off and makes
a long beep.)
2. Press[#].
(Enter step of password
authentication.)
3. Enter the administrator
password.
(The default password is 1234.)
5. Exit.
(Press [*] or do not operate
the device within 20 seconds,
The indicator turns red and
makes a long beep, then
automatically exit.)
4. Authentication succeeds.
(The indicator turns green.)
Note: The default administrator password is 1234. You are advised to change the
initial password at the beginning.
Change Administrator Password
1. The administrator
password is authenticated.
2. Press [8].
3. Enter a new administrator
password.
Succeed
5. Password is successfully
changed. (The indicator turns
green and makes a long beep.)
4. Enter the new administrator
password again for
authentication.
6. Exit.
(The indicator turns red
and makes a long beep.)
Fail
(The indicator turns red
and makes three beeps.)
Note: Four-digit passwords are automatically verified. If passwords less than four
digits, press [#] to confirm.
2
Open Door by Entering Administrator Password
1. The administrator password
is authenticated.
2. Press [0] or [#].
(The indicator turns green
and makes a long beep.)
3. Press [0] or [#].
(The indicator turns green and
makes a long beep.)
5.Exit.
(The indicator turns red and
makes a long beep.)
4. The door is opened
(The indicator turns green and
makes a long beep.)
Note: This function can be used to open the door.
Forgot Administrator Password
If administrator password is lost, you may reset the password to default through
tamper switch. Dismantle the device and wait for 30 seconds until a short beep is
heard, then press the Tamper Switch three times to reset to the initial administrator
password, this operation must be done within 30 seconds.
Note: The default administrator password is 1234.
1.2 Adding Users
Register the fingerprint or card of a user or register cards in batches.
Adding a User
1. The
administrator is
authenticated.
2. Press [1].
6. Exit.
(Press [*], the indicator
turns red and makes a
long beep. )
5. Registration succeeds.
(The indicator turns green
and makes a long beep.)
3. Input user ID twice
(The indicator turns
green and makes a
long beep.)
4. Register fingerprint or
card. (Press fingers three
times or swipe the
card once.)
4. Register fingerprint or card.
(Press fingers three times or swipe the card once.)
Note:
1. Five digits user ID is automatically verified, if user ID is less than five digits, press [#]
to confirm.
2. If the user ID is not available, the ID number increases automatically. It continues to
register new one once a user is successfully registered.
3. The registration fails if the user ID, fingerprint or the card has been registered (the
3
indicator turns red and makes three short beeps). When the indicator turns green,
you can register the user again. If you fail to swipe card, press fingerprint or enter
user ID for three times, the device will enter in idle status.
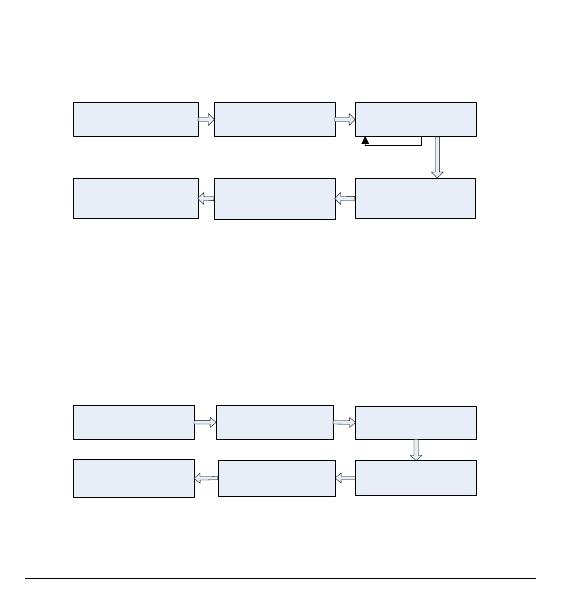
Registering Cards in Batches
1. The administrator password
is authenticated.
2. Press [6].
(Register cards in batches)
3. Swipe the first card once.
5. Cards are successfully
registered in batches.
4. Enter the total number of
cards.
6. Exit.
(The indicator turns red and
makes a long beep, then
automatically exit.)
Fail
(The indicator turns red
and makes three beeps.)
Succeed
Note:
1. In the process of entering the total number of cards, three-digit numbers are
automatically verified. For numbers with less than three digits, press [#] to confirm.
Press [*] to enter the total number of cards again.
2. You must clear all the registered users before registering cards in batches. IDs of the
to-be-registered cards must be consecutive numbers.
1.3 Register Access Passwords
This device supports 8 passwords, each password has a Group ID ranged from 1 ~ 8.
The default password value is 0 for all groups, which means those passwords are
disabled.
1. The administrator password
is authenticated.
2. Press [3]. (The indicator
turns green and makes a
long beep.)
3. Enter the group ID of
password.(Group IDs: 1 ~ 8.)
4. Enter the password twice.
(The password is consists of
four digits.)
6. Registration succeeds.
(The indicator turns green
and makes a long beep.)
7. Exit. (Press [*], the indicator
turns red and makes a long
beep, then automatically exit)
Note:
1. When a password is changed to be 0, 00, 000, or 0000, the password
is disabled.
4
2. When a password is successfully changed, you can immediately change the next
password by entering another group ID.
1.4 User Authentication
Card / Fingerprint / Password Authentication
When the device is power-on, it enters user authentication state.
1. The device is in user
authentication state.
2. Swipe user card, or enter
password followed by "#".
3. User authentication
succeeds. (The indicator turns
green and makes a
long beep.)
Succeed
Fail
(The indicator turns red
and makes two beeps.)
Note: Press [#] after entering a password for authentication. The door opens if the
entered password is identical with one of the 8 passwords. The initial eight passwords
for opening the door are empty.
1.5 User Deletion
Delete one, multiple or all registered user(s).
Deleting One User
1. The administrator password is
authenticated.
2. Press [2].
(The indicator turns green
and makes a long beep.)
3. Enter a user ID, press the
fingerprint, or swipe the card.
Succeed
5. User deletion succeeds.
(The indicator turns green
and makes a long beep.)
4. Determine whether the user
is authentic. (The indicator
turns green and makes a long
beep.)
6. Exit.
(Press [*] or do not operate the
device within 20 seconds, the
indicator turns red and makes a
long beep.)
Fail
(The indicator turns red
and makes three beeps.)
Note:
1. You can either swipe the card, press fingerprint or input user ID to delete a user. Five
digits user ID will be automatically verified, if user ID is less than five digits, press [#]
to confirm.
5
2. After successful deletion, the device will automatically enter the process of deleting
next user. Press [*] to exit.
Deleting All Users
1. The administrator password
is authenticated.
2. Press [9].
(The indicator turns green
and makes a long beep.)
3. Press [9].
(The indicator turns green and
makes a long beep.)
5.Exit.
(The indicator turns red and
makes a long beep, then
automatically exit.)
4. Deletion of all users succeeds.
(The indicator turns green and
makes a long beep.)
Note: In step 3, Press [9] for automatic confirmation. Other numbers are considered
invalid. If an invalid number is entered, the device indicator turns red and makes three
short beeps, then makes a long beep and exits the process.
2. Access Control Management
2.1 Unlocking Duration Configuration
1. The administrator password
is authenticated.
2. Press [4].
(The indicator turns green
and makes a long beep.)
3. Enter the unlocking
duration. (range: 1s to 10s)
5.Exit.
(The indicator turns red and
makes a long beep again.)
4. Modification of the
unlocking duration succeeds.
(The indicator turns green and
makes a long beep.)
Note: Press [10] for automatic confirmation. For values with less than 10, press [#] to
confirm. Values greater than 10 will be considered invalid.
2.2 Authentication Mode Configuration
1. The administrator password
is authenticated.
2. Press [5].
(The indicator turns green
and makes a long beep.)
3. Enter authentication mode.
5.Exit.
(The indicator turns red and
makes a long beep.)
4. Configuration succeeds.
(The indicator turns green and
makes a long beep.)
6
Note: Details about authentication modes are as follows:
Authentication Mode
Value
Description
PW
1
Only password verification
RF
2
Only RF Card verification
FP
3
Only fingerprint verification
FP/PW/RF
4
fingerprint or password or RF Card verification
RF&PW
5
RF Card and password verification (swipe card before
entering password)
FP&PW
6
fingerprint and password verification (fingerprinting before
entering password)
2.3 Concealed Mode Configuration
Under standby mode, when the Concealed Mode is on, the indicator will be turned off.
1. The administrator password
is authenticated.
2. Press [0].
(The indicator turns green
and makes a long beep.)
3.Press [3].
(The indicator turns green and
makes a long beep.)
5. Configuration succeeds.
(The indicator turns green
and makes a long beep.)
.Configure the concealed
mode
(0: enable; 1: disable).
6.Exit.
(The indicator turns red and
makes a long beep.)
Note: When user is authenticating the card or fingerprints or password under
Concealed Mode, the indicator will still blink correspondingly to denote process status.
2.4 Door Sensor Mode Configuration
The door sensor has three modes:
NONE: The door sensor is disabled.
NO (Normally Open): The door sensor will send an alarm signal if it detects the
door is closed.
NC (Normally Close): The door sensor will send an alarm signal if it detects the
door is open.
7
1. The administrator password
is authenticated.
2. Press [0].
(The indicator turns green
and makes a long beep.)
3.Press [5].
(The indicator turns green and
makes a long beep.)
5. Conflagration succeeds.
(The indicator turns green
and makes a long beep.)
.Configure the door sensor
mode (0: NO;1: NC; 2: None).
6.Exit.
(The indicator turns red and
makes a long beep again)
2.5 Alarm Configuration
Note: If an alarm is triggered, it can be terminated after the user is authenticated.
Configuring Alarm Switch
Only if the alarm switch is set to be ON will the Failed Authentication Alarm and Door
Sensor Alarm be effective. The default status of the alarm switch is ON.
1. The administrator password
is authenticated.
2. Press [0].
(The indicator turns green
and makes a long beep.)
3.Press [1].
(The indicator turns green and
makes a long beep.)
5. The configuration is
successful.
(The indicator turns green
and makes a long beep.)
.Configure the alarm setting.
(0: enable; 1: disable).
6.Exit.
(The indicator turns red and
makes a long beep again.)
Note: The Temper Alarm is still effective even if the alarm switch is OFF.
Configuring Failed Authentication Alarm
If the administrator fails in authentication in 3 attempts, Failed Authentication Alarm will
be triggered. No authentication can be made within 20 seconds.
1. The administrator password
is authenticated.
2. Press [0].
(The indicator turns green
and makes a long beep.)
3. Press [2].
(The indicator turns green and
makes a long beep.)
5. Configuration succeeds.
(The indicator turns green
and makes a long beep.)
. Failed Authentication Alarm
Switch. (0: enable; 1: disable).
6.Exit.
(The indicator turns red and
makes a long beep again.)
8
Configuring Tamper Alarm
If this function is enabled, alarms will be raised when the device is dismantled from the
wall.
1. The administrator password
is authenticated.
2. Press [7].
(The indicator turns green
and makes a long beep.)
3. Configure Tamper Alarm
Switch. (0: enable; 1: disable).
5. Exit.
(The indicator turns red and
makes a long beep.)
4. Configuration succeeds.
(The indicator turns green and
makes a long beep.)
Configuring Door Sensor Delay
When the door is not closed well after a time period, the Door Sensor Delay will raise an
alarm to alert users. Its configured value is the time period denoting how long after the
door is opened will the alarm ring.
1. The administrator password
is authenticated.
2. Press [0].
(The indicator turns green
and makes a long beep.)
3.Press [4].
(The indicator turns green and
makes a long beep.)
5. Configuration succeeds.
(The indicator turns green
and makes a long beep.)
.Configure the Door Sensor
Delay. (range: 1s to 254s).
6.Exit.
(The indicator turns red and
makes a long beep.)
Note:
1. Three-digit values will be automatically verified. For values with less than three digits,
press [#] to confirm. Values greater than 254 are considered invalid.
2. When an alarm is triggered, the device interior alarm will be triggered first, 30 seconds
later, the device exterior alarm will be triggered.
9
  • Page 1 1
  • Page 2 2
  • Page 3 3
  • Page 4 4
  • Page 5 5
  • Page 6 6
  • Page 7 7
  • Page 8 8
  • Page 9 9
  • Page 10 10
  • Page 11 11
  • Page 12 12
  • Page 13 13

ZKTeco X7 User manual

Type
User manual

ZKTeco X7, a robust access control system, offers secure and convenient door access management. With its ability to connect with other devices and support doorbells, it provides enhanced security for your premises. The device facilitates user management, including adding, deleting, and authenticating users. It features tamper alarm and door sensor functions, triggering an alarm when the device is tampered with or the door is unexpectedly opened or improperly closed.

Ask a question and I''ll find the answer in the document

Finding information in a document is now easier with AI