Page is loading ...

EYEZONE B1080PAM
User Manual
Feb 24, 11
CONTENTS
1. Package Contents………………..………..………………………….. 1
2. Introduction……………………………..…….………………………... 1
3. Features………………………………………………………………… 1
4. Hardware Overview………………………………….….……………... 2
5. Remote Control…………………….…………………….…………….. 3
6. Using the B1080PAM………….…………………..……………..... 4
6.1 Start the B1080PAM………………….….……………………... 4
6.2 Home Menu………………………………………...………………. 4
6.3 Movie Playback………………………….….……………………... 5
6.4 Photo View………………………………………….………………. 6
6.5 Music Playback…………….…………….….……………………... 7
6.6 File Interface……………………..………………...………………. 7
6.7 Copy File………………………………….….……………………... 8
6.8 Delete File……………….………………………….………………. 9
7. Setting Up…………………………………………..…………….…….. 10
7.1 Display…………….………………………………..………………. 11
7.2 Language………………………………………………..………….. 11
7.3 Photo Setup…….…………………………………..………………. 12
7.4 Movie Setup………….………………………..………..………….. 12
7.5 Music Setup…….…………………………………..………………. 13
7.6 Default……………….…………………………………..………….. 13
7.7 About……………..….…………………………………..………….. 13
8. Troubleshooting…………………………………………….……………. 14

1
1. PACKAGE CONTENTS
1. B1080PAM
2. Remote Control
3. User Manual
4. Power Adapter (DC5V, 2A)
5. Component Video Cable
6. Audio Cable
2. INTRODUCTION
The Eyezone B1080PAM is a high-performance and low-cost digital signage player that allows
you to play advertising contents in 1080P HD. No software is required, simply insert the SD(HC) card
or USB flash driver with media files and it will play the media files automatically. The B1080P-AM
offer HDMI, Component Video and Video output to match your display’s input.
The B1080P-AM is an ideal for advertising, retail displays, digital poster, museum exhibits and
other applications.
3. FEATURES
Supports multiple file formats: Video, Photu and Music.
Supports HDMI, Component Video and Video (with audio) outputs.
Resolution:
- HDMI: up to 1080p.
- YPbPr: up to 1080i
Supports SD(HC) card and USB flash driver.
Supports Auto-Play function.
Play photos as a slideshow with background music
Multi-Language OSD: English, Chinese, German, French, Spanish, Italian, Portuguese,
Netherlands and Russian.
Dimensions (L/ W/ H): 149x95x25.5 mm.
2
4. HARDWARE OVERVIEW
USB Slot: Insert the USB flash driver.
SD Card Slot: Insert the SD memory card.
Power Switch: Toggle between main power on & off.
Audio Output: Connect to audio input on TV or external speakers.
Video Output: Connect to video input on TV.
Component Video Output: Connect to component video input (YPbPr) on TV.
HDMI Output: Connect to HDMI input on TV.
Power Indicator
DC Input: Connect the supplied power adapter. (DC5V / 2A)

3
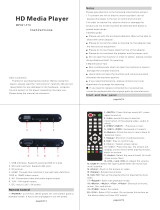
5. REMOTE CONTROL
1
2
3
4
5
6
7
8
9
10
11
12
13
14
15
16
17
18
19
20
21
22
23
24
25
Power on/ off
Change the output mode
Open the setting menu
Back to previous screen
Storage device selection (in home menu)
Mute sound
Move the cursor
Confirm/ enter/ playback
Open the Copy/ Delete menu (in file list)
Volume up/ down
Enter into the photo file list.
Enter into the music file list.
Enter into the video file list.
Enter into the file list. (list all the media files)
Pause/ resume playback
Stop playback
Play the selected file
Select the repeat mode
Forward videos or music
Rewind videos or music
Skip to the previous file
Skip to the next file
Change the display mode when playing video
Open the time search bar when playing video
Enable/ disable background music
Rotate the photo
4
6. USING THE B1080PAM
6.1 Start the B1080PAM
Step1: Using the HDMI or component video cable to connect between B1080PAM and TV.
Step2: Insert the SD memory card or USB flash driver with media files.
Step3: Connect the power adapter and turn on the power switch, then the B1080PAM will power on
automatically.
NOTE: After boot, the B1080PAM will play the media files automatically, you can press the STOP key,
and press the Card Selection key to back to home menu.
- If the first file in the file list is video format, the B1080PAM will play all the video files automatically.
- If the first file in the file list is picture format, the B1080PAM will play all the picture files with
background music automatically.
- If the first file in the file list is music format, the B1080PAM will play all the music files automatically.
6.2 Home Menu
There are five icons (Movie, Photo, Music, File and Setting) in home menu. You can use the left or right
key to select these options and press ENTER key to enter the option.
In the home menu, you can use the Card Selection key to select storage device (USB storage or SD
card).

5
6.3 Movie Playback
Step1: Select the Movie icon and press ENTER key to enter the movie list.
Step2: Use the up or down key to select movie file and press ENTER key to playback.
Step3: Press Stop or Card Selection key to back to movie list when playing movie.
6.3.1 Movie Info Bar
Press the Pause key to open the info bar when playing movie. The info bar includes previous, fast
rewind, play/ pause, subtitle, audio switch, zoom in (out), fast forward and next functions. You can use
the left or right key to select and press ENTER key to enable.
6.3.2 Time Search Bar
Press the S-Time key to open the time search bar when playing movie. You can use the up or down key
to set the time and press ENTER key to enable.
6
6.3.3 Resume Playback
NOTE: The resume play function must be enabled (refer to section 7.4 Movie Setup).
If you try to open a video file that has been partially played before, and the following screen will appear.
Select ˇ to resume playback or select Χ to start playback from the beginning.
6.4 Photo View
Step1: Select the Photo icon and press ENTER key to enter the photo list.
Step2: Use the up or down key to select photo file and press ENTER key to view the selected photo.
6.4.1 Photo Info Bar
Press the Pause key to open the info bar when slideshow photos. The info bar includes previous, play/
pause, rotate, zoom, background music, viewing mode and next functions. You can use the left or right
key to select and press ENTER key to enable.

7
6.5 Music Playback
Step1: Select the Music icon and press ENTER key to enter the music list.
Step2: Use the up or down key to select music file and press ENTER key to playback.
6.5.1 Music Info Bar
The info bar includes previous, fast rewind, play/ pause, stop, play mode, repeat mode, fast forward and
next functions. You can use the left or right key to select and press ENTER key to enable.
6.6 File Interface
Step1: Select the File icon and press ENTER key to enter the file interface.
Step2: The file interface will list all media file. You can use the up or down key to select media file and
press the ENTER key to playback.
8
6.7 Copy File
Step1: Select one file or one folder in the file list, and press the EDIT key to open the Copy/ Delete
menu.
Step2: Select Copy option and press ENTER key to enter into copy menu.
Step3: Use the up or down key to select target device, and press ENTER key to start copy.
Step4: After copy complete, the copy menu will display the “copy complete” message.
Step5: After complete, press the Card Selection key to exit copy menu.

9
6.8 Delete File
Step1: Select one file or one folder in the file list, and press the EDIT key to open the Copy/ Delete
menu.
Step2: Select Delete option and press ENTER key to enter into delete menu.
Step3: Select the ˇ icon and press the ENTER key to start delete.
Step4: After delete complete, the delete menu will display the “delete complete” message.
Step5: After complete, press the Card Selection key to exit delete menu.
10
7. SETTING UP
In the home menu, select Setting icon and press ENTER key to enter into setting menu (you
can also directly press the SETUP key to into setting menu).
In the settings menu, you can use the up or down key to select options and press the ENTER
key to enter sub-menu.

11
7.1 Display
- Display: The option is change the output mode and resolution (include NTSC, PAL, 480i, 480P, 576i,
576P, 720P, 1080i and 1080P), press ENTER key to enable.
- TV Mode: The option is TV screen proportional (include 4:3 and 16:9).
7.2 Language
Select the menu language (English/ Chinese/ German/ French/ Spanish/ Italian/ Portuguese,
Netherlands/ Russian)
12
7.3 Photo Setup
- View: Set photo interface file display mode (Thumbnail and List).
- Sorting: Set photo file sort mode (by file name and by file date).
- Directory: Set the photo interface whether to display the folder.
- Repeat: Set the repeat mode (Repeat all, Repeat directory and Repeat off).
- Cropping: Set photo specifications mode (Smart crop, Stretch photo and Entire photo).
- Slideshow duration: Set the interval time of slideshow (3, 5, 10, 30 and 60 second and 5 minutes).
- Transition effect: Enable/ disable the transition effect.
7.4 Movie Setup
- View: Set movie interface file display mode (Thumbnail and List).
- Sorting: Set movie file sort mode (by file name and by file date).
- Directory: Set the movie interface whether to display the folder.
- Repeat: Set the repeat mode (Repeat all, Repeat directory, Repeat movie and Repeat off).
- Subtitle: Set whether to automatically open the video subtitles.
- Resume Play: Enable/ disable the resume play function.
- Digital Audio Output: Set the digital audio output mode (SPDIF RAW/ SPDIF PCM).
- List Mode Preview: Enable/ disable the preview function.

13
7.5 Music Setup
- View: Set music interface file display mode (Thumbnail and List).
- Sorting: Set music file sort mode (by file name and by file date).
- Directory: Set the music interface whether to display the folder.
- Repeat: Set the repeat mode (Repeat all, Repeat directory, Repeat song and Repeat off).
- Lyrics: Display the lyrics of the song.
7.6 Default
Reset all settings to the default settings.
7.7 About
View the firmware version.
14
8. TROUBLESHOOTING
Situation Check Point
No Picture
1. Check power cable and power switches.
2. Ensure the video cable is connected between the
B1080PAM and TV.
3. Make sure the file format on the memory card or USB
flash driver is correct.
4. Check if your display device is switched to correct
video input source.
No Response From
the Remote Control
1. Ensure that the battery (CR2025 3v lithium battery) in
the remote control and it is inserted the correctly.
2. Check for any barrier between the remote control and
B1080PAM.
No sound
1. Check if the mute function is on.
2. Check if the volume is set properly.
3. Check if audio cable has been connected correctly.
/