Page is loading ...

EN
CAPÍTULO
CHAPTER
1
2
3
4
5
6
7
8
9
10
11
12
13
INDEX
Introduction
General points on delivery
Guarantee
Safety Measures
Technical Data
Setting up and Installation
Control Description
Detergent drawer
Selection
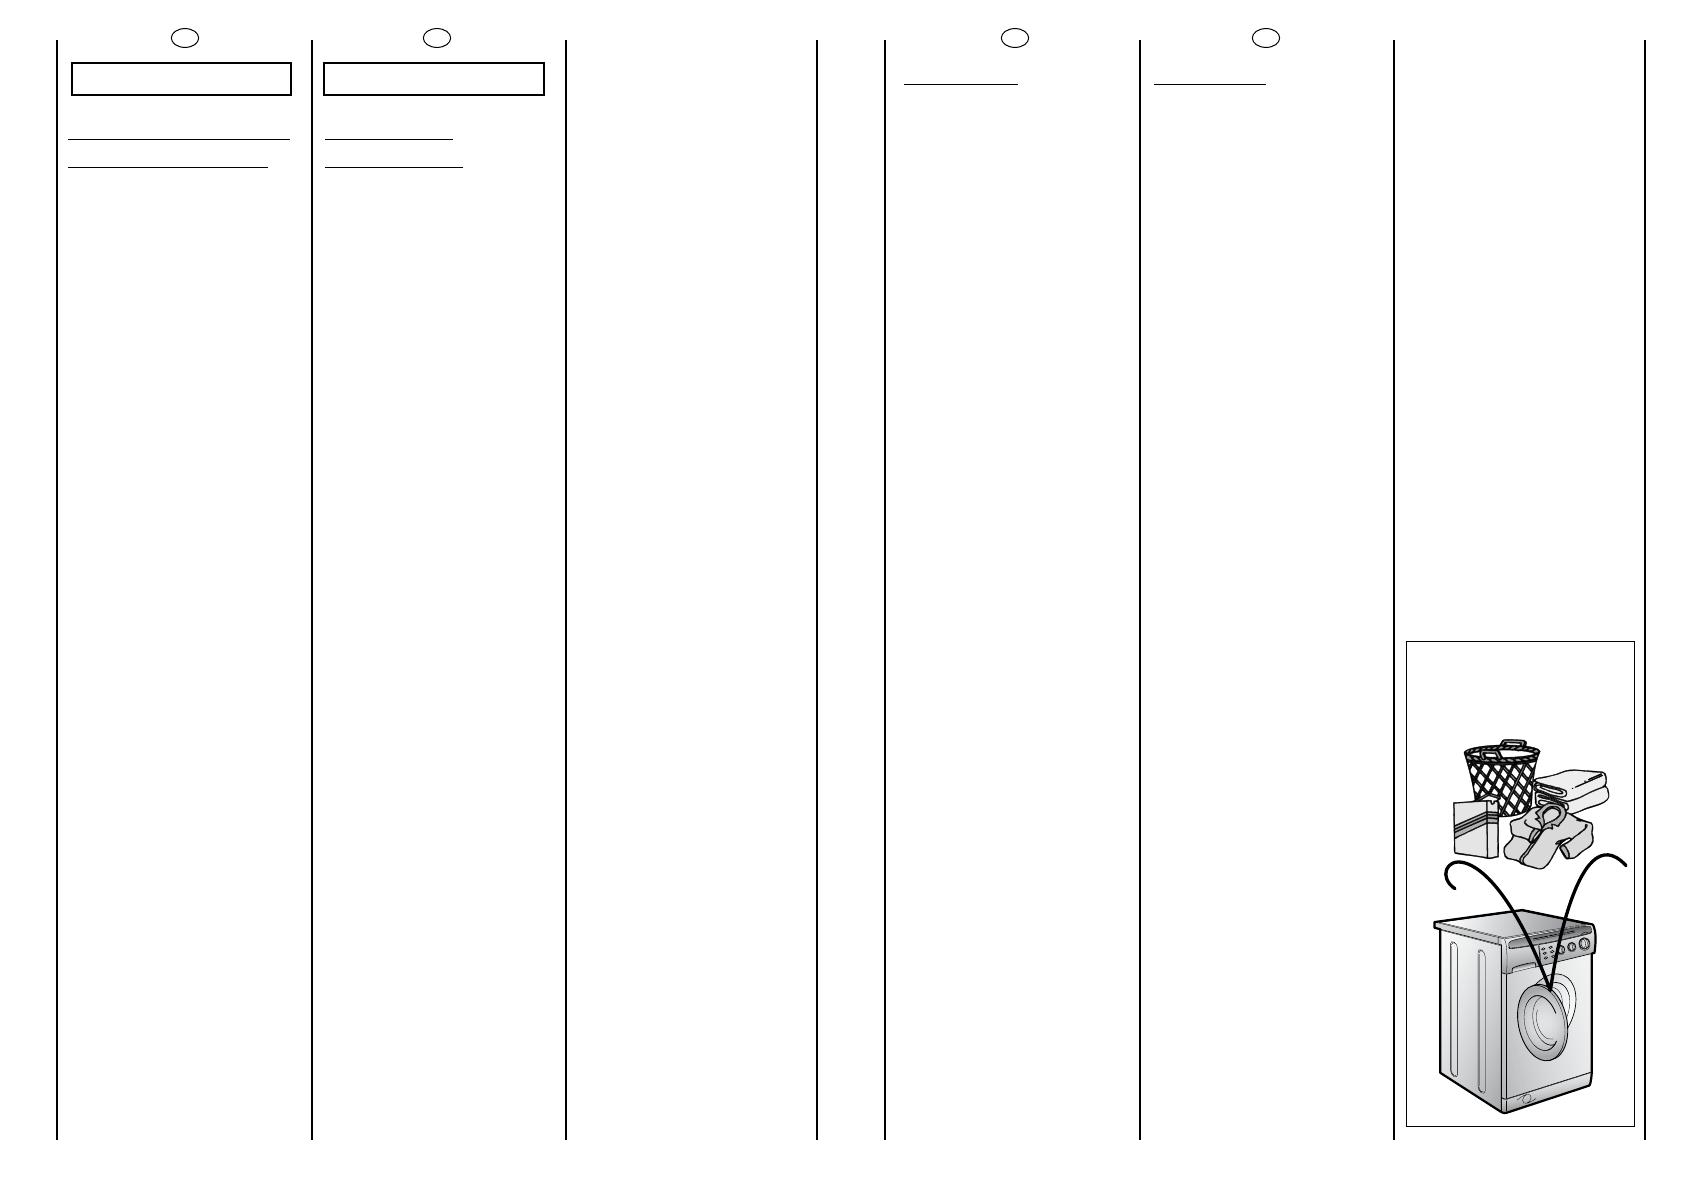
The Product
Table of Programmes
Customer
Awareness/Washing
Cleaning and routine
maintenance
Faults Search
3
PT
INDICE
Introdução
Verificações a efectuar
quando a máquina lhe for
entregue
Garantia
Instruções de segurança
Dados técnicos
Instalação
Descrição dos comandos
Colocação do detergente
Selecção dos programas
Separação das peças de
roupa
Tabela de programas de
lavagem
Consciencialização do
cliente/Lavagem
Limpeza e manutenção da
máquina
Eliminação de avarias
2
EN
OUR COMPLIMENTS
With the purchase of this
Hoover household
appliance, you have shown
that you will not accept
compromises: you want only
the best.
Hoover is happy to present
their new washing machine,
the result of years of
research and market
experience through direct
contact with Consumers.
You have chosen the quality,
durability and high
performance that this
washing machine offers.
Hoover is also able to offer a
vast range of other
household appliances:
washing machines,
dishwashers, washer-dryers,
cookers, microwave ovens.
Traditional ovens and hobs,
refrigerators and freezers.
Ask your local retailer for the
complete catalogue of
Hoover products.
Please read this booklet
carefully as it provides
important guide lines for
safe installation, use and
maintenance and some
useful advise for best results
when using your washing
machine.
Keep this booklet in a safe
place for further
consultation.
When contacting Hoover
or a Customer Services
Centre always refer to the
Model, No., and G number
(if applicable of the
appliance see panel).
PT
PARABÉNS!
Ao adquirir este
electrodoméstico Hoover,
demonstrou não estar
disposta a contentar-se com
qualquer coisa: você quer o
melhor!
A Hoover alegra-se de lhe
poder oferecer esta nova
máquina de lavar roupa,
resultado de anos de
investigação e de
experiência de mercado,
em contacto directo com
os nossos clientes. Ao
escolher esta máquina, está
a escolher a qualidade, a
durabilidade e as
características excepcionais
que ela tem para oferecer.
Mas a Hoover orgulha-se
ainda da vasta gama de
electrodomésticos que
coloca à disposição dos
seus clientes: máquinas de
lavar roupa, máquinas de
lavar loiça,máquinas de
lavar e de secar, fogões,
micro-ondas, fornos e
placas de fogão, frigoríficos
e congeladores.
Peça ao seu agente da
especialidade que lhe dê o
catálogo dos
electrodomésticos Hoover.
Leia este livro de instruções
atentamente. Ele contém
não só informações
importantes sobre a
instalação, a utilização e a
manutenção seguras da
sua máquina, mas também
conselhos úteis sobre como
tirar o melhor proveito da
sua máquina.
Preserve este livro
cuidadosamente,
mantendo-o à mão para
futuras consultas.
Quando contactar o seu
agente Hoover ou os
Serviços de Assistência
Técnica refira sempre o
modelo e o número da sua
máquina, bem como o
número G (se aplicável).
Todas estas referências se
encontram na
placadedecaracterísticas
da sua máquina.
7
EN
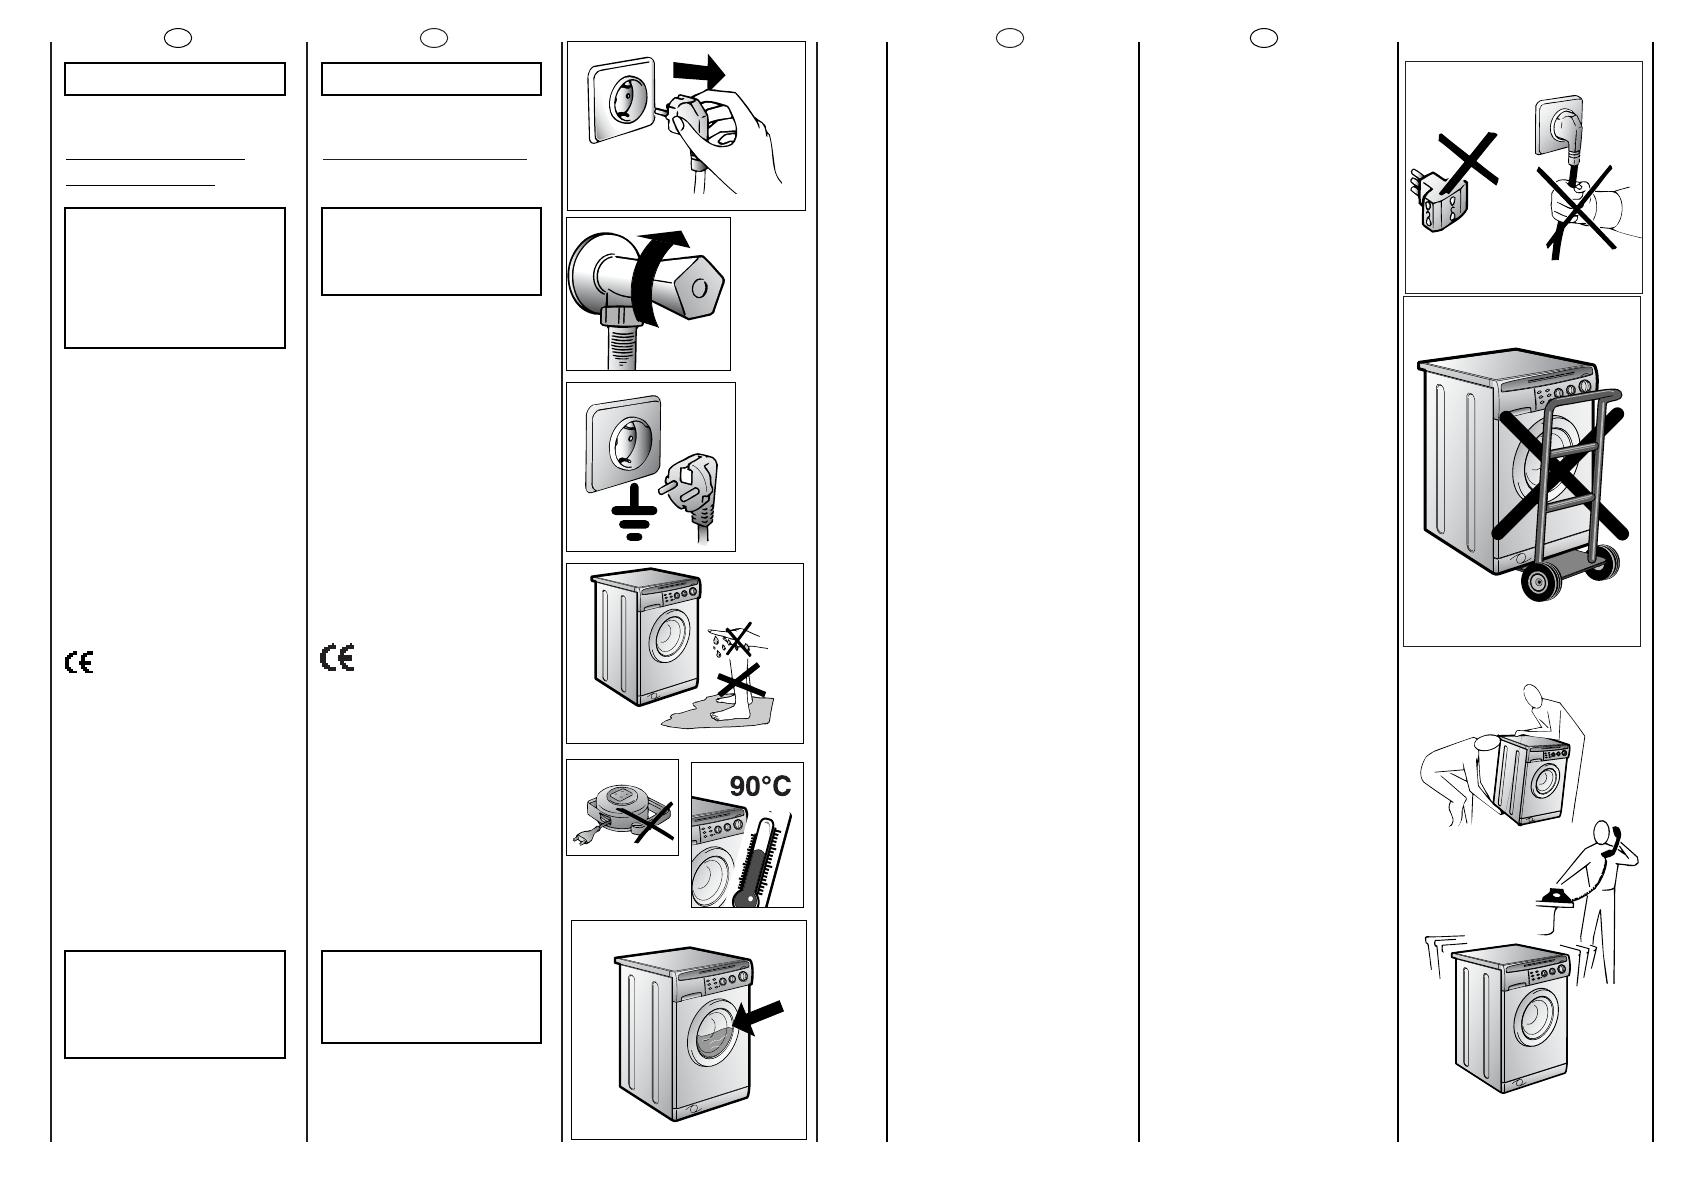
● Do not use adaptors or
multiple plugs.
● Do not allow the appliance
to be used by children or the
incompetent without due
supervision.
● Do not pull the mains lead
or the appliance itself to
remove the plug from the
socket.
● Do not leave the
appliance exposed to
atmospheric agents (rain, sun
etc.)
● In the case of removal,
never lift the appliance by
the knobs or detersive
drawer.
● During transportation
do not lean the door against
the trolley.
Important!
When the appliance
location is on carpet floors,
attention must be paid so as
to ensure that there is no
obstruction to the bottom
vents.
● Lift the appliance in pairs
as illustrated in the diagram.
● In the case of failure
and/or incorrect operation,
turn the washing machine
off, close the water inlet tap
and do not tamper with the
appliance. Contact a Hoover
Technical Assistance Centre
for any repairs and ask for
original Hoover spare parts.
Avoidance of these norms
may compromise the safety
of the appliance.
● Should the supply cord
(mains cable) be demaged,
this is to be replaced by a
specific cable available from
the after sales service centre.
PT
● Não utilize adaptadores ou
fichas múltiplas.
● Não deixe que crianças
(ou adultos incapazes de
operarem com
electrodomésticos) usem os
equipamentos sem
supervisão.
● Nunca puxe pelo cabo ou
pelo próprio
electrodoméstico para retirar
a ficha do electrodoméstico
da tomada.
● Proteja o seu
electrodoméstico dos
elementos (chuva,sol, etc.).
● Se tiver de deslocar a sua
máquina ou de a mudar de
lugar, nunca pegue nela
pelos botões ou pela gaveta
para detergente.
● Durante o transporte
nunca deite a máquina
sobre o lado da porta.
Atenção: Se o
electrodoméstico for
instalado num local
alcatifado, deverá assegurar-
se de que as aberturas de
ventilação inferiores não
fiquem tapadas ou
obstruídas.
● Tal como a figura ilustra, a
máquina deverá ser sempre
erguida por duas (2) pessoas.
● Se a sua máquina se
avariar ou deixar de
trabalhar correctamente,
desligue-a, feche a
alimentação de água e não
tente repará-la. Qualquer
trabalho de reparação
deverá ser sempre feito por
um técnico autorizado
Hoover, devendo sempre ser
instaladas peças
sobressalentes originais. O
incumprimento desta norma
poderá acarretar sérias
consequências para a
segurança dos equipamentos.
● Se o cabo de alimentação
de energia, a ser ligado à
rede, estiver danificado,
deverá ser substituido por um
cabo específico, que poderá
adquirir directamente aos
serviços de Assistência
Técnica Hoover.
6
EN
CHAPTER 3
SAFETY MEASURES
IMPORTANT:
FOR ALL CLEANING
AND MAINTENANCE
WORK
● Remove the plug
● Turn off the water inlet tap.
● All Hoover appliances are
earthed. Ensure that the
main electricity circuit is
earthed. Contact a qualified
electrician if this is not the
case.
This appliance
complies with Directives
89/336/EEC, 73/23/EEC and
following changes.
● Do not touch the
appliance with wet or damp
hands or feet.
● Do not use the appliance
when bare-footed.
● Extreme care should be
taken if extension leads are
used in bathrooms or shower
rooms. Avoid this where
possible.
WARNING: DURING THE
WASHING CYCLE, THE
WATER CAN REACH A
TEMPERATURE OF 90°C.
● Before opening the
washing machine door,
ensure that there is no water
in the drum.
PT
CAPÍTULO 3
INSTRUÇÕES DE
SEGURANÇA
IMPORTANTE:
ESTAS INSTRUÇÕES
SÃO EXTREMAMENTE
IMPORTANTES PARA
TODAS AS OPERAÇÕES
DE LIMPEZA E DE
MANUTENÇÃO.
● Deslige o aparelho da
corrente, retirando a ficha do
respectivo cabo de
alimentação da tomada.
● Feche a torneira de
alimentação de água.
● Todos os electrodomésticos
Hoover têm ligação à terra.
Assegure-se de que a instalação
eléctrica a que a máquina está
ligada se encontra devidamente
ligada à terra.Se tiver dúvidas ou
a instalação eléctrica não
estiver devidamente ligada à
terra, peça a um electricista
qualificado que proceda à
verificação e eventualmente à
ligação da instalação à terra.
Este aparelho está em
conformidade com as directivas
europeias 89/336/CEE, 73/23/CEE
e respectivas alterações
posteriores.
● Nunca toque no equipamento
com as mãos ou os pés
molhados ou húmidos.
● Não utilize os seus
electrodomésticos quando
estiver descalça.
● Evite usar cabos de extensão
em compartimentos com
banheira ou chuveiro; se,
eventualmente, tiver de optar
por essa solução, faça-o com o
maior cuidado.
ATENÇÃO:
DURANTE O CICLO
DE LAVAGEM A ÁGUA
PODE ATINGIR UMA
TEMPERATURA DE 90°C.
● Antes de abrir a porta da
máquina de lavar roupa
certifique-se de que o tambor já
não tem água.

9
EN
CHAPTER 5
SETTING UP
INSTALLATION
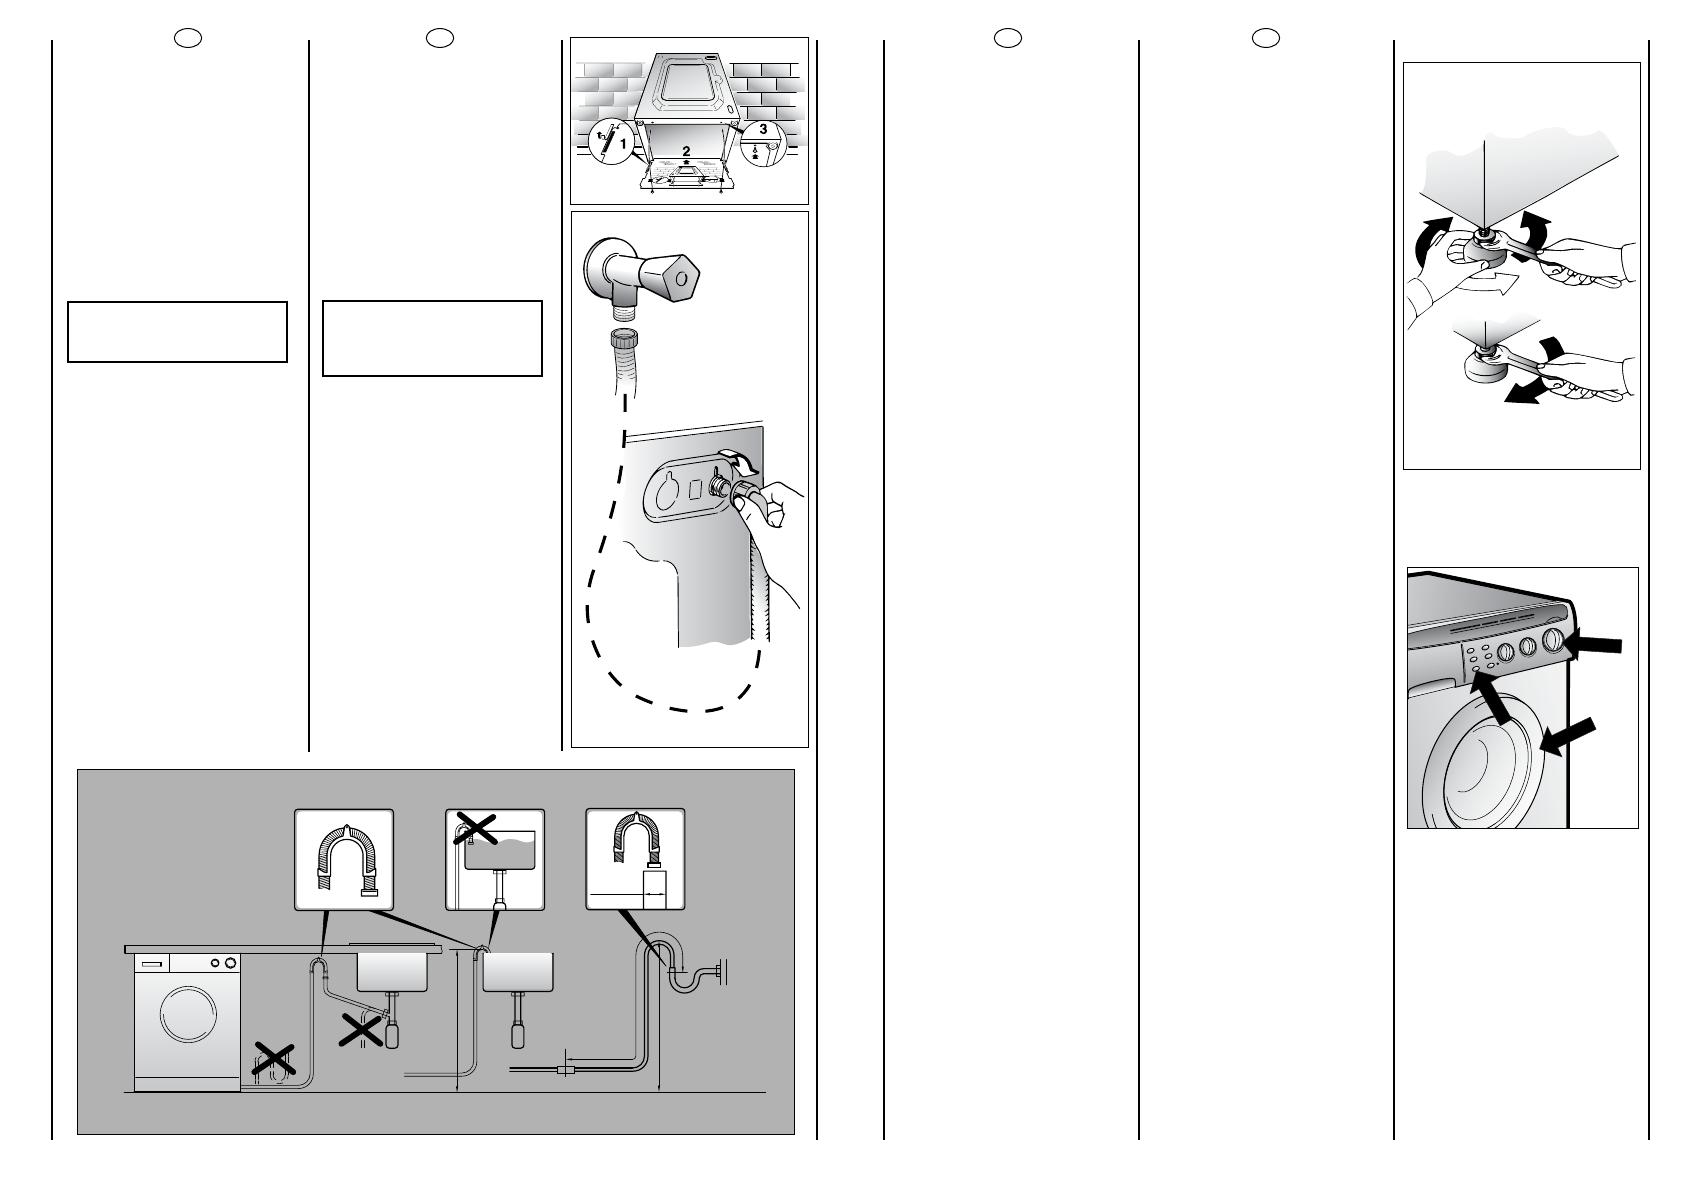
Move the machine near its
permanent position without
the packaging base.
Cut tube-holding straps.
Unscrew the central screw
(A); unscrew the 4 lateral
screws (B) and remove the
cross piece (C).
Lean the machine forward
and remove the plastic
bags containing the two
polystyrene blocks at the
sides, pulling downwards.
Press the plug (to be found
in the envelope with the
instructions) into the hole.
WARNING:
DO NOT LEAVE THE
PACKAGING IN THE
REACH OF CHILDREN
AS IT IS A POTENTIAL
SOURCE OF DANGER.
PT
CAPÍTULO 5
INSTALAÇÃO
Coloque a máquina, sem a
base da embalagem, perto
do local onde vai ficar
permanentemente
instalada.
Corte a tira que prende os
tubos e o cabo eléctrico.
Desaperte o parafuso
central (A); desaperte os
quatro parafusos laterais (B)
e retire a barra (C).
Com a ajuda de outra
pessoa incline o aparelho
para a frente e solte os
sacos de plástico contendo
os dois blocos de esferovite
de ambos os lados,
puxando-os para baixo.
Tape a abertura com o
bujão (fornecido
juntamente com a
máquina, no envelope que
contém o manual de
instruçóes).
ATENÇÃO:
NÃO DEIXE A
EMBALAGEM DA
MÁQUINA OU OS SEUS
COMPONENTES AO
ALCANCE DE
CRIANÇAS: ELA É UMA
POTENCIAL FONTE DE
PERIGO.
8
kg 6
8÷15
2150
1,75
10
min. 0,05
max. 0,8
230
l
W
kWh
A
800giri/min.
MPa
V
EN
CHAPTER 4
MAXIMUM WASH
LOAD DRY
NORMAL WATER LEVEL
POWER INPUT
ENERGY CONSUMPTION
(PROG.2)
POWER CURRENT FUSE
AMP
SPIN
r.p.m.
WATER PRESSURE
SUPPLY VOLTAGE
TECHNICAL DATA
PT
CAPÍTULO 4
CARGA MÁXIMA
(ROPA SECA)
NÍVEL DE ÁGUA NORMAL
POTÊNCIA ABSORVIDA
CONSUMO DE ENERGIA
(PROG. 2)
FUSÍVEL
VELOCIDADE
DE ROTAÇÃO (r.p.m.)
PRESSÃO DO SISTEMA
HIDRÃULICO
TENSÃO
DADOS TÉCNICOS
85 cm
60 cm
54 cm
11
EN
Use front feet to level the
machine with the floor.
a) Turn the nut clockwise to
release the screw adjuster of
the foot.
b) Rotate foot to raise or
lower it until it stands firmly
on the ground.
c) Lock the foot in position
by turning the nut anti-
clockwise until it comes up
against the bottom of the
machine.
Ensure that the Off/On
button (C) is not pressed.
Ensure that all the knobs are
on the “0” position and that
the door is closed.
Insert the plug.
After installation, the
appliance must be
positioned so that the plug is
accessible.
PT
Nivele a máquina regulando
a altura dois pés dianteiros.
a) Rode a porca no sentido
dos ponteiros do relógio
para soltar a rosca de
fixação do pé.
b) Rode a pé para o erguer
ou baixar até estar
firmemente assente no
chão.
c) Fixe o pé nessa posição
rodando a porca no sentido
contrário co dos ponteiros
do relógio até embater no
fundo da máquina.
Assegure-se de que a tecla
de ligar/desligar (C) não
esteja premida.
Assegure-se de que todos os
botões da máquina estejam
colocados na posição “0” e
de que a porta da máquina
esteja fechada.
Ligue a máquina à corrente,
inserindo a ficha do
respectivo cabo de
alimentação na tomada.
Depois da instalação, os
acessórios devem estar
posicionados, pelo que a
tomada deve estar num
local acessível.
A
B
C
10
min 50 cm
max 85 cm
+2,6 mt max
max 100 cm
min 4 cm
EN
Fix the sheet of corrugated
material on the bottom as
shown in picture.
Connect the fill hose
to the tap.
The appliance must be
connected to the water
mains using new hose-sets.
The old hose-sets should not
be reused.
IMPORTANT:
DO NOT TURN THE TAP
ON AT THIS TIME.
Position the washing
machine next to the wall.
Hook the outlet tube to the
edge of the bath tub,
paying attention that there
are no bends or
contractions along the tube.
It is better to connect the
discharge hose to a fixed
outlet of a diameter greater
than that of the outlet tube
and at a height of min. 50
cm. If is necessary to use the
plastic sleeve supplied.
PT
Fixe a placa de material
ondulado no fundo da
mãquina, da forma indicada
na figura.
Ligue a mangueira de
admissão de água à torneira
de alimentação.
Os acessórios devem estar
ligados à torneira da água,
usando mangueiras novas.
As mangueiras não devem
ser reutilizadas.
ATENÇÃO:
NÃO ABRA A TORNEIRA!
Encoste a máquina à parede.
Prenda o fim da mangueira
de esgoto por cima da borda
da bacia ou do tubo de
descarga,assegurando-se de
que não esteja torcida ou
dobrada.
Sempre que possível, utilize um
tubo de esgoto fixo com um
diâmetro superior ao da
mangueira de esgoto da
máquina de lavar, a fim de
permitir a saída do ar.
O topo da mangueira de
esgoto deverá estar a uma
altura mínima de 50 cm.
Se necessário use a curva
rígida fornecida juntamente
com a máquina.

DESCRIPTION OF
CONTROL
DOOR OPEN BUTTON
IMPORTANT:
A SPECIAL SAFETY
DEVICE PREVENTS THE
DOOR FROM OPENING
AT THE END OF THE
WASH/SPIN CYCLE. AT
THE END OF THE SPIN
PHASE WAIT UP TO 2
MINUTES BEFORE
OPENING THE DOOR.
DOOR LOCKED INDICATOR
LIGHT
Door locked indicator light is
illuminated when the door is
fully closed (only after that
On/Off button is pressed).
At the end of the cycle,
when the light will go out is
possible to open the door.
OFF/ON BUTTON
ATTENTION:
SELECT THE ON/OFF
BUTTON BEFORE
PRESSING ANY OPTION
BUTTONS.
“EXPRESS WASH” BUTTON
By pushing this button the
time of the wash
programme is reduced to a
maximum of 50 minutes
depending on the
programme and the
temperature selected.The
Express wash button can be
used for washing loads of 1
to 6 kg.
(This button can be utilised
only on cottons and
synthetic programmes).
DESCRIÇÃO DOS
COMANDOS
TECLA DE ABERTURA
DA PORTA
ATENÇÃO:
UM DISPOSITIVO
DE SEGURANÇA
ESPECIAL IMPEDE
A ABERTURA DA PORTA
NO FIM DO CICLO DE
LAVAGEM.
UMA VEZ CONCLUÍDO
O CICLO DE
CENTRIFUGAÇÃO
DEVERÁ ESPERAR 2
MINUTOS PARA PODER
ABRIR A PORTA.
INDICADOR LUMINOSO DE
FECHO DE PORTA
O indicador luminoso de
fecho de porta acende
quando a porta está
totalmente fechada (só
depois do botão “On/Off”
ser pressionado).
TECLA DE LIGAR/DESLIGAR
ATENÇÃO
PRESSIONE A TECLA DE
LIGAR/DESLIGAR
ANTES DE
SELECCIONAR UM
QUALQUER TECLA
FUNÇÃO.
TECLA DE ACTIVAÇÃO DO
PROGRAMA “EXPRESS WASH”
Se premir esta tecla, a
duração do programa de
lavagem sofre uma
redução, de modo a que,
dependendo do programa
e da temperatura
seleccionados, tenha uma
duração máxima de 50
minutos. Este programa
pode ser activado para
cargas que se estendem de
1 kg a 6 kg. (Esta opção só
pode ser utilizada em
programas de algodões e
sintéticos).
EN
13
C
B
2 min.
D
PT
P
12
EN
CHAPTER 6
CONTROLS
Detergent drawer
Door open button
Off/On button
“Express Wash” button
“Fast iron” button
Extra rinse button
Intensive wash button
Spin speed control
Wash control temperature
knob
Timer knob for wash
programmes
Buttons indicator light
Door locked indicator light
A
B
C
D
E
F
G
H
I
L
N
P
PT
CAPÍTULO 6
DESCRIÇÃO
DOS COMANDOS
Gaveta para detergente
Tecla de abertura da porta
Tecla de ligar/desligar
Tecla de activação do
programa “Express wash”
Tecla “Fast iron”
Tecla de super
enxaguamento
Tecla lavagem intensiva
Regulador de velocidade
Botão de selecção da
temperatura de lavagem
Botão de selecção do
programa de lavagem
Luzes das teclas
Indicador luminoso de
fecho de porta
AG F C DE BP H I L
N
15
H
EN
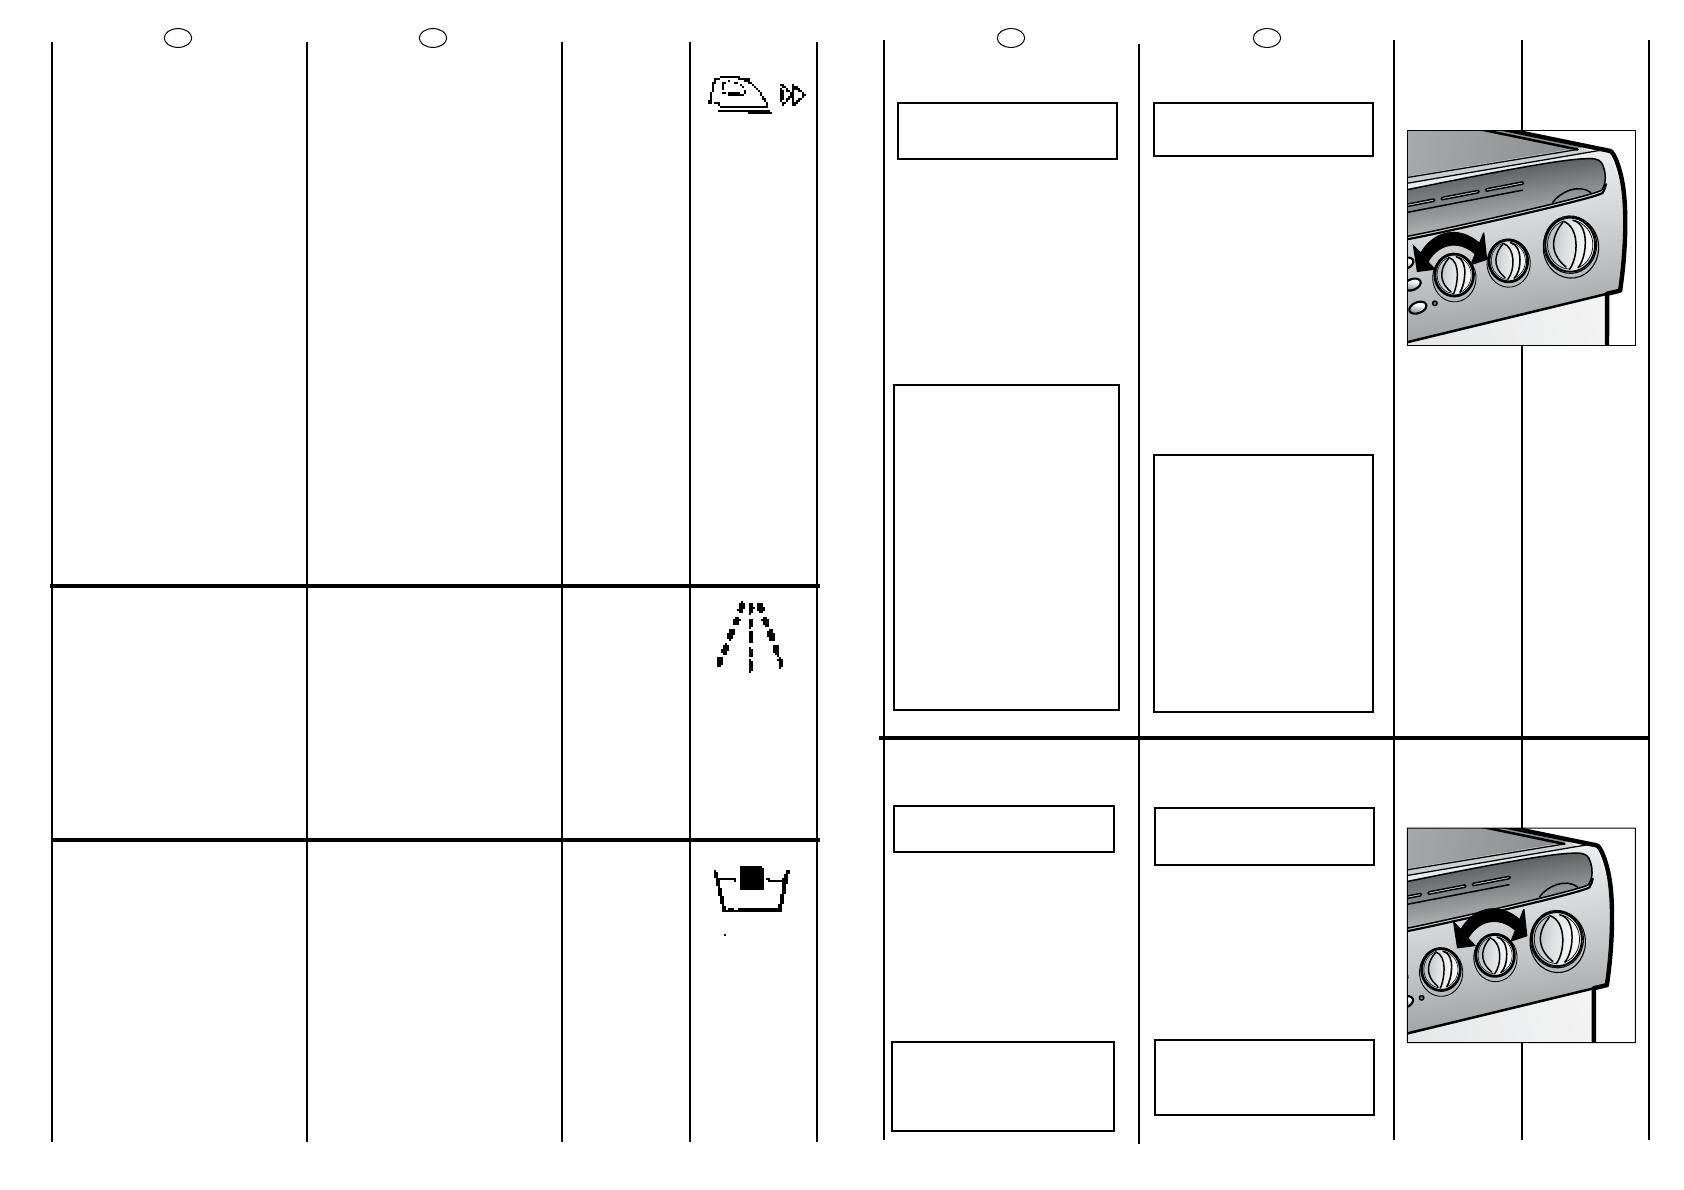
SPIN SPEED CONTROL
ROTATES IN BOTH
DIRECTIONS
The spin cycle is very
important to remove as
much water as possible from
the laundry without
damaging the fabrics.You
can adjust the spin speed of
the machine to suit your
needs. By adjusting the
control, it is possible to
reduce the maximum
speed, and if you wish, the
spin cycle can be cancelled
altogether-position 0.
NOTE:
THE MACHINE IS FITTED
WITH A SPECIAL
ELECTRONIC DEVICE,
WHICH PREVENTS THE
SPIN CYCLE SHOULD
THE LOAD BE
UNBALANCED.
THIS REDUCES THE
NOISE AND VIBRATION
IN THE MACHINE AND
SO PROLONGS THE LIFE
OF YOUR MACHINE.
WASH TEMPERATURE
CONTROL KNOB
ROTATES IN BOTH
DIRECTIONS
With this device it is possible
to reduce, but no increase
washing cycle temperature.
The table of programmes
indicate the maximum
temperature advised for
each type of wash.
WARNING: THIS
TEMPERATURE MUST
NEVER BE EXCEEDED
I
PT
REGULADOR DE VELOCIDADE
PODE SER RODADO EM
AMBOS OS SENTIDOS
A fase de centrifugação é
muito importante para que a
roupa saia o mais seca
possível, sem, no entanto,
danificá-la. A velocidade de
centrifugação pode ser
ajustada conforme as suas
necessidades. Ao ajustar o
controlo é possível reduzir a
velocidade máxima, ou até
mesmo parar totalmente o
cíclo de centrifugação.
NOTA:
O MODELO ESTÁ
EQUIPADO COM UM
DISPOSITIVO
ELECTRÓNICO ESPECIAL
QUE IMPEDE O CÍCLO
DE
CENTRIFUGAÇÃO CASO
AS CARGAS FOREM
DESEQUILIBRADAS. TAL
CONDUZ A UMA
REDUÇÃO DE RUIDOS E
DE VIBRAÇÕES,
CONTRIBUINDO PARA
UM MAIOR SILÊNCIO E
UMA MAIOR DURAÇÃO
DA MÁQUINA DE LAVAR.
BOTÃO DE SELECÇÃO DA
TEMPERATURA DE LAVAGEM
ESTE BOTÃO RODA EM
AMBAS AS DIRECÇõES
Este botão permite
seleccionar a temperatura
desejada para a lavagem
pretendida.
A tabela dos programas de
lavagem indica sempre a
temperatura máxima
recomendada para cada
tipo de lavagem.
ATENÇÃO:
ESTA TEMPERATURA
NUNCA DEVERÁ SER
EXCEDIDA.
EN
"FAST IRON" BUTTON
The “Fast iron” function
minimizes creases as much
as possible with a uniquely
designed anti-crease system
that is tailored to specific
fabrics.
MIXED FABRICS - the water is
gradually cooled throughout
the final two rinses with no
spinning and then a delicate
spin assures the maximum
relaxation of the fabrics.
RESISTANT FABRICS AND
WOOLLENS - after the final
rinse, the fabrics are left in
water until it is time to
unload.When you are ready
to unload, press the “Fast
iron” button – this will drain
and spin ready for emptying
SUPER RINSE BUTTON
This function will allow an
extra rinse or more water
added at the rinse stage –
depending on the
programme selected.This is
particularly important for
avoiding skin irritation from
detergent residues for
people with particularly
sensitive skin.
INTENSIVE WASH BUTTON
This function which is
available on all cotton
programmes is very useful for
heavy soiling. The
temperature is kept
constant throughout all the
wash phases and the
programme is extended to
ensure an extra deep
cleaning performance.
14
E
PT
TECLA "FAST IRON"
Ao activar esta função,é
possível reduzir ao mínimo a
formação de rugas,
personalizando ainda mais
o ciclo de lavagem com
base no programa
seleccionado e no tipo de
roupa a lavar.
Para os tecidos mistos,em
especial, a acção
combinada de uma fase de
arrefecimento gradual da
água, a ausência de
rotação da cuba durante
as descargas da água e
uma centrifugação
delicada, a baixa
velocidade, permite alisar a
roupa ao máximo.
Para os tecidos resistentes e
no programa de lãs,esta
tecla tem a única função
de deixar a roupa imersa na
água, no final do último
enxaguamento, com o
objectivo de alisar
perfeitamente as fibras.
Cancelar a selecção da
tecla para terminar o ciclo
com a fase de descarga e
centrifugação.
TECLA EXTRA
ENXAGUAMENTO
Premindo esta tecla,
conforme o programa
seleccionado, é adicionada
mais água nos
enxaguamentos ou é
adicionado um
enxaguamento
suplementar, o que é
particularmente importante
para as pessoas de peles
delicadas.
TECLA LAVAGEM INTENSIVA
Premindo esta tecla, activa
apenas nos ciclos de
algodão, a temperatura
seleccionada é mantida
durante todas as fases do
ciclo de lavagem.
Esta propriedade,
combinada com uma
acção mecânica
sustentada, permite obter
óptimos resultados de
lavagem com roupa
resistente, particularmente
suja.
G
F

17
EN
CHAPTER 7
DETERGENT
DRAWER
The detergent drawer is
divided into 3
compartments:
- the first, labelled "I",is for
prewash detergent or for
“Speed Wash”
programme detergent
-The second II for the
main wash detergent
IMPORTANT:
REMEMBER THAT SOME
DETERGENT ARE
DIFFICULT TO REMOVE.
IN THIS CASE WE ADVISE
THE USE OF THE SPECIAL
CONTAINER TO BE USED
INSIDE THE DRUM.
IMPORTANT:
ONLY INTRODUCE
LIQUID PRODUCTS IN
THE THIRD
COMPARTMENT.
-The third ✿✿ is for
special additives,
softeners, perfumes,
starches, whiteners, etc.
PT
CAPÍTULO 7
COLOCAÇÃO DO
DETERGENTE
GAVETA PARA
DETERGENTE
A gaveta para detergente
está dividida em 3
compartimentos:
- o primeiro, indicado
com a letra “I”, destina-
se ao detergente da
pré-lavagem ou do
programa “Speed
Wash”.
-O segundo
compartimento II
destina-se ao
detergente para a
lavagem.
ATENÇÃO:
LEMBRE-SE DE QUE
ALGUNS DETERGENTES
SÃO DIFÍCEIS DE
REMOVER.
RECOMENDAMOS QUE,
NESSE CASO, UTILIZE O
RECIPIENTE ESPECIAL
PARA O DETERGENTE,
QUE DEVERÁ SER
DIRECTAMENTE
COLOCADO NO
TAMBOR.
ATENÇÃO:
O TERCEIRO
COMPARTIMENTO
DA GAVETA PARA
DETERGENTES
SO´ PODEM
SER UTILIZADOS PARA
PRODUTOS LÍQUIDOS.
-O terceiro
compartimento
✿✿
destina-se a
aditivoss especiais,
amaciadores,
perfumes, gomas,
branqueadores, etc.
16
L
EN
TIMER KNOB FOR WASH
PROGRAMMES
IMPORTANT:
ALWAYS ROTATE THE
KNOB IN A CLOCKWISE
DIRECTION, NEVER IN
AN ANTI-CLOCKWISE
DIRECTION. DO NOT
PRESS THE “ON” BUTTON
(C) BEFORE SELECTING
THE PROGRAMME
The tables describe the
washing programme on the
basis of the number or
symbol chosen.
IMPORTANT : IF YOU
NEED TO CHANGE A
PROGRAMME THAT HAS
ALREADY STARTED –
SWITCH OFF THE
MACHINE BY THE ON /
OFF BUTTON AND THEN
MOVE THE PROGRAMME
DIAL TO THE CORRECT
POSITION. IF YOU DO
NOT PRESS “OFF”
BEFOREHAND, THE DIAL
WILL AUTOMATICALLY
MOVE TO ITS INITIAL
POSITION.
BUTTONS INDICATOR LIGHT
The indicator light around
the option buttons will light
when specific options
are selected
N
PT
BOTÃO DE SELECÇÃO DO
PROGRAMA DE LAVAGEM
ATENÇÃO:
RODE SEMPRE O BOTÃO
NO SENTIDO DOS
PONTEIROS DO RELÓGIO
E NUNCA NO SENTIDO
CONTRÁRIO. NUNCA
PRESSIONE A TECLA DE
LIGAR/DESLIGAR (C)
PARA LIGAR A MÁQUINA
ANTES
DE SELECCIONAR
O PROGRAMA
DE LAVAGEM QUE
PRETENDE.
As tabelas de programas
descrevem os programas de
lavagem com base no
número do programa ou no
símbolo seleccionado.
IMPORTANTE: SE DESEJAR
MUDAR DE UM
PROGRAMA JÁ EM
FUNCIONAMENTO PARA
OUTRO, PRIMA SEMPRE A
TECLA LIGAR/DESLIGAR
ANTES DE RODAR O
SELECTOR DE
PROGRAMAS; SE NÃO O
FIZER, A MÁQUINA,
PASSADOS ALGUNS
MINUTOS,VOLTARÁ A
COLOCAR
AUTOMATICAMENTE O
SELECTOR NA SUA
POSIÇÃO INICIAL.
LUZES DAS TECLAS
Acendem-se quando as
respectivas teclas são
premidas.
OK

EN
19
CHAPTER 9
THE PRODUCT
IMPORTANT:
When washing heavy rugs,
bed spreads and other
heavy articles, it is advisable
not to spin.
To be machine-washed,
woollen garments and other
articles in wool must bear
the “Machine Washable
Label”.
IMPORTANT:
When sorting articles
ensure that:
-there are no metal
objects in the washing
(e.g. brooches, safety
pins, pins, coins etc.).
- cushion covers are
buttoned, zips and
hooks are closed, loose
belts and long tapes on
dressing gowns are
knotted.
-runners from curtains are
removed.
-attention is paid to
garment labels.
-when sorting, any tough
stains should be
removed prior to
washing using stain
removers only
recommended on
label.
PT
CAPÍTULO 9
SEPARAÇÃO DAS
PEÇAS DE ROUPA
ATENÇÃO:
Recomendamos que,
sempre que lavar tapetes
pesados, colchas e outras
peças de roupa igualmente
pesadas, suprima a
centrifugação.
Antes de colocar uma peça
de lã na máquina, verifique
a respectiva etiqueta,para
se assegurar de que a peça
em questão é um artigo de
“Pura Lã Virgem” e também
“Lavável à Máquina” e
“Não feltrante”. Só estas
peças de lã poderão ser
lavadas na máquina.
IMPORTANTE:
Quando separar as
peças de roupa a
lavar certifique-se de
que:
- não deixou objectos
metálicos nas peças
de roupa, por
exemplo, alfinetes,
alfinetes de ama,
moedas, etc.;
-apertou os botões das
almofadas, os fechos,
os colchetes e os
cintos e que amarrou
as tiras de tecido
compridas;
-retirou as argolas das
cortinas;
-o programa de
lavagem
seleccionado está de
acordo com as
indicações de
lavagem fornecidas
pelos fabricantes das
peças de roupa
(símbolos inscritos nas
respectivas etiquetas).
-Além disso, antes de
colocar qualquer
peça de roupa muito
suja na máquina,
remova as nódoas
mais difíceis com um
detergente especial
ou tira-nódoas.
EN
18
CHAPTER 8
SELECTION
For the various types of
fabrics and various degrees
of dirt the washing machine
has 3 different programme
bands according to: wash
cycle, temperature and
lenght of cycle (see table of
washing cycle
programmes).
1 Resistants Fabrics
The programmes have been
designed for a maximum
wash and the rinses, with
spin intervals, ensure perfect
rinsing.
The final spin gives more
efficient removal of water.
2 Mixed and Synthetic
Fabrics
The main wash and the rinse
gives best results thanks to
the rotation rhythms of the
drum and to the water
levels.
A gentle spin will mean that
the fabrics become less
creased.
3. Delicate fabrics, wool &
hand washing
This group of programmes
have been specially
designed to wash the most
delicate fabrics
Use the Delicate
programme for delicate
fabrics
Use the Woollens
programme only for
machine washable wool
Use the HandWash
programme for any
machine washable
handwash garments
PT
CAPÍTULO 8
SELECÇÃO DOS
PROGRAMAS
A máquina dispõe de 3
grupos de programas
diferentes baseados nos
diversos tipos de tecidos a
lavar, nos vários graus de
sujidade, na temperatura a
na duração do programa
de lavagem (vide a tabela
de programas).
1 Tecidos resistentes
Os programas deste grupo
foram desenvolvidos de
modo a garantirem os
melhores resultados de
lavagem,e os
enxaguamentos com
centrifugação intercalar
garantem um
enxaguamento perfeito da
roupa.
A centrifugação final
assegura que as peças de
roupa fiquem bem torcidas.
2 Tecidos mistos e sintéticos
A lavagem e o
enxaguamento estão
optimizados através dos
ritmos de rotação do
tambor e dos níveis de
água.
A centrifugação suave
assegura uma formação
reduzida de pregas e de
rugas nos tecidos.
3. Tecidos delicados, lãs e
lavagem manual
Este sector corresponde a
uma série de programas
distintos, especificamente
estudados para lavar roupa
que necessite de
tratamentos especiais:
A lavagem delicada,a ser
usada para tecidos muito
delicados.
A lavagem de lãs, a ser
usada exclusivamente para
roupa de “lã lavável na
máquina”.
A lavagem manual,
concebida para tratar
delicadamente as peças
laváveis à mão.
22 23
WEIGHT
MAX
kg
6
6
6
3,5
-
-
2
2
2
2
-
1
1
1
-
-
2
SELECT
PROG.
1
2
3
4
5
6
7
8
9
10
S
SELECT
TEMP.
°C
Up to
90°
Up to
90°
Up to
60°
Up to
40°
-
-
Up to
60°
Up to
50°
Up to
40°
-
-
Up to
40°
Up to
30°
Up to
30°
-
-
Up to
50°
❙❙ ❙
●● ●
●●
●●
●●
●
●●
●●
●●
●
●●
●●
●●
●
●
❀
(*
(*
(*
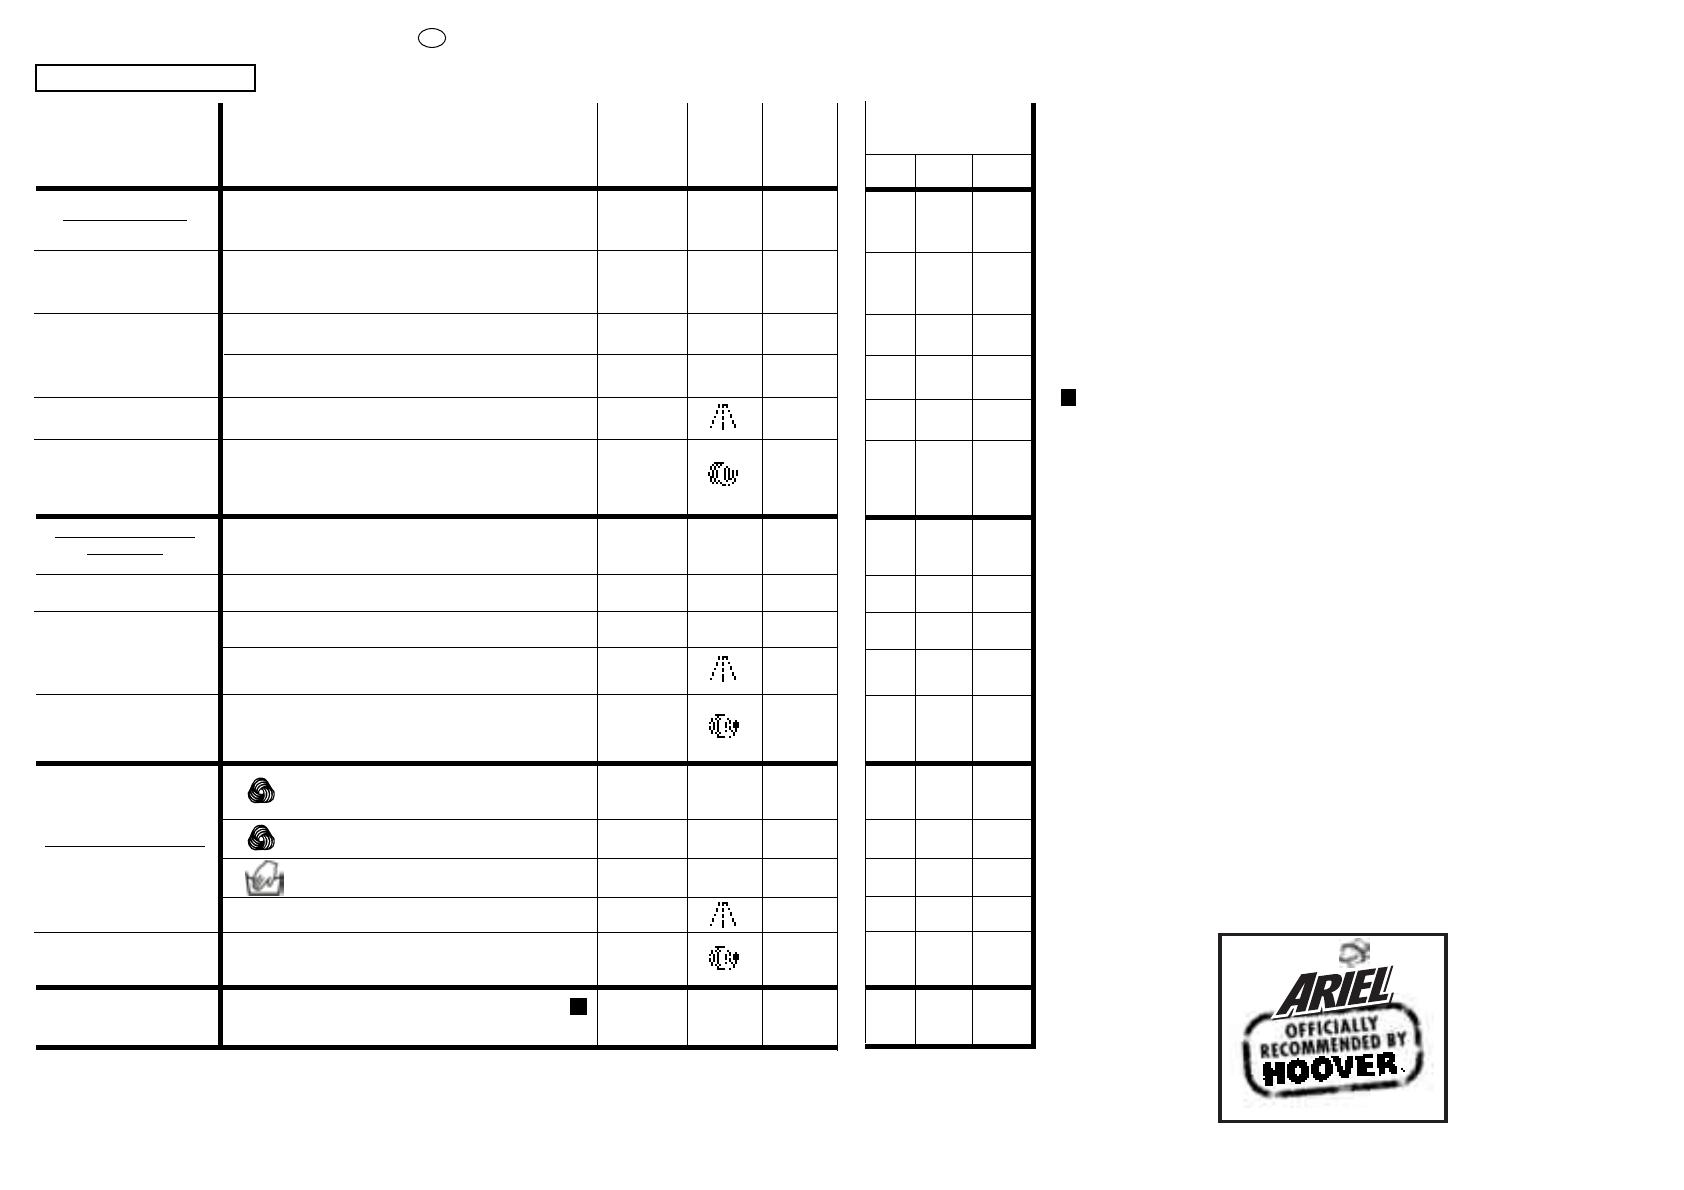
PROGRAM FOR
Whites & Prewash
Whites normal
Coloureds fast
Coloureds non fast
Rinses
Long spin
Mixed fabrics
Coloureds
Acrylics
Rinses
Short spin
“MACHINE WASHABLE” woollens
Delicate wash
“MACHINE WASHABLE” woollens
Hand wash
Rinses
Short spin
Speed wash
TABLE OF PROGRAMMES
CHARGE DETERGENT
FABRIC
Resistant fabrics
Cotton, linen
Cotton, mixed
resistant
Cotton, mixed
Cotton
Cotton, linen
Mixed fabrics and
synthetics
Mixed, resistant
Cotton, mixed fabrics,
synthetics
Synthetics (nylon,
perlon), mixed cotton
Mixed, delicate
synthetics
Very delicate fabrics
Mixed, delicate
synthetics, wool
FOR YOUR NEW WASHING MACHINE
Please read these notes
When washing heavily soiled laundry it is recommended the load
is reduced to 3 kg maximum.
* Programmes according to CENELEC EN 60456.
The variable temperature selector allows a reduction in the wash
temperature.For example, an intense cottons cycle can be
washed in cold water simply by moving the dial to the tap symbol.
The spin speed may also be reduced,to match any guidelines
suggested on the fabric label, or for very delicate fabrics cancel
the spin completely this option is available with a spin speed
selector.
Speed wash Programme
The Speed wash programme allows a complete washing cycle to
be carried out in approximately 30 minutes, with up to a maximum
load of 2 kg and a the temperature of up to 50°C.
The washing temperature can be reduced by using the control
knob I.
When selecting the “Speed wash” programme, please note that
we recommend you use only 20% of the recommended quantities
shown on the detergent pack.
The detergent must be placed in the pre-wash compartment
(marked I) in the detergent dispenser.
For mixed, synthetics and very delicate fabrics that are heavily
soiled a prewash cycle may be selected using the Speed wash
programe (the detergent must be placed in the compartment
marked I) before selecting the main wash programme.
Get the best results from your new Hoover machine
To ensure you get the best results from your new Hoover machine it
is important to use the right detergent in your everyday wash.
There are many detergents available in the market and making a
choice from the wide range available can often be confusing.
At Hoover we regularly test many different types of detergent to
assess which give the best wash results in our machines.We found
only one brand always lives up to our exacting standards and
provides outstanding cleaning across a broad range of dirt and
stains, as well as providing high levels of fabric care.That’s why
Hoover gave Ariel their official seal of approval.
EN
CHAPTER 10
EN
WASHING
VARIABLE CAPACITY
This washing machine
automatically adapts the
level of the water to the
type and quantity of
washing. In this way it is also
possible to obtain a
“personalized” wash from an
energy saving point of view.
This system gives a decrease
in energy consumption and
a sensible reduction in
washing times.
The maximum load for
heavy fabrics is 6 kg, while, in
the case of delicate fabrics,
it is advisable not to exceed
2 kg (1 kg in the case of
machine washable articles
in “Machine Washable
Woolens”) so as to avoid the
formation of creases which
may be difficult to iron.A net
bag should be used for
particularly delicate fabrics.
Let us suppose that the
washing consists of HEAVILY
SOILED COTTON (tough
stains should be removed
with suitable stain removal).
It is advisable not to wash a
load made up entirely of
articles in towelling fabric
which absorb a lot of water
and become too heavy.
EXAMPLE:
The advice of Hoover is set
out in the washing
programme table:
● Ensure that article labels
carry the indication 60°C.
● Open the door by
pressing button (B).
● Load the drum with a
maximum of 6 kg of dry
washing.
● Close the door
25
PT
LAVAGEM
CAPACIDADE VARIÁVEL
Esta máquina ajusta
automaticamente o nível de
água ao tipo e quantidade de
água ao tipo e quantidade de
roupa a lavar. Torna-se assim
possível obter uma lavagem
“personalizada”, inclusive do
ponto de vista da poupança
de energia.
O sistema proporciona uma
redução do consumo de
energia e uma redução
sensível da duração da
lavagem.
A máquina pode levar uma
carga máxima de 6 kg de
tecidos resistentes ou de 2 kg
de tecidos delicados (ou ainda
de 1 kg de peças de “Pura Lã
Virgem”laváveis à máquina).
Evitar-se-á assim a formação
de rugas excessivas, que
dificultam o engomar da
roupa. Sempre que lavar peças
de roupa extremamente
delicadas, meta-as dentro de
um saco de rede.
Suponhamos que a carga de
roupa a lavar é composta por
ROUPA DE ALGODÃO MUITO
SUJA (as nódoas mais difíceis
deverão ser removidas com o
detergente especial).
Recomendamos que nunca
carregue a máquina só com
atoalhados, pois estes tecidos
absorvem muita água,ficando
muito pesados.
EXEMPLO:
As recomendações da Hoover
constam da tabela de
programas de lavagem,cuja
consulta aconselhamos:
● Certifique-se de que as
etiquetas das peças de roupa
a lavar indicam que podem
ser lavadas a 60°C.
● Prima a tecla de abertura da
porta (B) para abrir a porta.
● Carregue a máquina com
um máximo de 6 kg de roupa
seca.
● Feche a porta da máquina.
60° C
6 kg MAX
EN
CHAPTER 11
CUSTOMER
AWARENESS
A guide environmentally
friendly and economic use
of your appliance.
MAXIMISE THE LOAD SIZE
To prevent any possible
waste of energy, water or
detergent we recommend
that you put a full load in
your washing machine, not
exceed the maximum loads
shown below:
Cotton and linen 6 kg
Mixed 2 kg
Ver y delicate 1,5 kg
Wool 1 kg
Save up to 50% energy by
washing a full load instead
of 2 half loads.
DO YOU NEED TO PRE-WASH?
For heavily soiled laundry
only!
SAVE detergent, time, water
and between 5 to 15%
energy consumption by NOT
selecting Prewash for slight
to normally soiled laundry.
IS A HOT WASH REQUIRED?
Pretreat stains with stain
remover or soak dried in
stains in water before
washing to reduce the
necessity of a hot wash
programme.
Save up to 50% energy by
using a 60°C wash
programme.
24
PT
CAPÍTULO 11
CONSCIENCIALIZA-
ÇÃO DO CLIENTE
Um guia para uma utilização
mais ecológica e económica
da sua máquina de lavar
roupa.
MAXIMIZE A QUANTIDADE DE
ROUPA A LAVAR
Para evitar eventuais
desperdícios de energia,
água ou detergente,
recomenda-se a utilização
da capacidade máxima de
carga da máquina de lavar
roupa, não excedendo
contudo as seguintes
especificações de carga
máxima:
Algodão e linho 6 kg
Mistos 2 kg
Muito delicados 1,5 kg
Lãs 1 kg
Poupe até 50% de energia
lavando uma carga
completa em vez de lavar 2
meías cargas.
TEM DE FAZER UMA PRÉ-
LAVAGEM?
Só se a roupa estiver muito
suja!
Se, no caso de a roupa estar
pouco ou normalmente suja,
NÃO seleccionar a função de
pré-lavagem,estará a
POUPAR detergente, tempo e
água e ainda entre 5 a 15%
de consumo de energia.
TEM REALMENTE DE LAVAR A
ROUPA COM ÁGUA QUENTE?
Trate as nódoas com um
produto especial para
remover as nódoas ou
amoleça as nódoas já secas
em água antes de lavar a
roupa na máquina: deixará
assim de ter tanta
necessidade de lavar a roupa
com um programa de
lavagem a quente.
Poupe até 50% de energia
utilizando programas de
lavagem a 60°C.
EN
CHAPTER 12
CLEANING AND
ROUTINE
MAINTENANCE
Do not use abrasives, spirits
and/or diluents on the
exterior of the appliance. It is
sufficient to use a damp
cloth.
The washing machine
requires very little
maintenance:
● Cleaning of drawer
compartments.
● Filter cleaning
● Removals or long periods
when the machine is left
standing.
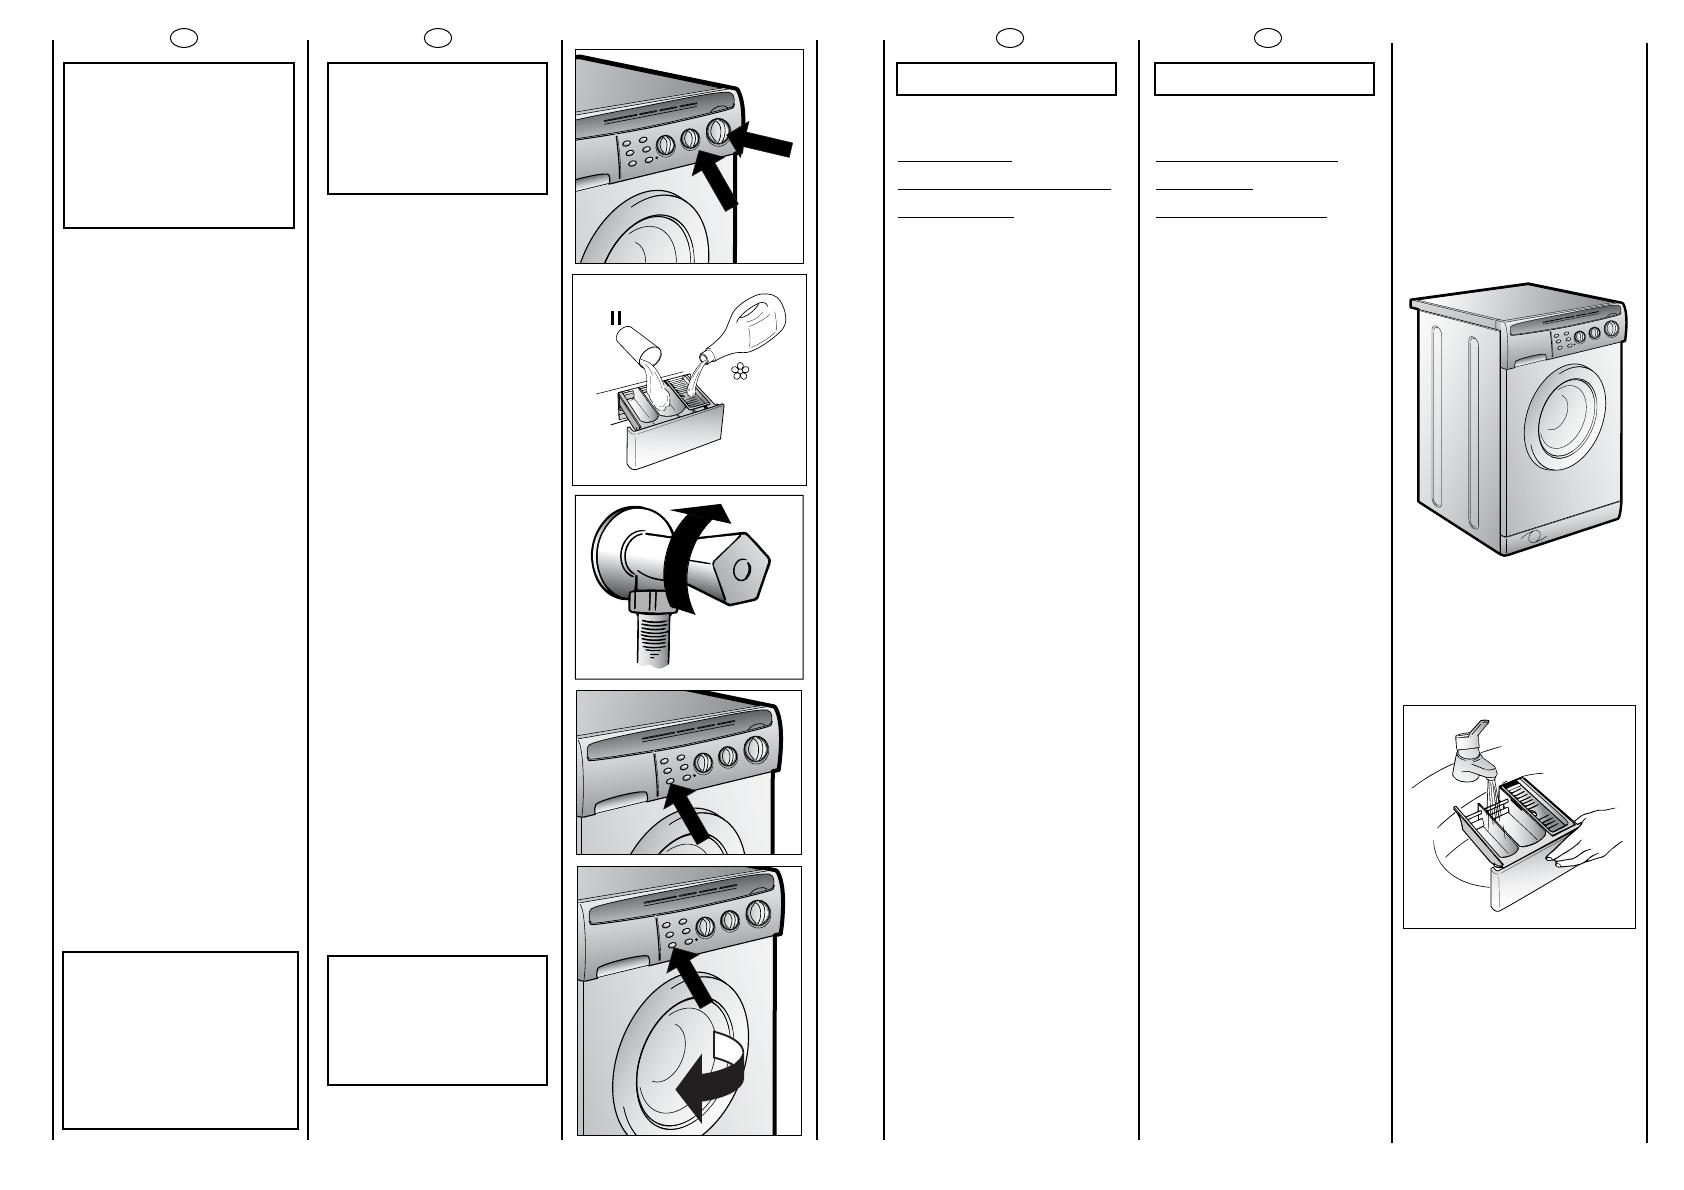
CLEANING OF DRAWER
COMPARTMENTS
Although not strictly
necessary, it is advisable to
clean the detergent, bleach
and additives
compartments occasionally.
Remove the compartments
by pulling gently.
Clean with water.
Put the compartments back
into place
27
PT
CAPÍTULO 12
LIMPEZA E
MANUTENÇÃO DA
MAQUINA
Não utilize produtos
abrasivos, com álcool,
soluções alcoólicas e/ou
diluentes para limpar as
paredes externas da
máquina: basta passar um
pano húmido para a limpar.
Esta máquina exige muito
pouca manutenção:
● Limpeza da gaveta para
detergentes.
● Limpeza do filtro.
● Adopção de medidas
especiais quando a
máquina vai ser mudada de
sítio (mudança de casa,por
exemplo) ou quando a
máquina estiver muito
tempo sem funcionar.
LIMPEZA DA GAVETA PARA
DETERGENTE
Embora não seja
estritamente necessário, é
recomendável limpar
ocasionalmente os resíduos
de detergente, de
branqueador e de aditivos
da gaveta para detergente.
Para tal, deverá puxar
suavemente a gaveta toda
para fora.
Lave cuidadosamente
cada um dos
compartimentos sob um
jacto de água, e volte a
colocar a gaveta na
máquina.
EN
IMPORTANT:
WHEN SETTING THE
PROGRAMME ENSURE
THAT THE ON/OFF
BUTTON IS NOT TURNED
ON.
Select programme 2:
Choose the programme by
rotating the knob (L) in a
CLOCKWISE DIRECTION and
make the number of the
programme coincide with
the sign.
● Move the temperature
knob (I) to 60°C.
● Open the detergent
drawer (A).
● Put 120 g in the second II
wash compartment .
● Put 50 ml of the desired
additive in the additives
compartment
✿✿
.
● Close the detergent
drawer (A).
● Ensure that the water inlet
tap is turned on.
● And that the discharge
tube is in place.
● Press the “ON” button (C).
The washing machine will
carry out the set
programme.
● At the end of the
programme, press the
On/Off button (C).
● Open the door and
remove the washed articles.
FOR ALL TYPES OF
WASH CONSULT THE
PROGRAMME TABLE
AND FOLLOW THE
OPERATIONS IN THE
ORDER INDICATED.
26
PT
ATENÇÃO:
AO SELECCIONAR
O PROGRAMA DE LAVAGEM
ASSEGURE-SE DE QUE A
MÁQUINA NÃO ESTEJA
LIGADA, OU SEJA, DE QUE
A TECLA DE
LIGAR/DESLIGAR NÃO
ESTEJA PREMIDA.
Seleccione o programa 2:
Para seleccionar o programa
deverá rodar o botão de
selecção do programa de
lavagem (L) no SENTIDO DOS
PONTEIROS DO RELOGIO até o
número do programa pretendido
coincidir com a marca.
● Seleccione a temperatura
máxima de lavagem (60°C) com
o respectivo botão de selecção
(I).
● Abra a gaveta para detergente
(A).
● Deitar 120 g de detergente no
segundo compartimento da
gaveta para detergente.
● Deitar 50 ml do aditivo
pretendido no compartimento
para aditivos
✿✿
.
● Feche a gaveta para detergente
(A).
● Certifique-se de que a torneira
de alimentação de água esteja
aberta.
● Certifique-se também de que o
tubo de descarga esteja bem
colocado.
● Prima a tecla (C) para ligar a
máquina.
● A máquina executará o
programa seleccionado, ou seja,
neste caso, o programa 2.
● Quando o programa chegar
ao fim pressione a tecla de
ligar/desligar (C) para desligar a
máquina.
● Abra a porta e retire a roupa
da máquina.
A TABELA DE PROGRAMAS
CONTÉM INFORMAÇÕES
SOBRE TODOS OS TIPOS DE
LAVAGEM. CONSULTE-A
PARA ESCOLHER O
PROGRAMA ADEQUADO À
ROUPA QUE VAI LAVAR, E
SIGA AS OPERAÇÕES PELA
ORDEM AQUI APRESENTADA.
Please note:
It is normal for the programme selector dial to move only from one stage of washing programme to another
and not show any movement in-between – so at certain periods, the dial will stay still.
An electronic device is controlling the exact movement of the timer.
30
O modelo e caracteristicas indicados nesta folha podem ser alterados sem qualquer
aviso.
The manufacturer declines all responsibility in the event of any printing mistakes in
this booklet. The manufacturer also reserves the right to make appropriate
modifications to its products without changing the essential characteristics.
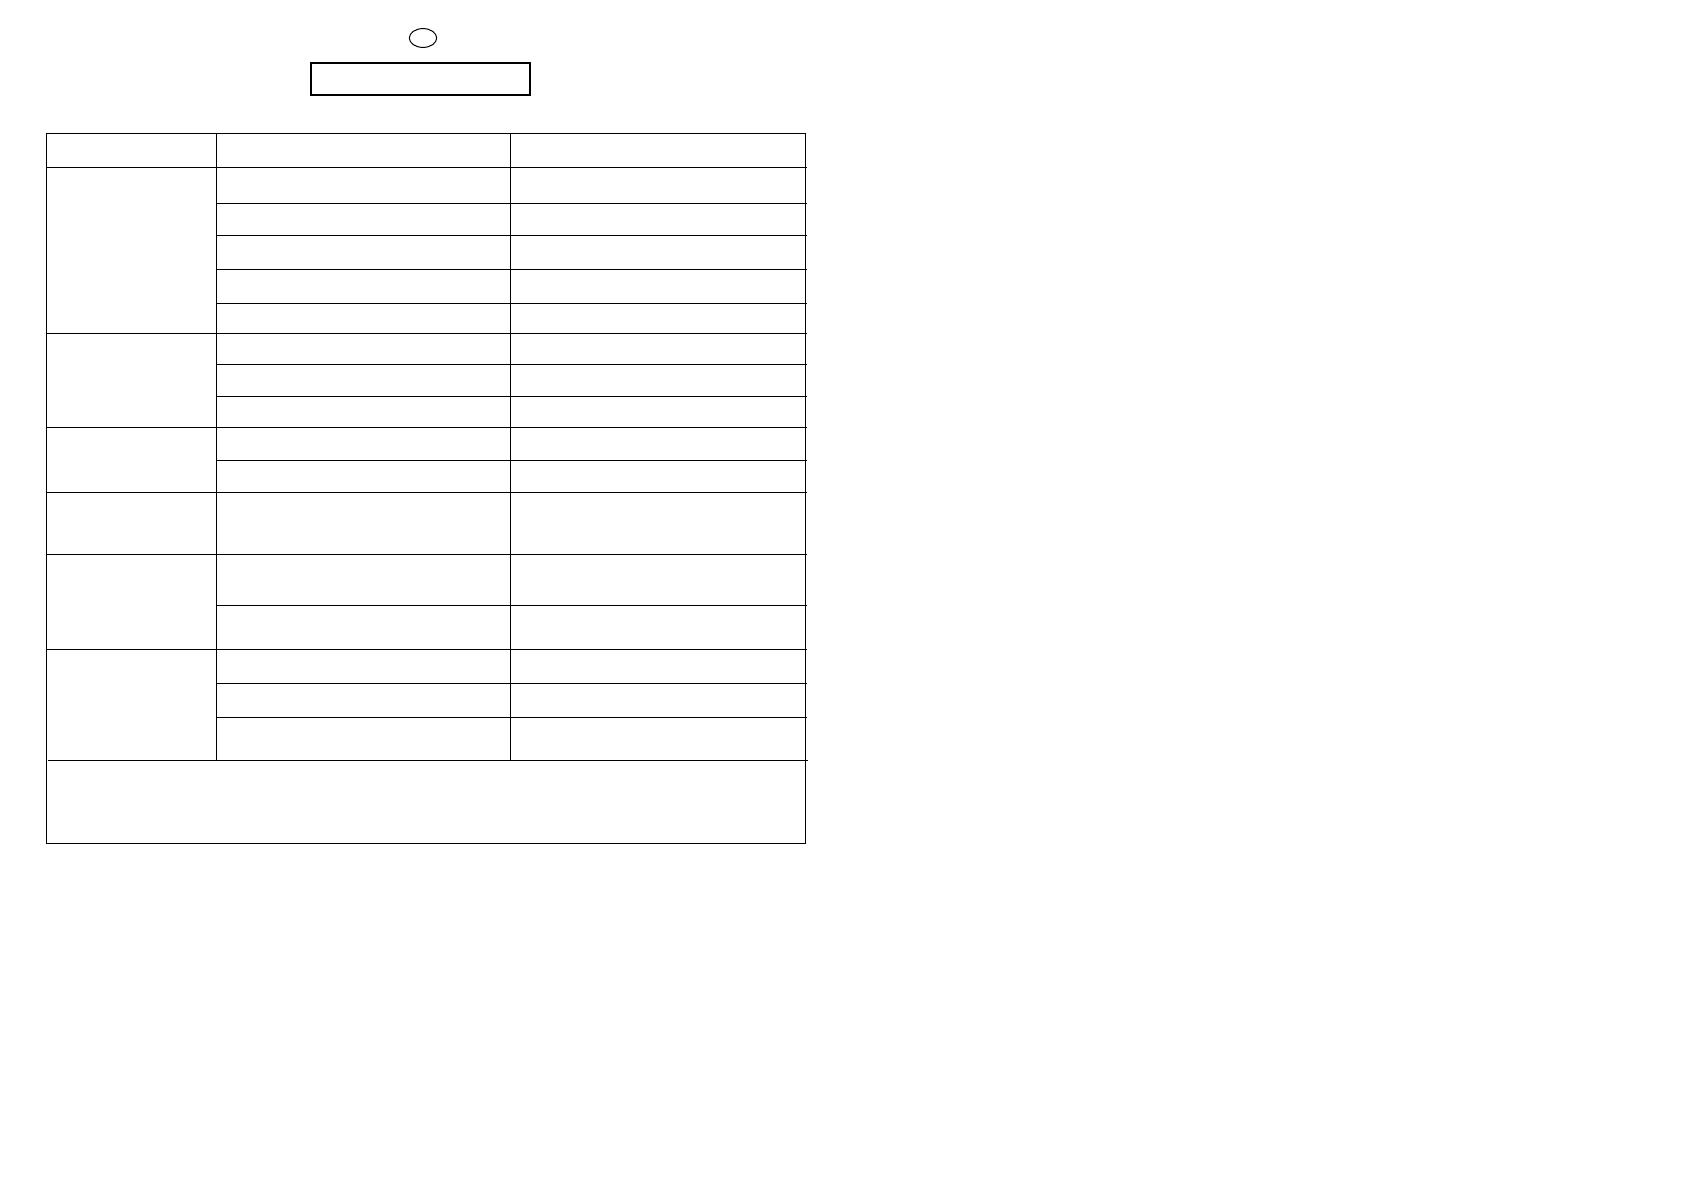
CHAPTER 13
EN
FAULT
If the fault should persist, contact a Hoover Technical Assistance Centre.For prompt servicing, give the model of
the washing machine, to be found on the label placed on the cabinet inside of the porthole or on the
guarantee certificate.
Important
1The use of environment friendly detersives without phosphates may produce the following effects:
-The discharge rinse water may result cloudier due to the presence of zeolites in suspension. This does not
compromise the efficiency of the rinses.
-The presence of white powder (zeolites) on the washing at the end of the washing cycle. This does not
remain incorporated in the fabric and does not alter the colour.
-The presence of foam in the last rinse water which is not necessarily a sign of inadequate rinsing.
-The non-ionic surface-active agents present in the composition of washing machine detersives are often
difficult to remove from the washing itself and, even in small quantities, may produce visible signs of the
formation of foam.
- Carrying out further rinses, in cases such as this, is not useful.
2 If your washing machine fails to function, carry out the above-mentioned checks before calling the Hoover
Technical Assistance Service.
1. Does not function
on any
programme
2. Does not load
water
3. Does not discharge
water
4. Water on floor
around washing
machine
5. Does not spin
6. Strong vibrations
during spin
Mains plug not plugged in
Mains switch not on
No power
Electric circuit fuses failure
Load door open
See cause 1
Inlet tap turned off
Timer not set correctly
Discharge tube bent
Odd material blocking filter
Leak from the washer between the tap
and inlet tube
The washing machine has not
discharged water
“No spin” setting (some models only)
Washing machine not perfectly level
Transport bracket not removed
Washing load not evenly distributed
Insert plug
Turn on mains switch
Check
Check
Close load door
Check
Turn on water inlet tap
Set timer on correct position
Straighten discharge tube
Check filter
Replace washer and tighten the tube
on the tap
Wait a few minutes until the machine
discharges water
Turn the programme dial onto spin
setting
Adjust special feet
Remove transport bracket
Distribute the washing evenly
CAUSE
REMEDY

03.09 - 41006494.A - Printed in Italy - Imprimé en Italie
PT
EN
/