Page is loading ...

www.rivatech.de
Specification subject to change without notice
RC4602SV-7416A-30
Installation Guide

RC Series RC4602SV-7416A-30 Installation Guide
04-2017-A 2
Precautions & Notes
Please read this manual carefully before installing the unit.
Never disassemble the camera. Unauthorized disassembly may cause equipment failure
or damage to the unit.
Please do not install the camera in a place exposed to direct sunlight.
Do not operate the camera in environments beyond the specified temperature.
Refer to Environment Condition on APPENDIX (A): SPECIFICATIONS in this manual.
Before applying power to the camera, check the power source to ensure that it is within
the specifications. Refer to Electrical Characteristics on APPENDIX (A):
SPECIFICATIONS.

RC Series RC4602SV-7416A-30 Installation Guide
04-2017-A www.rivatech.de 3
Table of Contents
Precautions & Notes ................................................................................................. 2
1. FEATURES ............................................................................................................. 5
2. PACKAGE CONTENTS............................................................................................. 6
3. PART NAMES ........................................................................................................ 7
4. INSTALLATION ...................................................................................................... 8
4.1. Installing the camera .......................................................................................................... 8
Installation without bracket .................................................................................................. 8
Wall Mount ......................................................................................................................... 10
Wall / Corner Mount ........................................................................................................... 11
Wall / Pole Mount ............................................................................................................... 14
Ceiling Mount ...................................................................................................................... 18
4.2. Adjusting angle of the camera ......................................................................................... 19
4.3. Adjusting zoom and focus ................................................................................................ 19
4.4. Setting the Image Attribute ............................................................................................. 19
5. CONNECTIONS .................................................................................................... 20
6. CONFIGURATION ................................................................................................ 23
6.1.Set up network environment ............................................................................................ 23
6.1.1. Generic IP Environment ............................................................................................ 23
6.1.2. Custom IP Environment............................................................................................. 24
6.2. View video on web page .................................................................................................. 26
6.2.1. ActiveX Installation .................................................................................................... 26
6.2.2. View video using IPAdmin Tool ................................................................................. 27
6.3. Reboot .............................................................................................................................. 28
6.4. Factory Default ................................................................................................................. 28
6.5. Safe Mode ........................................................................................................................ 29
APPENDIX (A): SPECIFICATIONS .............................................................................. 31
Summary ................................................................................................................................. 31
Electrical Characteristics ......................................................................................................... 32
Environment Condition ........................................................................................................... 32
Mechanical Condition ............................................................................................................. 32
APPENDIX (B): POWER OVER ETHERNET ................................................................. 33
Power Comparison .................................................................................................................. 33
APPENDIX (C): DIMENSIONS ................................................................................... 34


RC Series RC4602SV-7416A-30 Installation Guide
04-2017-A www.rivatech.de 5
1. FEATURES
Camera
Sony STARVIS Exmor 1/2.8” 1080p CMOS Image Sensor
True Day/Night
Auto Iris Lens
WDR
30x Optical and 12x Digital zoom
Weather Proof (IP66)
Vandal Proof (IK10)
Video
H.264 Baseline, Main, High profile (MPEG-4 Part 10/ AVC), MJPEG(Motion JPEG)
Max 30fps in 1080p
Text Overlay
Audio
Two-way Audio Streaming
G.711 µLaw
Network
10/100 Base-T Ethernet
Integration
Software Development Kit (SDK) available
ONVIF Compliant (Profile S & Profile G)’
General
microSD/SDHC slot
Power Over Ethernet (PoE+)
Video Contents Analytics (VCA)
VCA Presence (Standard)
* Licenses with higher specifications than VCA Presence are optional.

RC Series RC4602SV-7416A-30 Installation Guide
04-2017-A www.rivatech.de 6
2. PACKAGE CONTENTS
Unpack and handle the equipment with care. The packaging contains:
Camera
Quick Installation Guide
Terminal Blocks
Ferrite Cores
Note
i
The contents above are subject to change without prior notice.

RC Series RC4602SV-7416A-30 Installation Guide
04-2017-A www.rivatech.de 7
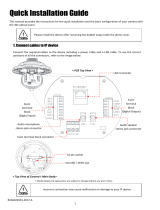
3. PART NAMES
① 3-Pin terminal block connector
For power connection (AC, FG, AC)
② Audio microphone stereo jack connector
Connector for RCA audio jack
③ Audio speaker stereo jack connector
Connector for RCA audio jack
④ 8-Pin terminal block (Digital Input)
Interface connector (IN4, IN3, GND, IN2, IN1, GND,
485+, and 485-). Please note that the terminal
block is used only for the digital input connection.
⑤ 6-Pin terminal block (Digital Output)
Interface connector (2N.O, COM2, 2N.C, 1N.O,
COM1, 1N.C)
⑥ LAN connector
RJ45 LAN connector for 10/100 Base-T Ethernet.
(PoE+ supported)
⑦ 32-pin slot
Main socket for 32-pin connector on PCB.
⑧ microSD/SDHC slot
Supports up to 32GB. Recommend Class 4 and
higher for HD recordings.
⑨ Reset button
Use the button to restart the device or to reset it to
Factory Default. Refer to 6.3. Reboot and
6.4. Factory Default for more details.
②
③
⑤
* Models and their appearance are subject to change without any prior notice.
④
①
Top View of PCB
⑦
⑥
Top View of
Camera’s Main Body
⑧
⑨

RC Series RC4602SV-7416A-30 Installation Guide
04-2017-A www.rivatech.de 8
4. INSTALLATION
4.1. Installing the camera
Installation without bracket
LAN cable
Power cable
Audio cable
DI/DO cable
1) Loosen the three screws on the top of the
camera, and detach the safety ring from the top.
2) Twist the top of the camera counter-clockwise to
separate it from the main body, and push the lever
of the plastic cover at the bottom of the top
outward to open it. Then, insert the provided
terminal blocks to the corresponding places on the
PCB by reference to the image on the previous
page.
3) Drop all the necessary cables through the neck of
the camera’s top, and fix the top to your installed
bracket or on the designated spot.
4) Install the provided ferrite cores on the cables by
winding cables around the ferrite cores once. Refer
to the image on the left.
5) Connect all the cables to corresponding
connectors by reference to the image on the
previous page. Then, close the PCB on the top of the
camera.
6) Hook the safety ring to the top of the camera
while carefully holding the camera's main body, and
align the triangle marks on the top with the main
body.
7) Twist the main body counter-clockwise once the
camera’s top and the main body are properly
aligned, and tighten the three screws on the top.
Caution
!
Install the device after removing the bubble wrap inside the dome cover.

RC Series RC4602SV-7416A-30 Installation Guide
04-2017-A www.rivatech.de 9
Note
i
The internal heater and fan do not work when the device is powered via PoE.
Caution
!
To prevent products from damage, place the camera on stable and non-vibrating
surfaces. If the stability is in doubt, consult safety personnel for reinforcements,
and then proceed with the installation.
Caution
!
Sealing gaps is recommended as gaps may appear after the camera installation.
Gaps may cause problems such as moisture, water leakage, and etc., which
negatively affect the operation of the camera if gaps remain unsealed.

RC Series RC4602SV-7416A-30 Installation Guide
04-2017-A www.rivatech.de 10
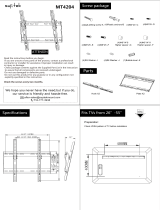
Wall Mount
Model Name
WMB-4600
Contents
Installation
Wall Mount Bracket
Washer Based Self-Drilling Screw 4x32
4EA
1) Drill four holes for screws and one bigger hole for cables on the wall based on the screw
holes of the wall mount bracket.
2) Insert the four plain washers (M6) into the washer based self-drilling screws, and place the
wall mount bracket to the wall by aligning the bracket’s screw holes with the drilled holes on
the wall.
3) Insert the screws prepared in Step 2 into the drilled holes on the wall through the
bracket’s screw holes, and tighten the screws.
3) Refer to the section, Installation without bracket on the previous page for the rest part of
the installation.
PL A I N W A S HE R
WASHER BASED SELF-
DRILLING SCREW
Plain Washer M6
4EA

RC Series RC4602SV-7416A-30 Installation Guide
04-2017-A www.rivatech.de 11
Wall / Corner Mount
Model Name
WMB-4600
CMA-4600
Contents
WMB-4600
CMA-4600
*Plain washer M8 is applied to be installed with WMB-4600.
Corner Mount Adaptor
Washer Based Self-Drilling Screw 4x32
8ea
PH M8x16L Bolt 4ea
Plain Washer M6
8ea
Plain Washer M8 4ea
Wall Mount Bracket
Washer Based Self-Drilling Screw 4x32
Flat Washer M6
4ea

RC Series RC4602SV-7416A-30 Installation Guide
04-2017-A www.rivatech.de 12
Installation of the corner mount adaptor
PLAIN WASHER M6
WASHER BASED SELF-DRILLING SCREW
1) Drill four holes on the installation surface based on the screw holes of each side of the
corner mount adaptor.
2) Insert the plain washers (M6) into the screws.
3) Place the corner mount adaptor to the installation surface by aligning the screw holes
with the drilled holes on the installation surface.
4) Insert the screws into the drilled holes through the screw holes on the adaptor, and
tighten the screws.

RC Series RC4602SV-7416A-30 Installation Guide
04-2017-A www.rivatech.de 13
Combination of wall mount bracket and corner mount adaptor
PLAIN WASHER
1) Insert plain washers into the PH M8x16L bolts.
2) Attach the wall mount bracket to the corner mount adaptor aligning the holes on both
brackets.
3) Insert the bolts prepared in Step 1 into holes on the corner mount adaptor through the
wall mount bracket, and firmly tighten the bolts.
4) Refer to the section, Installation without bracket on page 8 for the rest part of the
installation.

RC Series RC4602SV-7416A-30 Installation Guide
04-2017-A www.rivatech.de 14
Wall / Pole Mount
Model Name
WMB-4600
PMA-4600
Contents
WMB-4600
PMA-4600
Pole Mount Adaptor
PH M6x12L Bolt 4ea
SUS Band 2ea
Wall Mount Bracket
Washer Based Self-Drilling Screw 4x32
Flat Washer M6
4ea

RC Series RC4602SV-7416A-30 Installation Guide
04-2017-A www.rivatech.de 15
Installation of the pole mount adaptor
1) Push each SUS band through the holes on
the pole mount adaptor like the image on the
left.
2) Encircle the pole with the SUS bands
attached on the pole mount adaptor.

RC Series RC4602SV-7416A-30 Installation Guide
04-2017-A www.rivatech.de 16
3) Push each SUS band’s end through
the fastener’s hole located on the SUS
band’s head.
4) Fasten each SUS band by tightening
the screw on the fastener clockwise.
5) Fasten enough both fasteners and
check whether the bracket is firmly-fixed
on the pole.
FASTENER
HOLE
SCREW
FASTENER

RC Series RC4602SV-7416A-30 Installation Guide
04-2017-A www.rivatech.de 17
Combination of wall mount bracket and pole mount adaptor
Caution
!
Sealing gaps is recommended as gaps may appear after the camera installation.
Gaps may cause problems such as moisture, water leakage, and etc., which
negatively affect the operation of the camera if gaps appear but remain unsealed.
1). Attach the wall mount bracket to the corner mount adaptor aligning
the holes on the bracket and the adaptor.
2) Insert PH M6x12L bolts into the holes on the corner mount adaptor
through the wall mount bracket, and firmly tighten the bolts.
3) Refer to the section, Installation without bracket on page 8 for the rest
part of the installation.

RC Series RC4602SV-7416A-30 Installation Guide
04-2017-A www.rivatech.de 18
Ceiling Mount
Model Name
CMB-4600
Contents
Installation of the ceiling mount bracket
1) Drill four holes on the ceiling based
on the screw holes on the ceiling
mount bracket.
2) Insert the provided four flat
washers(M6) into the
screws(4x32).Then, attach the ceiling
mount bracket to the ceiling, insert
the screws into the holes on the
bracket, and tighten the screws.
3) Refer to the section, Installation
without bracket for the rest part of
the installation.
Ceiling Mount Bracket
Flat Washer M6
Self-Drilling Screw 4x32
Ceiling Mount Bracket
Washer Based Self-Drilling Screw 4x32
Flat Washer M6, 4ea

RC Series RC4602SV-7416A-30 Installation Guide
04-2017-A www.rivatech.de 19
4.2. Adjusting angle of the camera
The device is a 360° rotating camera and it is fully controlled by the web user interface.
Refer to the provided webpage user’s manual for more details.
4.3. Adjusting zoom and focus
The device is equipped with the 30x optical zoom lens with the auto focus feature and it is fully
controlled by the web user interface.
Refer to the provided webpage user’s manual for more details.
4.4. Setting the Image Attribute
On the camera’s webpage, users can configure the image settings. The menu of the image
attributes is available at Video Appearance via the path, Setup > Video & Audio > Camera. The
following attributes can be adjusted: Brightness, Contrast, Saturation, Sharpness, and
Orientation. For more detailed information, refer to the provided webpage user's manual.

RC Series RC4602SV-7416A-30 Installation Guide
04-2017-A www.rivatech.de 20
5. CONNECTIONS
① Audio connection
The camera provides a mono audio input and output. Due to low audio output power, an
amplified speaker is recommended for enhanced sound (Refrain from connecting a headphone
or an earphone directly to the camera).
② Sensor (DI) connection
Sensor (DI) can be connected to either a voltage type sensor or a relay type sensor like the
following figures. Settings can be done through the camera’s webpage.
Input voltage range: 0VDC minimum to 5VDC maximum, Max 10mA
Name
Descriptions
IN4
Alarm Signal Input 4
IN3
Alarm Signal Input 3
GND
Ground
IN2
Alarm Signal Input 2
IN1
Alarm Signal Input 1
GND
Ground
485+
Reserved
485-
Reserved
Caution
!
Do not exceed the maximum input voltage or relay rate.
Top View
②
③
⑤
* Models and their appearance are subject to change without any prior notice.
④
①
⑥
/