Page is loading ...

INSTALLATION INSTRUCTIONS
OAK HILL
™
FREESTANDING SOAKING TUB MODEL # D12025004.415
FREESTANDING SOAKING TUB WITH FEET MODEL # D12025014.415
5-1/2' x 36" (1676 x 914 mm)
© AS AMERICA, INC. 2017
All product names listed herein are trademarks of AS America, Inc.
ATTENTION INSTALLER:
Please deliver this manual to homeowner.
Thank you for selecting DXV. To ensure this product is installed properly, please read these instructions carefully
before you begin. (Certain installations may require professional help.) Also be sure your
installation conforms to local codes.
s
CAUTION: PRODUCT IS FRAGILE. TO AVOID BREAKAGE AND POSSIBLE INJURY, HANDLE WITH CARE!
!
755066-100 Rev. C (6/17)
- 1 -

755066-100 Rev. C (6/17)
TABLE OF CONTENTS:
Cover ....................................................................................................Page 1
Table of Contents ..................................................................................Page 2
Safety Instructions Notice .....................................................................Page 3
General Installation Information ............................................................Page 4
Tub Specications / Roughing-in References ........................................Page 5
Installation Instructions ......................................................................Page 6-7
Post Installation Instructions .................................................................Page 8
- 2 -

755066-100 Rev. C (6/17)
IMPORTANT SAFETY INSTRUCTIONS
READ AND FOLLOW ALL INSTRUCTIONS!
SAVE THESE INSTRUCTIONS
WARNING: Risk of personal injury. Do not permit children to use this bathtub without adult supervision. Never drop or
insert any object into any opening.
WARNING: Risk of electric shock. Do not permit electrical appliances near any bathtub when bathtub contains water.
WARNING: Risk of hyperthermia and possible drowning. People using medications and/or having adverse medical
history should consult a physician before using this product.
WARNING: Risk of personal injury. Do not overll bathtub before entering. Entering tub when lled more than 2/3 can
cause overow and slippery conditions. Exercise caution when entering and exiting.
WARNING: No food or alcoholic beverages. Use of your bathtub immediately after meals is not recommended. Avoid
alcohol consumption before or during bathing. Alcoholic beverages can cause drowsiness or hyperthermia
resulting in loss of consciousness or even drowning.
WARNING: Pregnancy. If you are or think you may be pregnant, consult your physician before using the bathtub.
Use this unit only for its intended use as described in this manual.
Do not use any attachments not recommended by DXV.
▲
!
▲
!
▲
!
▲
!
▲
!
▲
!
- 3 -

755066-100 Rev. C (6/17)
GENERAL INSTALLATION INFORMATION
Carefully uncrate and inspect your new bath for any shipping damage. If such damage is found, report it to your vendor
immediately. After inspection and during installation, protect the bath from construction damage. Before installing, the bath
must be lled with water to check for leaks that may have resulted from shipping damage or mishandling! Fittings (bath
ller, shower arm, etc.) are not provided with the bath and must be ordered separately. Framing and enclosing materials
are provided by others. Follow test procedures carefully.
ATTENTION INSTALLER!
TUBS ARE INTENDED FOR INDOOR USE ONLY.
If you have installation or warranty questions please do not return the unit to the place of purchase. Call 800-227-2734.
Always protect tub from construction damage by using a protective cover. Damage, including chips and scratches incurred
at the jobsite is excluded from warranty but may be repaired by qualied technician at the owner’s expense. Do not stand
in the tub or store materials in the tub during construction. Do not store tub in temperatures below 32 degrees Fahrenheit.
Protect all nished surfaces of the bathtub during construction and installation using a drop cloth.
RECOMMENDED TOOLS AND MATERIALS
Most of the procedures require the use of common tools and materials, which are available from hardware and plumbing
supply stores. It is essential that the tools and materials be on hand before work is begun.
TOOLS SUPPLIES REQUIRED COMPONENTS
• Level
• Tape Measure
• Pipe Wrench
• Slip Joint Pliers
• Screw Driver
• Standard Woodworking Tools
• Personal Safety Equipment
• Caulking Gun
• Drop Cloth
• Tub Adhesive
• Silicone Sealant
• Overow and Drain Trim Kit -D11000000.XXX
must be ordered separately
• Bath Filler (not Included)
- 4 -

755066-100 Rev. C (6/17)
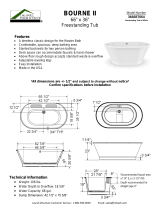
SPECIFICATIONS / ROUGH-IN REFERENCE
NOTE: An access panel must be provided to facilitate the connection of the drain
to the drain/waste outlet.
Access must be made through the oor below the tub.
18"
(457 mm)
2-1/8"
(ø54 mm)
17" (432 mm)
3-1/8"
(80 mm)
2-3/8"
(60 mm)
2-5/8"
(67 mm)
1/4"
(6 mm)
46-7/16"
(1179 mm)
36"
(914 mm)
25-1/16"
(637 mm)
29-13/16"
(757 mm)
59-5/8"
(1514 mm)
66"
(1676 mm)
29-3/4"
(756 mm)
GENERAL SPECIFICATIONS
DESCRIPTION
WEIGHT WITH
WATER / FLOOR
LOADING
PRODUCT
WEIGHT
GALLON TO
OVERFLOW
Oak Hill
5-1/2" x 36"
(1676 x 914 mm)
632.lbs. (287 kg.)
38 lbs./sq. ft.
(187 kg./sq. m)
115 lbs. (52 kg.) 62 gal. (235 l.)
For more details, see specication page per model at www.dxv.com
The drain outlet is directly under the drain hole in the tub.
- 5 -
18"
(457 mm)
2-1/8"
(ø54 mm)
17" (432 mm)
3-1/8"
(80 mm)
2-3/8"
(60 mm)
2-5/8"
(67 mm)
1/4"
(6 mm)
59-5/8"
(1514 mm)
66"
(1676 mm)
46-7/16"
(1179 mm)
36"
(914 mm)
29-3/4"
(756 mm)
25-1/16"
(637 mm)
29-13/16"
(757 mm)

755066-100 Rev. C (6/17)
- 6 -
1
2
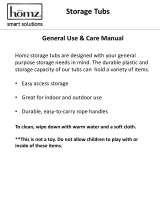
• Place the tub on a nished, level oor in the desired location. See Fig. 1.
• Using the adjustable feet on the underside of the tub, ensure
that the tub is level.
• For the Freestanding tub with base, ensure that there is a gap
between the tub base and the oor. Gap shall not exceed
3/16" (5 mm). See Fig. 2.
• Tighten the jamb nuts on the feet to ensure that they do not loosen. See
Photo 1.
• For the Freestanding tub with feet, check that decorative feet have enough
clearance to t in the locations as shown in Fig. 3.
Note: the feet are stamped on the inside with the letter A or B.
• Using a pencil, transfer the location of the holes in the leveling feet
to the oor. Min. 1 hole/foot.
• Remove the tub and drill 1/8" holes in
the oor where marked.
• Attach overow cover using the screws provided.
• Insert drain plug into drain hole. See Photo 2.
• Place large conical washer on drain plug and
push it against the drain boss. See Photo 3.
• Thread drain adapter onto drain plug and tighten.
See Photo 4.
Note: The drain/waste outlet must be installed in
accordance with all local building codes.
All drain connections must be made using an
access created beneath the tub.
3/16" MAX
(5 mm)
FINISHED FLOOR
Fig. 2.
Fig. 3. (Top View)
Photo 1.
Photo 2. Photo 3. Photo 4.
Fig. 1.
INSTALLING OVERFLOW COVER & DRAIN PLUG
INSTALLATION INSTRUCTIONS:
B
B
A
A
FREESTANDING SOAKING TUB
GENERAL INFORMATION
Rough in dimensions For critical dimensions, we suggest taking the measurements of the actual tub
on site. All printed specications are +/- 1/2 inch (13 mm) and subject to change without notice.
An access panel must be provided to facilitate the connection of the drain to the drain/waste outlet. Access must be
made through the oor below the tub.
FIXTURES/ FITTINGS
No xtures/ttings can be mounted on the tub deck of freestanding tubs. Floor or wall-mounted xtures/ttings are required.
Wall-Mounted - The position of the tub and the reach of the spout are critical. Pay special attention to the spout reach
when choosing your xtures/ttings. Be careful to ensure that the spout will extend out far enough to clear the tub ange
and the falling water will not hit too high up on the side wall of the tub and splash.
Floor-Mounted - Some freestanding xtures/ttings must be anchored to the tub drain for stabilization. The waste and
overow on these tubs are concealed so anchoring to the overow pipe (or tub structure) is not possible. Many kits (with
minor modication) can be mounted to the wall (rather than the drain pipe) for stabilization.

755066-100 Rev. C (6/17)
- 7 -
3
4
5
6
7
• The tail piece assembly, consisting of tail piece, drain strainer
gasket and slip-joint nut is used to connect the tub drain to
the drain/waste outlet. See Fig. 4.
• Slide the slip-joint nut over tail piece towards the anged end as shown.
• Slide the P-trap slip-joint nut and seal over the tail piece as shown.
• Assemble tail piece and P-trap. Cut tail piece if necessary.
For reference the ange of the tail piece should be approximately
2-1/2" (64 mm) above the nished oor when fully inserted
into the P-trap.
• Apply a generous bead of tub adhesive
to the base of the tub and leveling feet.
See Photo 5.
FOR THE FREESTANDING TUB WITH FEET,
ONLY THE LEVELING FEET NEED TO HAVE
TUB ADHESIVE APPLIED.
• Carefully set the tub into position. Ensure that drain strainer gasket is fully seated against
the tail piece ange.
• Connect the tailpiece to the tub drain. Tighten all of the drain connections. Remove any
excess caulking where the tub meets the oor and allow the adhesive to cure for 24 hours.
Note: Connecting the tailpiece assembly and the drain will require access from
beneath the tub.
• For the Freestanding tub with feet, install lag screws thru the leveling feet into the holes drilled in the oor in step # 1.
• Fill the tub with water and drain. Check for leaks and re-tighten connections as necessary.
• For the Freestanding tub with base, apply a bead of Tub & Tile caulk around the bottom edge of the tub where it meets the oor.
• Remove any excess caulking.
• For the Freestanding Tub with Feet, apply a bead of silicone to the bottom of the decorative feet & install them on the tub
in the locations shown in Fig 3.
• Apply a bead of silicone to the foot covers and attach them to the feet.
• Remove any excess caulking.
INSTALLING THE 1-1/2" DIAMETER TAIL PIECE ASSEMBLY INTO P-TRAP
DRAIN STRAINER GASKET
SLIP-JOINT NUT
TAIL PIECE
P-TRAP
(PROVIDED BY
INSTALLER)
THREADED PORTION
OF DRAIN ADAPTER
TAIL PIECE
ASSEMBLY
2"
(51 mm)
FINISHED
FLOOR
P-TRAP
SLIP-JOINT NUT
& SEAL
(PROVIDED BY
INSTALLER)
Fig. 4.
Photo 5.

- 8 -
POST INSTALLATION CLEAN-UP
Remove all construction debris from bath. Tile grout can be removed with a wooden Popsicle stick or tongue depressor.
Do not use wire brushes or any other metal implement on bath surface.
Post installation clean-up generally can be completed using warm water and liquid dishwashing detergent. Stubborn dirt
or stains may be removed using granular Spic and Span
®
mixed with water.
Painter’s naphtha can be used to remove excess adhesives and/or wet oil-base paint.
FEATURES OF YOUR NEW FREESTANDING TUB
Your new bathtub has been molded in the newest plumbing xture material available today. The unit has a tough durable
nish that is simple and easy to care for.
The colors have been formulated to enhance your choice of bathroom decorations. The high gloss surface is resistant to
impact and chemicals and will retain its lasting luster with proper care and maintenance.
In the United States:
DXV
One Centennial Avenue
Piscataway, New Jersey 08855
Attention: Director of Customer Care
For residents of the United States, warranty
information may also be obtained by calling
the following toll free number: (800) 227-2734
www.DXV.com
In Canada:
DXV
5900 Avebury Road
Mississauga, Ontario
L5R 3M3
Canada
Toll Free: 1-800-387-0369
Local: 905-306-1093
Fax: 1-800-395-1498
www.DXV.ca
In Mexico:
DXV
Via Morelos 330
Col. Santa Clara Coatitla
Ecatepec, Estado de México 55540
Toll Free: 01-800-8391200
www.DXV.mx
755066-100 Rev. C (6/17)
/