PREPARE TAIL PIECE
All parts involved in tail piece installation are
provided by the installer.
10. Drain waste vent must always be installed
according to local standard. Verify the
placement of the bathtub before drilling the
hole for the drain waste vent.
11. Install 1 1/2” rubber slip gasket over the
drain waste vent.
12. Cut tail piece to desired length (will vary for
each installation).
13. Slide tail piece nut over tail piece towards
flanged end.
14. Connect tail piece assembly to waste vent.
15. Place flange washer on top of tail piece.
INSTALL BATHTUB
17. Apply a generous bead of adhesive or
silicone to the bottom of the tub supports
(figure 12).
18. Then apply a bead of tub and tile caulk
around the edge of the base (figure 12).
19. Carefully set tub into position (figure 13)
and connect the drain hardware (previously
installed). Finish the installation of the tail-
piece installation.
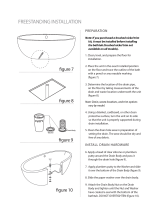
figure 11
pop up cover
drain body
rubber drain gasket
paper washer
drain body unit
tail piece
(provided by installer)
or
waste pipe stub
(provided by installer)
floor
drain pipe
(provided by installer)
trap
(provided by installer)