Page is loading ...

THIS COLD AIR KIT IS CERTIFIED TO UL 127 STANDARD AND ULC S610 STANDARD FOR
USE WITH DESA FACTORY-BUILT FIREPLACES.
Verify you have the correct kit for your DESA fireplace. Refer to your owner’s manual for correct cold air kit to be used. Each cold air
kit includes cold air box assembly, outside air vent hood with stucco flange and screws.
TM
INSTALLATION
Vent pipe must be in place and connected to starter collar on
fireplace before cold air kit can be installed.
1. Place front and rear sections of cold air box on top of fireplace
around starter collar. Slide rear half of box over front half, align-
ing holes. Using screws provided, attach sections of cold air
box together. Use pre-punched holes located on cold air box
flanges as guides to drill 3/32 diameter holes through the top of
fireplace. Secure cold air box to fireplace with screws provided.
2. Determine where vent hood will be installed on outside wall.
The inlet vent hood must be installed no lower than six feet
above ground level. Locate hood high enough not to be blocked
by drifting snow. If inlet vent hood is installed in a chase, it
must be at least three feet below the termination cap.
3. Cut a 4" diameter hole through the outside wall for installation
of the vent hood.
4. Determine length of duct (not included) needed between cold
air box and outside wall. Connect determined length of 4" Class
1 duct (not included) to collar on cold air box assembly. Secure
and seal with hi-temp duct tape (not included).
CAK-8 AND CAK-12 COLD AIR KIT
INSTALLATION INSTRUCTIONS
5. Route duct from cold air box assembly to wall and through the
4" diameter hole cut for the vent hood. Secure and seal duct to
vent hood with hi-temp duct tape. Remove oil at end of duct to
insure proper adhesion to duct tape to be applied.
6. Slide inlet vent hood into hole on outside wall and attach us-
ing screws included with kit.
VENTING RESTRICTIONS
• The duct must never be compressed, kinked or deformed!
• Reducing the cross sectional area of the duct will reduce the
amount of air flow.
• Air inlets are not to terminate in attic space.
• Do not install air inlet vent hood in a location that would draw
air from a garage or attic spaces.
• When additional ducting is needed, use Class 1 metallic duct
material to connect section of the Class 1 duct.
* On some fireplaces, rear top spacers may interfere with cod air kit
installation. If so, remove rear top spacers before installation of
cold air kit.
110829-01
Rev. A
09/02
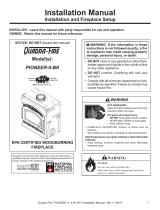
Figure 1 - Installing Cold Air Kit
Starter Collar
Rear Section of
Cold Air Box
4" Class 1 Duct
Inlet Vent Hood
Secure and Seal with
Hi-Temp Duct Tape
(Not Included)
Outside Wall
Flange
*
Vent
Pipe
Front Section of
Cold Air Box
/