
iii
INSTRUCTION MANUAL
Video cassette recorder
+
+
+
.4
t
it
Siqpllw
VHR-770
I
I
1
I
I I
,
1
1
+
G-CODEI!+IQml
PAL NTSC443

1
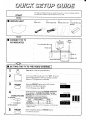
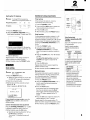
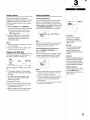
This page is designed to get you started if you are in a hurry, but please read the
START
full instructions manual to get the best from your VCR,
■
UNPACK UNIT
•1 •1
•1
❑
Power cord Aerial output cable Remote control unit 2 “AA (IEC R6)” size,
batteries
I
I
I
.— __
., _.
, .-
):
.—
.J
CONNECT TO TV
AS INDICATED
TV Aerial
‘—-7
Aerial output cable
■ SETTING-THE TV TO THE VIDEO CHANNEL )
J
1
WI
o
2
ID
VCR
I
00]
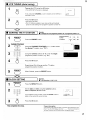
3 PRESET
CHANNEIJTRACKING
for Australia
k (~)
I
for New Zealand
5
PRESET
Turn off the VCR using the (9/1 button
Turn on your TV and set your TV to “VCR”, “O” or the
position designated for VCR use (always a position
where no TV programme is received).
Press the PRESET button on the VCR remote
control for more than 3 seconds.
● The VCR display shows “28 RF,
Set the UHF channel using the CHANNEIJTRACKING+
(for Australia) or CHANNEIJTRACKING- (for New
Zealand) button on the VCR remote control, so that the
test pattern (2 vertical bars) appears.
RF converter output (Video channel)
Area
Factory setting Range
Australia 28
28-69
New Zealand
28
22-69
● Adjust the tuning on the TV, if necessary, so that the test
pattern is clear.
When completed, press the PRESET button.
● The VCR is turned off.
VCR disdav
Rlllfm
(for Australia)
(for New Zealand)
00

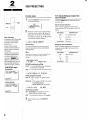
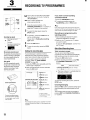
■ VCR TUNING (Auto tuning)
J
1
Turn on the VCR using the (5/1 button.
(!)/1
● The AUTO SETUP screen is displayed.
o
d
mm s,,”,
If not, press both CHANNEL (+ and –) buttons on the VCR for 3 :WL;WY
seconds or more.
2
Press the OK button.
OK
o
●
Auto tuning will start,
● The TV stations available in your area will be automatically
preset in order starting from programme position number “01”
■
SORTING THE TV STATION
Example:
9 To change TVl from programme position “03” to programme position “01”
‘ ‘E
Channel position o,
I
02 03
num~er
I
Press the PRESET button.
TV station ~TV3
‘A
I
TV1
Using the CHANNEIJTRACKING (+ or –) button select
the
desired TV station. (e.g. “TV1”)
~
‘V2 ~ TV1
I
3 ggg
Using the numeric buttons (O– 9), enter the target
000
programme position number. (e.g. “01”)
m
ED
4
OK
o
5
PRESET
Press the OK button.
Repeat steps 2 to 4 change another TV station
programme position number.
When finished, press the PRESET button.
■ CLOCK SETTING
Exampte:
■ To aet December 9,1997,16:15.
2
MENWTV
Press the MENU/TV button.
Set the date and time using the numeric buttons.
Enter in sequence, 0912971615.
If you entered a wrong number, press the CLEAR button to
delete it, then enter the correct number,
3
OK
o
Press the OK button.
7
( ,,0., s,,
0, 12,7 1, 15
,., -,. TIME S.(FT
[CLEAR 1-TO CORflECT
10KI -ENTER
This completes the setup.
I
Power interruption
‘-”-”~
I If the power to the VCR has failed or has been disconnected for more
~ than 1 hour the VCR display will show”- : ––”. The clock will need to
be reset. However the tuning information will not be erased.
2

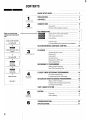
CONTENTS
I
QUICKSETUpGUIDE............................................. 1
1
Precautions ..................................................... 4
CONTROLS ......................................................... 5
INTRODUCTION
2
CONNECTIONS .................................................... 6
Accessories .,.,,.,.,,.,.,.,,.,.,,.,.,.,,,,.,.,.,,.,.,.,.,..,.,,........... 6
PREPARATION
Remote control batteries insertion ............................ 6
Make sure to make these
“+’’””’’””””””” ““’’’’’’’” -
wr4.
,a.-~gawdwd,dsq~%=~smx~
Setting the TVto the video channel........................... 7
settingsbeforeoperatingthe
VCR.
IncaseofanRFconnection
TurnofftheVCR
‘1
Setting theTV to thevideo
channel
4
I
Turn on theVCR
I
Gsl
.
4
I
Clocksetting
4
Setupisfinished
E31!Ia
VCRtuning (Auto tuning) .......................................... 7
-
Clock setting .............................................................. 8
Function setup ........................................................... 9
Hi-FiStereo/Bilingualprogrammedsound selection..... 9
ON-SCREEN MENUS AND BASIC CONTROL ................... 10
3
BASICOPERATION
PLAYBACK ......................................................... 11
Variable playback modes........................................... 11
Endless play .............................................................. 11
lndexsearch .............................................................. 11
Counter memory .. . .. . . .. . . . . . . . .. . . . . .. . .. . 12
Playback of an NTSCtape . . . . . . .. . . .. . . . . .. . .. 12
Picture adjustments ................................................... 12
RECORDING TV PROGRAMMED
................................
13
Setting the recording type ......................................... 13
Quick Start Recording timer ...................................... 13
4
G-CODE TIMER RECORDING PROGRAMMING ............... 14
On-screen programming ........................................... 14
ON-SCREEN
Programming onthe VCRdisplay ............................. 15
OPERATION
ON-SCREEN TIMER RECORDING PROGRAMMING .......... 16
Notes ontimer recording . .... .. . . .. . .. . .. . ....... .... 16
Frequenttimer recording programming .................... 17
Confirmation/Cancelling ............................................ 17
TAPE LIBRARY SYSTEM ......................................... 18
5
EDITING ............................................................ 19
Tape copy .................................................................. 19
ADVANCED
Audio dubbing ........................................................... 19
OPERATION
6
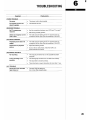
Troubleshooting .............................................. 20
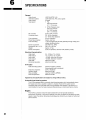
SPECIFICATIONS .................................................. 21

Safety precautions
DANGER:
This VCR contains live parts. Do not remove
the cabinet.
WARNING:
To prevent fire or shock hazard, do not
expose this product to rain or moisture.
CAUTION:
Do not put your hand or other objects in the
cassette loading slot because of the risk of
injury or an accident. Be sure to keep small
children away from the VCR.
Caution concerning condensation
Be careful of condensation
Condensation can form inside a VCR when it
is suddenly moved from a cold place to a
warm, humid one, or when a heater has been
turned onto quickly heat the room.
Do not insert a video cassette if you use
this VCR in areas subject to condensation.
Wait for 1-1/2 to 2 hours to completely
eliminate condensation before using the
VCR.
PRECAUTIONS
Operating precautions
●
●
●
●
●
●
●
●
●
Place the VCR on a flat, stable, level
surface. Never subject it to violent shaking
or any other shock or impact.
Do not expose the unit to high
temperatures. Excessive heat (heat
sources such as heaters, ovens, closed car
on hot days, etc.) may damage the unit.
Be sure to use this VCR only in a
temperature range of 5-C to 40”C (41°F to
105”F) and at less than 80% humidity.
Do not use the unit under the following
conditions:
—
in locations with high humidity
in presence of excessive dirt or dust
in areas subject to strong vibrations
—
near strong magnetic fields (e.g.
transmitting antennas, motors,
fluorescent lights, etc.)
Do not stack anything on top of your VCR,
or block the air vents, to prevent damaging
or overheating.
Do not place anything, except VHS video
cassette tapes, in the unit.
Do not allow rain, steam, dew, salt water,
sand, oily smoke, metal objects, etc. to
enter the unit.
Clean with a dry and soft cloth, or soft cloth
slightly moistened with a mild detergent
solution.
Do not use any type of solvent, such as
alcohol or benzine.
Power precautions
●
●
Do not forget that even in the stand-by
there is an electrical voltage inside the VCR
as long as it is connected to a wall socket.
Disconnect the power cord from the wall
socket if the VCR is not to be used for a
long time.
INTRODUCTION
Only cassettes marked ~ can
be used with this VCR.
Video cassette recorders bearing
the “l~Q” mark incorporate
VHS high picture quality
technology. Note that there is
interchangeability with former
VHSvideo cassette recorders.
Note:
If the unit does not operate
properly, switch it off, refer to
“TROUBLESHOOTING”or contact
your Sanyo authorized service
agent.
Power on/stand-bymode
The power on (I)/stand-by (0)
mode is selected by pressing the
W button.
VCRdisplay
Poweronmode(1)
Stand-bvmode(0)
“Stand-by mode” is the condition
in which only the time is
displayed.

1
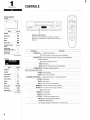
CONTROLS
INTRODUCTION
Functionindicator
TV screen
F
Mode
I
Display
Playback
Remote control sensor
Operate the remote control unit within a range of
approx, 30” and approx, 6m (20 ft.) from the front of
the VCR,
Fasl-forward
I
w
Rewind
I
++
Record
●
Record uause
● I
LJ
‘\ , /’
Programme position
number
~ 01-88
External input
--~”
AUDIOAUDEO IN (Rear)
L1
Indication
1
I
Function
External input
AV IN (Front)
~
L2
CHANNEL+, – Programme selection
FF Fast-forward, forward search during playback
(for 2 seconds)
VCR display
PAUSE/STILL
PLAY
0/1
Pause during recording, still picture during playback
Plavback
mm
Power onlstand-by mode
Recording
Rewind, reverse search during playback
TaDe stoD, cassette eiection
REC
REW
STOP/EJECT
Mode
Display
Cassettein w
Playback
I
D
1----
(On the remote control only)
A-DUB~Audio dubbing
AUDIO Sound track selection
CHANNEIJTRACKING+, -‘ Programme selection, tracking adjustment
CLEAR Clears data
INDEX Index search
INPUT ~External input mode selection
MEMORY ICounter “0:00:00” position memory
-t ””--
MENU/TV On-screen menu display selection
OK Confirms data
PRESET Tuner preset
RESET Counter reset
G-CODE G-Code timer programme set
SPILP Recording tape speed selection
“~Recoii;&eset-” ‘--: ‘“ -- ‘--”------”–—
-Direct programrnesetic{on, for”v;ious input
Forwardsearch
I
D
Fast-forward
I -lx-
Reversesearch
I
u
Rewind
I %-
Record
I
REC
Recordpause
5

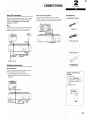
Aerial/RF connection
Set one of the channels on the TV as a video
channel specifically for the signals from the
VCR, See “Setting the TV to the video
channel” on page 7,
Note:
Stereo sound can only be enjoyed when the VCR is
connected to a stereo monitor~V or stereo audio
system using an AV or Hi-Fi audio connection.
1’
AERIAL
OUT
Aerial output cable
~u~P{i~~d (supplied)
To a ;all socket
Additional connections
AV connection
If your TV has an AV terminal, the following
AV connections are also possible,
● The advantage of this connection is a
higher quality of picture and sound during
playback.
TV
UDIO
IN
1~ ““”1 I
I ( .oon~
]U
cm
I
@@@
I .3
.
A A
AV-cable AUDIO VIDEO
(not supplied)
OUT
OUT
CONNECTIONS
Hi-Fi audio connection
You can obtain a dynamic sound output
through your Hi-Fi system when you playback
a tape recorded in Hi-Fi stereo on this VCR,
Stereo audio system
2
PREPARATION
Accessories
; ISeverything in the box?
Powercord
~
L–
Aerial output cable
u
I
I
L.
Remotecontrolunit J
2 “AA (IEC R6)” size,
1.5-volt batteries
I
Remote control batteries
insertion
1
2
3
Openthe lid.
Insert 2 “AA (IEC R6)” 1.5
volt batteries (supplied)
according to the @ and @
signs.
Replacethe lid,
6

2
PREPARATION
0/1—
PRESET -
1
1,
CHANNEU
TRACKING
(+,-) ;
—OK
El
AUTO SETUP
---------- --------- --------,
: [OK] .ENTER
II MENU I+TV
. . . . . . . . . . . . . . . . . . . . . . . ...-’
The buttons that can be used
with each menu are displayed
at the bottom of the screen.
The settings are entered with
the remote control.
If vou want to recall the AUTO
SETUPscreen, simply press
both CHANNEL(+ and -)
buttons on the VCRfor 3
seconds or more.
RFconverter output
(Video channel)
Area
1
Factory
1
Range I
seftino
Australia I 28
I
28-69
I
1
,
I
NewZealand! 28
I 22-69
I
I
7
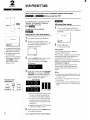
VCR PRESETTING
After all the connections are completed, please follow steps
_ to ~~ before using the VCR.
If the VCR has been connected to the TV
using the “AV connection”, simply set
your TV to the “AV” mode.
Go to -.
In case
of an RF connection
mI!lzl
Setting the TV to the video channel
1
2
3
4
Turn off the VCR using the (!)/1 button.
Turn on your TV and set your TV to
“VCR” or the position designated for VCR
use (always a position where no TV
programme is received).
m
VCR
00
Press the PRESET button on the remote
control for more than 3 seconds.
● The VCR display shows “28 RF.
(VCR display)
Rmm
Set the UHF channel using the CHANNEIJ
TRACKING+ (for Australia) or CHANNEU
TRACKING– (for New Zealand) button on
the VCR remote control, so that the test
pattern (2 vertical bars) appears.
(for Australia)
m
(for New Zealand)
m
●
●
●
When the VCR channel position on the
TV (UHF 22 (28) to 69) matches the
RF channel, the test pattern appears.
The output channel of the VCR (video
channel) is preset at the factory to be
received by your TV receiver on UHF
channel 28.
Adjust the tuning on the TV, if necessary,
so that the test pattern is clear.
s When completed, press the PRESET button.
● The VCR is turned off.
This completes the video channel setting.
VCR tuning (Auto tuning)
1
2
Turn on the VCR using the 0/1 button.
● The AUTO SETUP screen is displayed.
(TV screen)
m
u
Press the OK button.
● Auto tuning will start,
Auto tuning
This VCR has a built-in tuner capable of
tuning up to 88 TV stations.
The TV stations available in your area will be
automatically preset in order starting from
programme position number ‘(01”.
Because of this you may have to sort the TV
stations into the correct order. Please refer to
“Sorting the TV stations”.
When the Auto tuning is finished, the TV
station preset to the lowest programme
position number will be tuned on your TV
screen.
Notes:
●
●
●
During the auto tuning operations, please do not
press any of the buttons or controls on the VCR
or remote control.
Auto tuning is not possible if the VCR is set to
AV input mode.
The skip function will be automatically set for all
position numbers where no TV station has been
preset.

2
i
PREPARATION
Sorting the TV stations
ExamP/e: To change TV1 from program me
position “03’ to programme position “01”,
Programme position I 01 02
03
-—~
..—
...........
TV station
TV3
TV2
~TV1 ~
1
2
3
4
t .~
..........i
Press the PRESET button.
Using the CHANNEIJTRACKING (+ or –)
button select the desired TV station (e.g. TVl ).
r
\
I
TV1
I
Using the numeric buttons (O– 9), enter the
target programme position number (e.g. “01“).
Press the OK button.
Repeat steps 2 to 4 to change another TV
station programme position number.
5 When finished, press the PRESET button.
Clock setting
ExamP/e: Date... 9 December, 1997
1
2
3
Time... 16:15
Press the
MENU~V button.
● When the date and time are not set, the
CLOCK SET screen will be displayed.
Press the numeric 4 button,
Set the date and time usinq the numeric
buttons (O- 9).
Enter in sequence, 0912971615
CLOCK SET
;-09-: i-z: -9i----- 756-75-~
[+/-l +Tl ME SHIFT
[CLEAR] .TO CORRECT
[OK 1*ENTER
If you entered a wrong number, press the
CLEAR button to delet; it, then enter the
correct number.
Summer time/standard time adjustment
Press the CHANNEIJTRACKING (+ or –) button
to advance or retard the clock by one hour,
4 When finished, press the OK button,
● Seconds will start counting from “00 as
the OK button is pressed.
The normal TV broadcast screen will
return,
Additional tuning adjustments
Fine tuning
If the tuning is not optimum, it can be
improved by manual fine tuning,
1 Press the PRESET button.
2 Press the FF or REW button to obtain the
best possible picture and sound.
3 Press the OK button.
4 When finished, press the PRESET button.
Skip function
If only programme position numbers 1 to 30
have been preset, set the skip function for
programme position numbers 31 to 88, so that
only the preset TV stations will appear when
pressing the CHANNEIJTRACKING (+ or –)
button.
1
2
3
4
Press the PRESET button,
Using the numeric buttons or the
CHANNEIJTRACKING (+ or -) button,
select the programme position number to
skip.
Press the CLEAR button. The “S” indicator
will light,
To cancel the skip function, press the
CLEAR button again to erase the “S”
indicator.
Press the OK button.
Repeat steps 2 to 4 for every programme
position number to skip.
5 When finished, press the PRESET button.
Manual tuning
This tuning mode can be used to modify the
settings entered by the Auto tuning function,
or to manually preset the TV stations to
particular programme position numbers,
1
2
3
4
Press the PRESET button,
Using the CHANNEIJTRACKING (+ or-)
button, select the desired programme
position number,
Press the PLAY button,
If the search stops on a broadcast other
than the one desired, press the PLAY
button again until the broadcast from the
desired TV station appears on the TV
screen.
Press the OK button when the desired TV
Is
PLAY
REW
~)\ ),-.
‘., FF
CHANNEL/
MENIJTV
TRACKING
(+, -)
PRESET ~.r
7
CLEAR
o-9
000
0
cj
OK
(New Zealand only)
Tuningor presettingthe VCR
channels
This is very important for correct
G-Codeoperation.
Ideallyfor simpler operation,
channelsshould bepresetas
follows:
Television
Programme
stat
ion
I position number
TV 1
fl—
TV 2 2
TV 3
3
Foradditional channelsin yourarea
it is overto you to selectthe most
logicalchannelpositionto place
them.
-
* When you usethe G-Code
function to programme a
recording from a certain
channel for the first time, it will
askyou the programme
position number that channel
was preset to. That setting will
be memorized and
automatically set the nexttime
the same channel is selected,
station appears on the TV screen.
Repeat steps 2 to 4 to preset another TV
station to another programme position number.
5 When finished, press the PRESET button.
8

2
PREPARATION
Function setup
1
MENIUTV -
–AUDIO
Powerinterruption
If the power to the VCRhas failed
or hasbeendisconnectedfor
morethanl hour,theVCR
displayshows”-: --”.
However,thetunerpreset
memory will not be erased. So
there is no needto retune the
VCR stations.
The date, time and recording
information regarding future
recordings should be reset.
First refer to”- Clock
setting” on page 8, to setthe
clock (date and time), then, the
timer recording programmed
should be set again as desired.
VCR SETUP menu
(for Australia)
0. AUTO TUNING MEMORY
1 NTSC PBOPAL-TV NTSC443
2. CH I LO LOCK ON 00FF
[0-91 .SELECT
[MENU I ●TV
(for New Zealand)
0. AUTO TUNING MEMORY
I. NICAM OAUTO OFF
2. NTSC PBOPAL-TV NTSC443
3. CH 1LD LOCK
ON 00FF
[0-91 +SELECT
[MENU 1+TV
iii
VCR PRESETTING
1 Press the MENlf~Vbuttcm, then press
the numeric 3 button.
MENU
1. T IMER PROGRAM SET
2. PROGRAM CHECK /CLEAR
[3::VC:R::SE:TU:P::::::::::::::::::
4. CLOCK SET
n
~ Press the numeric button corresponding
to the item to set, until the “O” symbol is
displayed to the left of the desired mode.
(The settings indicated by the “O” symbols
are the factory default settings. )
.............
~ 0. AUTO TUNING MEMORY
i
Auto tuning
The Auto tuning function will start, and all
programme positions will be automatically
reprogrammed.
Note:
Be careful not to press the numeric button Oif you
do not wish to reprogramme all programme
positions.
------------- ---------------------------------
(New
Zealand only)
1. NICAM OAUTO OFF ;
,.
NICAM broadcasts setting
AUTO: To record NICAM stereo broadcasts
and bilingual broadcasts.
OFF: To record the normal sound (FM mono).
.............
~2:NTSC PBOPAL-TV NTSC443 ;
NTSC playback system
PAL-TV: When using a PAL (B/G) system
TV.
NTSC443: When using an NTSC4,43 system
TV. (Please use the
AUDIOMDEO OUT terminals.)
.............
~ 3. CHILD LOCK
ON 00FF
.......................
,
Child lock function
ON: “BLOCKED is displayed on the TV
screen and the sound is muted.
OFF: The child lock function is not engaged.
3
When finished, press the MENU/lV
button.
Hi-Fi Stereo/Bilingual programmed
sound selection
Using the AUDIO button, select the desired
sound to listen.
Stereo sound selection
When a stereo broadcast is received, the
stereo indicator “ST illuminates on the VCR
display.
VCR display !
Selected sound
“LR” Left and Right tracks
“=-
,,L ,,
Left track
-.
cc R,,
Right track
No indicator Monaural
Bilingual sound selection
When a bilingual broadcast is received, the
bilingual indicator
“BIL’ illuminates on the
VCR display.
VCR display ~
Selected sound
“LR”
Main and Sub
‘(L “
Main “-
“‘“ ‘-” v“- -
No indicator
I Main
9

2
PREPARATION
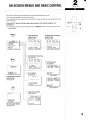
ON-SCREENMENUS ANDBASIC CONTROL
The VCR can easily be programmed by using the menus displayed on-screen.
The menus are controlled from the remote control.
If you memorize the basic operations, each setting can easily be made by following the steps of the
concerned menu.
Turn on the TV, then set it to the preset video channel or AV mode (if using the “AV
connection”).
● If a wrong sub-menu has been selected, press the MENU~V button to return to the main menu,
MENWTV
D
G-COOE
TYPE
and start again.
MENU/TV
1.
Timer recording
programming
(see page
16)
Frequent timer recording
programming
(see page 17)
I
PR DATE START END
02 25.12 10:30 I1:OOW
+01 17.12
10:00 11:50P
E
.---
--:—_
----:__
----:__
--_____
{*
~$
I“““
--:__
-_:__
--:__
-_,_-
I
[OK I+ ENTER
[CLEAR I *TO CORRECT
,.,..,,, @
[TYPE] ~TYPE [ + 1~FREQ TMR
~
[0-91 .SELECT
[MENU] ~TV
09.12.97
16:15
I
i ‘i
;~
~~
~:
2. Confirmation/Cancelling
j : (see page 17)
G-CODE
PR DATE START END
+01 23.12
15:30 16:OOW
02 25.12 10:30 II:OOW
__, --
__ :--
-- -- __, --
-- -- __, --
__ :--
3. Function setup
(see page 9)
~
\
G-CODE NUMBER
489135 ---
[OK I -ENTER
[CLEAR I *TO CORRECT
[G-CODE] *TV
[0-91 +SELECT
[MENU I+TV
4. Clock setting
(see page 8)
(for Australia)
0. AUTO TUNING MEMORY
1. NICAM
#AUTO OFF
2. NTSC PBOPAL-TV NTSC443
3. CH I LO LOCK
ON @OFF
G-Code timer recording
CLOCK SET
09.12.97
16:15
programming
(see page 14)
s, . . .
[0-91 .SELECT
[MENU 1+TV
TYPE
(for New Zealand)
5. Tape library system
(see page
18)
TYPE+F I LM
REC. L 1ST PLUS
PR DATE START TYPE
1. 01 10.11
16:00 FILM
2. 04 12.11
14:00 SPORT
3. 01 13.11
11:40 MUSIC
4. 02 13.11
10:00 NEWS
::
7.
[0-91 .SELECT
[TYPE I -TYPE
[CLEAR I *CANCEL
[OK I+ ENTER
.. ...8
Recording type setting
(see page
13)
10

3
BASICOPERATION
T
PLAY
(.
INDEX
REW
,-.’$ ;,-
./—\\ .
STOP
,:
P&:l
=
REW EJECT
Modesand buttonsillumination
3
–’
Forward search
Rewind search
Fast-forward
Rewind
Record
~:,
PLAY
,7>
FF
.-A’
FEW
All buttons off
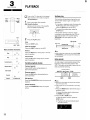
PLAYBACK
Turn on the TV, then set it to the preset
video channel or AV mode (if using the
C<AVconnection”).
Insert a recorded video cassette.
Cassette loading
Gently push the centre of the cassette
until it is loaded automatically,
Press the PLAY button.
stop
Press the STOP button.
Eject the cassette
Press the EJECT button on the VCR.
Rewind
Press the REW button during stop or reverse
search operation,
Fast-forward
Press the FF button during stop or forward
search operation.
Variable playback modes
Forward search
Press the FF button during playback or
fast-forward operation.
Reverse search
Press the REW button during playback or
rewind operation.
Still picture
Press the PAUSE/STILL button during normal
playback,
Frame advance
Press the PAUSE/STiLL button during still
picture,
Endless play
This function will play back a tape to the end,
rewind it then replay it again, and again until
you stop it.
1 In the stop or playback mode, first press the
PLAY button then while holding it down
press the REW button on the VCR,
2 To cancel the endless play, press the
STOP button.
If the counter memory function is used in
combination with endless play, the VCR will
play back the tape to the counter reading
“~ 0:00:00” then start again from the
beginning.
“m O+)o:oo”
Note:
During endless play, please do not press FF, REW
or PAUSE/STILL button because the endless play
will be cancelled.
Index search
An index signal is automatically placed at the
beginning of each recording made on this
VCR. This index can be used to search for the
next (or present) recording.
Current position
Index Index
signal signal
Notes:
● Make sure that indexes are at least five minutes
apart from each other.
● Index signals are not recorded after a recording
pause.
1 Press the INDEX button while in the stop or
playback mode,
To cancel the index search mode, press
the INDEX button again,
2 Press the FF or REW button,
To stop the search function, press the
STOP button.
● Playback will start automatically when
an index is found.

3
BASICOPERATION
I
Counter memory
Picture adjustments
This convenient feature for finding the
beginning of a specific recording etc., is made
possible by the “Linear Time counter” that
indicates the tape run time in hours, minutes
and seconds.
1 Press the RESET then the MEMORY
button before starting recording or playback.
● The zero point of the counter is now
memorized and the memory indicator
“@@’will illuminate.
2 Press the REW button at the end of the
recording or playback, the tape will be
rewound and stop automatically at the
memorized position.
Notes:
● Whenever you load a cassette tape, the counter
is reset to
“0:00:00.
● If you play back a blank tape or a blank portion
of tape, the counter will not operate.
Playback of an NTSC tape
This VCR can playback an NTSC tape on a
PAL (B/G) or NTSC 4.43 system TV,
NTSC
When you playback an NTSC tape on a PAL
TV,
●
●
If the image is unstable, rolling vertically,
use the TV vertical hold button to stabilize
the image.
The image may shrink vertically and a
black band may appear at the top and
bottom of the screen.
Notes about NTSC tape
● An NTSC tape cannot be copied normally.
● Picture quality of NTSC tapes cannot be
guaranteed with this VCR.
● When an NTSC Hi-Fi tape is played back,
the monaural sound only will be heard.
Tracking adjustment
This VCR is equipped with an auto tracking
function. During playback this function will
adjust the tracking to the best possible image.
If noise appears in the playback picture, press
the CHANNEUTRACKING (+ or –) button, to
reduce the noise interference in the image.
L-J
.----A---I
-~-’ ‘z~~+;~i--- Noise interference
-&44,0, ~
Note:
Depending on the cassette tape, you may find that
some noise interference cannot be completely
corrected using the tracking controls.
If the still picture moves up and down
Use the CHANNEL/TRACKING (+ or –)
button, to correct.
Once the cassette tape is unloaded, the VCR
is reset and the next time the VCR is used
you may need to do the corrections again.
Notes:
●
●
●
During variable playback modes the picture may
contain some noise or vibration that cannot be
corrected, This is not a malfunction.
If still picture playback is continued for about five
minutes, the VCR will automatically change to
stop mode in order to prevent the tape from
being damaged,
This VCR will not guarantee the picture quality of
still picture or frame advance.
,..
I
RESET
Q
MEMORY ~
; n
CHANNEU .
TRACKING
(+,-)
I Autopoweron
I The power is automatically
switched on as a cassette is
inserted while the VCR is in the
stand-by mode.
Autoplay
The VCRwill play backa tape
automatically when a video
cassette is inserted whose
erasure-prevention tab has been
removed,
Autoeject
When a video cassette without an
erasure-prevention tab is played
to the end of the tape, the tape
will be automatically rewound and
then the cassette will be ejected.
Stand-bymode eject
The video cassette will be ejected
when the EJECT button is
pressed, even when the VCR is in
stand-by mode.
12

3
BASICOPERATION
I
CHANNELI
B
S’/L’
TRACKING
TYPE
(+, -)
OK
Recordingtape speed
Best image and sound
s’ quality.
Nodisplay.
Recording or playback times
are double the SP mode.
‘pm
Mis-erasure preventioneject
The cassette will automatically be
ejected if recording is attempted
on a video cassette without an
erasure-prevention tab.
Autorewind
The VCR automatically rewinds
the tape when it reaches the end.
This function does not operate
with timer recording or Quick
Start Recording timer.
Erasure-prevention tab
To prevent accidental erasure,
removethe tab after recording.
To record again, cover the hole
with vinyl tape.
RECORDING TV PROGRAMMED
n Turn on the TV, then set it to the preset
— video channel or AV mode (if using the
0-9
1
2
3
4
5
“AV connection”),
Insert a video cassette with
erasure-prevention tab.
Press the numeric buttons, or the
CHANNEIJTRACKING (+ or -) button, to
select the TV station to be recorded.
To select the tape speed, press the
SP/LP button.
If necessary, press the TYPE button to
set the recording type.
Please refer to “Setting the recording
type” below.
Press the REC button.
To stop the recording, press the STOP
button.
Setting the recording type
If a recording type is selected, it will be
displayed and make programme selection
easier when listing the tape recording data.
It can be used to easily find a desired
recording. (Refer to “TAPE LIBRARY
SYSTEM” on page 18.)
1 Press the TYPE button repeatedly untill the
desired type is displayed.
2 When the desired type has been selected,
press the OK button.
n
TYPE+ ~FILM;r--------------- --
(Recording list plus screen)
1.
::
4.
5.
6
7
[0
-91+ SELECT
I
FILM (F): Film
S#ORT (S): SpOrtS
D;AMA (d): Drama
MhlC (M): Music
N;WS (n): News
4
ANIME (A): Animation,
cartoon
4
EDUC.(E): Educational
programme
The letter In brackets
(e.g. (F)) shows the display
on the
VCRdisplay
Note:
The selected recordinu tvpe is cancelled if the VCR
If you wish to avoid recording
unwanted material
1
Press the PAUSEISTILL button.
2 To continue recording, press the
PAUSE/STILL button or REC button,
Note:
If the record pause mode continues for about five
minutes, the VCR will automatically go into the stop
mode in order to prevent damage to the tape.
Recording one programme while
watching another
1
2
Start recording the desired TV station
programme selected on the VCR.
Select on the TV receiver the TV station
you want to watch.
If using the “AV connection”, set the TV to
the TV mode,
Quick Start Recording timer
Timer recording is simple.
You can start a recording and then
programme when the VCR will automatically
stop recording and go into stand-by mode.
1
2
Press the REC button twice.
Set the recording end time by using REC
and CHANNEIJTRACKING (+ or –)
buttons.
REC IUnits of 30 minutes
CHANNEIJTRACKING Units of 1 minute
(+, -)
I
● The timer indicator (~) will light after the
recording end time is set.
To
stop the recording at any time, press the
STOP button.
Checking/Changing
When the REC button is pressed during Quick
Start Recording, the recording end time will
blink,
The recording end time can be changed by
pressing REC and CHANNEUTRACKING (+
or –) buttons.
IS turned off (stand-by-mode) or if the cassette tape
is ejected.
13

G-CODETIMER RECORDING
PROGRAMMING
There are two ways of programming G-Code
timer recordings,
One is using the on-screen display and the
other one is using the VCR display.
● You can set up to 6 programmed to be
recorded upon a period of up to 1 year.
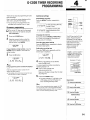
On-screen programming
Turn on the TV, then set it to the preset
video channel or AV mode (if using the
“AV connection”).
Press the G-CODE button.
Using the numeric buttons, enter the
Cod; number for the programme you
want to record. (e.g. 489135)
~
;4L1913.5.i3.:.:.J
If you entered a wrong number, press the
CLEAR button to delete it, then enter the
correct number.
Press the OK button.
‘-l
G-CODE NUMBER
489135 ---
PR DATE START END
~01 25.12
15:00 16:OOW
Notes:
If the programme position number (PR) displays
“--~j:
Enter the programme position number the TV
station has been preset to.
● That setting will be memorized and set the next
time the same TV station is selected.
m
++ 25.12 15:00 16:OOW
Additional settings
Daily/Weekly recording
Press the MENWTV button repeatedly to
select:
.... “f”-
~R DATESTARTfor daily recording (Monday
‘Oi 25i‘I”~F15’00 through Friday)
for weekly recording (the
.!; ~~;;wi~~~ same programme every
week)
Changing the end time
Each press of the CHANNEUTRACKING (+
or –) button will change the recording end
time by units of 10 minutes.
Recording tape speed setting
Press the SP/LP button repeatedly to display
the desired tape speed.
Setting the recording type
Press the TYPE button repeatedly until the
desired type is displayed.
A When allthesettings areas desired,
press the OK button.
You can programme another recording by
repeating steps 2 to 4.
~ Insert a video cassette with
erasure-prevention tab.
Make sure the tape is longer than the total
recording time.
s Press the G-CODE button.
● The timer indicator (n) will light on the
VCR display and the VCR goes into
timer recording stand-by mode.
Note:
Even if a timer recording has been preset, the VCR
can be used as usual up to the programmed start
time. When finished using the VCR, do not forget to
return it to timer recording stand-by mode.
ON-SCREENOPERATION
G-COOE
+77
:%
MENIJTV
J
SP/LP
CHANNEL/ -
TRACKING
TYPE
(+,-) ;
7
CLEAR
o-9
%. OK
This VCR has a built-in G-Code
system. Programming timer
recordings is now as simple as
entering a Code number (1 to 9
digits) listed next to each
programme in your local TV
guide or newspaper TV
programme listing.
G-Code is atrademark applied for
by Gemstar Development Corp.
G-Codesystem is manufactured
under license from Gemstar
Development Corporation.
~
NewspaperorTV guide
I
I
—.- .—
Easyprocess
1
Press the G-COOEbutton.
4
i 2 Enter the Code number.
I
I 3 Press the OK button.
I
Additional settings
4
‘ 4 Press the OK button.
4
I 5 Press the G-COOE button.
I
14

ON-SCREENOPERATION
%
G-COOE
MENWTV
CHANNELI
SP/LP
TRACKING
TYPE
(+, -)
CLEAR
o-9 0:
~.
OK
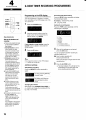
(New Zealand only)
Note on sky decoders and
recording
●
1.
2.
There are at present two types
of sky decoders available in
New Zealand.
Base Band Decoder (no remote
controlsupplied,oldertype).
YOUcannotsuccessfullyrecord
G-Codeprogrammedusingthis
typeofdecoder.(Unlessyour
videois modifiedinternallyfirst.)
ContactSkyTVfor details.
IRD Oecoder (suppliedwithSky
Remote andwith UHFoutput).
This decoder allows you to
programme recordings using the
G-Codefunction. You can usethe
SkyCODENUMBERSto record
SkyTV programmed with your
VCR, However,pleasenote the
following limitations.
(a)The Sky CODENUMBERSused
with the VCRcan not change the
channels on the Sky Decoder.
This meansyou must first
preselect the Sky channel you
want to record (movies, sport,
news)
(b)The VCRwill then turn on and
record the programme position
which has beenset for Sky. (e.g.
programme position “4”).
The Skychannel you record
(movies, sport, news) will depend
on which channel the decoder was
left on.
(c) Remember the first time You usea
Sky CODENUMBER,the
programme position number
(’(PR”) on
thevideoneedsto be
setthe same
for allthreeSky
channels.
Thiswilldependontheprogramme
positionnumberyouallocatedfor
Sw intheset
up. ieprogramme
position number “4’.
G-CODE TIMER RECORDING PROGRAMMING
Programming on the VCR display
You can programme or confirm a G-CODE
timer recording on the VCR display even if the
TV
is turned off.
1
2
Press the G-CODE button.
UsincJthe numeric buttons, enter the
Cod; number for the programme you
want to record. (e.g. 489135)
If you entered a wrong number, press the
CLEAR button to delete it, then enter the
correct number.
3
Press the OK button.
Note:
If the programme position number (PR) displays
“--”, please refer to page 14.
Additional settings
Daily/Weekly recording
Press the MENU/TV button repeatedly to
select:
for daily recording (Monday
,through Friday)
for weekly recording (the
same programme every
week)
Changing the off time
Each press of the CHANNEL/lRACKiNG (+
or –) button will change the recording off time
by units of 10 minutes.
Recording tape speed setting
Press the SP/LP button repeatedly to display
the desired tape speed.
No display: Standard Play mode
LP: Long Play mode
Setting the recording type
Press the TYPE button repeatedly until the
desired type is displayed.
F: Film
s: sports
d: Drama
M: Music
n: News
A: Animation, cartoon
E: Educational programme
a When allthesettincrs areas desired,
press the OK butte;.
You can programme another recording by
repeating steps 2 to 4.
Insert a video cassette with
erasure-prevention tab.
Make sure the tape is longer than the total
recording time.
Press the G-CODE button.
● The timer indicator (n) will light on the
VCR display and the VCR goes into
timer recording stand-by mode.
15

ON-SCREEN TIMER RECORDING
PROGRAMMING
&ar@af Programme position... 02
Date... 25
December
Start time... 21:30
End time... 23:15
11 Turn on the TV. then set it to the Dreset
-
— video channel or AV mode (if using the
“AV connection”)
1
2
3
Press the MENLUTV button, then press
the numeric
1 button.
MENU
[j:; T:[M:ER::P:R.O:G.R:A.M::S:E.T::::: ;
2. PROGRAM CHECK I CLEAR
3. VCR SETUP
4. CLOCK SET
5. REC. LIST PLUS
Using the numeric buttons, set the
programme position number (e.g. “02”),
1
PR DATE START END
+,0?; -- ---
_-:_. _. :_.
9
I
Using the numeric buttons, set the date
(e.g. 25 12).
I
PR OATE START ENO
+02 :Z:5:.Z2 --: -- --: --Y
I
If you entered a wrong number, press the
CLEAR button to delete it, then enter the
correct number.
Additional settings
Daily/Weekly recording
Press the CHANNE~RACKING (+) button
repeatedly to select:
PR oA~E sTARTIfor daily recording (Monday
.02 25.1 Z~~l 5:00 ‘throuqh Friday)
for weekly recording (the
PR DATE START I
.02 25,1 ~.wz15:oo I
same programme every
.....
week)
Recording tape speed setting
Press the SP/LP button repeatedly to display
the desired tape speed.
a Set the recording start andend times (e.g.
213023 15).
1
PR DATE START END
---------- .. .. . ..
+02 25.12 :2j.;3.0..Z3.; l.$Y
I
Setting the recording type
Press the TYPE button repeatedly until the
desired type is displayed.
PR DATE START .TYP.E.
+02 25.12 21:30 FILM;
-- -- -- -_ :-_ -----
--,—.--—-
1
s When allthesettings areas desired,
press the OK button,
YOUcan programme another recording by
repeating steps 2 to 5,
~ Insert a video cassette with
erasure-prevention tab.
Make sure the tape is longer than the total
recording time,
6
Press the 0/1 button.
● The timer indicator (~) will light on the
VCR display and the VCR goes into
timer recording stand-by mode.
Notes on timer recording
● The (~) indicator will flash if no video
cassette is loaded when going into timer
stand-by mode.
● The (~) indicator will flash and the video
cassette is ejected if a video cassette with
no erasure-prevention tab is loaded.
● Daily recording starting on a Saturday or
Sunday is not possible.
Programme priority
● If several timer recordings have
overlapping recording time, the recording
with the earliest start time will be recorded
first, until the
end.
19:00
20:00 21:00 22:00
23:00
,
I I
1 \
I Programme ]
>7---–-.-=
./
.,
——-—-t ——–
I
-1
These portions will not be recorded
ON-SCREENOPERATION
~.—---
(!)/1
%
:1
MENU/TV
CHANNEL/ ‘ ,
SP/LP
TRACKING
TYPE
(+)
CLEAR
o-9
000
0
INPUT
0
OK
To record from an external
source
At step 2,
Pressthe INPUTbutton.
“L1” is displayed instead of the
programme position number.
“L1”: AUDIOMDEO IN (Rear)
If a programme position number
is already displayed, first press
the CLEAR button.

ON-SCREENOPERATION
ON-SCREEN TIMER RECORDING PROGRAMMING
I
Frequent timer recording
&
TYPE
MENWTV
CHANNELI
~—
TRACKING
(+, -)
o-9
000
0
CLEAR
o
OK
programming
This VCR memorizes the settings of 5
previous timer recordings.
Using these settings, you can now easily
programme a timer recording for a
programme on the same day of the week and
at the same hour that a programme previously
recorded.
1 Press the MENUllVbutton, then press
the numeric 1 button.
MENU
[j:: T:[MER::PRoG.RAM::sEt::::::;
2. PROGRAM CHECK /CLEAR
3. vCR SETUP
4. CLOCK SET
5. REC. LIST PLUS
z Every time the CHANNE~RACKING (+)
button is pressed, using one of the 5
memorized recordings data, a
programmed timer recording will be
displayed for the next same day of the
week.
Memorized recordings
PR OATE
01 10.12
START END
10:00 11:50?!
PR D~TE START ENO
01 17.12 10:00 11: 50P
.- -- --
-—, __
-- --
--
-- --:-_
-—, -_ __ :_-
[OK I -ENTER
[CLEAR I -TO CORRECT
[MENU l~TV [+1 +FREQ. TMR
Ita
● When using memorized recording data, the
recording type will not be set. If necessary,
press the TYPE button to set the recording
type.
3
Press the OK button.
Notes:
● If a previous timer recording was set for daily
(Monday through Friday) or weekly recording,
the settings are not memorized.
● If the VCR is reset, the frequent timer memory
will be erased.
Confirmation/Cancelling
1 Press the MENU/TV button, then press
the numeric 2 button.
H
:2-:P-RO-GR-AM-“c-HE”cK-icLEAR-~
● Programmed timer recordings are
listed,
PR DATE START ENO
+01 23.12
15:30 16: OO$P
02 25.12 10:30 I1:OOP
—-:.- --:. -
-- --
-_,-_
-- --
--, -_
.- ----- -- .-—
[+/- l~SELECT”
[CLEAR I* CANCEL
[MENU I ~TV [TYPE 1~TYPE
Recording type confirmation
Press the TYPE button and the “TYPE”
column will be displayed instead of the “END
time column.
Press the TYPE button again to return to the
“END
time column display.
●
●
●
2
3
4
f
(
(
PR DATE START TYPE
+01 23.12
15:30 FILM
02 25.12 10:30 ORAMA
-- --
_-:_. --—-
--
—-:-. ----
-- -- --
[+/- lkELECT”
[CLEAR I *CANCEL
[MENU I -TV [TYPE I +TYPE
To correct a programmed timer recording,
‘irst cancel it, then reprogrammed it as
~esired.
To cancel a programmed timer recording,
>ontinue with step 2.
To return to the normal TV broadcast
screen, press the MENWTV button.
Using the CHANNEUTRACKING (+ or–)
button, select the programme to cancel.
PR DATE START END
01 23.12 15:30 16:OOY
~02 25.12
10:30 ll:OO!f
-_:--
-- -- _-
--:_-
--:_-
-- --
-., -_
[+/-1 kELECT
[CLEAR I *CANCEL
[MENU] *TV [TYPE I +TYPE
Press the CLEAR button.
When finished, press the MENU/lV
button.
17

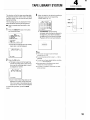
This function will list the tape recordings data
(Programme position number, date, recording
start time, type). It can be used to easily find a
desired recording.
The recording type is only displayed if it has
been set before recording the programme.
~ Insert a cassette tape recorded on this
VCR.
1 Press the MEFllJ~V button, then press
the numeric 5 button.
MENU
1. TIMER PROGRAM SET
2. PROGRAM CHECK /CLEAR
3. VCR SETUP
4. CLOCK SET
(5:: R:EC:;C:[S:7.::P.L:U.S:::::::::::;
[0-91 .SELECT
[MENU ]*TV
09.11.97 16:15
●
If the tape recordings data has already
been read, it will be displayed.
REC. LIST PLUS
PR DATE START TYPE
1.
2.
3.
4.
::
7.
[OK 1+STAR1
z Press the OK button
● The tape is rewound to the beginning
and the recordings data is read. Every
time a set of recordings data is read it
is displayed on-screen.
REC. L I ST PLUS
PR DATE START TYPE
1. 02 17.10 12:00 FILM
2.
3.
4.
5.
6.
7.
[0-91 +SELECT
TAPE LIBRARY SYSTEM
3
When the data for the desired recording is
displayed, press the corresponding
umeric button
(1– 7).
REC. LIST PLUS
PR DATE START TYPE
1. 02 17,10 12:00 FILM
2, 01 17.10 18:30 SPORT
3. 04 17.10 20:30 ORAMA
4. 02 18.10 12:00 MUSIC
5 -– -–.––
-----
6. 01 18:10 22:00 NEWS
7. 05 19.10 22:00 ANIME
[0-91 .SELECT
●
“SEARCHING” will be flashing
on-screen while the tape is rewound to
the beginning, then fast-forwarded to
the beginning of the desired recording.
Playback will then start automatically,
;:;
.. : : :
..,’
SEARCH ING -
..’” ; : : “..
.,;
Notes:
●
●
●
●
●
This function can only be used with tapes
recorded by this VCR.
If a recording data cannot be read, “-–” will be
displayed.
If a type has not been selected before recording,
f{
–––––” will be displayed.
Recording data of recordings shorter than 5
minutes may not be displayed.
If the tape is unloaded or rerecorded, the data
will be canceled.
4
ON-SCREENOPERATION
Ii
I
● Up to 7 sets of recordings data can be
displayed on-screen at the same time,
If 8 or more sets of recordings data are
read, the last 7 sets only are displayed,
To cancel the operation, press the STOP
button.
18

5
ADVANCEDOPERATION
—
%
STOP
,_ .3
PNILJ;[
REC
SPILP
AUDIO
A-OUB
T-J
INPUT ~
External input mode selection
Press the INPUT button.
“11”or “L2” is displayed instead
of the programme position
number.
AUDIOMOEO IN (Rear): select “L1”
AV IN (Front)
: select “L2”
Notes:
●
●
If you are using a tape with a
monaural only original sound
recording, the audio dubbing will
erase the original sound. Audio
dubbing is only possible on a
tape with Hi-17original sound.
After an audio dubbing, to listen
to the Hi-n sound, press the
AUOIObutton to display the “L’
and “R” indicators on the VCR
display.
To listen to the dubbed sound,
press the AUDIObutton to erase
the “L” and “R” indicators from
the VCR display.
Audio dubbing
Mode
Stand-by
Dubbing
Display
m
m
(;~{: Flashing)
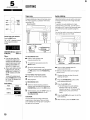
EDITING
Tape copy
Copying (dubbing) a tape can be done using
two video recorders, a playback VCR and a
recording VCR.
Recording VCR
I PlaybackVr2R (C%rncorder)
Camcorder
VCR
for
0-9
1
2
for
-
3
for
4
5
RECORDING VCR
Insert a video cassette with
erasure-prevention tab.
To select the tape speed, press the
SPILP button.
Set to the record pause mode.
The record pause mode is set by pressing
the REC button then the PAUSE/STILL
button.
PLAYBACK
VCR (Camcorder)
Insert the recorded video cassette.
Start playback.
RECORDING VCR
When the desired starting position is
reached, start recording by pressing the
PAUS13STILL button or the REC button,
When finished, press the STOP button on
the RECORDING VCR then on the
PLAYBACK VCR.
CAUTION:
The unauthorized recording of television
programmes, video tapes, films and other
such material may infringe upon copyright or
the rights of third parties.
Audio dubbing
Using this function, you can add a voice over
or background music to the image recorded
on a tape.
To perform an audio dubbing on a tape
recorded with a camcorder, you will have to
first make a Hi-Fi copy of the camcorder tape
to a VHS format video cassette using this
VCR.
You can then add a voice over or background
music to the copy you have made.
/
I
/ ,
.,,,. ,
.,,,., .,!,.,0, /
Audio source
Camcorder Stereo audio system
~ Insert a video cassette tape with
erasure-prevention tab.
● Make sure the recorded sound (original
sound) is Hi-Fi,
1
2
3
Playback the tape to select the audio
dubbing start point.
Press the PAUSE/STILL button at the
audio dubbing start point.
Press the A-DUB button,
4
5
●
The VCR goes into audio dubbing
stand-by mode. The “L and “R” -
indicators will go off. If monitoring the
external sound, the sound will be
heard,
Press the A-DUB button again to start the
audio dubbing.
When finished, press the STOP button.
19
Page is loading ...
Page is loading ...
Page is loading ...
Page is loading ...
-
 1
1
-
 2
2
-
 3
3
-
 4
4
-
 5
5
-
 6
6
-
 7
7
-
 8
8
-
 9
9
-
 10
10
-
 11
11
-
 12
12
-
 13
13
-
 14
14
-
 15
15
-
 16
16
-
 17
17
-
 18
18
-
 19
19
-
 20
20
-
 21
21
-
 22
22
-
 23
23
-
 24
24


Ask a question and I''ll find the answer in the document
Finding information in a document is now easier with AI
Related papers
Other documents
-
Panasonic NV-HV60 User manual
-
Sony SLV-EZ725AZ User manual
-
-
-
-
-
JVC HR-DD949E User manual
-
Black Diamond Equipment BLD-6HD1 User manual
-
LG AF994NP Owner's manual
-