Page is loading ...

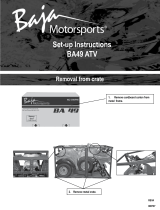
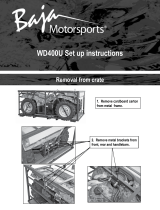
1. Remove cardboard carton.
Removal from Carton
SC150 Scooter Set up Instructions
2. Remove metal frame, plastic covering,
hardware and all parts provided.

2
Parts
Front wheel
Tools
Mirrors
Battery
Rear luggage carrier
Headlight panel
Hardware
Rear Shocks
3. Lift rear end to attach left and right rear shocks
using bolts provided. Torque to 17 ft.lbs.
Fender A

3
Rear Luggage Carrier
5. Remove hardware provided for assembly.
Attach handlebar stem to steering stem.
Torque to 33 ft.lbs.
6. Secure all wires with zip tie.
Handlebar
Bolt
Nut
4. Attach rear luggage carrier
using hardware provided.
6mm bolts
Torque to 7 ft.lbs.
8mm bolts
Torque to 17 ft.lbs.

4
Front Fender
7. Attach fender A to fender B using
1 phillip head screw.
8. Attach each side of front fender to fork
with 4 phillip head screws, 2 on each side.
Phillip head
screw
Fender A
Fender A
Fender B

5
9. Align speed sensor between
front wheel and front fork.
11. Remove brake caliper shipping spacer
and discard. Attach brake caliper to front
forks using bolts provided.
Torque bolts to 7 ft.lbs.
Shipping spacer
Axle bolt
Speed sensor
Alignment tab
on front fork
10. Place front wheel spacer between disc
brake and fork on axle bolt. Attach front
wheel with axle nut provided.
Torque to 33ft.lbs.
Front wheel
spacer
Axle nut
Wheels

6
12. Connect headlight wire. Align tabs on
headlight panel with grooves on console.
Tab
Groove
13. Secure headlight panel using
phillip head screws.
Headlight panel

7
14. Attach left and right mirrors to handlebar assembly
using allen head screw, lock washer and spacer.
Mirrors
Allen head screw
Lock washer
Spacer

8
Battery located in
oorboard under mat.
Battery Installation
WARNING
The following procedure is very dangerous and should be performed with utmost care and attention. Wear
protective eyewear, rubber gloves, and have water available should electrolyte come in contact with skin or
eyes. KEEP ALL CHILDREN AWAY FROM THE AREA WHILE THIS PROCEDURE IS BEING PERFORMED.
POISON – CAUSES SEVERE BURNS
Contains sulfuric acid.
Avoid contact with skin, eyes, or clothing
To prevent accidents, rinse empty container with water.
ANTIDOTE:
External – ush with water
Internal – Call physician immediately. Drink large quantities of water or milk.
Follow with milk of magnesia, beaten eggs or vegetable.
Eyes – Flush with water for 15 minutes and get prompt medical attention.
KEEP OUT OF REACH OF CHILDREN.

9
Note: The following page is for vehicles with battery’s containing separate electrolyte pack. Most
battery’s will come with the electrolyte already sealed into the battery.
Preparing the battery:
· Place battery on level surface. Remove sealing tape
from top. (see gure 20)
· Take the electrolyte container out of the plastic bag.
· Place electrolyte container upside down with the
sealed silver mouths of the electrolyte bottles in line
with the six ller holes of the battery. (see gure 21)
· Push the container down strongly enough to break the
silver seals.
· As electrolyte starts owing into battery, air bubbles
will come up from the mouths of the plastic electrolyte
bottles.
· Leave bottles upside down in battery holes until
electrolyte is completely drained.
· Never leave children unattended around battery.
· If air bubbles cease to oat to the top of the electrolyte
bottles, tap lightly on top.
· DO NOT remove container from battery while it is
draining.
· Never cut or pierce electrolyte container.
· After all the electrolyte has drained from the bottles
into the battery, pull plastic electrolyte bottles gently
out of the battery.
· Discard empty electrolyte bottles in a waste area that
is inaccessible to children and animals.
· After lling let battery stand for at least 30 minutes
before charging. This allows the electrolyte to
penetrate plates for optimum performance and ensures
longer battery life.
· After 30 minutes the battery is ready for its initial
charge. Place cap strip loosely over the lling holes as
shown in the picture. (see gure 22)
Figure 20
Figure 21
Figure 22
Battery Installation

10
WARNING
NEVER REMOVE THE STRIP OF CAPS
NOR ADD ANY WATER OR ELECTROLYTE.
How to Initially Charge the battery:
1. Connect the red positive (+) cable to the red positive (+)
pole of the battery.
(see gure 23)
2. Connect the black negative (-) cable to the black
negative (-) pole of the battery. (see gure 24)
Note: The red positive (+) cable has a larger diameter
than the black negative (-) cable.
3. Charging rate: Charge battery @ 0.7 Amps for
5 ~ 10 hours.
• After charging is complete, press down rmly with
both hands to seat the caps. (Do not pound or
hammer.) The battery is now sealed. (see gure 25)
• Locate battery compartment on scooter. The
battery compartment is located under the oorboard.
(see gure 26)
• Attach red positive (+) cable to positive (+) terminal
on battery. Then attach black negative (-) cable to
negative (-) terminal on battery.
•
Figure 23
Figure 24
Figure 25
Figure 26
Battery Installation

11
13. Fill engine with correct amount of oil. Refer
to owners manual for oil types and quantity.
14. Fill gas tank as specied in owners manual.
Oil Plug.
Gas and Oil
!!WARNING!!
This engine may be shipped with packing
oil. This oil should be drained and replaced
with new oil as described in the owners
manual. Never attempt to start engine with-
out rst replacing engine oil with proper
amount and grade as described in the own-
ers manual.
15. Refer to owners manual for proper
starting instructions.
ATTENTION: Side kick stand must be placed
in upright position in order to start engine.
/