Winmate M101B User manual

Category
Tablets
Type
User manual

This manual is also suitable for

Winmate M101B is a rugged Tablet PC designed for use in harsh outdoor environments. It features a 2 Megapixel webcam, a 5MP autofocus rear camera with flash, and a capacitive touch screen for precise input. The M101B also has a variety of ports and expansion options, including USB 3.0, HDMI, LAN/RS232, and a microSD card reader. With its powerful performance and durable design, the Winmate M101B is ideal for use in a variety of applications, such as field service, manufacturing, and healthcare.

Winmate M101B is a rugged Tablet PC designed for use in harsh outdoor environments. It features a 2 Megapixel webcam, a 5MP autofocus rear camera with flash, and a capacitive touch screen for precise input. The M101B also has a variety of ports and expansion options, including USB 3.0, HDMI, LAN/RS232, and a microSD card reader. With its powerful performance and durable design, the Winmate M101B is ideal for use in a variety of applications, such as field service, manufacturing, and healthcare.

Please read these instructions carefully before using this product, and save this manual for future use.
M101B Tablet PC
Quick Start Guide
M101B Quick Start Guide 1
Getting Started
Congratulations on purchasing this rugged Tablet Computer. The rugged design allows you to
use it in harsh outdoor environments.
This quick start guide tells you step by step how to get the Tablet Computer up and running. You
will find instructions for the following procedures:
Unpacking
Description of Parts
First Time Operations
Turning On/Off
Vehicle Docking (Optional)
Desk Docking (Optional)
Unpacking
Check and identify the supplied accessories:
Tablet Computer
Standard Battery
Power Adapter
Power Cord and Plugs
Capacitive Touch Stylus
2 M101B Quick Start Guide
Description Of Parts
Front:
Right:
No Item Description
1
Front Camera 2 Megapixel Webcam
2
LED Indicators: Show the current status of
the Tablet Computer
RF
Green - WiFi/BT/3G/GPS
ON
No light - None of
WiFi/BT/3G/GPS is ON
HDD Green - Harddrive Activity
No light - Harddrive Idling
Battery
Orange – AC adapter is
plugged in and charging
Green – AC adapter is
plugged in and battery is
completely charged
Solid Red - Low battery
(<10%)
Blinking Red – Battery is
being hot swapped.
Not lit – Battery is in use
and more than 10%
Power
Blue – Tablet is ON
No light – Tablet is OFF
3
Touch Screen Displays and act as one of
the inputs for the Tablet
Computer
4
Fn1 Button Programmable function
key configured by HotTab
Utility. Default: Web
Browser
5
Menu Button HotTab Quick Access
6
Power Button Turns on/off tablet
Front LED Indicators Detail:
No Item Description
7
I/O Cover Protects I/O ports
8
Micro HDMI HDMI output to external
display
9
LAN/RS232 Adapter port for
LAN/RS232 connector
10
USB 3.0 High speed USB port
connects to USB
devices, such as USB
flash drive, mouse,
keyboard, printer, etc.
11
Mic In/Line Out Headset or headphone
can be connected (Mic
is only supported with
3.5mm 4-pin headset)
12
Power Jack DC-IN power input jack
13
MicroSD Card
Reader
Memory card reader
port for MicroSD Card
14
Reset Button Hardware reset button
Side I/O Details:
Front Buttons Details:
M101B Quick Start Guide 3
Rear:
Bottom:
No Item Description
15
Kensington
Lock Port
Provides lock access for
Kensington Lock.
16
Optional
Barcode
Barcode Scanner for
reading of 1D/2D
barcode.
17
Optional RFID RFID reader for reading
of RFID tags.
18
Rear Camera 5MP Autofocus Camera.
Captures photos and
videos.
19
Camera Flash LED camera flash to
provide flash lighting
when use with camera.
20
Expansion Port Provides optional
connectivity to custom
modules for special
application (USB2.0 x 1 ,
RS232 x 1).
21
Fn2 Button Programmable function
key configured by
HotTab Utility. Default:
Camera
22
Volume Buttons Volume Control.
(+) Raises volume,
(-) Lowers volume.
23
Battery Lock
Latch
Latch to lock the battery
in place once battery is
inserted. Not spring-
loaded.
24
Battery Release
Slider
Spring-loaded slider that
latches the battery in.
25
Touch Pen Slot Pen holder slot to store
touch pen
26
3G Module/SIM
card slot
Service window to insert
Micro SIM card. Also
provide access to 3G
Module.
27
Speakers Emits sounds.
No Item Description
28
Docking
Connector
Port to docking solutions
such as vehicle docking
to provide power and
external antenna
Docking Connector Detail:
Expansion Port Detail:
Rear Buttons
Detail:
Battery Lock Latch
Detail:
4 M101B Quick Start Guide
Combination Keys (Keyboard Key Emulation)
For the physical buttons on the M101B tablet computer, in addition to their dedicated functions
detailed in the previous section, they can also be used to emulate commonly used keyboard key
strokes. Under different scenario, a single physical button or a combination of physical buttons
provide different keyboard key strokes, which are specified below:
Under POST (before Windows boots up):
Buttons Keystroke
Menu
F7
Fn1
Recovery Menu
Fn2
ESC
Volume Up
Up
Volume Down
Down
Menu + Fn1
Enter
Menu + Volume Up
Right
Menu + Volume Down
Left
Under Windows:
Buttons Keystroke
Volume Up + Volume Down
Ctrl + Alt + Del
M101B Quick Start Guide 5
First-time Operation
Insert SIM card (For Optional 3G/LTE equipped device)
The Tablet Computer supports data connection using 3G/LTE SIM cards and fits a Micro-SIM
card. (Note: 3G/LTE feature is optional). Perform the following to install the SIM card into your
Tablet Computer:
1. Remove the service window in the rear by unscrewing the four screws.
2. Remove the screw that is securing the 3G/LTE module.
3. Carefully lift the 3G wireless module up, and be careful not to damage the connected
cable.
4. Make sure the SIM card IC contact patch is faced down; the notch is in the direction of
insertion (towards right).
5. Insert the 3G SIM card into the slot located near the right side of the service window.
6. Reposition the removed 3G/LTE module screw to secure the 3G/LTE module.
7. Reposition the removed service window screw to secure the service window.
Inserting Battery Pack
To insert the included standard battery pack into the Tablet Computer:
1. Disconnect any cords connected to the tablet computer.
2. Turn the tablet computer over, back facing up.
3. Locate the Battery Lock Latch and push it to the “Unlocked” position.
4. Locate the Battery Release Slider that is spring-loaded. Pull back and hold.
5. Insert the battery with the connector-pins side first, and then lower the battery into the
battery compartment. Continue to hold the Battery Release Slider until the battery is fully
inserted.
6 M101B Quick Start Guide
6. Make sure the battery is completely lowered into the compartment before letting go of the
Battery Release Slider. Battery will be flat against the housing once fully inserted
Removing the Battery Pack
1. Shut down the tablet computer (or put it to sleep). Disconnect any cords connected to the
computer.
2. Turn the tablet computer over, back facing up.
3. Locate the Battery Lock Latch and push it to the “Unlocked” position.
4. Locate the Battery Release Slider that is spring-loaded. Pull back and hold.
5. Lift the battery out using the opening on side of battery compartment.
Connecting to Power Supply
The Tablet Computer operates either on external AC power or internal battery power. It is
recommended to use AC power when you start up the Tablet Computer for the first time.
Caution
Use only the AC adapter included with your Tablet Computer.
Using other AC adapters may damage the Tablet Computer and
the Battery.
Perform the following to connect the Tablet computer to AC Power:
1. On the side of the Tablet computer, lift the I/O protective cover by pulling on the latch
2. Plug the DC cord of the AC adapter into the Power Jack of the tablet computer.
3. Plug the AC power cord into the AC adapter.
4. Finally, Plug the AC power cord into the electrical outlet.
M101B Quick Start Guide 7
When the AC Adapter is connected, the battery pack starts charging. The battery LED indicator
on the tablet computer will show different states. Please refer to description of the LED indicator
in the Description of Parts.
Turning On / Off
Turning On
Press and hold the power switch for 3 seconds until the blue LED power indicator light is lit up.
Note:
Do not press the power switch repeatedly.
Do not perform the following operations until the hard drive indicator turns off
o Connecting or disconnecting the AC adapter
o Pressing the power switch
o Touching the tablet buttons, screen, or external keyboard/mouse
Turning Off
Perform the following procedure to shutdown the Tablet Computer:
1. Make sure you have closed any programs that are open on the Desktop. Start Screen
apps don’t need to be closed.
2. Open the Charms Bar by swiping your finger from the far right of the screen towards the
middle of the screen.
3. Tap on the Settings charm.
4. Tap on Power.
5. Tap on Shut Down.
6. Wait for the Tablet Computer to power off.
Note:
The computer will forcefully be turned off if the power switch is pressed and held for six
seconds or longer.
8 M101B Quick Start Guide
Setting up Windows on your computer for the first time
When setting up Windows for the first time on your computer, the procedures vary on the
different versions of Windows. Some versions of Windows require entry of a product key. Refer
to the following table for product key entry:
Windows Versions Require Entry of Product Key?
Windows Embedded Standard 7 (WS7P)
No
Windows 7 Professional
Yes
Windows 7 Ultimate
Yes
Windows Embedded 8 Standard
No
Windows Embedded 8.1 Industry Pro
No
Location of the Product Key
For versions of Windows that require entry of a Product Key, find the Product Key sticker located
on the inside surface of the battery slot after removing the battery:
Detail First Time Setup Instruction
For more detailed step by step first time setup instructions, please download the latest user
manual by going to http://www.winmate.com.tw OR refer to the digital copy of user manual
included in the disk that comes with the tablet.
M101B Quick Start Guide 9
Vehicle Docking (Optional)
Features
Holds the tablet securely in a moving vehicle
Easy to remove / insert with one hand
VESA mount for various standard fixtures
USB (x2) on docking for quick access
Anti-theft design with security lock
Lockable terminal block connector for 9-36V DC input
Dimensions
10 M101B Quick Start Guide
*All dimensions in millimeters
Description of Parts
M101B Quick Start Guide 11
First Time Operation
Driver installation
For the tablet to work with the vehicle docking, the driver of the vehicle docking has to be
installed first. The vehicle docking driver is not pre-installed on the tablet. For a detailed
installation guide, please refer to the CD that is included with the package. OR visit winmate
official site’s download center to download the latest driver: http://www.winmate.com.tw/
Mounting
The vehicle docking is designed to work with a standard 75mm x 75mm VESA vehicle mounting
arm or base. Please mount the VESA plate on the back of the vehicle mount first before using it
with the tablet.
How to Use
Insert Tablet
1. Lower the tablet with its top slightly tilted forward into the vehicle mount. Align the docking
alignment fingers on the bottom of the vehicle mount to bottom of the tablet where the two
alignment holes (to the sides of the pogo-pin) are, then push the tablet in against the
vehicle mount.
2. Make sure the tablet’s back is aligned upright against the vehicle mount. Reposition if the
tablet still moves around.
3. Once the tablet is aligned, hold your fingers on the hand grip on the back of the vehicle
mount like shown in the picture, and push down on the top hook with the palm of your
hand until a click sound is heard to secure the tablet into the vehicle mount.
12 M101B Quick Start Guide
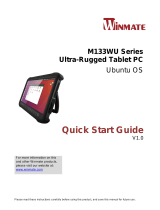
Remove Tablet
1. Reach for the latch on the back of the tablet and pull it sideways.
2. The top hook should be released after the latch is pulled.
3. Tilt the tablet slightly forward first, and then pull the tablet straight up to remove it.
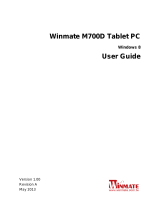
Powering the Vehicle Docking
The vehicle docking’s input/output expansion functions will only work if power is connected to it.
The vehicle docking is designed to be powered via its terminal block input.
There are two ways of powering the terminal block input:
1. Use the optional power cable (car cigarette lighter to terminal block)
2. Provide 9~36V input power to the terminal block directly.
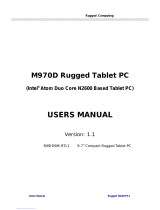
External Display Modes (If optional VGA port is equipped)
Display Modes Description
Duplicate (Clone) Mode
(Default setting)
Under duplicate mode, users can easily operate the tablet with
touch screen.
Extend Mode
Under extend mode, due to Intel graphic driver issue,
touchscreen function on tablet may not work correctly. It is
recommended to operate the tablet with keyboard / mouse
under this mode. If touch function is desired, please use the
duplicate mode.
Note: Display settings are saved automatically for use next time.
Specification
Dimension
284.41 x 213.3 x 73.8 mm
Power Input
9~36 DV in
I/O Support Bottom
RS232 x 1, USB 2.0 x 2, 10/100 LAN x1, VGA x 1 (optional),
SMA x 1 (for external GPS antenna), Terminal Block Input
Side
USB 2.0 x 2
Mounting
75 x 75mm VESA Mount
Vibration
MIL-STD 810G, 5 ~ 500Hz, 2.24G
M101B Quick Start Guide 13
Desk Docking (Optional)
Features
Designed to fit M101B
19V DC IN
LAN, RS232, USB x 4, VGA expansion
Optional WPR support (9-36V)
Dimensions
*All dimensions in millimeters
14 M101B Quick Start Guide
Description of Parts
1. 19 DC IN
2. 9-36V DC IN (optional)
3. USB 2.0 x 2
4. LAN (10/100)
5. VGA output
6. RS232
First Time Operation
Driver installation
For the tablet to work with the desk docking, the driver for the desk docking has to be installed
first. The desk docking driver is not pre-installed on the tablet. For a detail installation guide,
please refer to the CD that is included with the package OR visit winmate official site’s download
center to download the latest driver: http://www.winmate.com.tw/
How to Use
Insert Tablet
1. Align the docking alignment fingers on the bottom of the desk docking mount to the bottom
of the tablet where the two alignment holes (to the sides of the pogo-pin) are, then lower
the tablet in to position.
2. Make sure the tablet is aligned with the desk docking. Reposition if the tablet still moves
around.
M101B Quick Start Guide 15
Remove Tablet
1. Remove the tablet by lifting the tablet straight up from the desk docking.
Powering the Desk Docking
The desk docking’s input/output expansion functions will only work if power is connected to it.
The desk docking is designed to be powered via its 19V 2.5 Ø DC input.
There are two ways of powering the desk docking:
1. Use the power adapter that is included with the tablet as the desk docking does not come
with a separate power adapter.
2. Provide 9~36V input power to the terminal block directly.
External Display Modes
Display Modes Description
Duplicate (Clone) Mode
(Default setting)
Under duplicate mode, users can easily operate the tablet with
touch screen.
Extend Mode
Under extend mode, due to Intel graphic driver issue,
touchscreen function on tablet may not work correctly. It is
recommend to operate the tablet with keyboard / mouse under
this mode. If touch function is desired, please use the duplicate
mode.
Note: Display settings are saved automatically for use next time.
Specification
Dimension
299.44 x 121.14 x 62.00 mm
Power Input
19V DC In (Default)
9~36 DC Terminal block (Optional)
I/O Support Rear
RS232 x 1, USB 2.0 x 2, 10/100 LAN x1, VGA x 1, DC 2.5 Ø
Input, Terminal Block Input
Side
USB 2.0 x 2
  • Page 1 1
  • Page 2 2
  • Page 3 3
  • Page 4 4
  • Page 5 5
  • Page 6 6
  • Page 7 7
  • Page 8 8
  • Page 9 9
  • Page 10 10
  • Page 11 11
  • Page 12 12
  • Page 13 13
  • Page 14 14
  • Page 15 15
  • Page 16 16

Winmate M101B User manual

Category
Tablets
Type
User manual
This manual is also suitable for

Winmate M101B is a rugged Tablet PC designed for use in harsh outdoor environments. It features a 2 Megapixel webcam, a 5MP autofocus rear camera with flash, and a capacitive touch screen for precise input. The M101B also has a variety of ports and expansion options, including USB 3.0, HDMI, LAN/RS232, and a microSD card reader. With its powerful performance and durable design, the Winmate M101B is ideal for use in a variety of applications, such as field service, manufacturing, and healthcare.

Ask a question and I''ll find the answer in the document

Finding information in a document is now easier with AI